
Tradition demands every book about programming to have a "hello world" example and why would we offend people? We will implement, and run, a simple object instantiating script and show how to integrate this in Blender's script menu. We will also show how to document it and make an entry in the help system. Finally, we will spend some words on the pros and cons of distributing scripts as .blend files or as scripts to install in the scriptdir by the user.
Let's write some code! You can type in the following lines directly into the interactive Python console, or you can open a new text in Blender's text editor and then press Alt + P to run the script. It is a short script but we'll go through it in some detail as it features many of the key aspects of the Blender Python API.
#!BPY
import Blender
from Blender import Scene, Text3d, Window
hello = Text3d.New("HelloWorld")
hello.setText("Hello World!")
scn = Scene.GetCurrent()
ob = scn.objects.new(hello)
Window.RedrawAll()
The first line identifies this script as a Blender script. This is not necessary to run the script, but if we want to be able to make this script a part of Blender's menu structure we need it, so we better get used to it right away.
You will find the second line (which is highlighted) in virtually any Blender script because it gives us access to the classes and functions of the Blender Python API. Likewise, the third line gives us access to the specific submodules of the Blender module that we will need in this script. We could access them as members of the Blender module of course (for example, Blender.Scene), but importing them explicitly saves some typing and enhances readability.
The next two lines first create a Text3d object and assign that to the variable hello. The Text3d object will have the name HelloWorld in Blender so users can refer to this object by this name. Also this is the name that will be visible in the Outliner window and in the lower-left corner if the object is selected. If there already exists an object of the same type with this name, Blender adds a numerical suffix to the name to make it unique. For example, HelloWorld might become HelloWord.001 if we run the scripts twice.
By default, a newly created Text3d object will contain the text Text so we change that to Hello World! with setText() method.
A newly created Blender object is not visible by default, we have to associate that with a Scene so the next few lines retrieve a reference to the current scene and add the Text3d object to it. The Text3d object is not added directly to the scene but the scene.objects.new() method embeds the Text3d object in a generic Blender object and returns a reference to the latter. The generic Blender object holds information common to all objects, such as position, whereas the Text3d object holds specific information, such as the text font.
Finally, we tell the window manager to refresh any window that needs a refresh due to the addition of a new object.
Your own script doesn't have to be a second class citizen. It can be made part of Blender on par with any of the bundled scripts that come with Blender. It can be added to the Add menu present in the header at the top of the View3D window.
Note
Actually, the Add menu is present in the header at the bottom of the user preferences window but as this window is situated above the View3D window, and is by default minimized to just the header, it looks as if it's a header at the top of the View3D window. Many users are so accustomed to it that they see it as part of the View3D window.
It may supply information to Blender's help system just like any other script. The following few lines of code make that possible:
"""
Name: 'HelloWorld'
Blender: 249
Group: 'AddMesh'
Tip: 'Create a Hello World text object'
"""
We start the script with a standalone string containing several lines.
Note
Each line starts with a label followed by a colon and a value. The colon should follow the label immediately. There should not be any intervening space, otherwise our script will not show up in any menu.
The labels at the beginning of each line serve the following purpose:
Name(a string) defines the name of the scripts as it appears in the menuBlender(a number) defines the minimum version of Blender needed to use the scriptGroup(a string) is the submenu of the scripts menu under which this script should be groupedIf our scripts are to appear under the Add | Mesh menu in the View3D window (also accessible by pressing Space) this should read
AddMesh. If it should be under a different submenu of the script's menu, it could read, for example,WizardsorObject. Besides the necessary labels the following optional labels might be added:Version(a string) is the version of the script in any format you like.Tip(a string) is the information shown in the tooltip when hovering over the menu item in the Scripts menu. If the script belongs to the groupAddMesh, no tooltip will be shown even if we define one here.

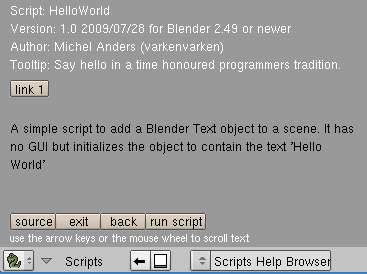
Blender has an integrated help system that is accessible from the Help menu at the top of the screen. It gives access to online resources and to information on registered scripts via the Scripts Help Browser entry. Once selected, it shows a collection of drop-down menus, one for each group, where you can select a script and view its help information.
If we want to enter our script in the integrated help system we need to define some additional global variables:
__author__ = "Michel Anders (varkenvarken)"
__version__ = "1.00 2009/08/01"
__copyright__ = "(c) 2009"
__url__ = ["author's site, http://www.swineworld.org"]
__doc__ = """
A simple script to add a Blender Text object to a scene.
It takes no parameters and initializes the object to contain the
text 'Hello World'
"""
These variables should be self-explanatory except for the __url__ variable—this one will take a list of strings where each string consists of a short description, a comma, and a URL. The resulting help screen will look like this:
Now all that we have left to do is to test it and then place this script in an appropriate location. We can test the script by pressing Alt + P. If no errors are encountered, this will result in our Hello World Text3d object being added to the scene but the script will not be appended to the Add menu yet.
If a script is to be added to the Add menu it has to reside in Blender's script directory. To do this, first save the script in the text buffer to a file with a meaningful name. Next, make sure that this file is located in Blender's script directory. This directory is called scripts and is a subdirectory of .blender, Blender's configuration directory. It is either located in Blender's installation directory or (on Windows) in the Application Data directory. The easiest way to find ours is to simply look at the sys.path variable again to see which listed directory ends in .blenderscripts.
Scripts located in Blender's scripts directory will be automatically executed on startup, so our hello world script will be available anytime we start up Blender. If we want Blender to reexamine the script directory (so that we don't have to restart Blender to see our new addition) we can choose Scripts | Update menus in the interactive console.