In Blender it is quite simple to generate a fractal terrain (just add a plane, go to edit mode, select all, and then subdivide fractal a few times W → 3). If you want something more elaborate a few excellent scripts exist to help you (see for example http://sites.google.com/site/androcto/Home/python-scripts/ANTLandscape_104b_249.py). But how would you apply textures to such a terrain? In this example, we will examine a method to choose between different material inputs based on the slope of the surface that we're shading. This will allow us to create the effect that very steep slopes are generally devoid of greenery even though they might be well below the tree line. Combined with a height-dependent material we should be able to shade a mountainous terrain in a pretty convincing way.
Note
Reducing computation time:
Pynodes are computationally intensive as they are called for every visible pixel. Clever coding can sometimes reduce the amount of computation needed but if a further speedup is required a just-in-time compiler might help. psyco is such a compiler and we will encounter it in the last chapter where we will apply it on Pynodes and see whether it has any appreciable effect.
The slope can be defined as the angle between the floor plane and a line tangent to the surface at the point of interest.
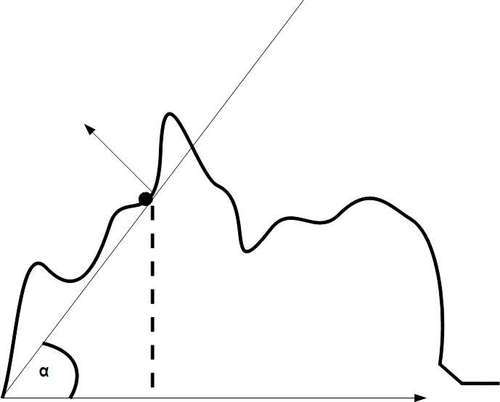
Because we assume our (imaginary) floor plane to stretch horizontally along the x and y axis this angle is completely determined by the z-component of the surface normal at the same point. Now we can calculate this angle exactly (it is but as artists we may want to have some extra control anyway so we simply take the normalized z-component of the surface normal and modify this output intensity with any color ramp node that we like. Within a Pynode a surface normal is a readily available vector entity: self.input.shi.surfaceNormal. There is a snag however...
The surface normal that we have available happens to be defined in camera space. This means that, for example, when the surface normal is pointing straight at the camera it is defined as (0, 0,-1). Now we want our surface normals to be defined in world space. A normal that is pointing straight up for instance should have a value of (0,0,1) irrespective of the position or tilt of the camera (after all, mountainside vegetation does not normally change with the camera angle). Fortunately, we can convert from camera space to world space by taking the camera's world space matrix and multiplying the surface normal with the rotation part of this matrix. The resulting code looks like this:
class Slope(Node.Scripted):
def __init__(self, sockets):
sockets.output = [Node.Socket('SlopeX', val = 1.0), Node.Socket('SlopeY', val = 1.0), Node.Socket('SlopeZ', val = 1.0),]
self.offset = vec([1,1,1])
self.scale = 0.5
Note that the initialization code does not define an input socket. We will get the surface normal at the position of the pixel that we are shading from the shader input (highlighted in the next piece of code). We do define three separate output sockets for the x, y, and z components of the slope for ease of use in a node setup. As we mostly will be using just the z-component of the slope, having it available in a separate socket saves use from extracting it from a vector with an additional vector manipulation node.
def __call__(self):
scn=Scene.GetCurrent()
cam=scn.objects.camera
rot=cam.getMatrix('worldspace').rotationPart().resize4x4();
N = vec(self.shi.surfaceNormal).normalize().resize4D() * rot
N = (N + self.offset ) * self.scale
self.output.SlopeX=N[0]
self.output.SlopeY=N[1]
self.output.SlopeZ=N[2]
__node__ = Slope
The transformation from camera space to world space is done in the line that references the surface normal (highlighted). The orientation is dependent only on the rotation, therefore we extract only the rotation part of the camera's transformation matrix before we multiply the surface normal with it. As the normalized result may point downward we force the z-component to lie in the range [0, 1] by adding 1 and multiplying by 0.5. The full code is available as slope.py in slope.blend.
There is one important thing to be aware of: the surface normal that we use here is not interpolated and hence equal everywhere along the surface of a single face, even if the smooth attribute of a face is set. This shouldn't be a problem in a finely subdivided landscape where the slope input is not used directly, However, this is different from what you might expect. In the present implementation of Pynodes, this limitation is difficult if not impossible to overcome.
The following illustration shows an example of what is possible.
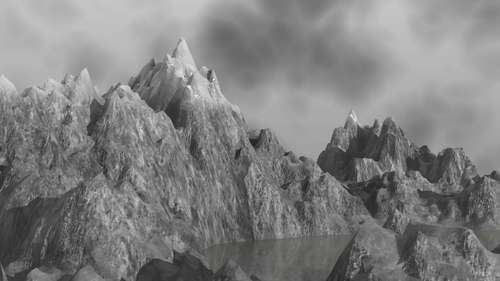
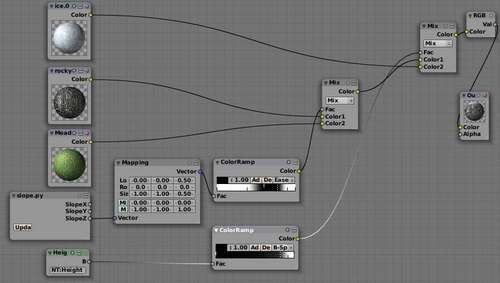
The effects shown above were realized by combining different materials in the node setup shown in the next screenshot. This setup is available in slope.blend as well. The lower two materials were mixed using our slope-dependent node and the resulting material was mixed with the upper material based on a Pynode that calculates the height.