
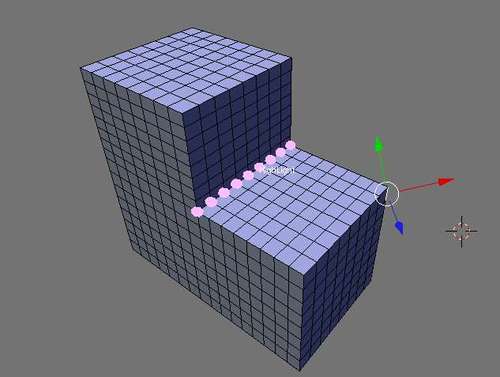
Sometimes, when working with a complex object, it is difficult to keep track of a relevant feature as it may be obscured by other parts of the geometry. In such a situation, it would be nice to highlight certain vertices in a way that keeps them visible, no matter the orientation, and independent of the edit mode.
Space handlers provide us with a way to perform actions each time the 3D view window is redrawn or a key or mouse action is detected. These actions may include drawing inside the 3D view area as well, so we will be able to add highlights at any position we like.
How do we determine which vertices we would like to highlight? Blender already provides us with a uniform way to group collections of vertices as vertex groups so all we have to do is let the user indicate which vertex group he would like to highlight. We then store the name of this selected vertex group as an object property. Object properties are designed to be used in the game engine but there is no reason why we shouldn't reuse them as a way to persistently store our choice of vertex group.
So again, we have a script that will be called in two ways: as a space handler (that is, each time the 3D view window is redrawn to highlight our vertices) or by running it from the text editor with Alt + P to prompt the user to choose a vertex group to highlight.
The following outline shows which steps we will take in each situation:
- Get active object and mesh.
- If running standalone:
- Get list of vertex groups
- Prompt user for choice
- Store choice as property of object
- Else:
- Get the property that holds the vertex group
- Get a list of vertex coordinates
- For each vertex:
- draw a small disk
The resulting code is available as AuraSpaceHandler.py in scriptlinks.blend:
# SPACEHANDLER.VIEW3D.DRAW
It starts with a line of comment that is essential, as it signals to Blender that this is a space handler script that can be associated with the 3D view (no other area can have space handlers associated at present) and should be called on a redraw event.
import Blender
from Blender import *
scn = Scene.GetCurrent()
ob = scn.objects.active
if ob.type == 'Mesh':
me = ob.getData(mesh = True)

if Blender.bylink:

p=ob.getProperty('Highlight')
vlist = me.getVertsFromGroup(p.getData())
matrix = ob.matrix
drawAuras([me.verts[vi].co*matrix for vi in vlist],p.getData())

else:

groups = ['Select vertexgroup to highlight%t']
groups.extend(me.getVertGroupNames())
result = Draw.PupMenu( '|'.join(groups) )
if result>0:
try:
p=ob.getProperty('Highlight')
p.setData(groups[result])
except:
ob.addProperty('Highlight',groups[result])
The script proper then proceeds to retrieve the active object from the current scene and gets the object's mesh if it is a Mesh. At the highlighted line, we check if we are running as space handler and if so, we fetch the property that we named Highlight. The data of this property is the name of the vertex group that we want to highlight. We proceed by getting a list of all vertices in this vertex group and by getting the matrix of the object. We need this because vertex locations are stored relative to the object's matrix. We then construct a list of vertex locations and pass this along with the name of the vertex group to the drawAuras() function that will take care of the actual drawing.
The second highlighted line marks the beginning of the code that will be executed when we run the script from the text editor. It creates a string consisting of the names of all vertex groups associated with the active object separated by pipe characters (|) and prepended by a suitable title. This string is passed to PopMenu() which will display the menu, and will either return with the user's choice or with -1, if nothing was chosen.
If there was a vertex group chosen, we try to retrieve the Highlight property. If this succeeds we set its data to the name of the chosen vertex group. If the property did not yet exist, we add a new one with the name Highlight and again with the name of the chosen vertex group as data.
Next we have to make sure that scriptlinks are enabled (Buttons window | Scripts panel | Scriptlinks. Click on enable scriptlinks if not yet selected.). Note that to Blender it makes no difference whether we are dealing with space handlers or script links as far as enabling them is concerned.
The final step in using our space handler is associating it with the 3D view. To do this toggle the entry Draw: AuraSpaceHandler.py in the view (Space Handler Scripts menu of the 3D view).
The code we haven't seen yet deals with the actual drawing of the highlights and the name of the vertex group to identify what we are highlighting. It starts off by determining the colors we will use for the highlights and the text by retrieving these from the current theme. This way the user can customize these colors in a convenient way from the User Preferences window:
theme = Window.Theme.Get()[0]
textcolor = [float(v)/255 for v in theme.get( Window.Types.VIEW3D ).text_hi[:3]]
color = [float(v)/255 for v in theme.get(Window.Types.VIEW3D).active[:3]]
The first line will retrieve a list of themes that are present. The first one is the active theme. From this theme we retrieve the VIEW3D theme space and its text_hi attribute is a list of four integers representing a RGBA color. The list comprehension discards the alpha component and converts it to a list of three floats in the range [0, 1] that we will use as our text color. Likewise, we construct the color of the highlights from the active attribute.
Our next challenge is to draw a disk-shaped highlight at a specified location. As the size of the disk is quite small (it can be adjusted by altering the size variable), we can approximate it well enough by an octagonal shape. We store the list of x, y coordinates of such an octagon in the diskvertices list:
size=0.2
diskvertices=[( 0.0, 1.0),( 0.7, 0.7), ( 1.0, 0.0),( 0.7,-0.7), ( 0.0,-1.0),(-0.7,-0.7), (-1.0, 0.0),(-0.7, 0.7)]
def drawDisk(loc):
BGL.glBegin(BGL.GL_POLYGON)
for x,y in diskvertices:
BGL.glVertex3f(loc[0]+x*size,loc[1]+y*size,loc[2])
BGL.glEnd()
The actual drawing of the octagon depends heavily on the functions provided by Blender's BGL module (highlighted in the previous code). We start by stating that we will be drawing a polygon and then add a vertex for each tuple in the diskvertices list. The location passed to drawDisk() will be the center and the vertices will all lie on a circle with a radius equal to size. When we call the glEnd() function, the filled-in polygon will be drawn in the current color.
You might wonder how these drawing functions know how to translate locations in 3D to coordinates on the screen and there is indeed more here than meets the eye as we will see in the next section of code. The necessary function calls to inform the graphics system how to convert 3D coordinates to screen coordinates is not implemented in the drawDisk() function (preceding code snippet). This is because calculating this information for each disk separately would incur an unnecessary performance penalty as this information is the same for each disk we draw.
We therefore define a function, drawAuras(), which will take a list of locations and a groupname argument (a string). It will calculate the transformation parameters, call drawDisk() for each location in the list, and will then add the group name as an on-screen label at approximately just right of the center the highlights. Blender's Window module provides us with the GetPerspMatrix() function that will retrieve the matrix that will correctly convert a point in 3D space to a point on the screen. This 4 by 4 matrix is a Python object that will have to be converted to a single list of floats that can be used by the graphics system. The highlighted lines in the following code take care of that. The next three lines reset the projection mode and tell the graphics system to use our suitably converted perspective matrix to calculate screen coordinates. Note that changing these projection modes and other graphics settings does not affect how Blender itself draws things on screen, as these settings are saved before calling our script handler and restored afterward:
def drawAuras(locations,groupname):
viewMatrix = Window.GetPerspMatrix()
viewBuff = [viewMatrix[i][j] for i in xrange(4) for j in xrange(4)]
viewBuff = BGL.Buffer(BGL.GL_FLOAT, 16, viewBuff)
BGL.glLoadIdentity()
BGL.glMatrixMode(BGL.GL_PROJECTION)
BGL.glLoadMatrixf(viewBuff)
BGL.glColor3f(*color)
for loc in locations:
drawDisk(loc)
n=len(locations)
if n>0:
BGL.glColor3f(*textcolor)
x=sum([l[0] for l in locations])/n
y=sum([l[1] for l in locations])/n
z=sum([l[2] for l in locations])/n
BGL.glRasterPos3f(x+2*size,y,z)
Draw.Text(groupname,'small')
With the preliminary calculations out of the way we can set the color we will draw our disks in with the glColor3f() function. As we stored the color as a list of three floats and the glColor3f() function takes three separate arguments, we unpack this list with the asterisk operator. Next, we call drawDisk() for each item in locations.
Note
Blender OpenGL functions:
The documentation of Blenders BGL module lists a large number of functions from the OpenGL library. Many of these functions come in a large number of variants that perform the same action but receive their arguments in different ways. For example, BGL.glRasterPos3f() is a close relation to BGL.glRasterPos3fv() that will take a list of three single-precision float values instead of three separate arguments. For more information, refer to the API documentation of the Blender.BGL and Blender.Draw modules and the OpenGL reference manual on http://www.opengl.org/sdk/docs/man/.
If the number of highlights we have drawn is not zero, we set the drawing color to textcolor and then calculate the average coordinates of all the highlights. We then use the glRasterPos3f() function to set the starting position of the text that we want to draw to these average coordinates with some extra space added to the x-coordinate to offset the text a little to the right. Blender's Draw.Text() function will then draw the group name in a small font at the chosen location.