Many a rock video today features an animation of speaker cones reverberating with the sound of the music. And although the features for the manipulation of sound in the Blender API are rather sparse, we will see that this effect is rather simple to achieve.
The animation that we will construct depends mainly on the manipulation of shape keys. Shape keys can be understood as distortions of a base mesh. A mesh can have many of these distortions and each of them is given a distinct name. The fun part is that Blender provides us with the possibility to interpolate between the base shape and any of the distorted shapes in a continuous way, even allowing us to mix contributions from different shapes.
One way to animate our speaker cone, for instance, is to model a basic, undistorted shape of the cone; add a shape key to this base mesh; and distort it to resemble a cone that is pushed outward. We can then blend between this "pop out" shape and the base's shape depending on the loudness of the sound.
Animating by setting key frames in Blender means creating IPOs and manipulating IPO curves as we have seen earlier. Indeed, Shape or Key IPOs are very similar to other kinds of IPOs and are manipulated very much in the same way. The main difference between for example an Object IPO and a Shape IPO is that the individual IPO curves of a Shape IPO are not indexed by some predefined numerical constant (such as Ipo.OB_LOCX for an Object) but by a string because the user may define any number of named shapes.
Also, a Shape IPO is not accessed via an Object but through its underlying Mesh object (or Lattice or Curve, as these may have shape keys as well).
So now that we know how to animate shapes, our next goal is to find out how to add some sound to our mesh, or rather to determine at each frame how much the distorted shape should be visible.
As mentioned in the previous section, Blender's API does not provide many tools for manipulating sound files, Basically the Sound module provides us with ways to load and play a sound file but that's as far as it gets. There is no way to access individual points of the waveform encoded in the file.
Fortunately, standard Python distributions come bundled with a wave module that provides us with the means to read files in the common .wav format. Although it supports only the uncompressed format, this will suffice as this format is very common and most audio tools, such as Audacity, can convert to this format. With this module we can open a .wav file, determine the sample rate and duration of the sound clip, and access individual samples. As we will see in the explanation of the following code, we still have to convert these samples to values that we can use as key values for our shape keys but the heavy lifting is already done for us.
Armed with the knowledge on how to construct IPO curves and access .wav files, we might draw up the following code outline:
- Determine if the active object has suitable shapes defined and provide a choice.
- Let the user select a
.wavfile. - Determine the number of sound samples per second present in the file.
- Calculate the number of animation frames needed based on the duration of the sound file and the video frame rate.
- Then, for each animation frame:
- Average the sound samples occurring in this frame
- Set the blend value of the chosen IPO curve to this (normalized) average
The full code is available as Sound.py in sound000.blend and explained as follows:
import Blender
from Blender import Scene,Window,Draw
from Blender.Scene import Render
import struct
import wave
We start off by importing the necessary modules including Python's wave module to access our .wav file and the struct module that provides functions to manipulate the actual binary data that we get from the .wav file.
Next, we define a utility function to pop up a menu in the middle of our screen. It behaves just like the regular PupMenu() function from the Draw module but sets the cursor to a position halfway across and along the screen with the help of the GetScreenSize() and SetMouseCoords() functions from Blender's Window module:
def popup(msg):
(w,h)=Window.GetScreenSize()
Window.SetMouseCoords(w/2,h/2)
return Draw.PupMenu(msg)
The bulk of the work will be done by the function sound2active(). It will take two arguments—the filename of the .wav file to use and the name of the shape key to animate based on the information in the .wav file. First, we attempt to create a WaveReader object by calling the open() function of the wave module (highlighted). If this fails, we show the error in a pop up and quit:
def sound2active(filename,shapekey='Pop out'):
try:

wr = wave.open(filename,'rb')

except wave.Error,e:
return popup(str(e)+'%t|Ok')
Then we do some sanity checks: we first check if the .wav file is a MONO file. If you want to use a stereo file, convert it to mono first, for example with the free Audacity package (http://audacity.sourceforge.net/). Then we check if we are dealing with an uncompressed .wav file because the wave module cannot handle other types. (most .wav files are uncompressed but if needed, Audacity can convert them as well) and we verify that the samples are 16-bits. If any of these checks fail, we pop up an appropriate error message:
c = wr.getnchannels()
if c!=1 : return popup('Only mono files are supported%t|Ok')
t = wr.getcomptype()
w = wr.getsampwidth()
if t!='NONE' or w!=2 :
return popup('Only 16-bit, uncompresses files are supported%t|Ok')
Now that we can process the file, we get its frame rate (the number of audio samples per second) and the total number of bytes (oddly enough by using the awkwardly named function getnframes() from the wave module). Then, we read all of these bytes and store them in the variable b.
fr= wr.getframerate()
n = wr.getnframes()
b = wr.readframes(n)
Our next task is to get the rendering context from the current scene to retrieve the number of video frames per second. The number of seconds our animation will play is determined by the length of our audio sample, something we can calculate by dividing the total number of audio frames in the .wav file by the number of audio frames per second (highlighted in the following piece of code). We then define a constant sampleratio—the number of audio frames per video frame:
scn = Scene.GetCurrent()
context = scn.getRenderingContext()
seconds = float(n)/fr
sampleratio = fr/float(context.framesPerSec())
As mentioned before, the wave module gives us access to a number of properties of a .wav file and the raw audio samples, but provides no functions to convert these raw samples to usable integer values. We therefore need to do this ourselves. Fortunately, this is not as hard as it may seem. Because we know that the 16-bit audio samples are present as 2 byte integers in the "little-endian" format, we can use the unpack() function from Python's struct module to efficiently convert the list of bytes to a list of integers by passing a fitting format specification. (You can read more about the way .wav files are laid out on https://ccrma.stanford.edu/courses/422/projects/WaveFormat/.)
samples = struct.unpack('<%dh'%n,b)
Now we can start animating the shape key. We get the start frame from the rendering context and calculate the end frame by multiplying the number of seconds in the .wav file with the video frame rate. Note that this may be longer or shorter than the end frame that we may get from the rendering context. The latter determines the last frame that will get rendered when the user clicks on the Anim button, but we will animate the movement of our active object regardless of this value.
Then for each frame we calculate from start frame to end frame (exclusive) the average value of the audio samples that occur in each video frame by summing these audio samples (present in the samples list) and dividing them by the number of audio samples per video frame (highlighted in the next code snippet).
We will set the chosen shape key to a value in the range [0:1] so we will have to normalize the calculated averages by determining the minimum and maximum values and calculate a scale:
staframe = context.startFrame()
endframe = int(staframe + seconds*context.framesPerSec())
popout=[]
for i in range(staframe,endframe):
popout.append(sum(samples[int( (i-1)*sampleratio):int(i*sampleratio)])/sampleratio)
minvalue = min(popout)
maxvalue = max(popout)
scale = 1.0/(maxvalue-minvalue)
Finally, we get the active object in the current scene and get its Shape IPO (highlighted). We conclude by setting the value of the shape key for each frame in the range we are considering to the scaled average of the audio samples:
ob=Blender.Scene.GetCurrent().objects.active
ipo = ob.getData().getKey().getIpo()
for i,frame in enumerate(range(staframe,endframe)):
ipo[shapekey][frame]=(popout[i]-minvalue)*scale
The remaining script itself is now rather simple. It fetches the active object and then tries to retrieve a list of shape key names from it (highlighted in the next part). This may fail (hence the try … except clause) if for example the active object is not a mesh or has no associated shape keys, in which case we alert the user with a pop up:
if __name__ == "__main__":
ob=Blender.Scene.GetCurrent().objects.active
try:
shapekeys = ob.getData().getKey().getIpo().curveConsts
key = popup('Select a shape key%t|'+'|'.join(shapekeys))
if key>0:
Window.FileSelector
(lambda f:sound2active(f,shapekeys[key-1]),
"Select a .wav file",
Blender.Get('soundsdir'))
except:
popup('Not a mesh or no shapekeys defined%t|Ok')
If we were able to retrieve a list of shape keys, we present the user with a pop-up menu to choose from this list. If the user selects one of the items, key will be positive and we present the user with a file selector dialog (highlighted). This file selector dialog is passed a lambda function that will be called if the user selects a file, passing the name of this selected file as an argument. In our case we construct this lambda function to call the sound2active() function defined previously with this filename and the selected shape key.
The initial directory that will be presented to the user in the file selector to pick a file from is determined by the last argument to the FileSelector() function. We set it to the contents of Blender's soundsdir parameter. This usually is // (that is, a relative path pointing to the same directory as the .blend file the user is working on) but may be set in the user preferences window (File Paths section) to something else.
Now that we have our Sounds.py script we can apply it as follows:
- Select a
Meshobject. - Add a "Basis" shape key to it (Buttons window, Editing context, Shapes panel). This will correspond to the least distorted shape of the mesh.
- Add a second shape key and give it a meaningful name.
- Edit this mesh to represent the most distorted shape.
- In object mode, run
Sound.pyfrom the text editor by pressing Alt + P. - Select the shape key name defined earlier (not the "Basis" one) from the pop up.
- Select the
.wavfile to apply.
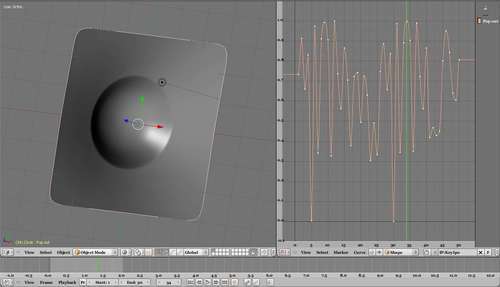
The result will be an object with an IPOcurve for the chosen shape key that will fluctuate according to the beat of the sound as shown in the next screenshot: