
Before we start crafting scripts in Blender we must check whether or not we have all the necessary tools available. After that we will have to familiarize ourselves with these tools so that we can use them with confidence. In this chapter, we will look at:
- What can and cannot be accomplished with Python in Blender
- How to install a full Python distribution
- How to use the built-in editor
- How to run a Python script
- How to explore built-in modules
- How to write a simple script that adds an object to a Blender scene
- How to register a script in the Blender scripts menu
- How to document your script in a user-friendly way
- How to distribute a script
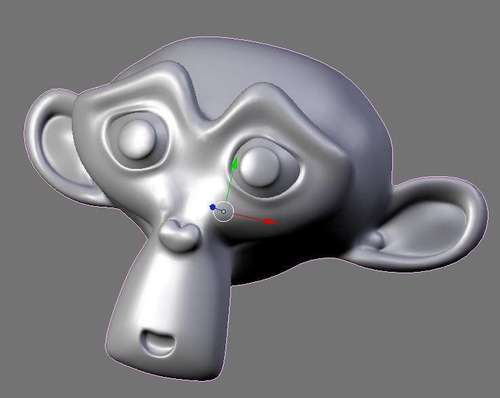
With so many things possible there is an awful lot to learn, but fortunately the learning curve is not as steep as it might seem. Let's just type in a quick few lines of Python to put a simple object into our Blender scene, just to prove we can, before we head into deeper waters.

Voila! That's all that is needed to add Suzanne, Blender's famous mascot, to the scene.
Almost anything in Blender is accessible from Python scripts but there are some exceptions and limitations. In this section, we illustrate what this means exactly and which notable features are not accessible to Python (for example, fluid dynamics).
The Blender API consists of three major areas of interest:
- Access to Blender objects and their properties, for example a
Cameraobject and itsangleproperty or aSceneobject and itsobjectsproperty - Access to operations to perform, for example adding a new
Cameraor rendering an image - Access to the graphical user interface, either by using simple building blocks or by interacting with the Blender event system
There are also some utilities that do not fit well in any of these categories as they concern themselves with abstractions that have no direct relation to Blender objects as seen by the end user, for example functions to manipulate vectors and matrices.
Taken together this means we can achieve a lot of things from Python scripts. We can:
- Create a new Blender object of any type, including cameras, lamps, meshes, and even scenes
- Interact with the user with a graphical user interface
- Automate common tasks within Blender such as rendering
- Automate maintenance tasks outside of Blender such as cleaning up directories
- Manipulate any property of a Blender object that is exposed by the API
That last statement shows one of the current weaknesses of the Blender API: any object property that the developers add in the Blender C source must be provided separately in the Python API. There is no automatic conversion from internal structures to the interface available in Python and this means that efforts must be duplicated and may lead to omitted functionality. For instance, in Blender 2.49 it is not possible at all to set up a fluid simulation from a script. Although it is possible to set up a particle system, there is no way to set the behavioral characteristics of a boids particle system.
Another problem of the 2.49 Python API is that many of the actions a user may choose to perform on an object have no equivalent in the API. Setting simple parameters such as the camera angle or performing a rotation of any object is easy and even associating for example, a subsurface modifier to a mesh is just a few lines of code but common actions, especially on mesh objects, such as subdividing selected edges or extruding faces are missing from the API and must be implemented by the script developer.
These problems led the Blender developers to completely redesign the Blender Python API for the 2.5 version, focusing on feature parity (that is, everything possible in Blender should be possible using the Python API). This means that in many situations it will be far easier to get the same results in Blender 2.5.
Finally, Python is used in more places than just standalone scripts: PyDrivers and PyConstraints enable us to control the way Blender objects behave and we will encounter them in later chapters. Python also allows us to write custom textures and shaders as part of the nodes system as we will see inChapter 7,Creating Custom Shaders and Textures.
Also, it is important to keep in mind that Python offers us far more than just the (already impressive) tools to automate all sorts of tasks in Blender. Python is a general programming language with an extensive library of tools included, so we do not have to resort to external tools for common system tasks such as copying files or archiving (zipping) directories. Even networking tasks can be implemented quite easily as a number of render farm solutions prove.
When we install Blender, a Python interpreter is already part of the application. This means that it is not necessary to install Python as a separate application. But there is more to Python than just the interpreter. Python comes with a huge collection of modules that provide a wealth of functionality. Anything from file manipulation to XML processing and more is available, and the best bit is that these modules are a standard part of the language. They are just as well maintained as the Python interpreter itself and (with very few exceptions) available on any platform that Python runs on.
The downside is, of course, that this collection of modules is fairly large (40MB or so), so the Blender developers chose to distribute only the bare minimum, primarily the math module. This makes sense if you want to keep the size of the Blender downloads manageable. Many Python developers have come to depend on the standard distribution because not having to reinvent the wheel saves huge amounts of time, not to mention it's not an easy task to develop and test a full-fledged XML library say, just because you want to be able to read a simple XML file. That is why it is now more or less a consensus that it is a good thing to install the full Python distribution. Fortunately, the installation is just as easy as the installation of Blender itself, even for end users, as binary installers are provided for many platforms, such as Windows and Mac, also in 64-bit versions. (Distributions for Linux are provided as source code with instructions on how to compile them, but many Linux distributions either already provide Python automatically or make it very easy to install it afterwards from a package repository).
Chances are that you already have a full Python distribution on your system. You can verify this by starting Blender and checking the console window (the term console window refers to either the DOSBox that starts in parallel on Windows or the X terminal window where you start Blender from on other systems) to see if it displays the following text:
Compiled with Python version 2.6.2.
Checking for installed Python... got it!
If it does, then there is nothing you have to do and you can skip to The interactive Python console section. If it shows the following message then you do have to take some action:
Compiled with Python version 2.6.2.
Checking for installed Python... No installed Python found.
Only built-in modules are available. Some scripts may not run.
Continuing happily.
The steps toward a full Python installation for Windows or Mac are as follows:
- Download a suitable installer from http://www.python.org/download/. At the moment of writing, the latest stable 2.6 version is 2.6.2 (used in Blender 2.49). It is generally a good thing to install the latest stable version as it will contain the latest bug fixes. Make sure, however, to use the same major version as Blender is compiled with. It is fine to use version 2.6.3 when it is released even as Blender is compiled with version 2.6.2. But if you use an older version of Blender that is compiled with Python 2.5.4 you have to install the latest Python 2.5.x release (or upgrade to Blender 2.49, if that is an option).
- Run the installer: On Windows the installer offers you to choose where to install Python. You can choose anything you like here, but if you choose the default, Blender will almost certainly find the modules installed here without the need to set the
PYTHONPATHvariable. (see below) - (Re) start Blender. The Blender console should show the text:
Compiled with Python version 2.6.2.
Checking for installed Python... got it!
If it doesn't, it might be necessary to set the
PYTHONPATHvariable. Refer to the Blender wiki for detailed information:http://wiki.blender.org/index.php/Doc:Manual/Extensions/Python
On Ubuntu Linux, the first step is not needed and installing can be done by using the built-in package manager:
sudo apt-get update
sudo apt-get install python2.6
Other distributions might use a different package management system so you might have to check the documentation for that. Under Windows it might be necessary to set the PYTHONPATH environment variable, although this is unlikely when using the provided packages.
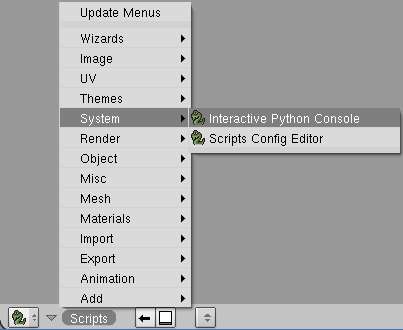
To see where Blender actually looks for modules you may look at Python's sys.path variable. To do this you have to start up Blender's interactive Python console. Note that you use a different and possibly confusing notion of console here—the DOSBox or the terminal window that is started alongside Blender's main application window and where various informational messages are displayed is referred to as console as well! The Python interactive console that we want to use now is started from the script window:
Once the interactive Python console is started, type the following commands:
import sys
print sys.path
Note that the interactive Python console does not show any prompt (unless when expecting indentation, for example within a for loop) but anything you type will be in a different color (white on black by default) from what is returned (that will be blue or black). The two preceding commands will give us access to Python's sys module that contains various variables with system information. The sys.path variable that we print here will hold all of the directories that will be searched when we try to import a module. (Note that importing sys will always work because sys is a built-in module.) The output will be something similar to:
['C:\Program Files\Blender Foundation\Blender', 'C:\Program Files\Blender Foundation\Blender\python26.zip', 'C:\Python26\Lib', 'C:\Python26\DLLs', 'C:\Python26\Lib\lib-tk', 'C:\Program Files\Blender Foundation\Blender', 'C:\Python26', 'C:\Python26\lib\site-packages', 'C:\Python26\lib\site-packages\PIL', 'C:\PROGRA~1\BLENDE~1\Blender', 'C:\Documents and Settings\Michel\Application Data\Blender Foundation\Blender\.blender\scripts', 'C:\Documents and Settings\Michel\Application Data\Blender
Foundation\Blender\.blender\scripts\bpymodules']
If your Python installation directory is not in this list then you should set the PYTHONPATH variable before starting Blender.