
What use is a clock if you cannot set the time in a convenient way? Instead of positioning each hand, we would like to turn a single knob to move both the big hand and the little hand where the little hand would have to move twelve times as slow as the big hand.
Therefore, we would have to define a knob object (that we probably would not render) and drive the rotation of the bones in the clock by the rotation of this knob.
To set up the driven channels we follow these steps:
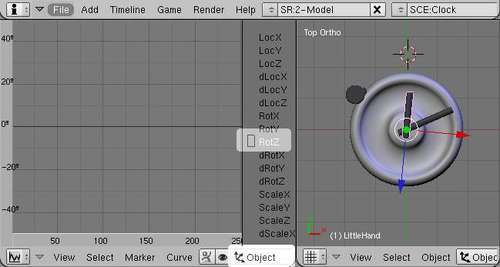
- In the 3D View, select the
bighandobject. - In the IPO window, make sure that you have the object IPO types selected. On the right-hand side, there will be a list of channels. Select the one labeled RotZ by left-clicking on it. It will be highlighted.
- Select Curve | Transform Properties. A pop-up window will appear. Click on the Add Driver button.
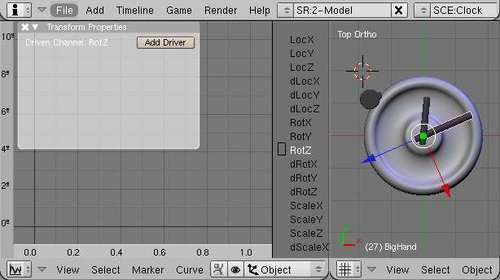
- With the Transform Properties pop up still present, select Curve | Insert 1:1 mapping and next click on the Default one-to-one mapping pop up (or press Enter). The resulting graph will show up as a straight, pale blue line in the IPO editor window.
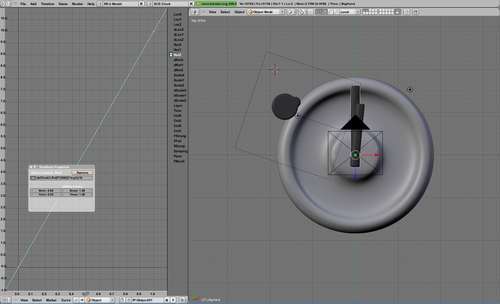
- In the Transform Properties pop-up window, click on the pale green python icon. The python icon will turn dark green and it is now possible to enter a pydriver expression in the adjacent text field. Enter the following line of code:
ob('Knob').RotZ*(360/(2*m.pi))/10
Et voila! If you now rotate the knob object about its z-axis the big hand follows suit. The pydriver expression does need some clarification though. The highlighted part is the driver—the object channel that supplies the input for our driven channel. The ob('Knob') part is the shorthand allowed in pydriver expressions for Blender.Object.Get('Knob') and the RotZ attribute supplies us with the rotation about the z-axis. This rotation, however, is given in radians, whereas the result of a pydriver expression for a rotation channel should be in degrees, so we multiply by 360 degrees and divide by 2 times pi. Finally, we divide our calculated number of degrees by ten because for some obscure reason, Blender does not really expect degrees but the number of degrees divided by 10! (Note that this "divide by ten" business is valid only for rotation channels and not for any of the other channels!)
Note
1-on-1 mappings
You may wonder why we would have to insert a 1-on-1 curve first. Well, the relation between a driven channel and its driver contains one more layer and that is a curve translating the output of the pydriver to the final output. This curve can be tweaked of course, but normally we would do all the fine-tuning in our pydriver and just put in a 1-on-1 curve. This way of working is so common that Blender provides a menu entry especially for this situation since it is quite tedious to create the necessary curves again and again for each driven channel.
Of course, we could have accomplished the same feat by driving the rotation channel directly by the rotation channel of the knob object or even by a copy rotation constraint. That would have saved us the strange conversion issues but the purpose of this section is to show the basics.
The little hand is an example where using a pydriver really is a valid solution. (Although by tweaking the IPO curve itself we could alter the pace of the driven channel but that would not be as clear as a simple expression and almost impossible for more complex relations) We repeat the list of actions shown earlier but now for the little hand object and enter the following pydriver expression:
ob('Knob').RotZ*(360/(2*m.pi))/10/12
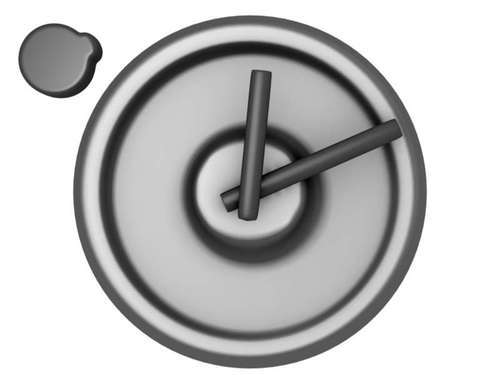
Because the little hand runs twelve times as slow as the big hand, we use the same pydriver expression as for the big hand but divide that result by twelve. Now when we rotate the knob object about its z-axis, the big hand will follow as will the little hand at its set pace. Instead of manually rotating the knob it is also possible to animate the rotation of the knob to animate both clock hands. The complete result is available as clock-pydriver.blend and a rendered image of the clock, with the knob driving the motion of the hands visible on the top left, is shown in the next screenshot:
Within pydriver expressions some useful shortcuts can be used to save on typing. In the step-by-step example we already made use of the ob('<name>') shortcut that refers to Blender objects by name and likewise, it is possible to access Mesh objects and materials by me('<name>') and ma('<name>') respectively. Furthermore, the Blender module is available as b, the Blender.Noise module as n, and Python's math module as m. This allows for expressions using trigonometric functions such as sinus, for example. These facilities are sufficient to cover many issues but they still might not be enough, for instance if we would like to import external modules. There is a way around these difficulties though as we will see in the next section.
The input field for pydrivers is limited to 125 characters and even though the shortcuts provided to access Python's math module and some of the Blender modules allow for shorter expressions, the space provided is often not enough. Also, as pydrivers must be Python expressions, it is quite difficult to debug them (because you cannot insert print statements for example) or to attain something like an if/then functionality. The latter can be overcome, to a certain extent, by clever tricks based on the fact that True and False in Python are converted to 1 and 0 respectively inside numerical expressions, so the statement:
if a>b:
c=14
else:
c=109
may be expressed as:
c = (a>b)*14 + (a<=b)*109
However, this feels awkward and evaluates the condition twice. Fortunately, both the space problem and the limitation to a single expression can be solved by using a text block named pydrivers.py. If such a text block is present, its contents are accessible as a module called p. So, for example, if we define a function clamp() in pydrivers.py that looks like this:
def clamp(a,low,high):
if a<low : a=low
if a>high: a=high
return a
We may invoke this function in our pydriver expression as p.clamp(a,14,109).
We will use pydrivers.py quite a bit in the following examples, not only because it allows for more complex expressions, but also because the width of the pydriver field is even smaller than the length of its allowed content making it very hard to read as you have to scroll about to access all parts of an expression.