Realism in scenes is often accomplished by providing lots of detail, especially in natural objects. However, this kind of realism comes with a price as detailed models often contain many faces and these faces consume memory and take time to render. A realistic tree model may contain as much as half a million faces so a forest of these would be almost impossible to render, even more so, if this forest is part of the scenery in a fast-paced game.
Blender comes with a number of tools to reduce the amount of memory needed when rendering many copies of an object; different Mesh objects may refer to the same mesh data as may DupliVerts. (Child objects that are replicated at the position of each vertex of a parent object. See http://wiki.blender.org/index.php/Doc:Manual/Modeling/Objects/Duplication/DupliVerts for more information.) Duplication of objects in particle systems also allows us to create many instances of the same object without actually duplicating all the data. These techniques may save huge amounts of memory but detailed objects still may take a lot of CPU power to render because the details are still there to be rendered.
Billboards are a technique used to apply a picture of a complex object to a simple object, such as a single square face, and replicate this simple object as many times as needed. The picture must have suitable transparency otherwise each object may occlude the others in unrealistic ways. Apart from that, this technique is quite simple and may save a lot of rendering time and it will give fairly realistic results for objects placed in the middle distance or farther away. Blender's particle systems may use billboards either as simple squares with images applied or by applying an image to a simple object ourselves and using that as a duplicating object. The latter also holds for dupliverted objects.
The trick is to generate an image with suitable lighting to be used as an image that can be applied to a square. Actually, we want to create two images: one shot from the front, one from the right, and construct an object consisting of two square faces perpendicular to each other with the two images applied. Such an object will give us a limited amount of freedom later in the placement of the camera in our scene as they do not have to be seen from just one direction. This works well only for objects with a roughly cylindrical symmetry, such as trees or high-rises, but then it is quite effective.
The workflow for constructing such objects is complex enough to warrant automation:
- Position two cameras front and right of the detailed object.
- Frame both cameras to capture all of the object with the same angle.
- Render the transparent images with alpha premultiplied and without sky.
- Construct a simple object of two perpendicular squares.
- Apply each rendered image to a square.
- Hide the detailed object from rendering.
- Optionally, replicate the simple object in a particle system (the user may opt not to automate this part but place the simple objects manually).
The "premultiplication" mentioned in the third step may need some clarification. Obviously, the rendered images of our complex object need not show any background sky as their replicated clones may be positioned anywhere and may show different parts of the sky through their transparent parts. As we will see, this is simple enough to accomplish but when we simply render a transparent image and overlay it later on some background the image may have unsightly glaring edges.
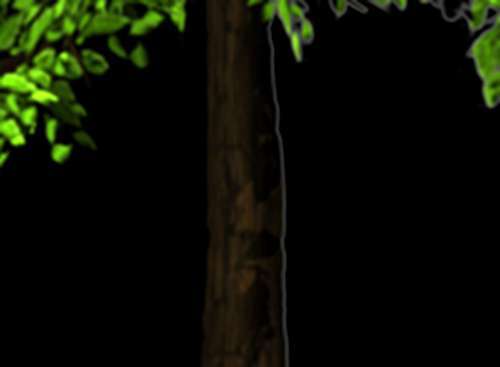
The way to avoid this is to adjust the rendered colors by multiplying them with the alpha value and the render context has the necessary attributes to indicate this. We should not forget to mark the images produced as "premultiplied" when using them as textures, otherwise they will look too dark. The difference is illustrated in the following screenshot where we composited and enlarged a correctly premultiplied half on the left and a sky rendered half on the right. The trunk of the tree shows a light edge on the right. (Refer to Roger Wickes' excellent book "Foundation Blender Compositing" for more details.)
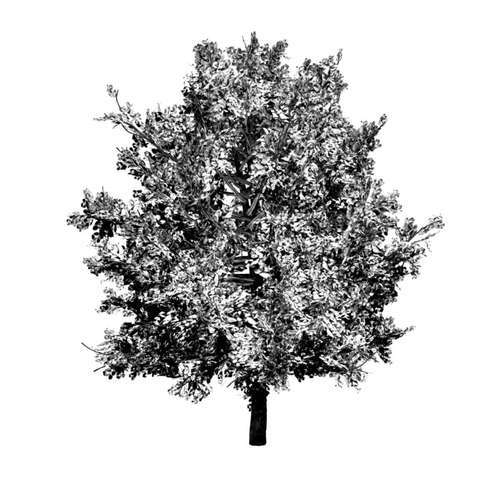
The beech tree (used in these and the following illustrations) is a highly-detailed model (over 30,000 faces) created by Yorik van Havre with the free plant-modeling package ngPlant. (See his website for more fine examples: http://yorik.uncreated.net/greenhouse.html) The following first set of images shows the beech tree from the front and the resulting front facing render of the two billboards on the left. (slightly darker because of the premultiplication).
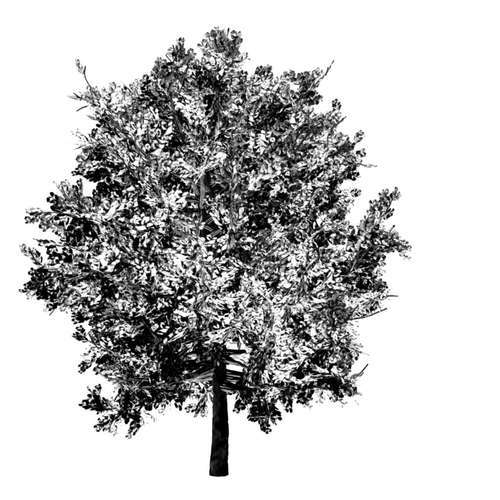
The next set of screenshots shows the same beech tree rendered from the right together with a right-facing render of the billboard on the left. As can be seen, the rendition is certainly not perfect from this angle and this closeup, but a reasonable three-dimensional aspect is retained.
To give an impression of the construction of the billboards the next screenshot shows the two faces with the rendered images applied. The transparency is deliberately lessened to show the individual faces.

Our first challenge is to reuse some of the functions that we wrote for the generation of our contact sheet. These functions are in a text buffer called combine.py and we did not save this to an external file. We will create our cardboard.py script as a new text buffer in the same .blend file as combine.py and would like to refer to the latter just like some external module. Blender will make this possible for us as it searches for a module in the current text buffers if it cannot find an external file.
Because internal text buffers have no information on when they were last modified, we have to make sure that the latest version is loaded. That is what the reload() function will take care of. If we didn't do this Blender would not detect if combine.py had changed, which could lead to us using an older compiled version of it:
import combine
reload(combine)
We will not reuse the render() function from combine.py because we have different requirements for the rendered images that we will apply to the billboards. As explained, we have to make sure that we won't get any bright edges at points where we have partial transparency so we have to premultiply the alpha channel in advance (highlighted). We reset the rendering context to 'rendering the sky' again just before we return from this function because it's easy to forget to turn this on again manually and you may waste time wondering where your sky has gone:
def render(camera):
cam = Object.Get(camera)
scn = Scene.GetCurrent()
scn.setCurrentCamera(cam)
context = scn.getRenderingContext()
frame = context.currentFrame()
context.endFrame(frame)
context.startFrame(frame)
context.displayMode=0
context.enablePremultiply()

context.renderAnim()
filename= context.getFrameFilename()
camera = os.path.join(os.path.dirname(filename),camera)
try:
os.remove(camera) # remove otherwise rename fails on windows
except:
pass
os.rename(filename,camera)
context.enableSky()
return camera
Each rendered image will have to be converted to a suitable material to apply to a UV-mapped square. The function imagemat() will do just that; it will take a Blender Image object as an argument and will return a Material object. This material will be made completely transparent (highlighted) but this transparency and the color will be modified by the texture we assign to the first texture channel (second highlighted line). The textures type is set to Image and because we rendered these images with a premultiplied alpha channel, we use the setImageFlags() method to indicate that we want to use this alpha channel and set the premul attribute of the image to True:
def imagemat(image):
mat = Material.New()
mat.setAlpha(0.0)
mat.setMode(mat.getMode()|Material.Modes.ZTRANSP)
tex = Texture.New()
tex.setType('Image')
tex.image = image
tex.setImageFlags('UseAlpha')
image.premul=True
mat.setTexture(0,tex,Texture.TexCo.UV, Texture.MapTo.COL|Texture.MapTo.ALPHA)
return mat
Each face that we will apply a material to will have to be UV-mapped. In this case, this will be the simplest mapping possible as the square face will be mapped to match a rectangular image exactly once. This is often called reset mapping and therefore the function we define is called reset(). It will take a Blender MFace object that we assume to be a quad and set its uv attribute to a list of 2D vectors, one for each vertex. These vectors map each vertex to a corner of the image:
def reset(face):
face.uv=[vec(0.0,0.0),vec(1.0,0.0),vec(1.0,1.0),vec(0.0,1.0)]
The cardboard() function takes care of constructing an actual Mesh object from the two Image objects passed as arguments. It starts off by constructing two square faces that cross each other along the z-axis. The next step is to add an UV-layer (highlighted) and make it the active one:
def cardboard(left,right):
mesh = Mesh.New('Cardboard')
verts=[(0.0,0.0,0.0),(1.0,0.0,0.0),(1.0,0.0,1.0),(0.0,0.0,1.0),
(0.5,-0.5,0.0),(0.5,0.5,0.0),(0.5,0.5,1.0),(0.5,-0.5,1.0)]
faces=[(0,1,2,3),(4,5,6,7)]
mesh.verts.extend(verts)
mesh.faces.extend(faces)
mesh.addUVLayer('Reset')
mesh.activeUVLayer='Reset'
Next, we construct suitable materials from both images and assign these materials to the materials attribute of the mesh. Then, we reset the UV coordinates of both faces and assign the materials to them (highlighted). We update the mesh to make the changes visible before we return it:
mesh.materials=[imagemat(left),imagemat(right)]
reset(mesh.faces[0])
reset(mesh.faces[1])
mesh.faces[0].mat=0
mesh.faces[1].mat=1
mesh.update()
return mesh
To replace the mesh of the duplication object of a particle system we implement a utility function setmesh(). It takes the name of the object with an associated particle system and a Mesh object as arguments. It locates the Object by name and retrieves the first particle system (highlighted in the next code snippet). The duplication object is stored in the duplicateObject attribute. Note that this is a read-only attribute so currently there is no possibility of replacing the object from Python. But we can replace the data of the object and that is what we do by passing the Mesh object to the link() method. Both the emitter object and the particle system's duplication object are changed so we ensure that the changes are visible by calling the makeDisplayList() method on both of them before initiating a redraw of all Blender's windows:
def setmesh(obname,mesh):
ob = Object.Get(obname)
ps = ob.getParticleSystems()[0]
dup = ps.duplicateObject
dup.link(mesh)
ob.makeDisplayList()
dup.makeDisplayList()
Window.RedrawAll()
The run() function encapsulates all the work that needs to be done to convert the active object to a set of billboards and assign them to a particle system. First, we retrieve a reference to the active object and make sure that it will be visible when rendered:
def run():
act_ob = Scene.GetCurrent().objects.active
act_ob.restrictRender = False
The next step is to make the rest of the objects in the scene invisible before we render the billboards. Some object may have been made invisible by the user, therefore, we have to remember the states so that we can restore them later. Also,we do not alter the state of lamps or cameras as making these invisible would leave us with all black images (highlighted):
The next step is to make the rest of the objects in the scene invisible before we render the billboards. Some object may have been made invisible by the user, therefore, we have to remember the states so that we can restore them later. Also,we do not alter the state of lamps or cameras as making these invisible would leave us with all black images (highlighted):
renderstate = {}
for ob in Scene.GetCurrent().objects:
renderstate[ob.getName()] = ob.restrictRender
if not ob.getType() in ('Camera','Lamp' ):
ob.restrictRender = True
act_ob.restrictRender = False
Once everything is set up to render just the active object, we render front and right images with suitably framed cameras, just like we did in the combine.py script. In fact, here we reuse the frame() function (highlighted):
cameras = ('Front','Right')
combine.frame(cameras,act_ob.getBoundBox())
images={}
for cam in cameras:
im=Image.Load(render(cam))
im.reload()
images[cam]=im
bpy.data.images.active = im
Window.RedrawAll()
Then we restore the previous visibility of all the objects in the scene before we construct a new mesh from the two images. We finish by making the active object invisible for rendering and replacing the mesh of the duplication object in a designated particle system by our new mesh:
for ob in Scene.GetCurrent().objects:
ob.restrictRender = renderstate[ob.getName()]
mesh = cardboard(images['Front'],images['Right'])
act_ob.restrictRender = True
setmesh('CardboardP',mesh)
The final lines of code create the cameras necessary to render the billboards (if those cameras are not already present) by calling the createcams() function from the combine module before calling run():
if __name__ == "__main__":
combine.createcams()
run()
The full code is available as cardboard.py in combine.blend.
Assuming that you have a high poly object that you would like to convert to a set of billboards, a possible work flow would look like this:
- Create an object called
CardboardP. - Assign a particle system to this object.
- Create a dummy cube.
- Assign the dummy cube as the duplicate object on the first particle system of the
CarboardPobject. - Select (make active) the object to be rendered as a set of billboards.
- Run
cardboard.py. - Select the original camera and render the scene.
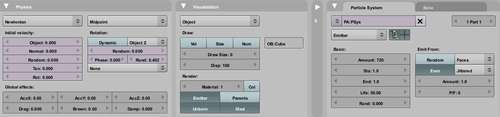
Of course, the script might be changed to omit the automated replacement of the duplication objects mesh if that is more suitable. For example, if we would like to use dupliverted objects instead of particles we would simply generate the cardboard object and assign its mesh to the dupliverted object. If we do use a particle system we probably do not want all replicated objects to be oriented in exactly the same way. We might, therefore, randomize their rotation, an example setup to accomplish that is shown in the following screenshot:
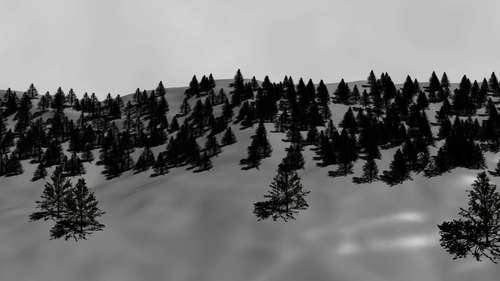
The next screenshot illustrates the application of billboards created from a tree model and used in a particle system: