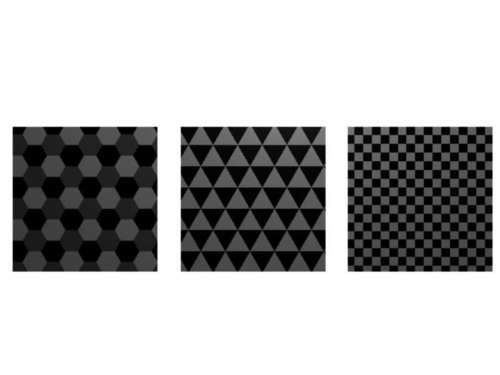
The checkerboard texture is perhaps the simplest texture that you can imagine and is therefore often used as an example when programming textures. Because Blender already has a built-in checker texture (since version 2.49, in the texture context of the nodes window) we go one step further and create a texture node that displays not only a checkerboard texture but tilings of triangles and hexagons as well.
from Blender import Node,Noise,Scene
from math import sqrt,sin,cos,pi,exp,floor
from Blender.Mathutils import Vector as vec
# create regular tilings to be used as a color map
class Tilings(Node.Scripted):
def __init__(self, sockets):
sockets.input = [Node.Socket('type' , val= 2.0, min = 1.0, max = 3.0),
Node.Socket('scale' , val= 2.0, min = 0.1, max = 10.0),
Node.Socket('color1', val= [1.0,0.0,0.0,1.0]),
Node.Socket('color2', val= [0.0,1.0,0.0,1.0]),
Node.Socket('color3', val= [0.0,0.0,1.0,1.0]),
Node.Socket('Coords', val= 3*[1.0])]
sockets.output = [Node.Socket('Color', val = 4*[1.0])]
The first few lines start off by defining our input and output sockets. The output will simply be a color in all cases but we have a more varied set of input sockets. We define three different input colors because the hexagon pattern needs three colors to give each hexagon a color that is distinguishable from its neighbor.
We also define a Coords input. This input socket may hook up to any output of a geometry socket. In this way we have many possibilities to map our color texture to the object that we are texturing. A Scale socket is defined as well to control the size of our texture.
Finally, we define a Type socket to select the pattern that we wish to generate. As the Pynode API does not provide a drop-down box or any other simple selection widget we make do with a value socket and arbitrarily pick values to represent our choice: 1.0 for triangles, 2.0 for checkers, and 3.0 for hexagons.
We end our __init__() function with the definition of a number of constants and a dictionary of color mappings that we will use when generating a hexagonal texture.
self.cos45 = cos(pi/4)
self.sin45 = sin(pi/4)
self.stretch = 1/sqrt(3.0)
self.cmap = { (0,0):None,(0,1):2, (0,2):0, (1,0):0, (1,1):1, (1,2):None, (2,0):2, (2,1):None,(2,2):1 }
The next step is to define the __call__() function:
def __call__(self):
tex_coord = self.input.Coords
# we disregard any z coordinate
x = tex_coord[0]*self.input.scale
y = tex_coord[1]*self.input.scale
c1 = self.input.color1
c2 = self.input.color2
c3 = self.input.color3
col= c1
The __call__() function starts off by defining some shorthands for input values and multiplying the input coordinates by the chosen scale to stretch or shrink the generated pattern. The next step is to establish the kind of pattern that is desired and call the appropriate function to calculate the output color for the given coordinates. The resulting color is assigned to our only output socket:
if self.input.type<= 1.0:
col = self.triangle(x,y,c1,c2)
elif self.input.type <= 2.0:
col = self.checker(x,y,c1,c2)
else:
col = self.hexagon(x,y,c1,c2,c3)
self.output.Color = col
The various pattern-generating functions are all very similar; they take x and y coordinates and two or three colors as arguments and return a single color. As these are member functions of a class, they take an additional first argument of self as well.
def checker(self,x,y,c1,c2):
if int(floor(x%2)) ^ int(floor(y%2)):
return c1
return c2
The checker function checks in which row and column we are and if the row number and the column number are both odd or even (that is what the exclusive or operator establishes) it returns one color, if not it returns the other color.
def triangle(self,x,y,c1,c2):
y *= self.stretch
x,y = self.cos45*x - self.sin45*y, self.sin45*x + self.cos45*y
if int(floor(x%2)) ^ int(floor(y%2)) ^ int(y%2>x%2) : return c1
return c2
The triangle function first rotates both x and y coordinates together by a 45 degree angle (changing squares into upright lozenges). It then determines the color based on row and column numbers just like in the checker function but with a twist: the third term (highlighted) checks whether we are on the left of the diagonal crossing a square and because we have rotated our grid, we really check whether or not the coordinates are above the horizontal line dividing our lozenge. This may sound a bit complicated but you can check the following screenshot to get the idea:

def hexagon(self,x,y,c1,c2,c3):
y *= self.stretch
x,y = self.cos45*x - self.sin45*y, self.sin45*x + self.cos45*y
xf = int(floor(x%3))
yf = int(floor(y%3))
top = int((y%1)>(x%1))

c = self.cmap[(xf,yf)]

if c == None:
if top :
c = self.cmap[(xf,(yf+1)%3)]
else :
c = self.cmap[(xf,(yf+2)%3)]
return (c1,c2,c3)[c]
The hexagon function is like the triangle function in many respects (after all a hexagon is six triangles glued together). Therefore, it performs the same rotation trick but instead of picking the color by using a straightforward formula, things are a bit more involved and hence we use a color map here (highlighted in the previous code snippet). Basically, we divide the screen into horizontal and vertical strips and pick the color based on the strips we are in.
The final piece of magic is in the last line of our script:
__node__ = Tilings
The way Pynodes are currently implemented, Blender needs this assignment to identify a class as a node. Our node will show up in the pop-up menu of a script node as Tilings. The full code is available as tilings.py in tilings.blend together with a sample node setup. Some of the possible patterns are shown in the next screenshot:
The corresponding node setup is shown in the next screenshot. Note that we have not connected any node to the color inputs but even more elaborate patterns can be created if we do.

If you would look closely at the diagonal boundaries of the hexagonal or triangular tilings you would notice some staircase-like artifacts even if oversampling was set to a high value.
Blender itself is smart enough to apply the chosen anti-aliasing level to things such as object boundaries, but in most cases textures on a surface will have to take care of anti-aliasing themselves. Blender's built-in textures are designed that way of course, but our own textures produced with Pynodes should address this explicitly.
There are numerous mathematical techniques available to reduce aliasing in generated textures but most are not easy to implement or require specific knowledge about the way a pattern is generated. Fortunately, Blender provides us with the Full OSA option (Buttons windows | Shading context | Material buttons | Links and pipeline tab). If we enable this option, Blender is forced to oversample each pixel in our texture by the amount selected in the render buttons. This is an expensive option but will get rid of aliasing effects without the need to implement specific filtering options in our Pynode texture.
In our tiling patterns we have limited the colors to the minimum number needed to distinguish each neighboring tile. But would it be possible to assign random colors based on some noise texture? This way we might color fish scales in a way that follows an overall random pattern yet colors each individual scale uniformly.
We cannot simply connect a colored texture to the color inputs as this leads to interesting patterns, perhaps, but each tile would not have a uniform color. The solution is to modify our Pynode to produce a unique vector that is uniform within any given tile. This vector may then be connected to any noise texture that takes a vector as input as all Blender textures do. This vector is used by the noise texture node to point to a single point in the random texture and this way we can produce randomly colored but uniform tiles.
To provide this functionality we modify our code by removing the color inputs and replacing the color output by a vector output (not shown). The code inside the __call__() function will now have to produce a vector instead of a color. Here we show the modified triangle function (full code available as tilingsv.py in tilingsv.blend):
def triangle(self,x,y):
y *= self.stretch
x,y = self.cos45*x - self.sin45*y, self.sin45*x + self.cos45*y
if int(floor(x%2)) ^ int(floor(y%2)) ^ int(y%2>x%2) :
return [floor(x),floor(y),0.0]
return [floor(x)+0.5,floor(y),0.0]
The logic is largely the same but, as shown in the highlighted line, we return a vector that is dependent on the position. However, due to the floor() operation it is constant within a triangle. Note that for the alternate triangle we add a slight offset; it doesn't matter which offset we choose as long as it is constant and produces a vector distinct from the other triangle.
The results show a random pattern of triangles that follows the large correlations in the noise yet leaves each individual triangle with a uniform color. The sample on the right has a larger noise size for the cloud texture used:
.jpg)
A possible node setup is shown in the following screenshot:
.jpg)
A texture can have more than just a geometric input. If you need a texture to change its behavior based on another texture in a way that cannot be achieved by a simple node setup you may provide it with extra input sockets. We will develop a Pynode that generates a normal map that simulates the little patches of wavelets on a pond on an almost windless day.
Where those patches appear is controlled by an extra input socket that may be linked to almost any noise texture. We will give this input socket the name amplitude because we use it to multiply it with our calculated normal. This way our wavelets will disappear wherever our noisy texture is zero.
The wavelength of the ripples is controlled by yet another input called wavelength and our Ripples node will have an input socket for the coordinates as well.
The fourth and final input is called direction—a vector that controls the orientation of our wavelets. It may be set by hand by the user but if desired, may be linked up to a normal node that provides an easy way to manipulate the direction with the mouse.
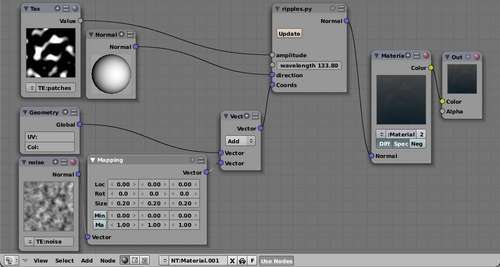
The resulting node setup that combines all of this is shown in the screenshot of the node editor:
The script for the node is straightforward; after importing some necessary definitions we then define the numerous input sockets and our single output socket:
from Blender import Node
from math import cos
from Blender.Mathutils import Vector as vec
class Ripples(Node.Scripted):
def __init__(self, sockets):
sockets.input = [Node.Socket('amplitude' , val= 1.0, min = 0.001, max = 1.0),
Node.Socket('wavelength', val= 1.0, min = 0.01, max = 1000.0),
Node.Socket('direction' , val= [1.0,0.0,0.0]),
Node.Socket('Coords' , val= 3*[1.0])]
sockets.output = [Node.Socket('Normal', val = [0.0,0.0,1.0])]
def __call__(self):
norm = vec(0.0,0.0,1.0)
p = vec(self.input.Coords)
d = vec(self.input.direction)
x = p.dot(d)*self.input.wavelength
norm.x=-self.input.amplitude*cos(x)
n = norm.normalize()
self.output.Normal = n*.01
__node__ = Ripples
Again, all real work is done in the __call__() function (highlighted in the preceding code snippet). We first define the shorthands p and d for the coordinates and the direction vectors respectively. Our wavelets are sinus functions and the location on this sinus curve is determined by the projection of the position on the direction vector. This projection is calculated by taking the "in product" or "dot product"—an operation provided by the dot() method of a Vector object.
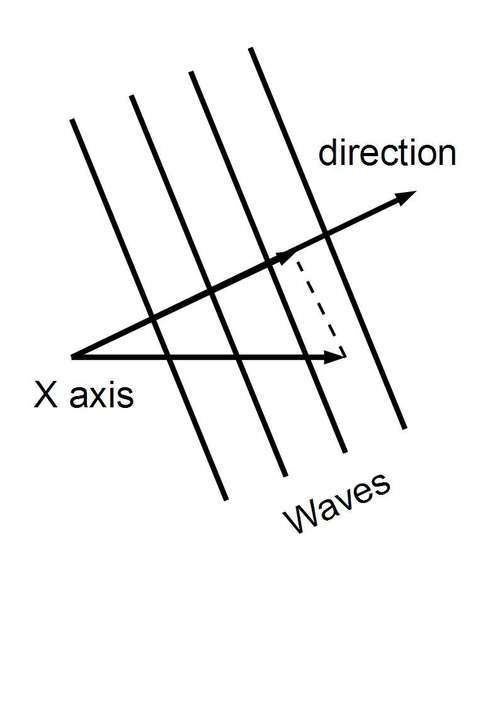
The projection is then multiplied by the wavelength. If we would calculate the sinus we would have the height of our wave. We are, however, not interested in the height but in the normal. The normal always points upward and moves along with our sine wave (see the next diagram). It can be shown that this normal is a vector with a z-component of 1.0 and an x-component equal to the negative derivative of the sine function, that is, minus cosine. The script (ripples.py) and an example node setup are available as ripples.blend.

In the node setup that we showed earlier you might have noticed that instead of linking up the geometry node directly to our ripples node, we added a second texture node and combined this node with the geometry input by adding and scaling the normal output of the texture node. We could have mixed in some noise in the ripples node itself but this way we give the user far more control over the type and amount of noise he wants to add (if any). This is a general pattern: nodes should be designed as simple as possible to facilitate reuse in different settings.
These ripples were not designed to be animated but in the following section we will design a node that can.