Creating elaborate assemblies of objects is automated easily enough, but we would like to provide the end user with ways to select all of these related objects and to move them together. This section shows how we can achieve that by creating groups and by parenting objects to each other. You will end up with a bunch of nice sunflowers as a result.
Groups are devised to make it easier to select, or manipulate, more than one object at the same time. Sometimes this behavior is part of a larger scheme. An armature for example, is a collection of bones, but then these collections have very specific relations (bones in an armature have precisely defined relations to each other).
There are many situations where we would like to identify a bunch of objects as belonging together without there being a specific relationship. Blender provides two kinds of groups to help us define their loose relations: object groups (or simply groups) for named collections of objects, and vertex groups for named collections of vertices within mesh objects.
Object groups allow us to select an otherwise unrelated set of objects we added to a group (we could group a mesh, an armature, and a bunch of empties together for example). A group relationship is different from a parent-child relationship. Groups merely allow us to select objects but parented objects move along when their parent is moved. The functionality to define and manipulate groups is provided in the Group module and its identically named class (a group is just like another Blender object, but one containing a list of references to other objects, but not to other groups unfortunately). You might, for example, append a group from an external .blend file just like you would a Lamp or a Mesh. The following table lists some often used group operations (see the Blender.Group module in the Blender API documentation for additional functionality):
|
Operation |
Action |
|---|---|
|
|
Creates a new group |
|
|
Gets a reference to a group by name |
Vertex groups are a convenient way to identify groups of related vertices (such as an ear or a leg in a model of a toy for example) but they have their uses beyond mere selecting. They can be used to determine the influence of bone deformations or to identify emitter regions of particle systems to name a few. Vertex groups will be our focus in the next chapter.
Parenting in real life might be difficult at times, but in Blender it is rather easy although there is a sometimes bewildering array of options to choose from. It is possible to parent an object to another object, to a single bone in an armature, or to one or three vertices in a Mesh object. The following table shows the relevant methods (Refer to Blender.Object in the Blender API for additional functionality):
|
Operator |
Action |
|---|---|
|
parent.makeParent([child1, child2, child3]) |
parent-children to a parent object |
|
parentmesh.makeParentVertex([child1,child2,child3], vertexindex1) |
parent-children to a vertex |
|
parentmesh.makeParentVertex([child1,child2,child3], vertexindex1,vertexindex2,vertexindex3) |
parent-children to three vertices |
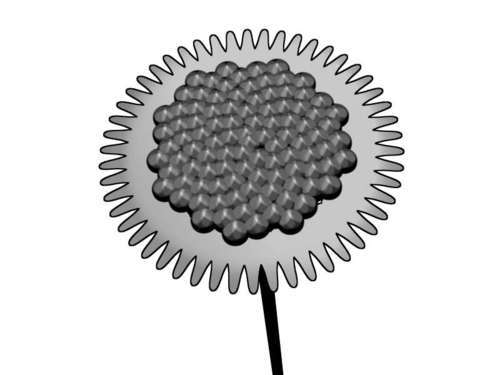
We can put all this information to good use when we write a script that will create a model of a sunflower (Van Gogh would probably have cut off his other ear as well if he saw this "sunflower" but then again, his was another way of looking altogether). The single sunflower that we will be creating consists of a stalk and a flower head. The head of a sunflower consists of tiny flowers that will become the seeds once fertilized and a rim of large petals. (I know, any botanist will cringe at my language. The tiny flowers are called "disc florets"—but floret is just a "little flower" right? And the ones on the edge are "ray florets".) Our head will have seeds and each seed is a separate Mesh object that will be vertex-parented to our head mesh.
We would like our seeds to not just move along with our seed head, but to follow any local curvature and orient themselves perpendicular to the head surface so we can, for example, distort the head mesh with proportional editing and all attached seeds will follow. To accomplish that we use the three vertex variant of vertex parenting.
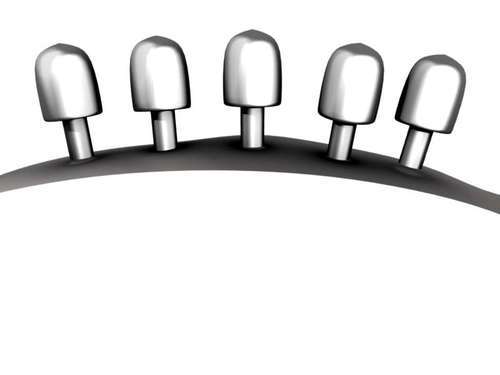
By parenting an object to three different vertices of a mesh, that object will follow the position of those vertices and orient itself relative to the normal (see the following illustrations):
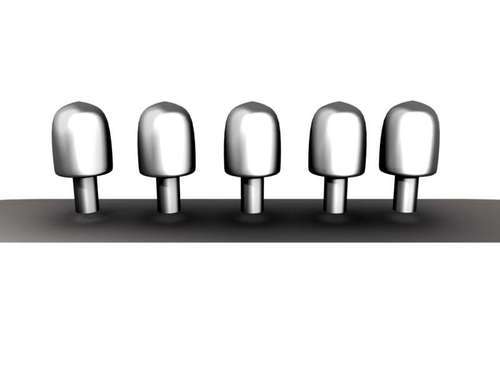
We do not need to connect all those triplets of vertices as the head mesh itself will not be rendered (it will be fully covered by seeds). We do define a face between each triplet of vertices though; otherwise it would be difficult for a modeler to see the head mesh in edit mode.
The petals are separate objects parented in the normal way to the head mesh as they need not follow any curvature of the head mesh, just its location and rotation. The head in turn is parented to the stalk so we can move the whole assembly around by moving the stalk.
Finally, we assign all individual objects to a single group. That way it will be easy to select everything in one go and it enables us to link or append one or more sunflowers from an external file as a single entity.
We said that all our seeds and petals are separate objects but it might make more sense to instantiate them instead (called making a linked copy in Blender). As all seeds and all petals as we have modeled them are identical, we can refer to the same mesh data and just change the location, rotation, or scale of the object as needed—saving possibly a fair amount of memory. When using Blender interactively we can instantiate an object by pressing Alt + D (instead of Shift + D for a regular copy). In our script, we simply define a new object and point it to the same Mesh object by passing a reference to the same mesh when calling Object.New().
Let's look at the main part of the script that will create the sunflower (the full script is available as sunflower.py). The first step is to calculate the position of the seeds:
def sunflower(scene,nseeds=100,npetals=50):
pos = kernelpositions(nseeds)
From these positions we create the head, vertices, and faces that we can parent the kernels to and assemble these into the head mesh (highlighted part of the following code):
headverts=pos2verts(pos)
faces=[(v,v+1,v+2) for v in range(0,len(headverts),3)]
head=Tools.addmeshobject(scene,headverts,faces,name='head')
The next step is to create the base mesh for the kernel and create objects that reference this mesh (highlighted part of the following code):
kernelverts,kernelfaces=kernel(radius=1.5,scale=(1.0,1.0,0.3))
kernelmesh = Tools.newmesh(kernelverts,kernelfaces,name='kernel')
kernels = [Tools.addmeshduplicate(scene,kernelmesh,name='kernel') for i in range(nseeds)]
Each kernel is then assigned a suitable location and parented to the appropriate vertices in the flower head mesh (highlighted part of the following code):
for i in range(nseeds):
loc = Tools.center(head.data.verts[i*3:(i+1)*3])
kernels[i].setLocation(loc)
head.makeParentVertex([kernels[i]], tuple([v.index for v in head.data.verts[i*3:(i+1)*3]]))
Next, we create a petal mesh and arrange duplicates of this mesh along the rim of the flower head (highlighted part of the following code):
petalverts,petalfaces=petal((2.0,1.0,1.0))
petalmesh = Tools.newmesh(petalverts,petalfaces,name='petal')
r = sqrt(nseeds)
petals = [Tools.addmeshduplicate(scene,petalmesh,name='petal') for i in range(npetals)]
Each petal is positioned and rotated along the rim and parented to the head (highlighted part of the following code):
for i,p in enumerate(petals):
a=float(i)*2*pi/npetals
p.setLocation(r*cos(a),r*sin(a),0)
e=p.getEuler('localspace')
e.z=a
p.setEuler(e)
head.makeParent(petals)
Finally, we create a stalk mesh and object and parent the head to the stalk. This way the entire flower may be moved by moving the stalk:
# add stalk (parent head to stalk)
stalkverts,stalkfaces=stalk()
stalkob = Tools.addmeshobject(scene,stalkverts,stalkfaces, name='stalk')
stalkob.makeParent([head])
All that is left to do is to group the kernels and petals in separate groups (highlighted) and then all parts in an overall sunflower group for easy reference:
kernelgroup = Blender.Group.New('kernels')
kernelgroup.objects=kernels
petalgroup = Blender.Group.New('petals')
petalgroup.objects=petals
all = Blender.Group.New('sunflower')
all.objects=sum([kernels,petals],[head,stalkob])
The addmeshduplicate() function used in the code is implemented in the Tools module in the following manner:
def addmeshduplicate(scn,me,name=None):
ob=scn.objects.new(me)
if name : ob.setName(name)
scn.objects.active=ob
me.remDoubles(0.001)
me.recalcNormals()
for f in me.faces: f.smooth = 1
me.update()
Blender.Window.RedrawAll()
return ob
Given a scene, a mesh, and a name (optional) for the object, it adds a new object to the scene. The Mesh object passed as an argument might be used again and again to create new objects that refer to the same mesh.
Newly created objects will be selected automatically but not be made active, so the next step is to make the newly-created object active (highlighted in the preceding code). This is not necessary but might be convenient to the user as are the next two actions: ensuring that all face normals point consistently outward and removing any vertices that are very close together. These last two actions can only be performed on a mesh that is embedded in an object.
Also, as a convenience, we set the smooth attribute for all faces, to get smoother images when rendering. Finally, we update the display list for this mesh and notify all Blender windows that there has been a change.
Tip
A slight digression, or why rabbits are related to sunflowers.
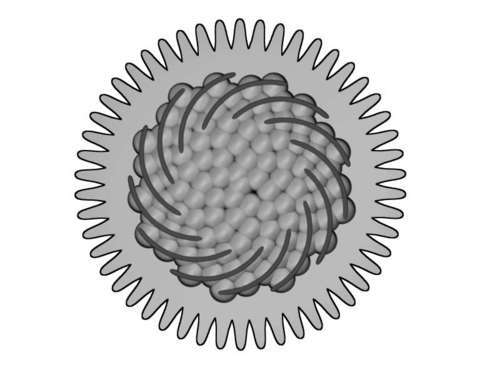
One of the things you may notice is that we have arranged the seeds in a peculiar spiral. This type of spiral, where subsequent positions along the spiral are spaced by following the so-called Golden ratio is called Fermat's spiral. Such a spiral results naturally in many seed heads when the florets or seeds are formed in the middle and pushed outward, resulting in a highly efficient packing.
When seen from above, the arrangement of seeds also seem to follow both left and right turning curves. The numbers of these curves usually are a pair from the Fibonacci sequence [ 1 1 2 3 5 8 13 21 …] and the ratio of such a pair of numbers tends to converge on the Golden ratio when they get bigger. (In the two illustrations of our seed head below we can discern 13 counterclockwise spirals and 21 clockwise spirals.) Fibonacci invented this series in an attempt to model the population growth of rabbits. More about sunflowers (and possibly rabbits) may be found here: http://en.wikipedia.org/wiki/Sunflower.