1. Getting Started
In This Chapter
When you open Photoshop for the first time, its interface can be rather intimidating: like being in the helicopter cockpit with no idea of how to fly the thing. So, before we take off, let’s do some essential background work. In this chapter, you’ll get acquainted with some of the fundamentals of working in Photoshop: opening existing files, creating new files from scratch, saving files, and ending a work session. We may not leave the ground, but you’ll feel much more confident about doing so when the time comes.
Opening Files
There are several ways to open files: using the Open command, using the Open Recent command, or dragging a compatible file format onto the Photoshop application icon.
To open a file:
Choose File > Open (Ctrl/Command+O), or click the Open button on the Home Screen (FIGURE 1.1).
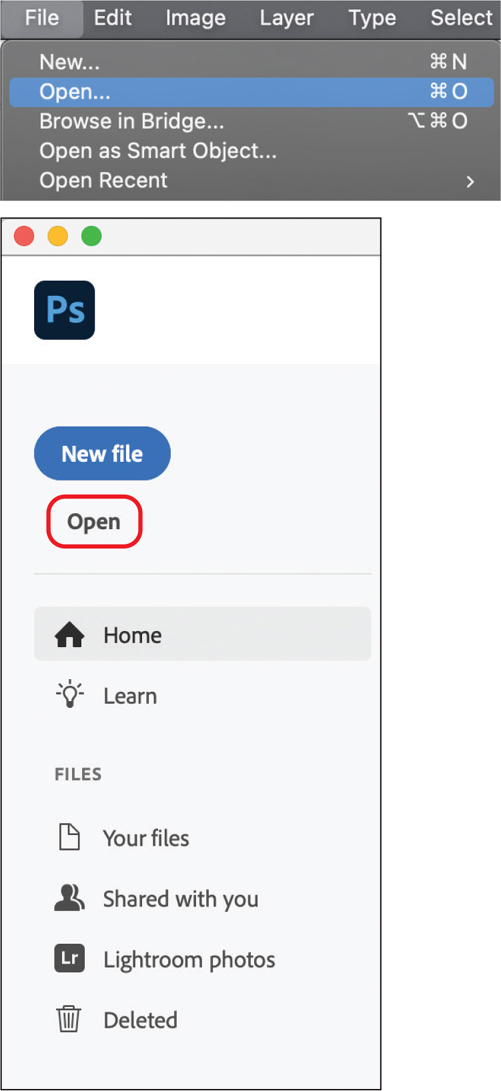
FIGURE 1.1 You can open a file from the File menu (top) or the Home Screen.
Navigate to the folder containing the file and from the file list, select the file you want to open. If the file does not appear, select the option for showing all files from the Files Of Type (Windows) or Enable (macOS) menu.
Click Open. In some cases, a dialog appears, letting you set format-specific options.
Tip
If you open multiple files, they will appear as tabbed documents. Click a tab to switch between the open documents. You can also choose the name of any open document on the Windows menu.
Tip
Sometimes it’s easier to choose from a list of recently opened files, either from the File > Open Recent submenu or on the Home Screen. (Note that the Home Screen will be visible only if Auto Show the Home Screen is selected in General Preferences.)
Tip
If you choose a file in camera raw format, it will open in Adobe Camera Raw. After you adjust it there, you can open it in Photoshop. (See Chapter 20, online.)
Creating a New, Blank Document
When you create a new document there are a number of decisions to be made, some of which may not make sense if you’re new to Photoshop. If in doubt, use the default settings for now.
To create a new document:
Choose File > New (Ctrl/Command+N), or click Create New File on the Home Screen to open the New Document dialog (FIGURE 1.2).
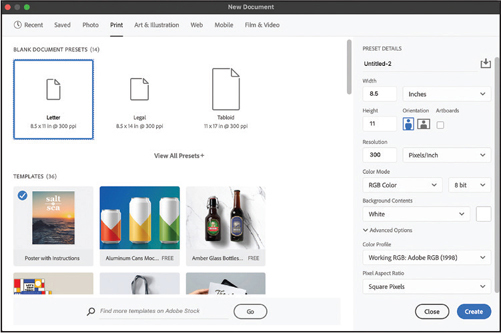
FIGURE 1.2 The New Document dialog
At the top of the dialog, click a document type tab (Photo, Print, Art & Illustration, Web, Mobile, or Film & Video), and then select one of the available document presets that appear (FIGURE 1.3).

FIGURE 1.3 Choose a tab to display a selection of blank document presets that most closely match the type of document you want to create.
Type a name in the Name field, or you can skip this and name the file when you save it.
If the default document size isn’t what you need, choose a unit of measurement, and then enter values for Width and Height (FIGURE 1.4).
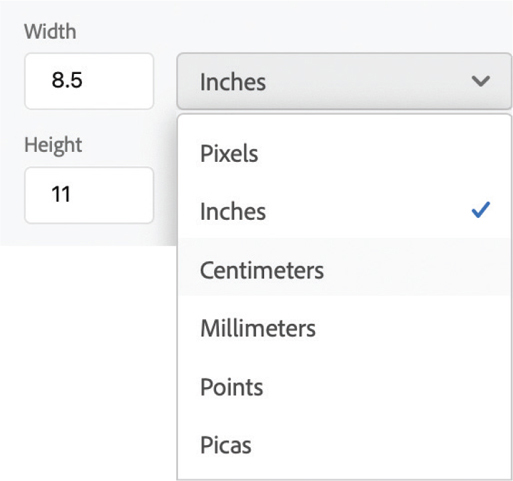
FIGURE 1.4 Choose a size and default unit of measurement.
Choose a document orientation: portrait (tall) or landscape (wide).
Enter the Resolution required for your target output condition (print or screen, for example).
Choose a color mode and bit depth; for most projects use RGB and 8-bit respectively (FIGURE 1.5).
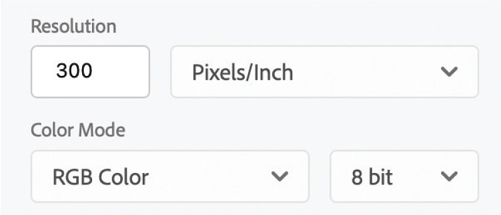
FIGURE 1.5 If the default values don’t fit your needs, choose a new resolution, color mode, and bit depth for your document.
(Optional) Click the Background Contents color swatch to choose a custom background color. White is the default, and there is rarely a need to change this; you can easily change the color of the background once the document is in progress.
(Optional) Under Advanced Options, choose a profile from the Color Profile menu (FIGURE 1.6). The available profiles will vary depending on the document’s Color Mode setting. For print output, we recommend choosing Adobe RGB (1998); for web output, we recommend sRGB. (For print and web output, leave Pixel Aspect Ratio set to Square Pixels.)
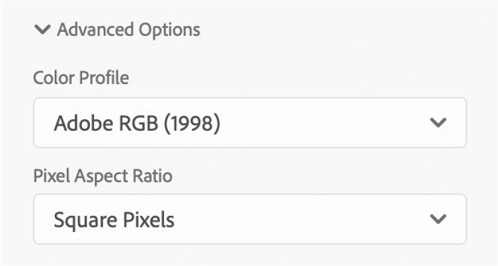
FIGURE 1.6 The Advanced Options in the New Document dialog.
Click OK. A new, blank document window appears.
Tip
If the Clipboard contains image data (artwork that you’ve copied from Photoshop or Illustrator or from a web browser), the New Document dialog uses the pixel dimensions of the Clipboard image contents as the default Width and Height.
Document Presets
If you tend to choose the same document size, color mode, and other settings, you can save time by creating a document preset.
To create a document preset:
Choose File > New (Ctrl/Command+N) to open the New Document dialog.
Choose the settings you want.
Click the Save Document Preset button.
Type a name for your preset. The new preset will now be listed under the Saved tab in the New Document dialog (FIGURE 1.7).
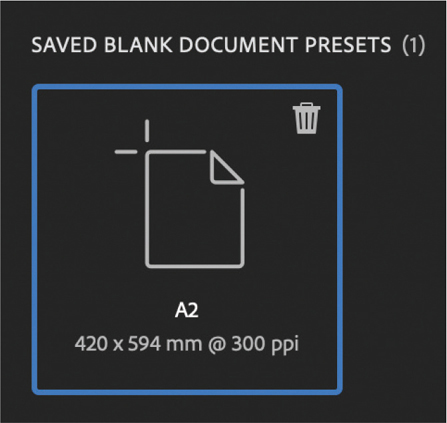
FIGURE 1.7 A saved preset
Tip
To delete a user-created preset, choose it then click the Trashcan icon in the top right of its thumbnail.
 Video 1.1
Opening and Saving Documents
Downloading Images from a Camera
One way of “getting images into Photoshop” is to download images to your computer by connecting your camera or a media card reader. Once the files are on your computer, you can use your favorite method to open them as Photoshop documents.
To load images from your camera:
Do one of the following:
Use the Get Photos from Camera command in Adobe Bridge to download photos (FIGURE 1.9), as well as organize, rename, and apply metadata to them. (See Chapter 21.)
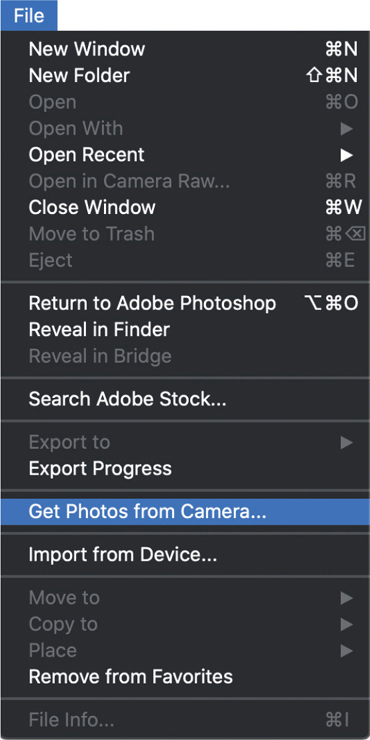
FIGURE 1.9 The Bridge File menu, from which you can download photos
If your camera or the card reader appears as a drive on your computer, copy image files to your hard drive.
Use the software that came with your camera, Windows Image Acquisition (Windows), or Image Capture (macOS) to transfer the images to your computer.
Saving Documents
Although Photoshop lets you save files in more than a dozen formats, you’ll probably use just a few of them, such as PSD (the native Photoshop file format), Photoshop PDF, JPEG, and TIFF. If you’re not sure what format to use, stick with the PSD format. In fact, to work nondestructively (more on this later) you should always save your document in PSD format, and then save copies in whatever format you require. This way you’ll always have an editable “master file” PSD to return to when necessary.
To save a document:
Choose File > Save (Ctrl/Command+S). If the document is blank, choose File > Save As (Ctrl+Shift+S/Command+ Shift+S). The Save As dialog opens.
Type a name in the File Name field (Windows) or the Save As field (macOS).
Click the On Your Computer button.
Choose a location for the file. In Windows, use the Navigation pane on the left side of the dialog. In macOS, click a drive or folder in the Sidebar panel on the left side of the window, then click a folder in one of the columns. To locate a recently used folder, use the menu below the Save As field.
From the Save As Type/Format menu, choose a file format (FIGURE 1.10). The PSD, PSB (Large Document Format), Photoshop PDF, and TIFF formats support layers.
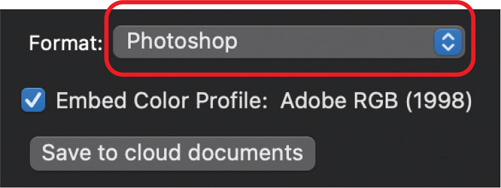
FIGURE 1.10 Choosing a file format
If you’re not yet familiar with the features listed in the Save area and the Color area, leave the settings as they are.
Click Save.
After you save a file for the first time, each subsequent use of the Save command overwrites the previous version by default. You can, however, easily save a separate copy if you need multiple variations of an image. The Save a Copy command creates a separate copy while leaving the existing document open.
To save a separate copy of an existing document:
Choose File > Save A Copy (Ctrl+Alt+S/Command+Option+S) to save a copy of a file under a new name or with different options (e.g., with or without alpha channels or layers).
Check any available options in the Save area that are appropriate.
(Optional) The word copy is appended to the filename by default. If you prefer, give the file a distinct name.
Click Save.
Tip
An asterisk on a document tab or title bar indicates unsaved changes.
Tip
To have the location in the Save As dialog default to the location of the current file, go to Edit/Photoshop > Preferences > File Handling, and check Save As To Original Folder.
Tip
Another way to copy an entire document is to choose Image > Duplicate. This creates a new window for the copy of the file, which you’ll then need to save as a separate file.
To save a flattened copy of a file:
Choose File > Save A Copy.
Deselect the Layers option; this becomes automatically deselected if you choose a format, like JPEG, that does not support layers.
Choose a format and any available options that are appropriate.
Click Save.
Closing Documents and Quitting Photoshop
When you’re finished working on a document, be sure to close it to make memory available for other documents—and so that you don’t inadvertently edit the document. When it’s time to close up shop for the day, you can quit Photoshop.
To close a document:
Click the X in a document tab, choose File > Close (Ctrl/Command+W), or click the Close button in the corner (upper-right, Windows; upper-left, macOS) of a floating document window.
If the file has unsaved changes, an alert appears. Click No (N)/Don’t Save to close the file without saving, or click Yes (Y)/Save (S) to save the file (or click Cancel or press Esc to dismiss the Close command).
Tip
To close all open documents, choose File > Close All (Ctrl+Alt+W/Command+Option+W). If an alert dialog appears, you can check Apply To All, if desired, to have one response apply to all the open documents, then click No/Don’t Save or Yes/Save.
To exit/quit Photoshop and close all open files:
In Windows, choose File > Exit (Ctrl+Q), or click the Close button for the application frame.
In macOS, choose Photoshop > Quit Photoshop (Command+Q).
Tip
If any open files contain unsaved changes, an alert dialog appears for each one when you exit/quit Photoshop.