19. Connecting Your Network to the Internet
It’s a Great Time to Connect Your LAN to the Internet
Because you now have your computers tied together with a nifty, inexpensive local area network (LAN), it seems silly that each user should have to use a modem to gain Internet access individually. No worries: You have a host of options for shared Internet connections. You can use a high-speed connection to serve the entire LAN, or you can share a modem connection made from one designated Windows 7 computer. Either way, shared access makes online life simpler and safer for everyone on the network.
A shared Internet connection can actually provide better protection against hackers than can an individual connection, because a shared connection has to funnel through a router device or a software service that blocks outside attempts to connect to your computers—except on your terms. This chapter shows you several ways to set up a shared Internet connection.
Note
![]()
You should also read Chapter 32, “Protecting Your Network from Hackers and Snoops,” for more details on protecting your network from hacking.
Ways to Make the Connection
When you’re using a single computer, you use its analog modem or a broadband cable, DSL, or satellite modem to connect to your ISP as needed. When you share your Internet connection on a network, either you designate one computer running Windows 7 (or Vista, or XP) to make the connection or you use an inexpensive hardware device called a connection-sharing router or residential gateway to serve as a bridge between your network and a dial-up, cable, or DSL modem. Whichever method you choose, the designated computer or router automatically sets up the connection any time anybody on your network needs it.
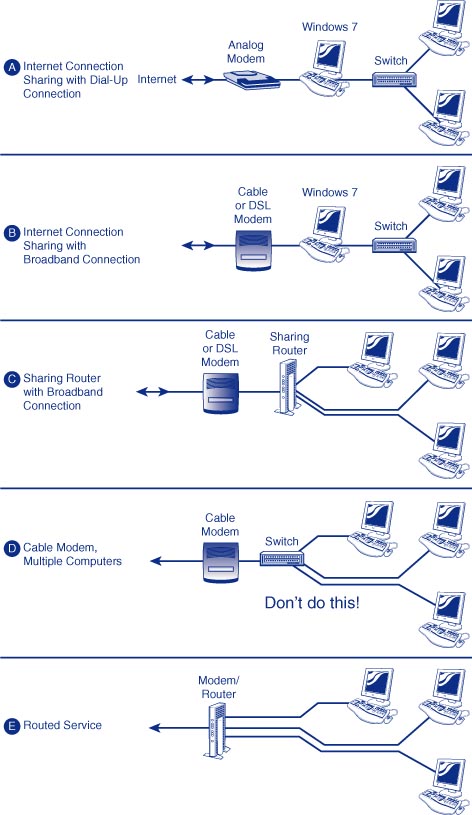
As an overview, Figure 19.1 shows five ways you can hook up your LAN to an Internet service provider (ISP). Throughout this chapter, we’ll refer to these as schemes A through E. They are
A. Windows Internet Connection Sharing (ICS) with an analog dial-up connection—In this scenario, the built-in software in Windows automatically dials your ISP from one computer whenever anyone on the LAN wants to connect to the Internet. This is called demand-dialing. (By the way, the modem doesn’t have to be an external one; it can be an internal modem. I just wanted it to show up in the figure.)
B. ICS with a broadband DSL or cable modem—The computer that hosts the shared connection uses a second LAN adapter to connect to a broadband modem. This type of connection might be always-on, or, if your ISP uses a connection-based setup called PPPoE, Windows will establish the link whenever anyone wants to use the Internet.
![]() To learn more about PPPoE, see “Configuring a High-Speed Connection,” p. 347.
To learn more about PPPoE, see “Configuring a High-Speed Connection,” p. 347.
Note
![]()
One disadvantage of schemes A and B is that the one “sharing” computer must be turned on before anyone else can use the Internet connection.
C. Connection-sharing router with a broadband connection—You can use a small hardware device that can cost as little as $20 to do the same job as ICS. The advantage of this is that you don’t have to leave a particular Windows computer turned on for other users to reach the Internet. It is also more secure because a separate device is shielding Windows from the Internet.
Note
![]()
Although I really prefer using the shared connection strategies—the first three schemes in Figure 19.1—they have a drawback: It’s more difficult to enable incoming access to your computer. In particular, it makes it hard to reach your computer with Remote Desktop, and it can be difficult for someone (tech support personnel, for example) to work with Windows XP users using Remote Assistance. I show you how to make these strategies work at the end of the chapter, under “Making Services Available.”
D. Cable service with multiple directly connected computers—This is the setup that some cable ISPs recommend for a home with more than one computer, but it is a bad idea. You can’t use this method and also use file and printer sharing. Use schemes B, C, or E instead. See “Special Notes for Cable Service,” later in this chapter, for more information.
E. Routed service with a router—Some ISPs provide routed Internet service through DSL, cable, Frame Relay, or other technologies. There’s usually an extra charge for this type of service because it provides a separate public IP address to each computer on the LAN. This has some advantages that I discuss later, but it also incurs a risk of exposing your network to hackers, unless you’re vigilant in setting it up.
Figure 19.1 Five ways to connect your LAN to the Internet.
Now let’s look at the issues involved in having a single ISP connection serve multiple computers.
Managing IP Addresses
Connecting a LAN to the Internet requires you to delve into some issues about how computers are identified on your LAN and on the Internet. Each computer on your LAN uses a unique network identification number called an IP address that is used to route data to the correct computer. As long as the data stays on your LAN, it doesn’t matter what numbers are used; your LAN is essentially a private affair.
When you connect to the Internet, though, those random numbers can’t be used to direct data to you; your ISP has to assign a public IP address to you so that other computers on the Internet can properly route data to your ISP and then to you.
Now, when you establish a solo dial-up connection from your computer to the Internet, this isn’t a big problem. When you dial up, your ISP assigns your connection a temporary public IP address. Any computer on the entire Internet can send data to you using this address. When you want to connect a LAN, though, it’s not quite as easy. Two approaches are used:
• You can get a valid public IP address for each of your computers.
• You can use one public IP address and share it among all the users of your LAN.
The first approach is called routed Internet service because your ISP assigns a set of consecutive IP addresses for your LAN—one for each of your computers—and routes all data for these addresses to your site. This is shown in scheme E in Figure 19.1. The second approach uses a technique called Network Address Translation, or NAT, in which all the computers on your LAN share one IP address and connection. This is how schemes A through C work.
NAT and Internet Connection Sharing
Microsoft’s Internet Connection Sharing system and the popular devices called residential gateways, connection-sharing routers, or wireless routers use NAT to establish all Internet connections using one public IP address. The computer or device running the NAT service mediates all connections between computers on your LAN and the Internet (see Figure 19.2).
Figure 19.2 A NAT device or program carries out all Internet communications using one IP address. NAT keeps track of outgoing data from your LAN to determine where to send responses from the outside.
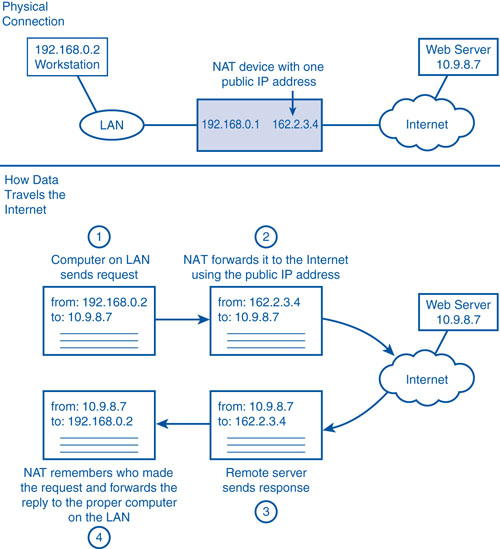
NAT works a lot like mail delivery to a large commercial office building, where there’s one address for many people. Mail is delivered to the mail room, which sorts it and delivers it internally to the correct recipient. With NAT, you are assigned one public IP address, and all communication between your LAN and the Internet uses this address. The NAT service takes care of changing or translating the IP addresses in data packets from the private, internal IP addresses used on your LAN to the one public address used on the Internet.
Using NAT has several significant consequences:
• You can hook up as many computers on your LAN as you want. Your ISP won’t care, or even know, that more than one computer is using the connection. You will save money because you need to pay for only a single-user connection.
• You can assign IP addresses inside your LAN however you want. In fact, all the NAT setups I’ve seen provide DHCP, an automatic IP addressing system, so virtually no manual configuration is needed on the computers you add to your LAN. Just plug a computer in, and it’s on the Internet.
• If you want to host a website, VPN, or other service on your LAN and make it available from the Internet, you have some additional setup work to do. When you contact a remote website, NAT knows to send the returned data back to you, but when an unsolicited request comes from outside, NAT has to be told where to send the incoming connection. I discuss this later in the chapter.
• NAT serves as an additional firewall to protect your LAN from probing by Internet hackers. Incoming requests, such as those to read your shared folders, are simply ignored if you haven’t specifically set up your connection-sharing service to forward requests to a particular computer.
• Some network services can’t be made to work with NAT. For example, you might not be able to use some audio and video chat services. These programs expect that the IP address of the computer on which they’re running is a public address. Windows ICS and some hardware-sharing routers can sometimes work around this problem using the Universal Plug and Play (UPnP) protocol, which I’ll discuss later in the chapter.
• A hardware connection-sharing router might provide you with better security than Windows ICS because, as special-purpose devices, their software is simpler and less likely to be buggy than Windows. Also, when used with Windows Firewall, you have two separate lines of defense against hackers instead of just one.
Starting with Windows 98, Microsoft has provided a NAT service through its ICS feature. It’s a built-in part of Windows. Given the choice between using Windows’ ICS service and buying an external hardware router, I recommend that you use a router, for two reasons:
• First, to use ICS, you have to leave one of your Windows computers turned on so that other computers can reach the Internet. Connection-sharing routers have to be left on, too, but they consume very little power compared to what a PC sucks up.
• More important, connection-sharing routers provide better security than using Windows alone. With the hardware router, a hacker would have to break through the router and then break into Windows.
I won’t go so far as to say that you shouldn’t trust ICS, and later I show you how to hook up your LAN using all of the methods I described earlier. I just put in as my final word on this issue that I use DSL/cable-sharing routers at my own home and office.
If you decide to use a router, look at the products made by Linksys, D-Link, SMC, and Netgear. You can find them at computer stores, office supply stores, and online (check www.buy.com), and on sale you can pick one up for $20 or less. Wireless versions that include an 802.11g or 802.11n wireless networking base station as well as a switch or hub for wired Ethernet connections don’t cost that much more—I’m looking at the ads in my Sunday paper right now and see prices ranging from $40 to $60.
More advanced (and expensive) versions include additional features such as a built-in print server or virtual private networking (VPN) service. For example, the D-Link DI-713P Wireless Broadband Router provides NAT (connection sharing), a three-port Ethernet switch, a print server, and a wireless access point, all in one box. But although combination devices might be less expensive when you look at the total cost of getting separate devices, separate units give you more flexibility in where you locate the devices, and if one device fails, you don’t lose all the functions at once.
The next section discusses issues that are important to business users. If you’re setting up a network for your home, you can skip ahead.
A Warning for Business Users
My enthusiasm notwithstanding, cable and DSL Internet service can give you a painful, bumpy ride. Some DSL ISPs (two that I’ve used, for example) have gone bankrupt and stranded their customers. Service outages are a fact of life, and I’ve seen problems stretch out over weeks. Customer support ranges from okay to incredibly bad, installation appointments are routinely missed, and even billing can be a terrible mess. If you ask a provider for a service-level agreement (a guaranteed percentage of uptime and throughput), the likely reply will be hysterical laughter.
So, if your business truly depends on your Internet connection for survival, DSL and cable might not be for you.
It costs a lot more in the short term to set up business-class Internet and networking service, but if you lose business when your connection fails, you probably can’t afford the risks that come with consumer-class DSL and cable Internet access.
There are some DSL and cable providers that have products tailored for businesses, and for really serious reliability, you might investigate Frame Relay. Frame Relay is an old technology, with pricing schemes from the pre-Internet era, and it requires equipment that seems expensive by today’s standards. However, Frame Relay customers can expect service interruptions of no more than three minutes per month versus perhaps three hours per month with DSL service. If this sounds worthwhile to you, contact a telecommunications consultant or a networking pro for more information.
Special Notes for Wireless Networking
If you’re setting up a wireless network, you must enable WEP or WPA encryption to protect your network from unexpected use by random strangers. People connecting to your wireless network appear to Windows to be part of your own LAN and are trusted accordingly.
![]() To learn more about setting up a secure wireless network, see “Installing a Wireless Network,” p. 463.
To learn more about setting up a secure wireless network, see “Installing a Wireless Network,” p. 463.
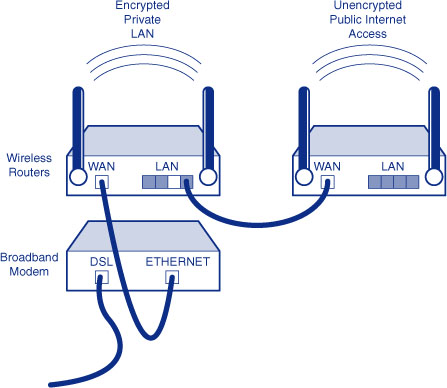
If you really want to provide free access to your broadband connection as a public service, provide it using a second, unsecured wireless router plugged into your network, as shown in Figure 19.3. Use a different channel number and SSID from the ones set up for your own wireless LAN. Set up filtering in this router to prevent Windows file-sharing queries from penetrating into your own network. See “Scheme E—Routed Service Using a Router,” later in this chapter, for the list of ports that you must block.
Figure 19.3 If you want to provide unsecured, free wireless Internet access to strangers, use a second wireless router to protect your own LAN.
(And remember that someone might use your connection to send spam or attack other networks. If the FBI knocks on your door some day, don’t say I didn’t warn you.)
Special Notes for Cable Service
Some cable ISPs can provide you with multiple IP addresses so you can connect multiple computers directly to your cable modem. This is scheme D in Figure 19.1. It’s a very simple setup, but I strongly urge you not to use this type of service. You can’t take advantage of file and printer sharing on such a network.
Caution
![]()
The “Scheme D” setup requires you to connect your cable modem directly to your LAN, without any firewall protection between the Internet and your computers. If you do this, you have to disable file and printer sharing on each computer. In Windows 7 parlance, you must designate your network a Public network. If you don’t, you would expose all your computers to a severe security risk.
If you want to take full advantage of having a LAN in your home or office, use scheme C instead: Simply add an inexpensive connection-sharing router—at a cost of less than $40, as I mentioned previously—and you’ll get all the benefits of a LAN without the risks of a direct connection.
Some cable ISPs don’t want you to use a router, but I think it provides superior protection against hacking, and that needs to be your first priority. If your ISP charges extra for multiple connections, you could pay your ISP for the extra connections but use just the one, safe shared connection to provide service to your other computers.
Configuring Your LAN
In the following sections, I describe how to set up each of the connection schemes diagrammed in Figure 19.1. If you’re still in the planning stages for your network, you might want to read all the sections to see what’s involved; this might help you decide what configuration you want to use. If your LAN is already set up and your Internet service is ready to go now, just skip ahead to the appropriate section.
Scheme A—Windows Internet Connection Sharing with a Dial-Up Connection
This section shows how to set up the Internet connection method illustrated in Figure 19.1, A.
The ICS feature provided with Windows 7 can share modem or broadband connections that require a sign-on procedure. The connection is made automatically whenever any user on the network tries to access the Internet; this is called demand-dialing. The following section describes how to set it up.
Setting Up the Shared Connection
To set up a shared connection, first install and test your modem and ISP information on the computer that will be used to share the connection. To do this, set up a standard dial-up connection using the procedure described in Chapter 13. Be sure that you can access the Internet properly by viewing at least one web page. When you know this is working, follow these steps:
1. Click Start, Control Panel, View Network Status and Tasks (under Network and Internet). Select Change Adapter Settings. Right-click the icon for your ISP connection and select Properties.
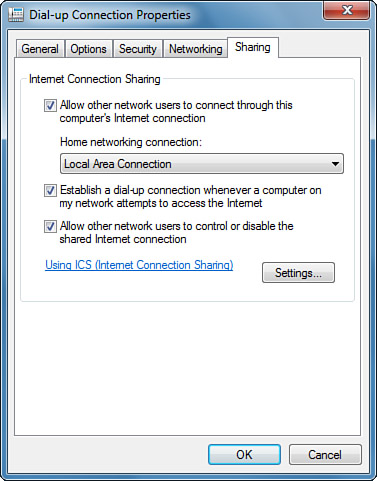
2. Select the Sharing tab. Check all the boxes, as shown in Figure 19.4.
Figure 19.4 On the computer that will share its connection, enable Internet Connection Sharing. Check all the boxes.
3. Select the Options tab. Uncheck Prompt for Name and Password and also Prompt for Phone Number. This allows the connection to start up without user intervention.
Note
![]()
If your computer has multiple network connections, the Home Networking Connection selection will be present. Open the drop-down list and select the network connection that leads to your network’s other computers.
4. If you want a dedicated, always-on 24×7 connection, check Redial If Line Is Dropped, set the number of Redial Attempts to 99, set Time Between Redial Attempts to 10 Seconds, and set Idle Time Before Hanging Up to Never. Be aware that if you pay per-minute charges, this can result in an astounding phone bill!
Caution
![]()
Step 5 is a crucial part of protecting your computer and LAN from hacking over the Internet. Omitting this step could make your computer vulnerable to hacking.
Usually, though, you’ll want a demand-dialing connection. Use these settings: Uncheck Redial If Line Is Dropped. Set the number of Redial Attempts to 10, set Time Between Redial Attempts to 10 Seconds, and set Idle Time Before Hanging Up to 10 Minutes. (I recommend using 10 minutes to start with; you can increase it later if you find that the line disconnects too frequently while you’re working.)
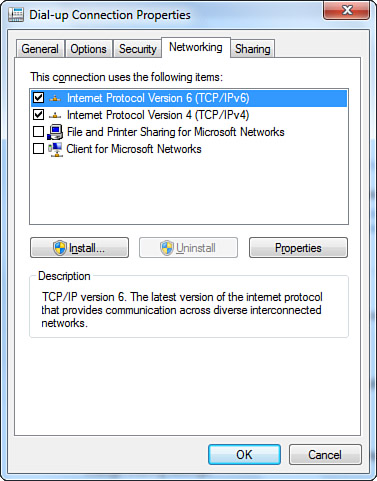
5. Select the Networking tab. In the list of components used by the connection, be sure that only Internet Protocol Version 6 (TCP/IPv6), Internet Protocol Version 4 (TCP/IPv4), and QoS Packet Scheduler (if present) are checked, as shown in Figure 19.5. This will prevent file sharing from being exposed to the Internet. The firewall will do that, too, but it doesn’t hurt to be extra safe.
Figure 19.5 Be sure that on your Internet connection, the Client and Sharing components are not checked.
7. Restart your computer and try to view any web page (such as www.google.com). Your computer should automatically dial your ISP. If the web page appears, proceed to “Configuring the Rest of the Network.” If it doesn’t, you’ll have to resolve the problem before continuing.
Configuring the Rest of the Network
When the shared connection is set up, configuring the rest of your LAN should be easy. On each of your other computers (all except the connection-sharing computer), follow these steps:
1. Open Network and Sharing Center and select Change Adapter Settings. Right-click the computer’s Local Area Network icon and select Properties. (On versions of Windows other than Windows 7, you might have to use different selections to get to your network adapter’s settings; check online help or your copy of the corresponding Special Edition Using book.)
2. Select Internet Protocol Version 4 (TCP/IPv4) and then select Properties.
Note
![]()
When you’re using a shared dial-up connection, it takes a while for the dialer to go through its paces if the connection wasn’t already up. Before it can finish, you might get an error from IE saying that it can’t open the page. If this happens, just wait a few seconds and Refresh (press F5) to try again.
3. Check Obtain an IP Address Automatically and Obtain DNS Server Address Automatically. Then, click OK.
4. Repeat steps 2 and 3 for Internet Protocol Version 6 (TCP/IPv6).
5. When finished, you should be able to open Internet Explorer and view a website. When you try, the connection-sharing computer should dial out for you.
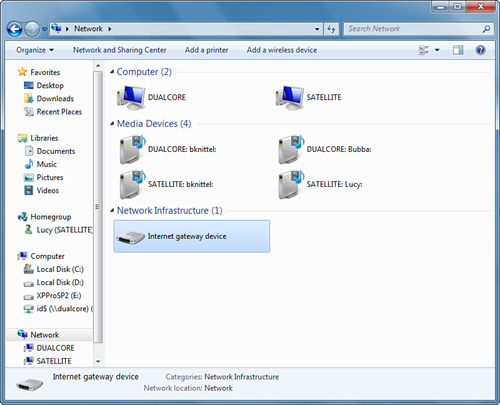
If you are using Windows Internet Connection Sharing or a connection-sharing router that supports Universal Plug and Play (UPnP), the Network window of all the computers on your network should have an icon that represents the shared Internet connection, as shown in Figure 19.6. To display this window, select Network in any Windows Explorer window (Computer, Documents, and so on). Or, open the Network and Sharing Center and double-click the Network icon at the top.
Figure 19.6 The other computers on your network can control a shared connection from their Network window.
Tip
![]()
If any of your other networked computers wants to dial an ISP itself, perhaps because it had previously been set up to make its own connection, just delete its dial-up connection icons. In Windows 7, you can do that from the Network and Sharing Center. Select Change Adapter Settings, then delete the now unneeded icon(s).
If you are using Windows Internet Connection Sharing, the shared connection will be labeled “Internet Gateway Device.” To control a dial-up or PPPoE DSL Internet connection shared by one computer from your other networked computers, right-click this icon and select Enable or Disable. (This works on all of the computers except the one that is sharing its connection. On the computer that is sharing its connection, you have to use the Network connection list that appears when you click the Network icon in the taskbar.)
![]() If you want to make services available to the Internet, continue with “Making Services Available,” later in this chapter.
If you want to make services available to the Internet, continue with “Making Services Available,” later in this chapter.
Scheme B—Windows Internet Connection Sharing with a Broadband Connection
This section shows how to set up the Internet connection method illustrated in Figure 19.1, B.
The procedure for configuring a shared high-speed cable or DSL Internet connection with Windows ICS is very similar to that for setting up a shared dial-up connection. To prepare, be sure to install and test your DSL or cable connection on the computer you’ll use to host the shared connection, as described in Chapter 13. It’s essential that you have this working before you proceed to set up your LAN and the shared connection.
Tip
![]()
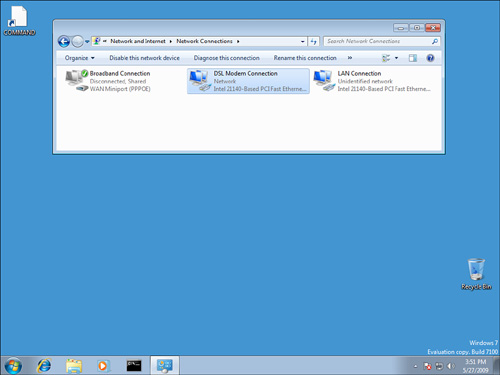
If your broadband service uses a LAN adapter instead of USB to connect your computer to the DSL or cable modem, you’ll be installing two LAN adapters in this computer: one for the LAN and one for the modem. I suggest that you install them one at a time. Install the one that you’ll use for your broadband connection first. From the Network and Sharing Center, select Change Adapter Settings, right-click the network adapter’s icon, and rename it DSL Modem Connection or Cable Internet Connection, or some other name that indicates what it’s used for, as shown in Figure 19.7. Configure and test the Internet connection. Then install the network adapter that you’ll use to connect to your LAN. Rename this connection LAN Connection or leave it as Local Area Connection. This will help you later in the setup process, when you need to know which connection goes to your ISP.
Figure 19.7 Install and rename your network adapters one at a time, indicating what purpose they’ll serve. “DSL Modem Connection” or “LAN Connection” is much more informative than “Local Area Connection #2.”
Verify that the broadband Internet connection is labeled as a Public network. To do this, follow these steps:
1. Click Start, Control Panel, View Network Status and Tasks (under Network and Internet).
2. If your broadband connection is not active, click Connect to a Network and make the connection.
3. In the Network and Sharing Center window, be sure that your Internet connection’s location is labeled “Public Network.”
When your broadband connection is configured correctly and is working, follow these steps:
1. Open the Network Connections window by clicking Start, Control Panel, View Network Status and Tasks. Select Change Adapter Settings.
2. Locate the icon that corresponds to your broadband connection.
If you have cable Internet service, this will probably be a network adapter. Earlier, I suggested that you rename it something like “Internet Connection,” or it may still be labeled Local Area Connection. If you use DSL service that requires a username and password to sign on, locate the connection icon that you set up for your ISP; it might be named “Broadband Connection.” Right-click this icon and select Properties.
3. Choose the Sharing tab. Check all the boxes, as shown earlier in Figure 19.4.
4. Select the Networking tab. In the list of components used by the connection, be sure that only Internet Protocol Version 6 (TCP/IPv6), Internet Protocol Version 4 (TCP/IPv4), and QoS Packet Scheduler, if present, are checked. This will prevent file sharing from being exposed to the Internet. (Windows Firewall will do that, too, but it doesn’t hurt to be extra safe.)
5. Click OK.
6. Click Windows Firewall in the Network and Sharing window. Make sure Windows Firewall is On.
7. Restart Windows and try to view any web page (such as www.google.com). If it doesn’t appear, you’ll have to resolve the problem before proceeding. You should check the appropriate connection icon to be sure it’s still configured correctly for your ISP.
Now, follow the instructions under “Configuring the Rest of the Network,” on p. 525, to set up your other computers.
Scheme C—Connection Sharing Router with a Broadband Connection
This section shows how to set up the Internet connection method illustrated in Figure 19.1, C.
Your router’s manufacturer will provide instructions for installing and configuring it. If you’re using cable or DSL Internet service, you’ll connect your broadband modem to the router using a short Ethernet patch cable. Then you’ll connect the router to your LAN using one of the two methods shown in Figure 19.8.
Figure 19.8 Connecting a connection-sharing router to your LAN.
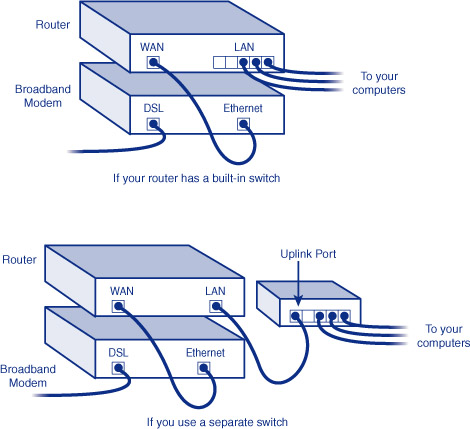
If you connect your router to a separate switch (or hub), be sure that the link indicators come on at both the switch and the router. If they don’t, you might need to move the switch end of the cable from a regular port to an uplink port or vice versa.
You then configure the router, telling it how to contact your ISP and what range of IP addresses to serve up to your LAN. Every device will use a different procedure, so you will have to follow the manufacturer’s instructions.
If your ISP uses PPPoE to establish a connection, you need to enable PPPoE and store your logon and password in the router. Most DSL service works this way. If your DSL provider does use PPPoE, you should enable the router’s auto-sign-on feature, and you can optionally set up a “keepalive” value that will tell the modem to periodically send network traffic even if you don’t, to keep your connection active all the time. (This might violate your service agreement with the DSL provider—better check before you do this.)
If you use cable Internet service and your ISP didn’t provide you with a special hostname that you had to give to your computer, your ISP probably identifies you by your network adapter’s MAC (hardware) address. You might find that your Internet connection won’t work when you set up the router. One of your router’s setup pages should show you its MAC address. You can either call your ISP’s customer service line and tell them that this is your new adapter’s MAC address, or configure the router to “clone” your computer’s MAC address—that is, copy the address from the computer you originally used to set up your cable connection. Your router’s setup manual should tell you how to do this.
Caution
![]()
Be sure to change the factory-supplied password of your router after you install it. (And write the password somewhere in the router’s manual, or put it on a sticky label on the bottom of the router.) Also, be sure to disable outside (Internet) access to the router’s management screens.
As you are configuring your router, you might want to enable Universal Plug and Play, discussed next in this chapter.
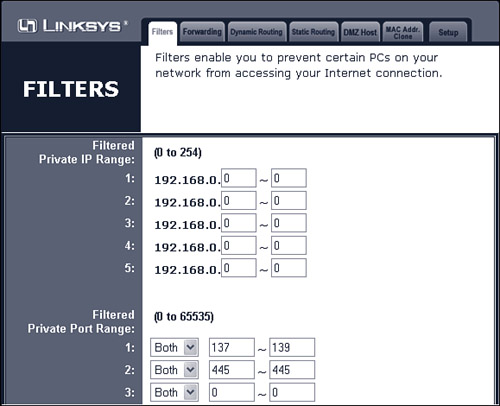
You might also opt for even better hacker protection by having your router filter (block) Microsoft file and printer sharing data. This is usually done on an advanced setup screen labeled Filtering. See “Scheme E—Routed Service Using a Router,” later in this chapter, for the list of ports that you must block.
When the router has been set up, go to each of your computers and follow the instructions under “Configuring the Rest of the Network,” on p. 525.
Using Universal Plug and Play
If you use a hardware connection-sharing router, you might want to consider enabling a feature called Universal Plug and Play (UPnP). UPnP provides a way for software running on your computer to communicate with the router. Specifically, UPnP provides a means for the following:
• The router to tell software on your computer that it is separated from the Internet by NAT. This may let some software—the video and audio parts of most instant messaging programs, in particular—have a better chance of working.
• Software running on the network to tell the router to forward expected incoming connections to the correct computer. Again, Windows Live Messenger is a good example. When the computer on the other end of the connection starts sending data, the router would not know to send it to your computer. UPnP lets UPnP-aware application programs automatically set up forwarding in the router.
• Other types of as-yet-undeveloped hardware devices to announce their presence on the network so that Windows can automatically take advantage of the services they provide.
To use UPnP, you must enable the feature in your router. It’s usually disabled by default. If your router doesn’t currently support UPnP, you might have to download and install a firmware upgrade from the manufacturer. Most routers now do support UPnP.
Scheme D—Cable Internet with Multiple Computers
This section shows how to set up the Internet connection method illustrated in Figure 19.1, D. As I mentioned earlier in the chapter, you cannot safely use file and printer sharing with this setup. Use this setup only if you don’t want file and printer sharing and just want to have several computers with Internet access.
In this configuration, follow your ISP’s instructions for setting up each computer separately. The only unusual thing here is that the computers plug in to a switch or hub, and the switch or hub plugs in to the cable modem—otherwise, each computer is set up exactly as if it was a separate, standalone computer with cable Internet service.
Caution
![]()
On each Windows 7 and Vista computer, you must set the network location for the connection that goes to your switch and cable modem to Public Network. On Windows XP, be sure that Windows Firewall is enabled, and that file and printer sharing is disabled.
To verify that the network location is set to Public Network on Windows 7, follow these steps:
1. Click Start, Control Panel, View Network Status and Tasks (under Network and Internet).
2. Check that the label under your network connection is labeled Public Network. If it’s not, click the network location label, and select Public Network.
If you later decide that you want to use file and printer sharing, do not simply set the network location to Home or Work and enable file and printer sharing. Instead, set up a shared connection using scheme B or C.
Scheme E—Routed Service Using a Router
This section shows how to set up the Internet connection method illustrated in Figure 19.1, E.
Some ISPs will sell you service that provides multiple, fixed IP addresses. This is the case for Frame Relay service and, in some cases, higher-priced business-class DSL service. You should really have a good reason for going this way, beyond just wanting to connect multiple computers—it’s not as secure as a single shared connection. Good reasons might be that you want the reliability of Frame Relay service or you need fixed IP addresses to host web, email, or other Internet-based services on several different computers.
For this type of service, if you are using a cable, DSL, satellite, or Frame Relay modem with a built-in router, your ISP will help you configure your network. In this setup, you will be provided with a fixed list of IP addresses, which you’ll have to parcel out to your computers. Your ISP should help you install all of this, but I can give you some pointers.
First of all, it is absolutely essential that your router be set up to protect your network. You must ensure that at least these three items are taken care of:
1. The router must be set up with filters to prevent Microsoft file-sharing service (NetBIOS and NetBT) packets from entering or leaving your LAN. In technical terms, the router must be set up to block TCP and UDP on port 137, UDP on port 138, and TCP on ports 139 and 445. It should “drop” rather than “reject” packets, if possible. This helps prevent hackers from discovering that these services are present but blocked. Better to let them think they’re not there at all.
Tip
![]()
I strongly urge you to ask your ISP to set up filtering in your router for you, to block all Windows networking services.
2. Be absolutely sure to change your router’s administrative password from the factory default value to something hard to guess, with uppercase letters, lowercase letters, numbers, and punctuation. Don’t let your ISP talk you out of this, but you should let them know what the new password is so they can get into the router from their end, if needed.
3. Disable SNMP access, or change the SNMP read and read-write “community names” to something other than the default. Again, use something with letters, numbers, and punctuation.
Caution
![]()
If your router is not properly configured to filter out NetBIOS traffic, your network will be exposed to hackers. This is absolutely unacceptable. If you’re in doubt, have your ISP help you configure the router. Also, after setting things up, visit www.grc.com and use the ShieldsUP pages there to be sure your computers are properly protected. For more information about network security, see Chapter 32.
Second, either your ISP will set up your router to automatically assign network addresses using DHCP, or you will have to manually set up a fixed IP address for each computer, using the IP address, network mask, gateway address, and DNS server addresses supplied by your ISP.
If you will be making the settings manually, make a list of the names of each of your computers and the IP addresses you want to assign. Follow these steps on each computer that is to get manual settings:
1. View the Network and Sharing Center.
Note
![]()
If your ISP supplies you with Internet Protocol Version 6 (TCP/IPv6) settings, repeat the previous steps, except select Internet Protocol Version 6 (TCP/IPv6) in step 3.
2. Under View Your Active Networks, right-click Local Area Connection and select Properties.
3. Select the Networking tab, select Internet Protocol Version 4 (TCP/IPv4), and then click Properties.
4. Enter an IP address and the other information provided by your ISP. The required settings are the IP address, subnet mask, default gateway, and DNS server(s).
Caution
![]()
Make absolutely sure that Windows Firewall is turned on, to protect your network from hackers. For more information on network security, see Chapter 32.
Making Services Available
You might want to make some internal network services available to the outside world through your Internet connection. You would want to do this in these situations:
• You want to host a web server using Internet Information Services (IIS).
• You want to enable incoming VPN access to your LAN so you can securely connect from home or afield.
• You want to enable incoming Remote Desktop access to your computer.
If you have set up routed Internet service with a router (scheme E in Figure 19.1), you don’t have to worry about this because your network connection is wide open and doesn’t use NAT. As long as the outside users know the IP address of the computer hosting your service—or its DNS name, if you have set up DNS service—you’re on the air already.
Note
![]()
If you’re interested in being able to reach your computer over the Internet using Remote Desktop, see Chapter 37, “Remote Desktop,” which is entirely devoted to the subject.
Otherwise, you have either Windows Firewall, NAT, or both in the way of incoming access. To make specific services accessible, you need to follow one of the sets of specific instructions in the next few sections, depending on the type of Internet connection setup you’ve used. Skip ahead to the appropriate section.
Enabling Access with Internet Connection Sharing
When you are using Microsoft’s Internet Connection Sharing feature, you need to execute two steps to provide outside access to a given service supplied by a computer on your network. First, you must tell the connection-sharing system (ICS) which computer on your network is to receive incoming connection requests for a particular service. Then, on the computer that provides the service, you must tell Windows Firewall to let these requests through.
Most server-type functions, such as Remote Desktop and IIS, require manual setup. On the computer that is providing the service itself, you must tell Windows Firewall to allow incoming connections to the service by following these steps:
1. Open the Windows Firewall screen by clicking Windows Firewall in the Network and Sharing Center.
2. Click Advanced Settings. In the left pane, click Inbound Rules. See if the service this computer is providing is already listed with Yes in the Enabled column and Allow in the Action column. If so, you can proceed to configure the computer that is sharing its Internet connection.
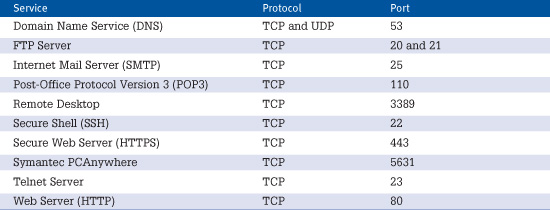
3. If the service isn’t already listed, click New Rule in the right pane. Click Port, click Next, select TCP or UDP, and enter the specific port number or port number range required by the service, as shown in Figure 19.9. Table 19.1 lists common services, port numbers, and protocols. (For the FTP and DNS services, you have to make two entries.)
Figure 19.9 Add a service’s port number and protocol type to Windows Firewall on the computer that is running the service.
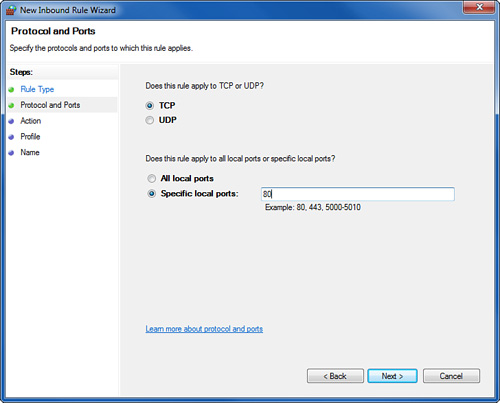
Table 19.1 Common Services and Port Numbers
4. Click Next and click Allow the Connection.
5. Click Next and leave all three check boxes (Domain, Private, Public) checked.
6. Click Next. For the rule name, enter the name of the service you’re enabling, add an optional description, and click Finish.
Next, you must instruct the computer that is sharing its Internet connection to forward incoming requests to the designated computer. On the computer that physically connects to the Internet, follow these steps:
1. Click Start, Control Panel, View Network Status and Tasks, and then select Change Adapter Settings.
2. Right-click the icon for the shared Internet connection and select Properties. View the Sharing tab and, in the Internet Connection Sharing section, click Settings.
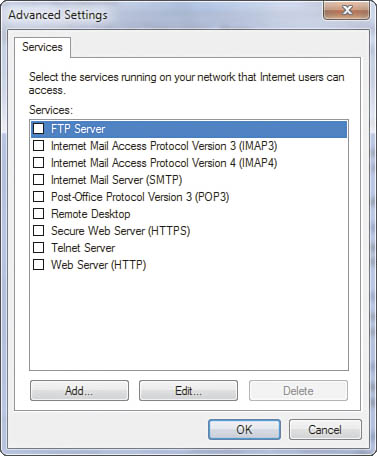
3. In the Advanced Settings dialog box, shown in Figure 19.10, check the Service entry for each service for which you want to permit access and for which you have servers on your LAN. The most common ones to select are Remote Desktop, FTP Server, and Web Server, if you have set up IIS.
Figure 19.10 The Services tab lets you specify which services are to be forwarded by Internet Connection Sharing.
4. When you select a check box, the Service Settings dialog box appears, as shown in Figure 19.11.
Figure 19.11 The Service Settings dialog box lets you specify the name or IP address of the computer that is to handle incoming connections for a particular service.

5. Enter the IP address of the computer that is hosting this service, if your LAN uses fixed IP addresses. If your LAN uses automatically assigned addresses from ICS, you can enter the computer’s name, and the software will locate the correct computer. Click OK to save the settings.
Note
![]()
If you want to use an incoming VPN connection, you must set it up on the computer that is sharing its Internet connection. ICS can’t forward VPN connections to other computers.
6. If the service you want to use isn’t listed, you need to find out what TCP and/or UDP ports the service communicates with. You have to search through the service software’s documentation or on the Internet to find these port values.
To add an unlisted service, click Add. Enter the name of the service, the IP address or hostname of the computer that is running this service, and the port number, as shown in Figure 19.12. Generally, you’ll want to use the same number for the port number the public sees (external port) and the port number used on the LAN (internal port). Check TCP or UDP, and then click OK.
Figure 19.12 Enter port information for a new service in this dialog box.
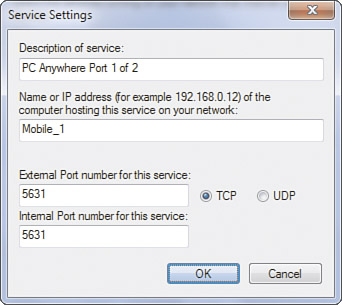
If the service you’re adding uses more than one protocol type or port number, you’ll have to make multiple entries.
Caution
![]()
With the exception of incoming VPN connection service, I suggest that you don’t run any other services on the computer that manages your firewall and/or ICS, especially IIS. There’s too great a risk that a security flaw in the service might let hackers compromise the firewall.
When you’ve enabled the desired services, incoming requests using the selected service ports will be forwarded to the appropriate computer on your LAN. Windows Firewall will know to let these services through.
Enabling Access with a Sharing Router
If you use a connection-sharing router on your LAN, you need to follow a somewhat different procedure to enable outside access to services on your network.
You must still open Windows Firewall on the computer(s) providing services, as described in the first six-step procedure in the previous section. Then you must use a manufacturer-specific procedure to set up forwarding for services that you want to expose to the Internet.
One difficulty with these devices is that you must forward services by IP address, not by computer name, and, normally, you set up computers to obtain their IP addresses automatically. This makes the computers moving targets because their IP address could change from day to day.
You have to make special arrangements for the computers on your LAN that you want to use to host services. On your router’s setup screens, make a note of the range of IP addresses that it will hand out to computers requesting automatic configuration. Most routers have a place to enter a starting IP address and a maximum number of addresses. For instance, the starting number might be 2, with a limit of 100 addresses. For each computer that will provide an outside service, pick a number between 2 and 254 that is not in the range of addresses handed out by the router, and use that as the last number in the computer’s IP address. I recommend using address 250 and working downward from there for any other computers that require a static address.
To configure the computer’s network address, follow the instructions under “Port Forwarding with a Router” on page 1019, with these changes:
• The material in Chapter 37 shows instructions for setting up Remote Desktop, with protocol TCP port 3389. You’ll need to use the protocol and port numbers for the service you’re enabling.
• Use a static IP address ending with .250 for the first computer you set up to receive incoming connections. Use .249 for the second computer, and work downward from there. Be sure to keep a list of the computers you assign static addresses to, and the addresses you assign.
For services that use TCP/UDP in unpredictable ways, you must use another approach to forwarding on your LAN. Some services, such as Windows Live Messenger, communicate their private, internal IP address to the computer on the other end of the connection; when the other computer tries to send data to this private address, it fails. To use these services with a hardware router, you must enable UPnP, as described earlier in the chapter.
Other services use network protocols other than TCP and UDP, and most routers can’t be set up to forward them. Incoming Microsoft VPN connections fall into this category. Some routers have built-in support for Microsoft’s PPTP protocol. If yours has this support, your router’s manual will tell you how to forward VPN connections to a host computer.
Otherwise, to support nonstandard services of this sort, you have to tell the router to forward all unrecognized incoming data to one designated computer. In effect, this exposes that computer to the Internet, so it’s a fairly significant security risk. In fact, most routers call this targeted computer a DMZ host, referring to the notorious Korean no-man’s-land called the Demilitarized Zone and the peculiar danger one faces standing in it.
To enable a DMZ host, you want to use a fixed IP address on the designated computer, as described in the previous section. Use your router’s configuration screen to specify this selected IP address as the DMZ host. The configuration screen for my particular router is shown in Figure 19.13; yours might differ.
Figure 19.13 Enabling a DMZ host to receive all unrecognized incoming connection requests. This is an option of last resort if you can’t forward incoming connections any other way.
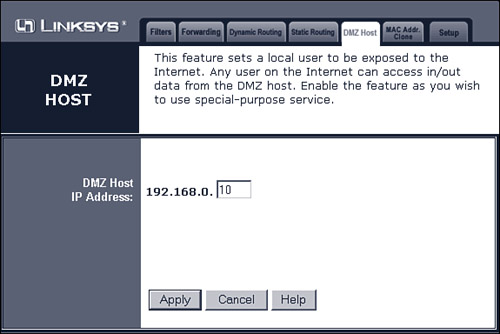
Now, designating a DMZ host means that this computer is fully exposed to the Internet, so you must protect it with a firewall of some sort. On this computer, you must set its network location to Public Network.
Tip
![]()
It’s not a bad idea to enable filtering for these ports even if you’re not using a DMZ host. It’s essential to do this if you set up a DMZ host.
You should also set up filtering in your router to block ports 137–139 and 445. Figure 19.14 shows how this is done on my Linksys router; your router might use a different method.
Figure 19.14 Configuring filters to block Microsoft file-sharing services.
