
37. Remote Desktop
Using Your Computer Remotely
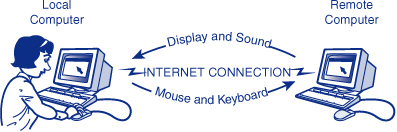
Windows 7 Professional, Enterprise, and Ultimate editions (as well as the comparable Windows Vista and XP versions) have a spiffy feature called Remote Desktop that lets you connect to and use your computer from another location. You can see your computer’s screen, move the mouse and type on the keyboard, open files, and even print, just as if you were really sitting in front of your own computer. The neat part is that you can do this from just about any computer, as long as it’s running some version of Windows or Mac OS X.
Figure 37.1 shows how this works.
Figure 37.1 You can use any computer running Windows or Macintosh OS X to connect to and control your computer.
This is just what you need when you’re out of town and need to read a file you left on the computer back home, or if you want to read your office email from home. I’ve been using this feature since it appeared in Windows XP Professional, and I love it.
You also can use the Remote Desktop Client program to attach to computers running Windows Server computers to access applications or for administration and maintenance.
Note
![]()
You don’t have to be miles away to take advantage of Remote Desktop, either. You can also use it to access other computers in your home or office, using your local area network (LAN). For instance, you can use it to start a lengthy computing or printing job on someone else’s computer without leaving your own desk.
This chapter consists of two parts. The first part shows you how to set up your computer so that you can access it remotely. The second part shows you how to connect to another computer using the Remote Desktop Client.
Note
![]()
The Remote Desktop Service, which lets you connect to your own computer from another computer, is available only on Windows 7 Professional, Enterprise, and Ultimate Editions, the comparable versions of Vista, and Windows XP Professional. If you have one of the Home versions of Windows, the part of this chapter that talks about setting up access to your own computer does not apply to your version of Windows. If you want to access your “home” computer remotely, look into the third-party programs mentioned at the end of the chapter.
On the other hand, the Remote Desktop Client, which is the application you use to connect to a remote computer and which is discussed in the second part of the chapter, is included with all Windows versions. It also can be downloaded for Mac OS X.
Third-party programs such as LapLink Everywhere, PCAnywhere, VNC, and Timbuktu, and web-based services such as LogMeIn and GoToMyPC, also provide this type of remote access capability, as I’ll discuss at the end of the chapter. Some of these products have more sophisticated features, and they can be easier to set up, but Remote Desktop is built into Windows and it’s essentially free (well, it’s free after you’ve paid for Windows).
Remote Desktop is a scaled-down version of Windows Terminal Services, a component of the Windows Server versions that lets multiple users run programs on one central server. By “scaled down,” I mean that only one person is allowed to connect to Windows 7 at a time, either remotely or with the regular monitor and keyboard. So if you connect remotely, the local user is temporarily kicked out to the Welcome screen. And if a local user logs on while you’re connected remotely, you’ll be disconnected. You won’t lose your work—you can reconnect later—but the bottom line is that only one person at a time is allowed to use a Windows 7 computer.
Note
![]()
Why would you set up your computer to host Remote Desktop connections when the third-party software can be easier to set up? One reason is that Remote Desktop transfers sound and supports multiple monitors. Another reason is that the online services require you to trust the third parties not to monitor or probe your computer over their connections. With Remote Desktop, the connection is direct to your computer and you control it completely.
Setting Up Access to Your Own Computer
This first half of the chapter tells you how to set up remote access to your own computer. If you want to use the Remote Desktop Connection client to access another computer, skip ahead to “Connecting to Other Computers with Remote Desktop,” later in the chapter.
Across a LAN (that is, between computers in your home or office), Remote Desktop Connection works right “out of the box”—you just have to enable the feature.
However, if you want to use Remote Desktop to reach your computer over the Internet, you have to set up several other things in advance.
Caution
![]()
If your computer is part of a corporate network, check with your network administrators before attempting to make any changes to the Remote Desktop settings. It might be a violation of company policy for you to do so. In fact, in all likelihood, these settings will be locked down and you won’t be able to change them anyway. If this is the case, if it’s allowed at all, your network admins will have to set up Remote Desktop access for you.
This procedure might sound complex as you read it, but it really isn’t that bad. Let’s go through the process step by step. You can go about this in other ways, of course, but what I give you here is a procedure that’s suitable for a home user with Windows 7 Ultimate edition or a small-office user with the Professional version.
And, again, let me remind you that there are web-based programs that do much the same thing as Remote Desktop. Several of them are free, and most of them require very little setup work—in particular, they completely bypass the networking issues that we’ll discuss shortly. If the instructions in this section sound too difficult, or if the setup doesn’t work for you, check out the section “Third-Party Remote Control Tools” at the end of the chapter.
Enabling Remote Desktop Access to Your Computer
To be sure that incoming Remote Desktop connections are enabled on your computer, follow these steps:
1. Click Start, right-click Computer, and select Properties.
2. At the left, click Remote Settings and, if necessary, confirm the User Account Control prompt.
3. Select Allow Connections from Computers Running Any Version of Remote Desktop. (The “more secure” version works only on corporate networks using IPSec security.)
4. By default, all Administrator-level accounts will be allowed to connect to the computer. If you want to grant Remote Desktop access to any Limited users, click Select Users, Add, Advanced, Find Now, and then locate the desired name in the Search Results section. Double-click the name. To add another name, click Advanced and Find Now again.
5. Click OK to close all the dialog boxes.
If your computer is set to go to sleep when it sits unused for a while, and you want the computer to be available for incoming connections at any time, you’ll have to disable automatic sleep. To do this, click Start, Control Panel, Hardware and Sound, Change When the Computer Sleeps, and for Put the Computer to Sleep, select Never. Then click Save Changes.
Note
![]()
A password must be set on a user’s account before that user can connect to the computer remotely.
At this point, check to be sure that Remote Desktop has been set up correctly: Click Start, Control Panel, System and Security, and Allow a Program Through Windows Firewall. Find Remote Desktop in the Exceptions list (you might need to scroll down), and be sure it’s checked under both Home/Work and Public. If it isn’t, click Change Settings, and then check the boxes. If you are using a third-party firewall, be sure to configure it to permit incoming Remote Desktop connections on TCP port 3389.
Caution
![]()
Be sure that every user account that can be reached via Remote Desktop (that is, every Administrator account and any Limited accounts that you entered in step 4) has a strong password. This means a password with uppercase letters and lowercase letters and one or more numbers and punctuation, and at least eight characters in length.
If you just want to use Remote Desktop within your home or office network, you’re finished and can skip ahead to the “Connecting to Other Computers with Remote Desktop” section. However, if you want to reach your computer through the Internet, you have more work to do.
Establishing 24×7 Access
Because you won’t be there at your home or office to turn on your computer and establish an Internet connection, you have to set things up so that your computer and connection are always working.
First, you need to get to the BIOS setup screen. Restart Windows and wait for the screen to go black. Press the BIOS setup hotkey. The screen tells you what to press; it’s usually the Delete or F2 key. Then, look for the Power Management settings. Find an entry titled AC Power Recovery, or something similar. Some computers have an option labeled Last Setting, which turns the computer on only if it was already on when the power failed. If it’s available, that’s the one to use. Otherwise, select the setting that turns your computer on whenever the AC power comes on. Then save the BIOS settings and restart Windows.
Besides a 24×7 computer, you need a 24×7 Internet connection. If you have cable Internet service or a type of DSL service that does not require you to enter a username or password, you already have an always-on Internet connection and can skip ahead to the next section. Otherwise:
• See if your DSL provider can upgrade your service to provide a static IP address and always-on service. This might be inexpensive enough to make it worthwhile.
• Use a hardware connection-sharing router. If you don’t have a router already, buying one is a worthwhile investment. They cost between $0 (after rebate) and $75, and can also provide wireless networking capability for your home or office. Chapter 19, “Connecting Your Network to the Internet,” tells how to set up a router for DSL service. Be sure to enable the router’s “keepalive” feature so that your connection is kept going all the time.
• If you use the Broadband connection sharing feature built in to Windows, you can add a third-party program to force Windows to keep the connection open all the time. The DynDNS Updater program (which I’ll discuss later) can do this for you.
Next, you must make sure you can locate your computer from out on the Internet.
Setting Up Dynamic DNS
All Internet connections are established on the basis of a number called an IP address, which is to your Internet connection as your telephone number is to your phone. When you’re somewhere else, you’ll need a way to let Windows find your home computer’s IP address so that Remote Desktop can establish a connection back to it.
Note
![]()
Many DDNS providers exist, many of which offer free services. You can find them easily enough by doing a Google search for “free DDNS service.” Here I give you step-by-step instructions for setting up service with DynDNS.com because it’s free and it’s directly supported by many hardware connection-sharing routers.
The solution to this problem is to use a free dynamic domain name service (DDNS). You’ll use the service to give your computer a name, like lucythedog.homedns.org. Add-on software in your computer will keep the service updated whenever your computer’s address changes.
To set up dynamic DNS service at DynDNS.com, follow these steps:
1. Got to www.dyndns.com in Internet Explorer. Click Create Account. Make up a username and password, and enter these along with your email address in the registration form. Be sure to jot down the username and password.
2. Read and acknowledge the terms of service, and click Create Account. (You’re allowed only one free account, but you can use it to register several computers, if you want.) Follow the instructions to activate your account and sign on.
3. At the top click Services, click Dynamic DNS, and then click the Get Started button.
4. Enter a hostname that you can easily remember, and select a domain name from the pull-down list. Under the IP Address box, click Use Auto Detected IP Address. Click Create Host. If someone else has claimed the name you chose, change the name or domain and try again until you succeed. Be sure to write down the hostname and domain name that you eventually select.
5. Click Next, and then click Activate Services.
Next, set up a DNS client program so that changes to your IP address are sent to DynDNS.com. Do this on the computer that you’re enabling for Remote Desktop access:
1. Log on as a Computer Administrator. Open Internet Explorer and go to www.dyndns.com/support. Click Download Now.
2. Run the downloaded program DynUpSetup.exe. Click Yes to run the downloaded program.
3. Step through the installation screens, using the default settings except this important one: On the Install as a Service page, check Install the DynDNS Updater as a Windows Service.
At the last screen, click Finish, and the Updater program will start.
Note
![]()
If you use a hardware sharing router, your router might have DDNS support built in, which means you can skip this part. Check your router’s setup screen to see if it has DDNS support, and if so, set it up to use your DDNS service.
4. When prompted, enter the DynDNS.com username and password you created previously. This should automatically download the hostname you set up.
5. Check the box next to the hostname you set up and click OK. In a short time, perhaps 30 seconds later, a balloon pop-up should tell you that the Updater synchronized your IP address with the DynDNS.com service.
To be sure that it’s working, click Start, All Programs, Accessories, Command Prompt, and type the command ping followed by the hostname and domain name you chose for your computer; for example, ping mycomputer.homedns.org. Press Enter and be sure that the command finds your IP address, and doesn’t print “Could not find host.”
Now your registered hostname will always point to your computer, even when your IP address changes. After a change, it might take up to an hour for the update to occur, but changes should be infrequent.
Configuring Port Forwarding
The last setup step is to make sure that incoming Remote Desktop connections from the Internet make it to the right computer. If your computer connects directly to your cable or DSL modem, you can skip this step. Otherwise, you have to instruct your sharing computer or router to forward Remote Desktop data through to your computer. To be precise, you have to set up your sharing computer or router to forward incoming requests on TCP port 3389 to the computer you want to reach by Remote Desktop.
The procedure depends on whether you are using the ICS service built into Windows or a hardware-sharing router. Use one of the procedures described in the next two sections.
Port Forwarding with Internet Connection Sharing
If you use the built-in Windows ICS service to share an Internet connection on one computer with the rest of your LAN, the forwarding procedure is pretty straightforward using these steps:
1. Go to the computer that is sharing its connection (whether or not it’s the one that you want to reach via Remote Desktop) and log on as an Administrator.
2. View the Properties dialog box for the local area connection that corresponds to the Internet connection itself. On Windows 7, click Start, Control Panel, Network and Internet, Network and Sharing Center. In the Tasks list, select Manage Network Connections.
3. Locate the connection that goes to your Internet service. This might be a broadband icon if you use DSL service, or a local area connection icon for cable service. It should have the word Shared next to it. Right-click the icon, select Properties, and view the Sharing tab.
4. Click Settings and, under Services, check Remote Desktop. In the Service Settings dialog box, enter the name of the computer that you want to make available via Remote Desktop and click OK.
5. When you’re finished, click OK to close all the dialog boxes.
Now you should be able to reach your computer from anywhere on the Internet using the hostname that you set up on DynDNS.com.
Port Forwarding with a Router
If you are using a hardware connection-sharing router, setup is a bit more difficult but is worthwhile. First, because your router doesn’t know your computers by their names, you have to set up a fixed IP address on the computer that you will be using via Remote Desktop, using these steps:
1. Click Start, All Programs, Accessories, Command Prompt.
2. Type the command ipconfig /all and press Enter. Locate the Local Area Connection part of the printout, which will look something like this:
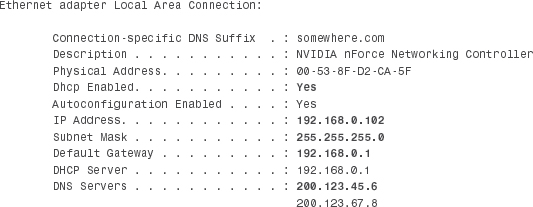
The important information is bold. (On your computer, the numbers will be different—use your numbers, not these!)
If the entry Dhcp Enabled says No, you don’t have to change anything here. Just note the IP Address entry, skip steps 3 through 9, and configure your router.
3. Click Start, Control Panel, Network and Internet, Network and Sharing Center, Manage Adapter Settings.
4. Right-click your Local Area Connection icon and select Properties.
5. Select the Internet Protocol Version 4 (TCP/IPv4) entry and click Properties.
6. Check Use the Following IP Address. Enter the first three parts of your original IP address exactly as you see it in your Command Prompt window, but replace the last part with 250. For example, on my computer, I’d enter 192.168.0.250. The first three sets of digits might be different on your network.
7. For the subnet mask and default gateway, enter the same numbers that were displayed in the Command Prompt window.
8. Check Use the Following DNS Server Addresses. Enter the one or two DNS Server addresses that were displayed in the Command Prompt window.
9. Click OK.
(If you need to set up any other computers with a fixed IP address, use the same procedure but use addresses ending in .249, .248, .247, and so on, counting backward from .250.)
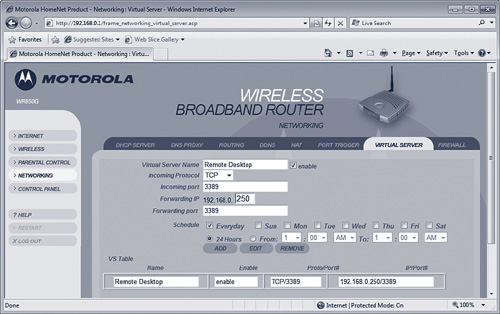
Now you have to instruct your router to forward Remote Desktop connections to this computer. You need to use the router’s setup screen to enable its Port Forwarding feature, which some routers call Virtual Server or Applications and Gaming. There, you need to enter the fixed IP address that you assigned to your computer and tell the router to forward connections on TCP port 3389 to this address. Every router uses a slightly different scheme, but Figure 37.2 shows a typical router. If a range of port numbers is required, or if external and internal numbers are entered separately, enter 3389 in all fields.
Figure 37.2 Use your router’s setup system to forward TCP port 3389 to your computer.
![]() To learn more about forwarding network requests on a shared Internet connection, see “Enabling Access with a Sharing Router,” p. 537.
To learn more about forwarding network requests on a shared Internet connection, see “Enabling Access with a Sharing Router,” p. 537.
Now you should be able to reach your computer from anywhere on the Internet, using the hostname that you set up on DynDNS.com.
Connecting to Other Computers with Remote Desktop
To establish a connection to another computer using the Remote Desktop system, you need a copy of the Remote Desktop Client, which is also sometimes called the Terminal Services Client. You can get this program in several ways:
• It’s preinstalled on all Windows 7 and Vista computers, on all editions. Select Start, All Programs, Accessories, Remote Desktop Connection.
• It’s preinstalled on all Windows XP computers, on all editions. Select Start, All Programs, Accessories, Communications, Remote Desktop Connection. The version that came with XP lacks support for multiple monitors and plug-and-play devices. You can upgrade the version on XP by downloading and installing the new version, as described in the next paragraph.
• You can download it from http://www.microsoft.com/download. Search for “Remote Desktop Connection” and get the latest version available for your operating system. There are versions for Windows and Mac OS X.
When you run the Remote Desktop Client, you’ll see the Remote Desktop Connection dialog box, shown in Figure 37.3.
Figure 37.3 The Remote Desktop Connection dialog box enables you to configure the connection and select the remote computer to use.
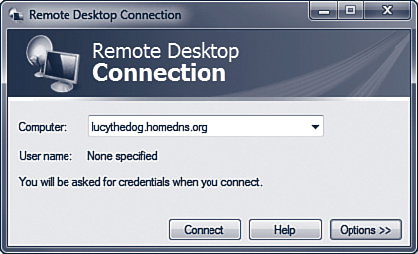
Enter the IP address or registered DNS name of the computer you want to use. If you have set up a DDNS hostname, as described in the first part of this chapter, the name might look something like mycomputer.homedns.org. If you’re connecting to a computer on your own network, it’s enough just to type its computer name.
At this point, you can select options that control how the remote connection is made, how large a window to use, and so on.
Connection Options
In the Remote Desktop Connection dialog box, you can set several connection options. In most cases, you can use the default settings and simply click Connect to start the connection, but several of the options can be quite useful.
To view the option categories, click the Options button. The dialog box expands to show six pages of settings, which you can select by clicking on the tab names across the top. You will rarely need to adjust any of these settings. However, some situations might require you to change settings before making a Remote Desktop connection. Table 37.1 lists these situations.
Table 37.1 Some Reasons to Change Remote Desktop Settings
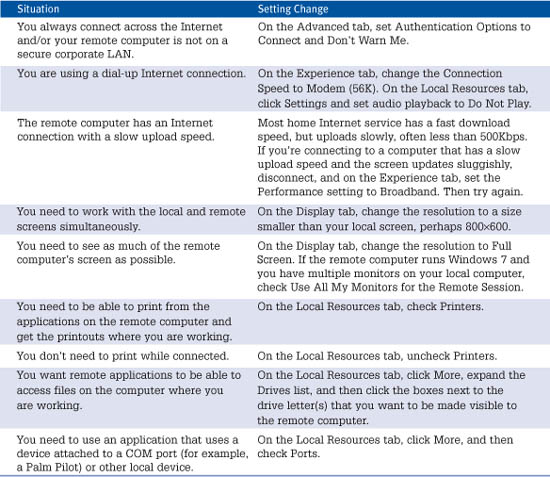
The Full Screen setting is very useful if you have serious work to do on the remote computer because it gives you the maximum amount of desktop space on which to work. Although the resulting connection will fill your local computer’s screen, you can still switch back and forth between remote and local work, as I describe in the next section.
Tip
![]()
If you routinely make connections to different computers using different settings, you can set up Remote Desktop Connection files with the computer name and all options preset. To do this, make the settings, click Save As, and select a file name. You can create shortcuts to the saved files and put them on your desktop, put them in your Start menu, or pin them to your taskbar.
When you have made the necessary settings, you might want to save them as the default settings for future connections. To do this, select the General tab and click Save.
Finally, after you have made any necessary option settings, click Connect to begin the connection. Windows prompts you to enter your username and password before it establishes the connection.
The program prompts you to enter a username and password. Type the username and password you use on the remote computer, the one to which you’re connecting. Entering the password is optional and, in most cases, not entering it here is safer. Let the remote system prompt you for your password.
Note
![]()
If you are connecting to a Windows Server Domain computer, by default, you use your domain logon. If you need to specify a local machine account, enter your username in the form machinenameusername, as in mycomputerAdministrator.
If you want the logon name and password to be stored (relatively securely) in the local computer so that future connections can be automatic, enter the password and check Remember My Credentials.
Finally, click OK to begin the connection.
Caution
![]()
Do not check Remember My Credentials if you are using a computer that is not your own or is not secure, because otherwise anyone who has access to the account will be able to connect to the same remote computer using your logon.
Logon Is Denied
![]()
If the remote computer connects but will not let you sign on, the account you tried to use might have a blank password or might be a Standard account that was not entered as an account authorized to connect remotely. See “Enabling Remote Desktop Access to Your Computer,” earlier in the chapter, for instructions on authorizing accounts. An account must have a password set before you can use it remotely, even if it’s authorized.
If Network Level Authentication is being used and the connection to the remote computer does not use the IPSec network security protocol, you might get a warning that the remote computer’s identity cannot be validated. (Thus, you could end up giving your password to a counterfeit computer.) In most cases, this is not a problem, so you can click Yes. You can also check Don’t Prompt Me Again for Connections to This Computer, or you can use the Advanced tab in the connection options, as described earlier, to prevent this warning from reoccurring.
Using the Remote Connection
When you’re logged on, you’ll see the remote computer’s desktop, as shown in Figure 37.4, and can use it as if you were actually sitting in front of it. In a full-screen connection, the title bar at the top of the screen tells you that you’re viewing the remote computer’s screen. The title bar might slide up out of view, but you can hover the mouse near the top of the screen to bring it back. You can also click the Minimize button to hide the remote screen, or click the Maximize button to switch between a windowed or full screen view.
Figure 37.4 The remote computer’s desktop appears in a window on your computer. You can also make it take over the entire screen.
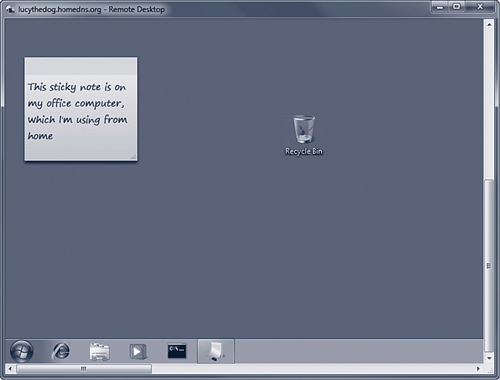
The keyboard, mouse, display, and sound (unless you disabled it) should be fully functional. It all works quite well—it can even be difficult to remember which computer you’re actually using!
If you elected to connect the local computer’s disk drives in the connection options dialog box, the local computer’s drives appear in Windows Explorer view. Access to these drives is fairly slow and annoying. Still, you can take advantage of this to copy files between the local and remote computers.
Tip
![]()
If the computer to which you’re connecting has more than one monitor or a larger monitor than the one you’re currently using, when you start an application, its window might not be visible. The problem is that when the application was last used, its window was placed on a secondary monitor and its position is now completely off the Remote Desktop screen. To make it visible, hover the mouse over the program’s icon in the taskbar. When the preview window appears, right-click it and select Move (or Restore, then Move). Then press and hold the arrow keys to slide the window into view. Press Enter when it’s visible, then finish positioning it with your mouse.
In addition, any printers attached to your local computer will appear as choices if you print from applications on the remote computer, as long as a compatible printer driver is available on the remote computer. Printers might not work if you are connecting from a Mac or a computer that is running an older version of Windows.
Keyboard Shortcuts
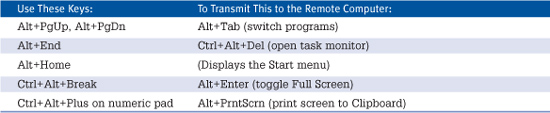
While you’re connected, you might want to use keyboard shortcuts such as Alt+Tab to switch between applications. This can confuse Windows, which won’t know whether to switch applications on the local computer or the remote computer. You can specify where special key combinations should be interpreted on the connection options Local Resources tab, as I described earlier, or you can use alternate key combinations to ensure that the desired actions take place on the remote computer. Table 37.2 shows the alternate keyboard shortcuts. Personally, I prefer to use these alternate shortcuts.
Table 37.2 Some Remote Desktop Keyboard Shortcuts
When you’ve finished using the remote computer, click Start. (Yes, our friends who use Apple computers make fun of Windows because of this, but what can we do?)
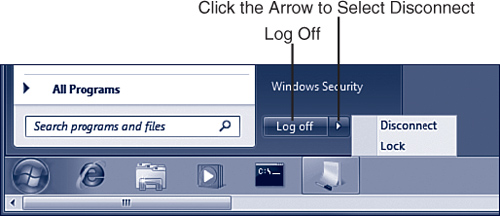
On the Start menu, you can click Log Off, which will log out of and end the remote session, or you can disconnect leaving yourself logged on with applications running. To disconnect, click the arrow next to the Log Off button and select Disconnect, as shown in Figure 37.5. You can later reconnect via Remote Desktop or by signing on at the remote computer itself.
Figure 37.5 Use the Logout or Disconnect choices to end your remote session. Disconnect leaves you logged in on the remote computer.
I use Remote Desktop to use my work computer from home, and I’ve found that I save a lot of time by never logging off entirely. When I finish at work, I just press Windows+L to switch out to the Welcome screen. Then I can reconnect from home and pick up where I left off without waiting for all those darn startup programs to get going. Likewise, at home, when I’m finished, I simply disconnect, so I never actually log off.
If you’re using Remote Desktop to use your own computer, this probably won’t matter to you because you’ll probably never see what happens on the other screen. But if you use Remote Desktop to work on someone else’s computer, let that person know what will happen before starting; otherwise, the two of you could get into a tussle, repeatedly kicking the other person off the computer, with neither of you knowing that the other person is there trying to get something done.
Third-Party Remote Control Tools
There are several third-party remote control tools that you might want to consider. A bunch of web-based products have emerged that work very well. Many of them have free versions, and most have some advantages over Remote Desktop: They work with any version of Windows, and they require almost no setup, even if you have a router on your Internet connection. Here are some products to check out:
• LogMeIn—Available in free and Pro versions. Pro gets you file transfer, sound, and printing. Mac and Windows versions are available. No network setup is necessary. Find information at www.logmein.com. (I use this program myself to assist several of my clients.)
• TeamViewer—Available free for personal, noncommercial use, TeamViewer requires no network setup and can even make your LAN available to the remote client computer through a built-in VPN service. Both Windows and Mac clients and hosts are available. Check out www.teamviewer.com.
• I’m InTouch—Another no-network-setup remote access product. The remote client is Java based, so you could access your PC from your Blackberry. How cool is that? Check out www.01com.com.
• BeAnywhere—Another subscription-based remote access product, requiring no network setup. Check it out at www.beanywhere.com.
• LapLink Everywhere (formerly Carbon Copy)—Requires no network setup. Clients are available for Palms and PocketPCs as well as PCs. Information at www.laplink.com.
• GoToMyPC—A commercial subscription-based product that offers remote access through any web browser. Information at www.gotomypc.com.
• Radmin—A low-cost remote control program. Information at www.radmin.com. Requires network setup.
• Symantec PCAnywhere—One of the original remote control programs. You can connect via modem, LAN, or Internet. It suffers from feature bloat, some long-standing bugs, and Symantec’s general disinterest in providing support to individuals, as opposed to big corporate customers; but overall, it’s a solid, industrial-strength product. Its file transfer feature is useful. Available from www.symantec.com and most software resellers. Requires network setup.
• VNC—An open-source program initially developed by AT&T. A big plus for VNC is that both host and client programs are available for virtually every OS. There are a few VNC versions available, with TightVNC and RealVNC the most popular. At the time this was written, TightVNC and the free version of RealVNC do not work on Windows 7 or Vista as a host. For information, check www.tightvnc.com and www.realvnc.com. Requires network setup.
Note
![]()
All these products let you access a computer via the Internet. The ones that require network setup can also access a computer across a LAN or corporate network. If you want to access a remote computer via a dial-up modem, though, you must use one of the old-school programs, such as Symantec PCAnywhere. Alternatively, you can set up an incoming dial-up networking connection for your computer, and use Remote Desktop or a network-based remote control program, such as VNC.