
Chapter 1
Getting Connected: Setting Up Your Studio
IN THIS CHAPTER
![]() Getting to know the various types of connectors
Getting to know the various types of connectors
![]() Plugging in your equipment
Plugging in your equipment
![]() Creating an efficient workstation
Creating an efficient workstation
![]() Making your room sound great (or at least decent)
Making your room sound great (or at least decent)
Okay, so you’re ready to turn that spare bedroom or basement into a recording studio. After you unpack all your shiny new gear and get it plugged in properly, you need to get your room to work for you. This involves creating an efficient place to work, but above all, it means getting your room to sound good. This can be tricky; after all, pro studios spend tons of time and money getting the room to sound great. You’re going to have to do much the same. You may not have to spend a ton of money (as if any of us can), but you will need to spend some time.
After you decide on a space for your home recording system, the next steps involve setting up the system and getting your space to work for you. In this chapter, I help you make sense of all those connectors that you end up using — and help you get them all plugged in properly. I also show you how to find the best way to work in your environment, with a goodly measure of tips and tricks thrown in to make your room sound as good as possible.
Understanding Analog Connections
You’ve probably had a chance to see and use a variety of analog connectors. If you play a guitar or keyboard (synthesizer), for example, you’re familiar with a ¼-inch analog plug. Some microphones use an XLR analog plug. Keeping all these connectors straight can be a little confusing: Why do you have to use one plug for one thing and another for something else? And what’s a TRS plug, anyway?
Read on to discover the most common analog connectors: ¼ inch (mono/TS and stereo/TRS), XLR, and RCA.
The ¼-inch analog plug
The ¼-inch plug is the most common audio connector and one of the most versatile. These plugs come in two varieties: mono/TS and stereo/TRS.
Mono/TS
The plug on a cord that you use for your guitar or synthesizer is an example of a mono ¼-inch plug. The mono part of the name refers to the fact that you have only one channel through which to send the signal. This type of plug is also referred to as a TS plug (short for Tip/Sleeve). The tip is the end of the plug, and the sleeve is the rest of the metal part. A plastic divider separates these two sections. Check out Figure 1-1 to see this familiar plug.

FIGURE 1-1: A typical ¼-inch plug used for guitar and other electric instruments.
TS plugs are used for a variety of purposes — to go from your guitar to your guitar amp, from your synthesizer to your mixer, from your mixer to your power amplifier (amp), and from your power amp to your speakers. You would expect that one cord can work for all these applications. After all, a TS plug is a TS plug, right? Well, not really. The same plug can be wired differently, and it can carry different levels of power. For example, here are the differences between instrument and speaker cords:
Instrument cord (the one you use for your synthesizer or guitar): This cord contains one wire and a shield — the wire is connected to the tip, and the shield is connected to the sleeve. You need the instrument cable’s shield to minimize noise. If you use a speaker cord (discussed next) for your instrument, you may end up with some noise (that is, you may hear a hiss or a buzz — or even a radio station — coming out of your amp or coming from where you’ve plugged in your instrument).
 Instrument cords are often called unbalanced lines because of the way that they’re wired. An unbalanced cord has one wire surrounded by a braided shield; the wire is connected to the tip of the TS plug, and the shield is connected to the sleeve. The signal is sent through the wire, and the shield is used for the ground. (It keeps the noise down.) You can also find balanced lines, which I explain in the next section of this chapter.
- A speaker cord: This cord contains two wires and no shield — one wire is connected to the tip and the other to the sleeve. Because the speaker cord carries a lot more current (power) than the instrument cable, the speaker cord doesn’t have a shield. The signal level covers noise that’s present in the cord. Because you have much less current present in an instrument, you don’t want to use a speaker cord for your instrument.
 When buying cords with TS plugs, first be sure to look at (or ask about) what purpose the cord is designed for. Then, when you take the cord home, be sure to note what type it is so that you use it correctly. You can mark your cord in a number of ways: You can put colored tape on it (red for speaker or blue for instrument, for example), put a tag on it, or — gasp — dot it with nail polish (not on the tip or sleeve, of course).
You generally don’t need to worry about which end of the cord you plug in to your instrument — the signal can travel equally well in either direction. However, you can buy cords that are designed to send the current in one direction. (This cord has an arrow on it, designating in which direction the signal should flow.) I call these designer cords, and two of the most common brands are Monster and Planet Waves. The theory behind these cords is that they do a better job of preserving the sound qualities of the instrument for which they’re designed. These cords are specifically designed for almost every instrument and application known to man.
Stereo/TRS
A stereo/TRS (short for Tip/Ring/Sleeve) ¼-inch plug looks like a stereo headphone plug (take a look at Figure 1-2). The tip is the end of the plug, the ring is the small middle section located between the two plastic dividers, and the sleeve is the rest of the metal part of the plug. A TRS plug can be used for the following three types of cords:
- Stereo cord: A stereo cord is used for signals that contain two separate portions: one for the right channel and the other for the left channel. This type of cord is generally wired with the left-channel signal attached to the tip, the right-channel signal connected to the ring, and the shield wired to the sleeve. This type of cord is typically used for headphones.
Balanced cord: A balanced cord is used on professional audio gear to join the various pieces of equipment (to connect the mixer to the recorder, for example). The advantage with a balanced cord is that you can have longer cord runs without creating noise.
Why are balanced cords so conveniently noise free? The balanced cord has two wires and a shield inside and has the same signal running through both wires. One signal is 180 degrees out of phase with the other (that is, their waveforms are opposite one another), and when the signals get to the mixer (or whatever they’re plugged in to) one of the signals is flipped and added to the other. When this happens, any noise that built up in the signal is canceled out.- Y cord: A Y cord consists of a TRS plug on one end and two TS plugs on the other, forming — you guessed it — a nice representation of the letter Y. This cord allows you to insert an effect processor — a compressor or equalizer, for example — in the line of a mixer (more specifically, into the insert jack of the mixer). Check out Book 2, Chapter 2 for details on mixers. The TRS plug both sends and receives a signal. This cord is wired so that the tip sends the signal and the ring receives it (see Figure 1-3). The sleeve is connected to the shield of each cable.

FIGURE 1-2: Use a balanced (TRS) plug to connect professional audio gear.

FIGURE 1-3: Use a Y cord to send and receive a signal.
XLR
The XLR connector is used for microphones and some line connections between professional gear. This cable has a female and a male end (see Figure 1-4). The cord is wired much like a TRS connector and is balanced to minimize noise. The XLR microphone cable is also called a low-Z cable because it carries a low-impedance signal.
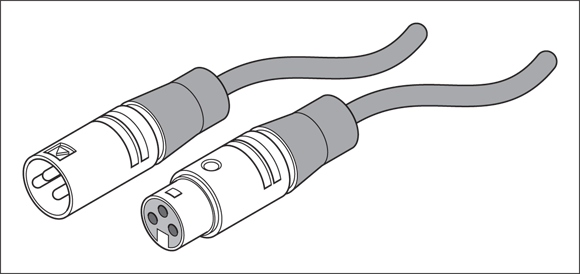
FIGURE 1-4: An XLR connector: One end is male (left), and the other is female (right).
RCA
RCA plugs — named for good old RCA and also called phono plugs — are common on home stereos and on some semipro audio gear (see Figure 1-5). They function much like a TS plug but aren’t very common in professional audio equipment. However, you find them on some mixers so that you can connect a tape deck, iPod, or other media device. They are also used for digital S/PDIF signals (see the next section for more details on these babies).

FIGURE 1-5: An RCA plug is used mainly on consumer stereo and some semipro audio equipment.
Delving In to Digital Connections
If you’re going to record using a digital recorder or mixer, you’re going to run into digital connectors (plugs and cables/cords). Digital audio equipment is a recent invention, and as such, no one standard has emerged. Because of this lack of standardization, a variety of digital connection methods are on the market, only a few (or one) of which may be on the equipment that you own or intend to purchase. Regardless, knowing about the most common types of connectors and their purposes can help you decide what equipment is right for you.
MIDI
MIDI, short for Musical Instrument Digital Interface, is a handy communication protocol that allows musical information to pass from one device to another. To allow the free passage of such information, MIDI jacks are located on a whole host of electronic instruments. Synthesizers, drum machines, sound modules, and even some guitars have MIDI jacks. And, to connect all these instruments, you need some MIDI cables. The MIDI connector contains five pins (male) that plug in to the female MIDI jack (port) on the instrument or device (see Figure 1-6).

FIGURE 1-6: MIDI connectors have two male ends. The device contains the female jack.
AES/EBU
AES/EBU (Audio Engineering Society/European Broadcasting Union) cables are much like S/PDIF cables (described in the next section). The AES/EBU standards require these cables to transmit two channels of data at a time. They differ from S/PDIF cables in that they consist of XLR plugs and use balanced cables. (Figure 1-7 shows what the inputs look like on the recording equipment.) AES/EBU was developed to be used with professional audio components, hence the use of balanced cords — the kinds used in professional-level equipment.
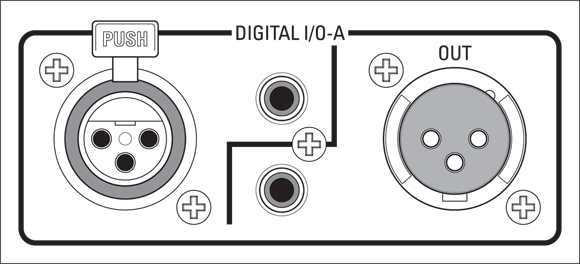
FIGURE 1-7: S/PDIF and AES/EBU connectors look the same as analog RCA (S/PDIF) and XLR (AES/EBU) but are marked as digital on the machine.
S/PDIF
S/PDIF (short for Sony/Phillips Digital Interface Format) cables consist of an unbalanced coaxial cable (one wire and a shield) and RCA plugs. (Figure 1-7 shows what the inputs look like on the machine.) These cables can also be made from fiber-optic cable and a Toslink connector. The S/PDIF format can transmit two channels of digital data at one time. S/PDIF protocols are similar to AES/EBU standards, except that S/PDIF was originally designed for the consumer market — which is why unbalanced cords are used. In spite of being developed for the consumer market, S/PDIF connectors are found on a lot of pro recording gear, along with (or instead of) AES/EBU.
If you want to use cords that are longer than 3–4 feet when you’re using an S/PDIF connector — or about 15 feet for AES/EBU connectors — your best bet is to use video or digital audio cables. Regular audio cables degrade the sound at longer distances because they can’t transmit the type of signal that digital produces without affecting the quality of the sound. If you use audio cables for longer distances, you lose some of the sound’s definition. Some people describe this sound as “grainy.”
ADAT Lightpipe
The ADAT (Alesis Digital Audio Tape) Lightpipe format allows eight tracks of digital audio to be sent at once. Developed by Alesis, ADAT Lightpipe (or simply Lightpipe for short) has become a standard among digital audio products. It consists of a fiber-optic cable that uses a special connector developed by Alesis.
TDIF
TDIF (Teac Digital Interface Format) is Teac’s return volley to the ADAT Lightpipe format. TDIF uses a standard computer cable with a 25-pin connector. Like the ADAT Lightpipe, TDIF cables can transmit eight channels of digital data at a time. TDIF isn’t nearly as common as ADAT Lightpipe because Alesis made its Lightpipe technology available to other companies to use for free. Alesis encouraged these companies to adopt it as a “standard” because the Alesis ADAT recorders were so common.
USB
USB, which stands for Universal Serial Bus, is a common component in nearly all modern computers. In fact, your computer probably has more than one USB port. In case it’s been a while since you’ve had to use your USB connection, take a look at Figure 1-8. As you can see, USB has the following different plugs that fit different jacks:
- Rectangular connector: This is called the “A” connector and is for any receiving device, such as your PC or a USB hub.
- Square connector: Called the “B” connector, this is used for a sending device, such as your USB audio interface or printer.

FIGURE 1-8: USB uses two types of connectors: the “A” connector (left) and the “B” connector (right).
Aside from having two different types of jacks and plugs, USB also has different standards, as follows:
- USB 1.1: This standard (the original) can handle a data rate of up to 12 Mbps (megabits per second).
- USB 2.0: Also called Hi-speed USB, this standard can handle 40 times the data flow of the earlier standard — 480 Mbps.
- USB 3.0: This is also referred to as SuperSpeed USB. This connection transfers data at an astounding 5 Gbps, tens times as fast as even USB 2.0.
You’ll still find some USB 1.1 audio interfaces on the market, but most have migrated to the faster, 2.0 and 3.0 versions.
FireWire
Developed by Apple, FireWire (also known as IEEE 1394 or iLink) is a high-speed connection that is used by many audio interfaces, hard drives, digital cameras, and other devices. You won’t find FireWire ports on any new computers, but you will still find some audio interfaces with them. Luckily, all these audio interfaces also have USB ports.
Like USB, FireWire comes in two flavors, which are described as follows:
- FireWire 400: This standard supports data-transfer speeds of up to 400 Mbps. Many audio interfaces currently use FireWire 400 as a way to connect with your computer. These interfaces can handle quite a few inputs and outputs.
- FireWire 800: Yep, you guessed it — this standard can handle data-transfer rates of 800 Mbps.
Thunderbolt
Thunderbolt is the fastest connectivity format to date, with speeds between 20 gigabits per second (Thunderbolt 2) and 40 gigabits per second (Thunderbolt 3). Audio interface manufacturers are excited about this amazing speed, and many experts see Thunderbolt as the next format that the pros will embrace.
Unfortunately, things got confusing when Thunderbolt 2 was quickly replaced by Thunderbolt 3 just as audio interface manufacturers rolled out a variety of Thunderbolt 2 interfaces. Each has a different type of connector (see Figure 1-9) and a different protocol, which I outline here:
- Thunderbolt 2: Thunderbolt 2 uses the mini DisplayPort and can transfer data at speeds up to 20 gigabits per second (Gbps). This was available on computers between mid-2013 and late 2015.
- Thunderbolt 3: Thunderbolt 3 employs the USB-C connector and doubles the speed of Thunderbolt 2 to 40 Gbps. You can find Thunderbolt 3 ports on computers and peripherals made after late 2015.

FIGURE 1-9: Thunderbolt is a high-speed data-transfer protocol that comes in two varieties: Thunderbolt 2 (left) and Thunderbolt 3 (right).
Working Efficiently in Your Studio
I hope you spend a great number of hours in your studio creating some great music (albeit possibly to the dismay of the rest of your family). Start by designing your studio layout for comfort and productivity. Then consider how to protect your equipment and also effectively place your audio monitors.
Setting up your studio for comfort and efficiency
One important thing to keep in mind is that you need to be comfortable. Start with a good chair. Then set up your workstation to be as easy to get around as possible. Figure 1-10 shows a classic L setup. Notice how everything that you need is within arm’s reach.
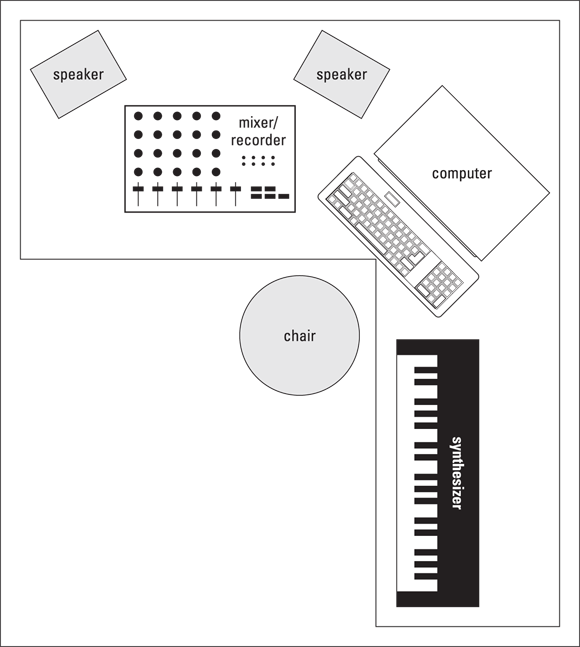
FIGURE 1-10: A classic L setup: Everything is easy to reach.
If you have enough room, you may want to consider a U-shaped setup instead. You can see an example of that in Figure 1-11. If you don’t have an external mixer/recorder, it’s often best to put the computer in the middle position.
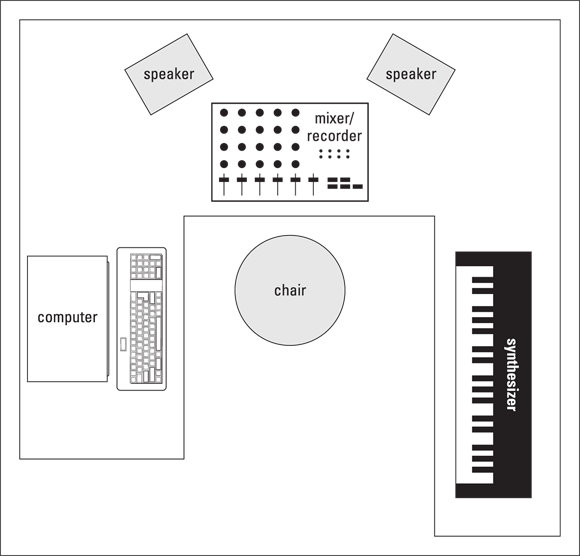
FIGURE 1-11: A U-shaped setup works great.
If you use a lot of outboard gear — such as preamps or effects processors — and you think that you need to plug and unplug a lot, invest in a good patch bay so that you don’t have to strain to get at your cords tucked away behind your mixer. A patch bay is a device that consists almost entirely of inputs and outputs, allowing you to route your gear in (and out) in an almost-infinite variety of ways. If you’re going to do much plugging and unplugging, you’ll quickly find out that a patch bay is truly indispensable.
Using a patch bay will not only save your back but will also save your cords because repeated plugging and unplugging wears them out quickly and produces buzzes that can be hard to locate.
Taming heat and dust
The number-one enemy of electronic equipment is heat. Dust is a close second. Try to set up your studio in a room that you can keep cool and fairly dust-free. Air conditioning is a must for most studios. Be careful with a window air conditioner, though, because it can make a lot of noise, requiring you to shut it off when you record. Depending on where you live, this can let your room heat up really fast. To deal with dust, try to cover up your equipment when you’re not using it, especially your microphones. A plastic bag placed over the top of a mic on a stand works well.
You can also just put your mics away when you’re not using them. However, if you use a particular mic a lot, you’re best off leaving it on a stand rather than handling it because some types of mics are pretty fragile. (You can find more on caring for your mics in Book 3, Chapter 1.)
Monitoring your monitors
If you have a set of near-field monitors — the kind that are designed to be placed close to you — they should be set up so they’re equidistant from each other and from you, at a height that puts them level with your ears. Figure 1-12 illustrates the best placement for your monitors. Placing your monitors this way ensures that you hear the best possible sound from them and can accurately hear the stereo field. (For more on the stereo field, see Book 6, Chapter 1.)
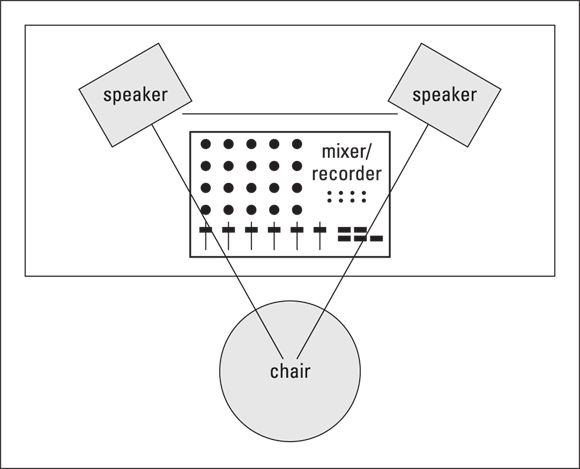
FIGURE 1-12: Monitors sound best when equidistant from each other and you.
Optimizing Your Studio
Chances are that your studio occupies a corner in your living room, a spare bedroom, or a section of your basement or garage. All these spaces are less-than-ideal recording environments. Even if you intend to record mostly by plugging your instrument or sound module directly into the mixer, how your room sounds will have a big effect on how good your music will turn out to be.
 Face it: As a home recordist, you’re unlikely to have easy access to the resources that create a top-notch sound room. Commercial studios spend serious cash — up to seven figures — to make their rooms sound, well, professional. However, you don’t need to spend near that amount of money (you mean you don’t want to sell off the private jet …?) to get great sounding recordings. All it takes is a little understanding of how sound travels, some ingenuity, and a little bit of work.
Sound isolation
One of the concerns that you (and your neighbors) are probably going to have when you start recording in your home is the amount of sound that gets in and out of your room. Sound waves are nasty little buggers. They get through almost any surface, and there’s not a lot you can do to stop it from happening.
You’ve probably noticed this phenomenon when somebody with a massive subwoofer in his car drives by blasting some obnoxious music. (Ever notice how someone else’s music is obnoxious, whereas your music never is, no matter how loud you play it? Amazing …) Your windows rattle, your walls shake, and your favorite mug flies off the shelf and breaks into a thousand pieces. Well, this is one of the problems with sound: It’s physical energy.
The best (and classic) way to isolate your studio room from everything around it is to build a room within a room.
I don’t have the space to go into detail here, but you can find resources to get you started by doing a Google search with the keywords “sound isolation.” Here are a couple of places to get you started:
- Sound Isolation Company (
www.soundisolationcompany.com): Aside from selling products to help you keep the sound in (or out) of your studio, you’ll find useful information here about the process of sound isolation. - Netwell (
www.controlnoise.com): Again, this company sells products to help control sound, but you’ll also find good basic information here to get you started.
For the purposes of most home recordists who don’t have the money or space to build a room within a room, the best thing you can do is to try to understand what noises are getting in and getting out — and deal with those. For example, if you live in a house or apartment with neighbors close by, don’t record live drums at night. You can also consider using a drum machine or electronic drum set (plugged directly into the recorder) instead.
Another idea is to try to choose a room in your house or apartment that is farthest away from outside noise (an interior room, for instance). Basements also work well because they’re underground and most of the sound gets absorbed by the ground. Installing a little fiberglass batting insulation in the ceiling — typical house insulation that you can find at your local home center — can isolate you pretty well from your neighbors’ ears. Detached garages are generally farther away from other buildings, so sound has a chance to dissipate before it reaches your neighbors (or before your neighbors’ noise reaches your garage).
Also keep these things in mind when trying to isolate your studio:
- Dead air and mass are your friends. The whole concept of a room within a room is to create mass and still air space so that the invading or escaping sound gets trapped. When you work on isolating your room, try to design in some space that can trap air (creating dead air) — such as a suspended ceiling or big upholstered furniture — or use double layers of drywall on your walls (mass).
- Don’t expect acoustical foam or carpet to reduce the noise. Using these can help reduce the amount of sound that bounces around inside the room but won’t do much to keep sound in (or out of) the room.
- Isolate the instrument instead of the room. Isolating the sound of your guitar amp can be much less expensive than trying to soundproof your whole room. Most commercial studios have one or more isolation booths for recording vocals and other acoustic instruments. You can use that concept to create your own mini isolation booths.
One idea for a truly mini isolation booth is to make an insulated box for your guitar (or bass) amp. If you just have to crank your amp to get the sound you want, you can place it inside an insulated box to reduce the amount of noise that escapes to the outside world. Check out Figure 1-13 to see what I mean.

FIGURE 1-13: An amp-isolator box reduces the amount of noise you hear from your amp, even when it’s cranked.
You can also create an isolated space in a closet by insulating it and closing the door when you record, or you can put your guitar amp (or drums) in another room and run a long cord from there to your recorder. If you do this, remember that for long cord runs, you need to use balanced cords. Otherwise you may get a bunch of noise, and your signal may be too low-level to record very well.
Sound control
After you create a room that’s as isolated from the outside world as possible, you need to deal with how sound acts within your room.
Sound travels through the air in the form of waves. These waves bounce around the room and cause reflections (reverberations or echoes). One problem with most home studios is that they’re small. Compounding this, sound travels very fast — roughly 1,130 feet per second, depending on altitude, humidity and temperature). When you sit at your monitors and listen, inevitably you hear the reflected sound as well as the original sound that comes from your speakers. In a big room, you can hear the original sound and reflections as separate sounds, meaning that the reflections themselves become less of a problem. For a good home studio, you have to tame these reflections so they don’t interfere with your ability to hear clearly what’s coming from the speakers.
How all these reflections bounce around your room can get pretty complicated. Read up on acoustics (how sound behaves) to discover more about different room modes: axial (one dimension), tangential (two dimensions), and oblique (three dimensions). Each relates to how sound waves interact while they bounce around a room. Knowing your room’s modes can help you come up with an acoustical treatment strategy, but there are very complicated formulas for figuring out your room’s modes, especially those dastardly tangential and oblique modes.
You can find out more on room modes, as well as discover some room mode calculators, on the Internet by using your favorite search engine and searching for “room modes.” Go to the website matches, and you’ll see quite a few places to start looking. I recommend that you research these modes; this topic alone can fill an entire book.
So, at the risk of offending the professional acoustical engineers in the world, I’m going to share some tricks that I’ve been using in my studios. My main goal has been to create a room with a sound I like and that gives me some measure of control over the reflections within the room. Because I both record and mix in one room (as do most home recordists), it’s helpful to be able to make minor adjustments to the sound to accommodate what it is I’m trying to accomplish.
The single best source I’ve found for sound control and acoustics information is Ethan Winer’s forum at Musicplayer.com. You can check it out at http://forums.musicplayer.com/ubbthreads.php/ubb/postlist/Board/24/page/1.
The two aspects of recording where sound control plays a major role — tracking and mixing — each require different approaches for you to get the best possible sound out of your recordings. I cover both these aspects in the following sections.
Sound control during tracking
Tracking is what you’re doing when you’re actually recording. Two things that can make a room a bad environment for tracking are:
- Not enough sound reflection
- Too much sound reflection
The goal when tracking is to have a room that’s not so dead (in terms of sound reflection) that it sucks the life out of your instrument — yet not so alive that it colors the sound too much. The determining factor in how much reflection you want in your room is based upon the instrument that you record and how it sounds in the room.
If your room is too dead (not enough sound reflection), you want to add some reflective surfaces to liven up things (the room, that is). On the other hand, if your room is too live (too much sound reflection), you need to add some absorptive materials to tame those reflections.
You can go out and buy a bunch of foam panels to catch the reflections, or maybe put in a wood floor or attach some paneling to the walls to add some life, but you’d be stuck with the room sounding only one way. It may end up sounding good for recording drums or acoustic guitar, but then it would probably be too live for getting a great vocal sound (which requires a deader space). One solution that I’ve found to work well is to get (or make) some portable panels that can either absorb or reflect the sound.
Figure 1-14 shows an absorber/reflector that I’ve used and have found to work quite well. One side has an absorptive material (dense fiberglass insulation), and the other side has a reflective surface (wood). They are put together in an attractive frame and designed to stack easily when you want them out of the way. Even with very little woodworking experience, you can crank out a set of them in a weekend for very little money (about $50 per panel). I guarantee that if you make them (or hire someone to make them for you), you’ll find dozens of uses for them around your studio.

FIGURE 1-14: Portable absorbers/reflectors make changing the sound characteristics of your room quick and easy.
Sound control during mixing
Your first step in getting control of the sound of your (probably less-than-perfect) room during mixing is to get a good pair of near-field monitors. Near-field monitors (as you can read about earlier in this chapter) are designed to be listened to up close (hence the “near” in their name) and will lessen the effects that the rest of the room has on your ability to hear them accurately and get a good mix.
The next step to mixing in an imperfect room is to mix at low volumes. I know: That takes the fun out of it, right? Well, as fun as it may be to mix at high volumes, it rarely translates into a great mix. Great mixing engineers often listen to their mixers at very low levels. Yes, they occasionally use high levels, but only after the mixing is pretty much done — and then only for very short periods of time. After all, if you damage your ears, you blow your career as a sound engineer. (Hey, that rhymes! Or is there an echo in here?) I don’t want to sound like your mother, but try to resist the temptation to crank it up. Your ears last longer, and your mixes sound better.
Even with these two things (near-field monitors and low mixing levels), you still need to do something to your room to make it work better for you. The secret to a good mixing room is to tame the reflections of the sound coming out of your speakers.
Dealing with high and midrange frequencies is pretty easy — just put up some foam panels or the absorptive side of the panels shown in Figure 1-14. (See? I told you that you’d have a use for those panels.) Start by hanging two (or putting them on a stand or table) so they’re level with your speakers on the wall behind you. Also, put one on each sidewall right where the speakers are pointed. (See Figure 1-15.) This positioning gets rid of the higher frequencies and eliminates much of the echo.
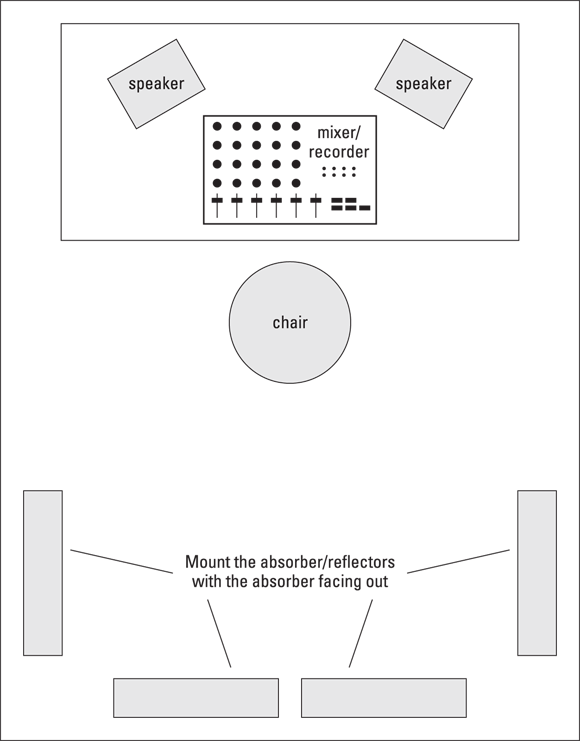
FIGURE 1-15: Positioning the absorber/reflectors like this helps with mixing.
You may also need to put something on your ceiling right above your head, especially if you have a low (8 feet or less) or textured ceiling. (You know, one with that popcorny stuff sprayed on.) You may not want to mount one of the absorption panels over your head because they’re fairly heavy. Wrapping up a couple of 2-x-4-foot panels made of dense fiberglass (the same ones used in the absorber/reflectors) in fabric would work just about perfectly (see Figure 1-16).

FIGURE 1-16: Use overhead panels to get rid of reflections off the ceiling.
You can also place a set of these overhead panels in the corners of your room behind the speakers. Just hang them at the same height of your speakers so that they cut off the corner of the room. If there isn’t enough room to fit the panels at an angle in the corner, you can eliminate the backing from the fiberglass and bend the fabric-covered panel to fit right in the corner. Either approach will absorb sound that may otherwise bounce around behind the speakers.
Another thing that you need to consider when you’re mixing is standing waves, which are created when bass tones begin reflecting around your room and bounce into each other. Standing waves have a weird effect on mix quality. They can either overemphasize the bass from your speakers (resulting in mixes that are short on bass) or cancel out some — or all — of the bass coming out of your speakers (resulting in mixes with too much bass). One of the problems with standing waves is that they can really mess up your mixes, and you may not even be aware that they are there.
To find out whether you have a problem with standing waves in your studio, sit in front of your monitors and put on one of your favorite CDs. Now listen carefully. Okay, now lean forward and backward a little bit. Does the amount of bass that you hear change as you move? Next, get up and walk around the room. Listen for places within the room where the bass seems to be louder or softer. You may find places where the bass drops out almost completely. If either inspection gives you a variable experience of the bass, you are the proud owner of standing waves. Don’t worry, though. You can tame that standing-wave monster with a pair of bass traps.
Bass traps absorb the energy in the lower frequencies so they don’t bounce all over your room and throw off your mixes. You can buy bass traps made of foam from some music stores, or (yep, you guessed it) you can make your own out of wood and insulation. Check out Figure 1-17 for a look at some homemade bass traps.

FIGURE 1-17: Use bass traps to get rid of standing waves.
The most common placement for bass traps is in the corners behind you when you’re sitting at your mixer (as shown in Figure 1-18). You may also find that putting a set in the other corners of the room helps even more.
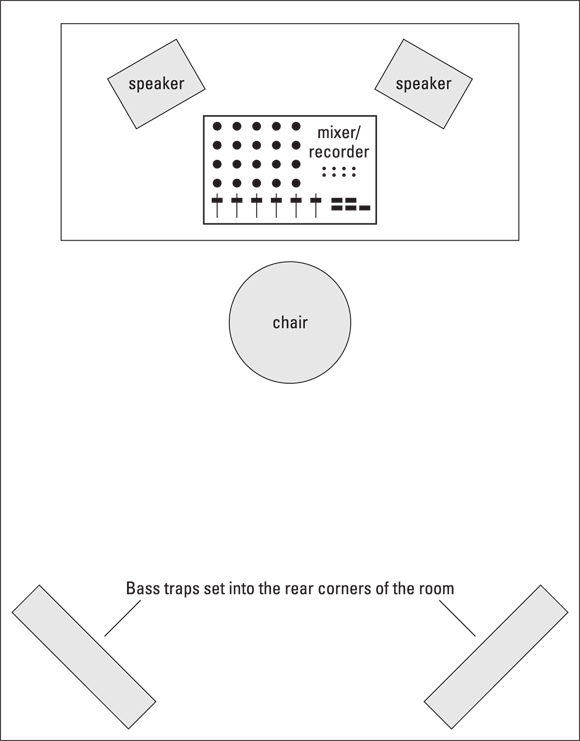
FIGURE 1-18: Put bass traps in the corners behind you to eliminate standing waves.
After you place the bass traps, do the listening test again. If you notice some areas where the bass seems to get louder or softer, try moving the bass traps around a little. With some trial and error, you’ll most likely find a place where they seem to work best.
Try not to get stressed out about the sound of your room. As important as your room’s sound may be, it has a lot less effect on the quality of your recordings than good, solid engineering practices. I know, I keep saying this, but it’s important to remember. Do what you can, and then work with what you’ve got.