
Chapter 2
Setting Up Your Mix
IN THIS CHAPTER
![]() Understanding signal flow
Understanding signal flow
![]() Routing inserts and sends
Routing inserts and sends
![]() Getting to know the Output windows
Getting to know the Output windows
![]() Using plug-ins
Using plug-ins
![]() Processing external effects
Processing external effects
Before you can actually mix anything in Pro Tools, you have to get a few preliminaries out of the way first. More specifically, you need to become familiar with the Mix window, have a good grasp of how the signal flows through the system, know how to create auxiliary inputs and master faders, and get up to speed on inserts and sends. This chapter gives you the details on all these things.
Revisiting the Mix Window
When you mix in Pro Tools, you spend most of your time working in the Mix Window, as shown in Figure 2-1. The Mix window contains the channel strips for each track, routing information, and your master faders. Each part of the Mix window is covered in detail in Book 2, Chapter 3.
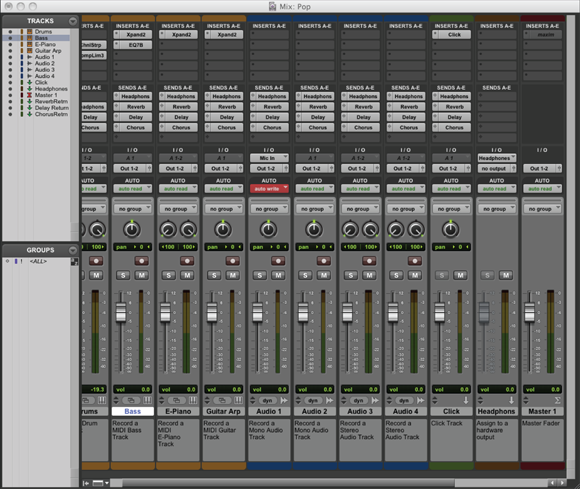
FIGURE 2-1: The Mix window is where you do your mixing in Pro Tools.
 To open the Mix window, choose Window ⇒ Mix from the main menu or press ⌘ += (equal sign; Mac) or Ctrl+= (equal sign; PC). You can then set up the display parameters of the window by choosing View ⇒ Mix Window from the main menu and choosing the options you want included in the view, as shown in Figure 2-2.
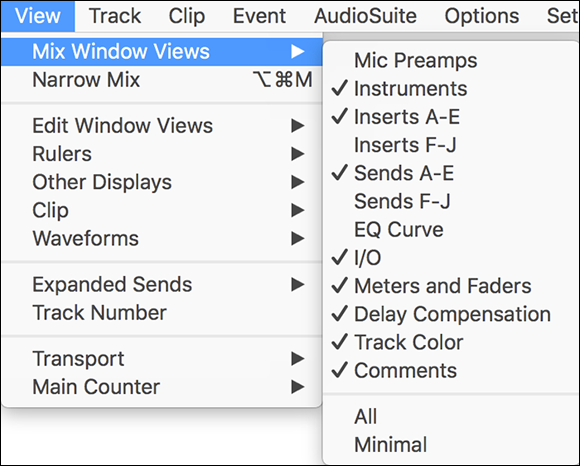
FIGURE 2-2: Select parameters to view in the Mix window.
Getting to Know Signal Flow
Knowing how the tracks you record are routed through Pro Tools can help you make the best choices and keep your sound top-notch while you mix your song. Figure 2-3 shows how the signal (represented by the clip in your audio tracks) flows through the track channels in the Pro Tools mixer (shown in the Mix window).

FIGURE 2-3: The signal flows through the Pro Tools mixer from top to bottom.
The audio enters the mixer at the top of the diagram and flows downward. From top to bottom, here’s how the signal flows through the channel strip:
- Source audio or input: This is the signal that’s coming from your hardware input or that’s recorded to your hard drive. The signal starts here and enters the track’s channel strip.
- Insert: This function lets you insert effects into your track. This function is for effects, such as equalizers or dynamics processors, where you want to change the sound of the entire signal.
Send Prefader: The Send function lets you route part of your signal out to an Aux bus, where you can then insert an effect such as reverb. With effects such as reverb, you don’t want to use the Insert function — as you would with a compressor — because you want to be able to control how much of the effect you hear. (Compressors only enable you to affect the entire signal, not some portion of it.)
Adjust this slider or knob to send as much or as little of the signal to the appropriate auxiliary component (Aux, get it?) for effects processing, applying as much or as little of that effect to your final sound. Turning the knob to the left produces less effect, and turning it to the right gives you more effect.
Along with being able to set the Effect Send level at each channel (you can send more than one channel’s signal to each effect), you can also adjust the level of the affected signal that’s brought back into the mixer by using the Aux bus fader (which is described in the next section).
 The Aux Send function can often be set to send the track’s signal either prefader or postfader. Having this option gives you more flexibility to control the affected sound. For example, you can send the dry signal of a kick drum to a reverb (with the switch in the Pre position) and then boost the bass on the dry signal. Doing this gives you some reverb on the higher frequencies without adding it to the lower ones, which would create some mud in the final mix.
The downside to this technique is that you can’t control the level of the signal being sent to the effect using the fader. (You bypassed the fader in the Pre position.) In this case, if you raise and lower the channel fader, the amount of effect that you hear in relation to the dry signal changes as well. For example, when you lower the fader, you hear more effect because less dry signal is mixed in — and when you raise the fader, you hear less effect because the dry signal is louder and the effect level is the same.
- Solo and Mute: These buttons let you solo (silence all other tracks) and mute (silence) the output of the track.
- Fader: This function lets you control the level (volume) of your signal leaving the track and going to the output(s) you have chosen in the Output section of the channel strip.
- Send Postfader: When you have the Pre button disengaged, your Send signal is sent from your track after it passes through the track fader. Adjusting the volume of the track also adjusts the level going through your Send function.
- Pan: This control lets you adjust the amount of your signal that goes to the left or right channel of your stereo output.
- Output: This is where your signal goes as it leaves the track’s channel strip. This can be the master bus.
To create a new track (audio, MIDI, auxiliary input, or Master fader), choose Track ⇒ New from the main menu to call up the New Track dialog box, where you can choose the type of track you want to create. (Book 3, Chapter 1 covers this process in detail.)
Rounding Out Your Routing
When you start mixing in Pro Tools, it helps to have few routing setups under control. You need a Master fader so you can control the volume leaving Pro Tools, and you need to know how to use the Insert and Send portions of the channel strip so that you can insert effects into your tracks. The following sections outline these procedures.
If you’re using version 6 or later, you can make a track inactive by ⌘ +Control-clicking (Mac) or Ctrl+Windows-clicking (PC) the Track Type indicator in the lower right of the track’s channel strip (as shown in Figure 2-4). This frees up processing power, which I recommend for any tracks in your session that you don’t want to play.
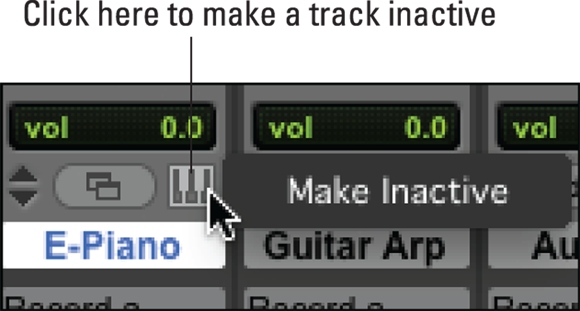
FIGURE 2-4: Make a track inactive to free processing power.
Using a Master fader
You use a Master fader to control the level coming out of all the tracks routed to it. Here’s a short list of a few of the things you can do with a Master fader:
- Control the main level of your mix. This is the standard use of this fader. All your tracks are routed to the Master fader, and you use it to control the overall level going to your monitors.
- Control submix levels. To control submix levels, route the tracks that you want to submix to one of your buses and assign the input of the Master fader to this bus. The output of this Master fader goes to your Master bus. You can set the individual levels of the submixed track at each track’s fader and the combined level at this submix’s Master fader.
- Control effect-send levels. You can route your sends — signals going through the Send section of your track — to a bus and designate that bus as the input of a Master fader. You can then insert your effect into this Master fader’s input, setting the resulting output to go to your mix bus’s Master fader.
- Add effects to your entire mix. You can add effects, such as compression or reverb, to the entire mix by placing it in the insert of the Master fader.
To create a Master fader, follow these steps:
Choose Track ⇒ New from the main menu.
The New Track dialog box appears.
- Use the drop-down menus to enter the number of tracks you want, the type (in this case, choose Master Fader) and whether you want your tracks(s) in stereo.
Click Create.
The Master fader appears in your session.
Click the Master fader’s Output selector — the second of the three buttons in the middle of the channel strip — and set it to the output that you want it to control.
If you want to make this the Master fader for your main mix bus, set this to the main outputs that all your tracks are routed to.
Adding auxiliary inputs
Auxiliary inputs are pretty much like audio tracks except that they receive a signal from within Pro Tools instead of from some external source (such as a microphone). Auxiliary inputs let you route internally and are great for some vital mixing tasks such as
- Sending several tracks to a single effect processor: This can reduce the stress on your system and can help you to make your tracks sound more cohesive — by blending their reverb sounds together, for example.
- Controlling a submix with a single fader:Submixing combines tracks before they are mixed by the Master bus. Chapter 7 in this mini-book details how to perform a submix in Pro Tools.
- Inputting audio signals from your MIDI devices: This lets you monitor the output from your MIDI devices when your MIDI tracks trigger them.
To create an auxiliary input track, follow these steps:
Choose Track ⇒ New from the main menu.
The New Track dialog box appears.
- Use the drop-down menus to enter the number of tracks you want, the type (in this case, choose Auxiliary Input), and whether you want your tracks(s) in stereo.
Click Create.
The auxiliary input appears in your session.
Click the track’s Input selector — the topmost of the three buttons in the I/O section of the channel strip — and choose the source for this track.
This can be an internal bus or a hardware input.
- Click the Output selector — the second of the three buttons in the middle of the channel strip — and set it to the output you want to send the signal.
Inserting inserts
Inserts are effects that you can place into a track’s signal to alter its sound. For example, inserting a compressor lets you control the dynamic range of your track, and inserting a delay can add an echo effect to your instrument. You can have up to ten inserts in each track in Pro Tools. You can use either hardware or software (plug-in) effects in these inserts.
The signal passes through the effects in the order — from top to bottom — in which they appear in the Insert section of your track’s channel strip. For example, in Figure 2-5, the signal goes through the compressor before it goes through the reverb. To change the order of your insert, simply click and drag it up or down the list.

FIGURE 2-5: Rearrange inserted effects by dragging.
To insert an effect into a track’s channel strip, follow these steps:
Enable the Insert view in the Mix window by choosing View ⇒ Mix Window ⇒ Inserts from the main menu.
The Insert section of the Mix window appears at the top of your track’s channel strip.
- Click an entry in the Insert section to open the drop-down menu.
Select a plug-in to insert (or the hardware output/input you want if you’re using an external effect).
If you choose a plug-in, the plug-in window opens. (See the “Playing with Plug-ins” section, later in this chapter, for more information.)
Turning off the effect in an insert
Here are the three ways to turn off the effect in an insert:
- Remove the insert. To remove the insert from the track, choose No Insert from the Insert drop-down menu. (Click and hold over the arrows located to the left of the Insert name to access the menu.) This removes the insert from the track and moves any inserts below it up the line.
- Bypass the effect. Do this by engaging the Bypass button in the plug-in window. To open this window, click the Insert name in the Insert section of the track’s channel strip. This keeps the effect inline but turns it off. The effect still draws processing power even though you don’t hear it.
- Make the insert inactive. Do this by pressing ⌘ +Control (Mac) or Ctrl+Windows (PC) while you click the plug-in’s name in the Insert section of the channel strip. Doing so removes the effect from the signal chain but not from the Insert section. This frees up processing resources and allows you to turn on the insert at any time. (You simply repeat the keystrokes-and-click you used to turn it off.)
Setting up sends
You can send the signal from your track to another bus for processing. Pro Tools lets you have up to ten such sends per audio, instrument, or auxiliary track. Sends are useful for two major purposes:
- Applying effects to more than one track, which you can do internally (using a plug-in) or externally (using a hardware device)
- Creating submixes that combine several tracks into one or two tracks
You can choose to send the signal pre-fader or post-fader, which means the signal going to the send is either sent before or after it travels through the track’s fader. The Pre-Fader or Post-Fader options, along with the Send Level, Panning, and Mute options, are accessed through the Send window, as shown in Figure 2-6. You access this window by clicking the Send name in the Send section of the track’s channel strip. If the Send section isn’t visible in the track’s channel strip, enable the Send view in the Mix window by choosing View ⇒ Mix Window ⇒ Sends from the main menu.

FIGURE 2-6: Use the Send window to determine send level, mute, pan, and pre- or post-fader settings.
To assign a send, follow these steps:
Enable the Send view in the Mix window by choosing View ⇒ Mix Window ⇒ Sends from the main menu.
The track channel strips expand to include the Sends section, located between the Inserts and I/O sections of the channel strip.
- Click one of the entries in the Send section to open the entry’s drop-down menu.
Select the bus or hardware output/input to which you want to send the signal.
The Send window opens.
In the Send window, select Pre-Fader or Post-Fader.
Selecting Pre-Fader sends the signal from your track before the fader control for that track and selecting Post-Fader sends the signal after it passes through the channel’s fader.
- While still in the Send window, adjust your level, panning, and mute settings.
To assign an effect to this sent signal, follow these steps:
Choose Track ⇒ New from the main menu.
The New Track dialog box appears.
- Use the drop-down menus to enter the number of tracks you want, the type (in this case, choose Auxiliary Input), and whether you want your tracks(s) in mono or stereo.
Click Create.
The auxiliary input appears in your session.
- Assign the input for this auxiliary track to the bus that you chose for your send destination in the previous list.
Follow the steps for inserting an effect into a track.
See the earlier section, “Inserting inserts.”
Viewing sends
You can view your sends, send controls, and send assignments by opening the following windows in your session:
- Send A-E Views: You can see the controls for a send in the track’s channel strip by choosing Views ⇒ Mix Window ⇒ Sends A–E (or F–J) from the main menu, where A–E represents a listing of the sends you have available to work with.
- Send View Level Meters: If you want to add to the basic Send view (see the previous bullet) to include level meters for the Send signal, select Show Meters in Sends View on the Metering tab of the Preferences dialog box. (Choose Setup ⇒ Preferences from the main menu to access this dialog box.)
- Send Assignments: You can show Send assignments for your tracks by choosing View ⇒ Mix Window ⇒ Sends A-E (or F-J) ⇒ Assignments from the main menu. This lets you see the names of the sends assigned to a track.
- Send Output Window: You can open a window that contains all the Send settings in a large format by clicking the name of the Send in the Send section of the track’s channel strip. This Send Output window is explained further in the upcoming section, “Accessing Output Windows.”
- Send Names: As one more way to stay organized, you can name the destination buses for your sends. Do so by choosing Setup ⇒ I/O from the main menu and then clicking the Bus tab on the I/O Setup dialog box. On the Bus tab, double-click the name of one of the buses (to highlight it) and then type in its new name, as shown in Figure 2-7.

FIGURE 2-7: You can create names for your buses to keep your effect sends straight.
Turning off the effect in a send
Here are three ways to turn off the effect in a send:
- Remove the send. To remove the send from the track, choose No Send from the Send drop-down menu. (Click and hold over one the arrows in the Send section of a track’s channel strip to open the drop-down menu.) This removes the send from the track and moves any other sends below it up the line.
- Bypass the effect. Do this by engaging the Bypass button in the plug-in window. This keeps the effect inline but turns it off. The effect still draws processing power even though you don’t hear it. To open the plug-in window, click the name of the plug-in in the track that this plug-in is inserted into. The Bypass button is located at the top of the window.
- Make the send inactive. Do this by pressing ⌘ +Control (Mac) or Ctrl+Windows (PC) while you click the send bus’s name in the Sends list. Doing so removes the effect from the signal chain but not from the Sends list. Making a send inactive frees processing resources, but you can still turn on the send at any time. (Simply repeat the keystrokes-and-click you used to turn it off.)
Using sends for groups
Controlling the send level and mute for sends across an entire group can be an enormous help because you can use one set of controls for all the tracks in a group. To control sends for a group, do the following:
Choose Modify Groups from the Mix Groups drop-down menu.
You can find this in the lower left-hand corner of the Edit window.
The Modify Groups dialog box appears.
Check the Send Levels option and/or the Send Mutes option under the Attributes or Globals tab (if the Follow Globals check box is checked) within the Modify Groups dialog box.
This sets it up so that the following happens:
- If you select Enable Sends: Any send level change you make on one track in the group affects all the tracks in a group.
- If you select Send Mutes: Any send mutes that you create on one track in the group affect all the tracks in a group.
For more on group sends, see Chapter 6 in this mini-book.
- Click OK.
Accessing Output Windows
Output windows are floating sections of either the channel strip or the send settings. These windows allow you to adjust Output controls without having to search for them in the Mix window. This section details the Send and the Track Output windows.
Tackling Track Output windows
Track Output windows contain Fader, Pan, Automation, Output Selector, Solo, and Mute controls, as shown in Figure 2-8.
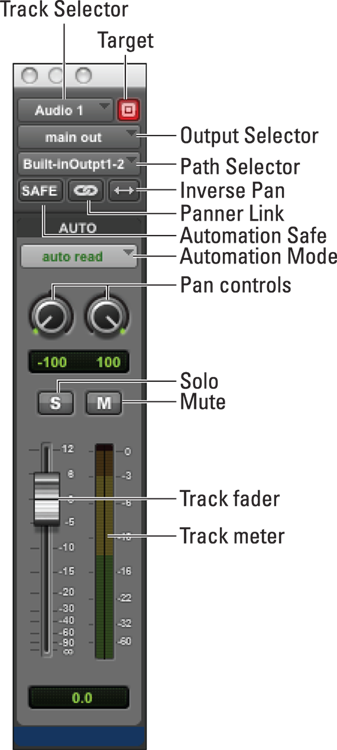
FIGURE 2-8: Use the Output window for a track to adjust Output parameters from outside the Mix window.
To open a Track Output window, just click the Output Window button in the track’s channel strip in the Mix window, as shown in Figure 2-9.
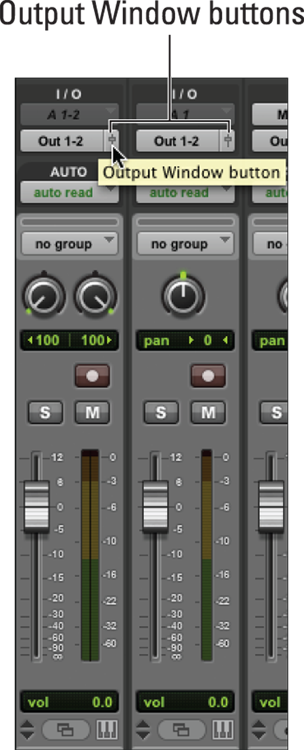
FIGURE 2-9: Open a Track Output window by clicking the Output window button in the Mix window.
The track output window includes the following controls:
- Close: Clicking this button closes the window.
- Path Meter View Box: When you click this button (the last button to the right at the top of the window), another window opens, showing the meters for the output path you selected in the Path Selector box. (See the upcoming Path Selector bullet.)
- Track Selector: This box lets you choose the track that shows in this window. You can choose from any track (audio, auxiliary input, or Master fader) in your session.
- Output Selector: From this box, you can choose from among the outputs (whether track or send) in your system.
- Path Selector: This button lets you choose the output path for the current track.
- Automation Safe: Clicking this button puts the track in Automation Safe mode where no new automation data can be written. (Chapter 6 in this mini-book has more on automation data.)
- Target: Engaging this button keeps this track’s window open if you click another Track or Send Output window. With the Target button disengaged (the button is red), whenever you open a send in the Output Selector box (see the earlier bullet) or another track’s Output Window button, the current track is replaced by the new Track or Send Output window.
- Inverse Pan: For stereo tracks, this button ensures that when you move one of the pan controls (left or right), the other moves to exactly the opposite side. Make sure that the Panner Link button (see next bullet) is depressed so this function can work.
- Panner Link button: This button links the two pan controls on a stereo track. With this button engaged, moving one panning slider also moves the other to the same location; when the button is not engaged, you can move each panning control independently.
- Pan controls: These adjust the pan setting for the track.
- Track fader: This adjusts the volume of the track.
- Track meter: This display shows the level of the track as the session plays.
- Mute: Depressing this button mutes the track.
- Solo: Clicking this button solos the track.
- Automation Mode: From this drop-down menu, you choose the automation mode for your track.
Setting up the Send Output window
The Send Output window, as shown in Figure 2-10, shows the same basic information as the Track Output window (refer to Figure 2-8), with two exceptions:
- Send Selector: Instead of viewing and selecting the output for the track (Output Selector), you can choose any of the five sends for the track.
- Pre/Post button: This button controls whether the send is located before (pre) or after (post) the track’s fader control. This is the button marked Pre, located just below the name of the track that feeds this send. Engaging this button sends the signal before the fader (pre-fader), and leaving the button untouched sends the signal after the fader (post-fader).
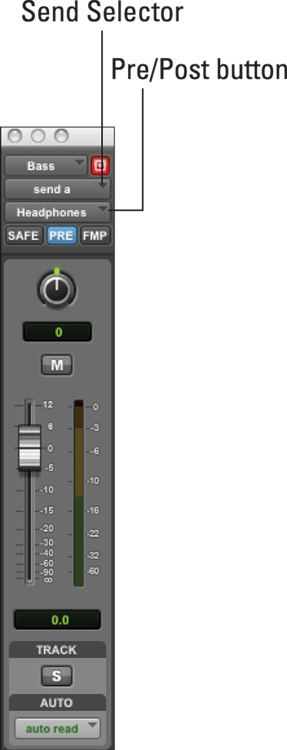
FIGURE 2-10: Use the Send Output window to assign send controls with minimum fuss.
To open a Send Output window, just click the Send name in the track’s Send list in the Mix window.
Playing with Plug-ins
Whenever you want to process tracks in Pro Tools — add EQ, effects, or dynamics processors — you use a plug-in. Plug-ins are audio-processing tools that change the sound of your original file. Some plug-ins permanently alter the original file and work offline (that is, processing happens without playing the session). This is the case with pitch-shifting, for example. Other plug-ins — reverb, for example — affect the audio file without permanently changing it, processing the audio in real time while the session plays.
These two types of audio processing — offline and real-time — are some of the more powerful mixing tools available to you in Pro Tools. With them, you can EQ your tracks and add compression, reverb, delay — and a myriad of other enhancements — to your music. Your only limitations are the plug-ins you have at your disposal and the processing power of your computer and your pocketbook. The following sections introduce you to the two types of plug-ins — Real Time and AudioSuite — and then show you how to route your system so you can use them effectively.
Real Time Plug-ins
Real time plug-ins process your audio while your session plays, allowing you to make adjustments on the fly and be able to hear these changes immediately. This is handy for adding compression, delay, and reverb, for example. The drawback to this is that anytime you process as your session plays, you’re using up more of your computer’s processing power — sometimes a lot more, as in the case of reverb. The following sections lay out the basics of using Real Time plug-ins; see Chapters 3–5 in this mini-book for more detailed information. Pro Tools requires plug-ins in the AAX, 64-bit format.
Routing your Real Time plug-ins
Real Time plug-ins are like the effects processors that you plug into your mixer. The sound from your tracks are sent to these effects and routed back through the mixer so you can hear the affected sound.
The two ways to place these effects in your mixer within Pro Tools are by using inserts or by using sends and returns. (Check out the earlier section, “Rounding Out Your Routing,” for more on inserts and sends.)
Inserts: Inserting a plug-in basically involves putting the effect inline with the audio as it travels through the channel strip in your mixer. This means all the sound from the audio file passes through the effect on its way out of the mixer (and to your ears).
When you insert a plug-in, you can choose from three formats:
- Mono in/mono out: One channel goes in and one comes out of the effect.
- Mono in/stereo out: One channel goes in, and two come out.
- Stereo in/stereo out: Two channels go in, and two channels come out.
- Sends: Using a send for your effects lets you route a portion of your track’s signal that you can then control with the Send level. These sends are routed to an auxiliary track, into which the effect is inserted. Thus you can route more than one track to a single effect.
Understanding the Real Time Plug-In window
When you select a plug-in (or click its name in the Inserts section of a track’s channel strip), a window opens, displaying all the controls for the plug-in, as shown in Figure 2-11. Most plug-ins usually have controls at the top of the window, similar to the ones described in the following list:
- Track Selector: This control lets you choose to view the plug-ins for any of the tracks in your session (except MIDI). Selecting a track without a plug-in shows no insert.
- Insert Position Selector: Use this to access any insert on the current track.
- Plug-In Selector: From this menu, choose from any Real Time plug-in that’s located in your Plug-Ins folder (the one located within the Pro Tools folder on your hard drive).
- Effect Bypass Button: This button (surprise, surprise) bypasses the effect, allowing you to quickly and easily compare the affected and unaffected sounds. A bypassed effect shows as blue in the Mix and the Edit windows. If you bypass some (but not all) of a multi-mono effect, the effect shows as purple in the Mix and the Edit windows. This makes it easy for you to see whether one of your effects is bypassed without having to open all your Plug-In windows.
- Settings menu: Clicking and holding on the arrows at the left side of the plug-in window accesses the Settings drop-down menu, as shown in Figure 2-12, which lets you save, copy, paste, import, delete, and lock your plug-ins’ settings, as well as set plug-in preferences (such as where to store these settings).
- Librarian menu: From this drop-down menu, choose from plug-in settings you have stored. This menu is activated by clicking and holding the setting name (labeled Factory Default in Figure 2-11) next to the arrows for the Settings drop-down menu.
- Previous (-) button: Clicking this button moves to the previous saved plug-in preset in your preset list.
- Next (+) button: Clicking this button moves to the next saved plug-in preset in your preset list.
- Preset list button: Click this button to open the plug-in preset list, from which you can select the preset you want.
- Compare button: Click this button to toggle between your current and your previous setting.
- Auto button: Clicking this button opens the Plug-In Automation dialog box, from which you can set automation for your selected plug-in parameters. (Chapter 6 in this mini-book has more on automation.)
- Automation Safe button: Engaging this button keeps any written automation data from being overwritten.
- Master Link button: Enabling this button allows you to control all channels of a multi-mono plug-in at once. You can see the channels of your session in the gray box above this button. The small black square represents the channels. In Figure 2-11, you see two because this is a stereo session. The left square represents your left channel, and the right square represents your right channel.
- Channel selector: This button lets you choose the channel to adjust for the plug-in.
- Target button: Depressing this button keeps the current Plug-In window open when you open another plug-in. With this button off, clicking the plug-in name in a track’s insert replaces the open window with a new window.
- Phase Invert button: This button (not available on all plug-ins) allows you to reverse the phase of the audio passing through the plug-in. This means flipping the waveform top to bottom. Book 5, Chapter 1 has more on waveforms.
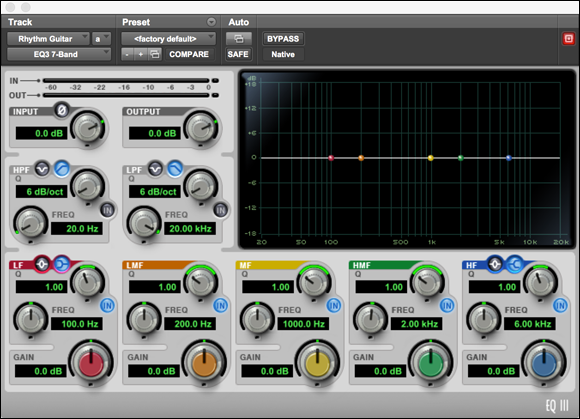
FIGURE 2-11: Most plug-in windows have some similar controls.
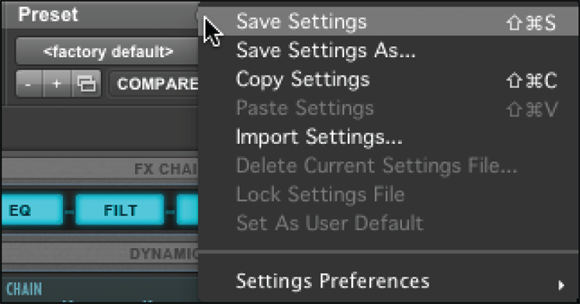
FIGURE 2-12: Use the Plug-Ins Settings menu to save settings, among other things.
Working with Real Time plug-ins
Chances are that you’ll spend quite a bit of time using plug-ins. Unless you have a control surface, you’ll probably end up spending more time than necessary just mouse-jockeying the controls. In the following list, I offer some shortcuts to make working with plug-ins quicker and easier:
- To make fine adjustments with your mouse: Press ⌘ (Mac) or Ctrl (PC) while you drag the plug-in control.
- To return a control to its default setting: Press Option (Mac) or Alt (PC) while you click that control.
- To move through the controls in a plug-in: Press the Tab key on your keyboard. To go backward, press Shift+Tab.
- For plug-in parameters that offer kilohertz (kHz) values: Press the K key after the number of kilohertz you want to enter. For example, to enter 10 kHz, type 10k.
- To increase the value of a parameter without using your mouse: Press the up-arrow key (↑) on your keyboard; to decrease a value, press the down-arrow key (↓).
- To enter a value via your keyboard: Type in the value in the parameter box and then press Return/Enter.
Using AudioSuite offline plug-ins
Pro Tools comes with a variety of offline plug-ins — that is, effects that you can use to process your tracks so that you end up either altering the original audio file or creating a new one. These types of plug-ins are listed under AudioSuite in the main menu. Figure 2-13 shows the AudioSuite menu. Each item expands to include all plug-ins available for that plug-in type.
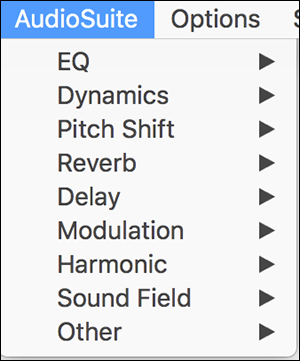
FIGURE 2-13: Use AudioSuite plug-ins to process your tracks offline.
When you select a plug-in from the AudioSuite menu, a window opens, containing all the controls for the plug-in, as shown in Figure 2-14. You’re going to find the same kinds of controls for nearly all the plug-ins. They include the following:
- Plug-in Selector: From this menu, choose from any AudioSuite plug-in listed in the AudioSuite menu.
- Selection Reference: This menu lets you choose which clips are processed. By default, when you select a clip in the track, the playlist, or the Audio Clips list, all occurrences of the selected clip are processed. You can limit the processing to the track/playlist or the Audio Clips list by selecting from the drop-down menu. Your choices are
- Playlist: If you choose Playlist, only clips that are selected in tracks or playlists in the Edit window are processed.
- Clip List: If you choose this option, only clips selected in the Audio Clips list are processed.
- Use in Playlist: This button lets you choose whether your chosen processing happens to all instances of your selected clips throughout the session, or whether processing happens to only those you have selected. The settings are as follows:
- Off: When this button is disabled, your processed audio is added to the Audio Clips list but not put into the session.
- On: When this button is enabled, the processed audio is placed in the playlist according to the Selection reference you chose. (See the Selection Reference bullet.) If you have Clip List selected, all copies of the clip are replaced within the session. If you selected Playlist, only the clips that you selected in the tracks are replaced.
- File Mode Selector: From this menu, choose how your audio is processed. You have three options:
 Overwrite Files: This option destructively overwrites your original file. Not all plug-ins have this option.
- Create Individual Files: This option creates a new audio file for each clip processed. These clips appear in the Audio Clips list.
- Create Continuous File: Choosing this option processes the selected clip as a single audio file. This option isn’t available when you have Clip List chosen as your Selection reference. (See the earlier Selection Reference bullet.)
- Process Mode Selector: This menu appears if you have a selection that includes more than one clip. With it, you can select whether processing is done clip by clip or whether it affects the entire selection.
- Settings menu: This drop-down menu lets you save, copy, paste, import, delete, and lock your plug-ins settings as well as set plug-in preferences (such as where to store these settings). Figure 2-12 shows this menu.
- Librarian menu: From this drop-down menu, choose from plug-in settings that you have stored.
- Compare button: Click this button to compare the unprocessed sound with the processed sound.
- Preview button: Pressing this button lets you preview the audio before you commit to processing it.
- Bypass button: This button bypasses the effect, allowing you to quickly and easily compare the affected and unaffected sounds. (This button applies only to the Preview feature and doesn’t change the processing of the file.)
- Process: Clicking this button processes the clip(s) you selected according to the rest of the settings in this window.
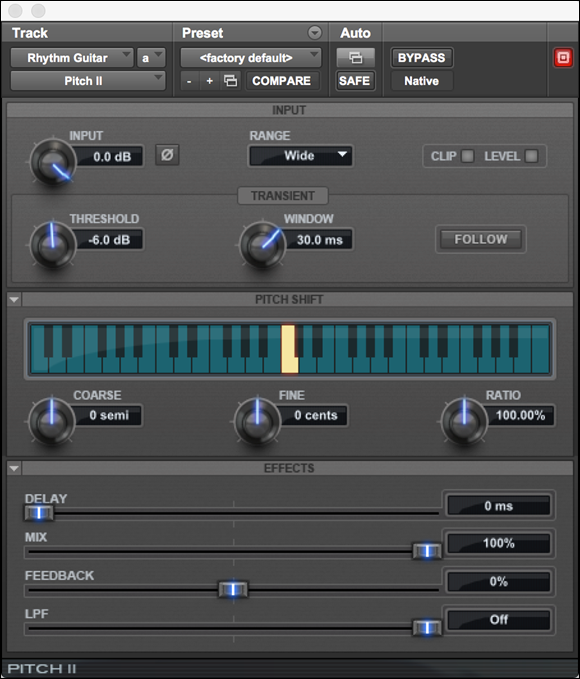
FIGURE 2-14: AudioSuite plug-in windows have some similar controls.
Using AudioSuite plug-ins to process an audio clip
You can use the AudioSuite plug-ins to process any part — or all — of an audio clip. If you choose part of a clip, that clip is split so the selected part becomes its own clip.
To use an AudioSuite plug-in, follow these steps:
With the Selector tool, select the clip or clips (click and drag across them) in the Edit window you want to process.
Book 5, Chapter 2 details this process.
When you process audio by using the Reverb or Delay plug-ins, make sure your selection includes extra room at the end of your material to include the actual reverb and delay; otherwise, the sound will be cut off.Choose the plug-in from the AudioSuite menu.
The Plug-In window appears.
- Click the Speaker icon in the lower left (Preview Processing) to hear your selected material.
Adjust the plug-in controls until you get the sound and processing settings you want.
The previous section spells out what these settings are for.
Click the Render button.
Pro Tools processes your audio.
Be aware that the processing can take some time and always demands some computer resources.
Processing with External Effects
You can connect external effects devices (such as a reverb or compressor) to Pro Tools and easily route your sends or inserts to them. The advantage of using an external device (with its own dedicated source of processing power) is that you can reduce demand for your system’s resources. The disadvantage is that going out and back into Pro Tools takes at least some time; you get a delay (latency) in the returned signal, especially if you’re using the analog connection in your Avid interface. This latency isn’t much of a problem with reverbs because a pre-delay on the effect is often desirable anyway, but it can be a real issue if you use an analog compressor. (Chapter 5 in this mini-book talks about pre-delay on reverb.)
The best way to eliminate the latency inherent in routing to an external analog device is to record your effect to a new track and then shift over the new clip in that track so that it synchronizes with the source track for that instrument. (Book 5, Chapter 3 explains the process of shifting clips.)
Using an external effects device requires three simple steps: creating a hardware insert, connecting the device to your interface, and assigning the insert in your track. How do you go about that? Glad you asked.
Creating a hardware insert
Before you can route your track’s insert to an external device, you need to create a hardware insert — an insert in a track that routes your signal to one of the hardware inputs and outputs of your Avid interface. Follow these steps:
Choose Setup ⇒ I/O Setup from the main menu.
The I/O Setup dialog box appears.
- Click the Insert tab on the I/O Setup dialog box.
Choose one of the insert paths listed (or choose Default if none are listed); double-click that path to create a new name for it.
The insert becomes highlighted.
- Type in a new name for the insert.
- Select the proper format for the insert path (mono or stereo), and then click OK.
Connecting your external device
You can connect an analog or a digital device as your hardware insert. The following sections describe connecting both devices.
Connecting an analog device
Nothing much to connecting an analog device, really. Just do the following:
- Select the output and input (or pairs for stereo) that correspond to the inserts I show you how to create in the earlier section, “Creating a hardware insert.”
- Connect the output of your audio interface to the input of your external device.
- Connect the output of your external device to the selected input in your audio interface.
Connecting a digital device
Whoa, here comes the high-tech stuff, right? Nah. Connecting a digital device is a bit more involved, but it’s still not brain surgery:
Connect your external device to your audio interface by the digital connections on the back of your device.
Depending on your device, you either use an optical connection or a coaxial S/PDIF connection. (Book 2, Chapter 1 has more about these types of connections.) Connect the output of your audio interface to the input of your external device and the Output of your external device to the input of your audio interface.
Choose Setup ⇒ Hardware from the main menu.
The Hardware Setup dialog box opens.
Click your audio interface in the Peripheral section of the window to select your audio interface.
If you have only one audio interface connected to your computer, it’s automatically highlighted.
- Perform one of the following in the Digital Input section of the Hardware Setup dialog box:
- Connect through the optical ports. Choose S/PDIF from the Optical Format drop-down menu.
- Connect through the coaxial (RCA) S/PDIF jack.
Choose your clock source — the digital clock that controls your system — from the Clock Source drop-down menu.
- External: If you want the effect device to be your clock source
- Internal: If you want Pro Tools to be the clock source (or if you don’t know what a clock source is)
Check out the Pro Tools Reference manual or go to Book 1, Chapter 3 for more on clock sources.
Set your external device to the appropriate clock source: Internal if you select External in Pro Tools, and External if you select Internal in Pro Tools.
Your owner’s manual should describe this process.
- Click OK.
Routing your track
To route your track’s insert to the hardware insert connected to your effects device, choose the hardware insert from the Insert drop-down menu, accessed by clicking and holding over one of the arrows in the Insert section of your track’s channel strip.
You’re now ready to dig in and use your external effect processor on your Pro Tools tracks.
The only disadvantage with using external effects in Pro Tools is that you can’t save the effect settings with your Pro tools session like you can with an RTAS plug-in. In order to get around this deficit, I usually type the effect patch (setting number) I use for a track in the Comments section of the track. To enter this information, double-click the track’s name in the Edit or the Mix window to call up the Name Track dialog box. Enter your effect patch and any other reminders you need in the Comments section, and then click OK to save your comments and close the window.