
Chapter 1
Taking Care of Tracks
IN THIS CHAPTER
![]() Working with tracks
Working with tracks
![]() Understanding track views
Understanding track views
![]() Grouping tracks
Grouping tracks
![]() Managing track voices
Managing track voices
Before you can do any recording in Pro Tools, you need to create and configure some tracks — specific places to put the vocals, instrumental parts, pterodactyl screeches, whatever. This involves setting up new tracks, naming the tracks, and assigning inputs and outputs to your newly created and named tracks.
But that’s not all. When working with tracks in Pro Tools, you also need to know how to show and hide, activate and deactivate, solo, mute, and adjust your view of them, among other things. This chapter takes the mystery out of dealing with tracks and shows you how to work with them both efficiently and effectively.
Understanding Tracks in Pro Tools
Pro Tools has six types of tracks (Audio, Auxiliary Input, Master Fader, VCA Master, MIDI, and Instrument) as well as two track formats (mono and stereo). All possible permutations and combinations of these various types and formats are explained with subtlety and style in the following sections.
Track types
When you work with tracks in Pro Tools, you have to keep in mind that you’re sure to end up dealing with six distinct flavors of tracks. They are
- Audio tracks: An audio track contains audio files and can be mono or stereo.
- Auxiliary Input tracks: These tracks are used as effects sends, for submixes, or for other routing purposes.
- Master Fader tracks: This track type contains the summed output for all the tracks routed to it. Master Fader tracks can be mono or stereo; stereo is most common.
- VCA Master tracks: This type of track does not pass audio but instead is used to control groups of tracks. VCA Master tracks are often used for controlling a group of tracks without needing to route them to an Auxiliary Input track. This is an easy way to route several submixes to one master fader.
- MIDI tracks:MIDI tracks contain MIDI data — instructions to MIDI devices on how to create specific digital sounds. (For more on MIDI, and MIDI tracks, go to Book 5.)
- Instrument tracks:Instrument tracks are blends of Audio and MIDI tracks that allow you to insert virtual instruments (such as software synthesizers) into your session. You can also route real instruments with their corresponding audio outputs into the same track. These tracks contain MIDI data while also allowing you some audio capabilities to make it easy to use both software and hardware instruments. Book 5, Chapter 2 offers more about these hybrid tracks.
Track formats
Pro Tools offers a bit less variety when it comes to track formats. Unless you are using Pro Tools HD or HDX, you get two — count ’em, two — choices:
- Mono: A mono (monaural) track consists of a single channel of audio or MIDI data. It uses, as its name implies, just one voice.
- Stereo: A stereo (stereophonic) track consists of two channels of audio and uses two voices. A MIDI track can’t be stereo.
Setting Up Tracks
Setting up your recording project is a little like setting up a railroad: It’ll take you somewhere only if you first put the tracks in place. Getting that done is what this section is about.
Creating new tracks
To create a new track, choose Track ⇒ New from the main menu or press ⌘ +Shift+N (Mac) or Ctrl+Shift+N (PC). Either method opens the New Tracks dialog box (as shown in Figure 1-1), where you get to choose the following:
- Number of new tracks: The default here is 1, but you can pretty much create as many tracks as your version of Pro Tools allows. You can see the totals at
www.avid.com/pro-tools/comparison. - Track format: Here you choose stereo or mono.
- Track type: Clicking the arrows opens a drop-down menu that lets you choose between an Audio, an Auxiliary Input, a Master Fader, a VCA Master, a MIDI, or an Instrument track.
- Samples or ticks: You can choose between samples or ticks (bars/beats) for your new tracks.
- Plus sign: Clicking this adds another tracks selection row containing all the options listed in this section so that you can add more than one type of track without having to open the New Track window repeatedly.

FIGURE 1-1: Create a new track here.
Make your selections and then click Create to create your new track. This track then appears in the Edit and Mix windows and in the Show/Hide list located on the right side of the Edit window. If the Show/Hide list isn’t visible, click the double arrow at the lower-left corner of the Edit window.
Duplicating tracks
You can duplicate tracks — creating a new track that mirrors all the input, output, effects send settings, and insert settings of your original track — in two easy steps:
Click the name of the track in the Mix or the Edit windows.
 To select more than one track to duplicate, hold the Shift key while you click each track’s name.
The name is highlighted.
Choose Track ⇒ Duplicate from the main menu.
The new track appears in the Mix and the Edit windows to the right of the track you’re duplicating and just below the duplicated track in the Show/Hide list.
Naming tracks
When you open a new track (choose Track ⇒ New), Pro Tools creates a default name for the track — something really helpful, like Audio 1 — but you can change the name to anything you want. You do this by double-clicking the name of the track in either the Mix or the Edit windows. A dialog box similar to what you see in Figure 1-2 opens, from which you can use the fields to both change the name of the track and add any comments you want to include about the track. After you enter your track name and comments, click OK — you’re set!
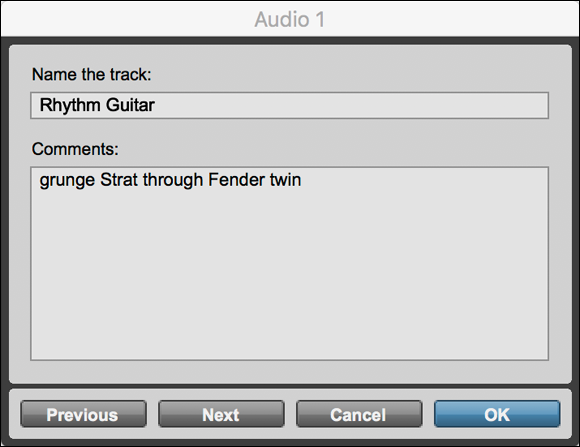
FIGURE 1-2: Choose a track name and add comments here.
I highly recommend that you name your new tracks right away; give each a name that describes what you plan to record on it. Some examples include Vox (or Vocals), Ld Gtr, Snare, Kick, and so on. This will save you confusion later on when you start to mix.
Assigning inputs and outputs
To record with your new track, you need to assign an input to it so Pro Tools knows where your source sound is coming from. To hear the track play, you need to choose an output so Pro Tools can send the sound out to your monitors or to your headphone jack.
That makes sense, right? Now, to actually assign an input to your track, do the following:
Choose View ⇒ Edit Window Views ⇒ I/O from the main menu to open the I/O section of the Edit window.
The I/O section shows the inputs and outputs for each track.- Within the I/O section of your track in the Edit window, click and hold the Input selector (see Figure 1-3) until the Input contextual menu pops up.
- While still holding down your mouse button, move the mouse over the Input menu until it rests on the input listing you want.
Release the mouse button to select your choice from the Input contextual menu.
This menu closes, and the input you select appears in the Input selector.
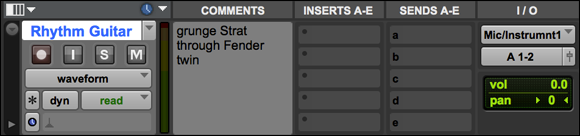
FIGURE 1-3: Assign an input or output here.
Choosing your outputs requires pretty much the same procedure, although now you start things off by clicking the Output selector instead.
If you have an output you want to use for your session, such as Analog 1-2, you can set this as the default in the I/O Setup dialog box. To do this, follow these steps:
- Choose Setup ⇒ I/O to open the I/O Setup dialog box.
- Click the Output tab.
- Choose your output from the New Track Default Output drop-down menu.
Click OK.
The window closes, and all your new tracks automatically receive your chosen output upon creation.
Altering Your View of Tracks
Pro Tools gives you lots of options to change how tracks look in the Mix and the Edit windows. You can change a track’s color, size, location, and even whether you can see it. The following sections get you up to speed on these options.
Showing and hiding tracks
Both the Edit and the Mix windows have the option of including an audio tracks list in the window view (see Figure 1-4). In this list, the Tracks list, you can show or hide selected tracks or groups of tracks. This list is located on the left side of either window. If it’s not visible, click the double arrows at the bottom-left of either window to open the list in that window.

FIGURE 1-4: Use the list to show, hide, or sort your tracks.
You can show and hide tracks in two ways:
Use the drop-down menu. Click and hold the title bar of the Show/Hide Tracks list until a menu opens up, as shown in Figure 1-5. Then just choose the option you want.
 The Show Only Selected Tracks option and the Hide Selected Tracks option require that you first highlight your desired tracks in the main part of the Edit or the Mix windows. To select one track, just click the track’s name. To select more than one track, hold down the Shift key while clicking each track you want. When you then use the Show Only Selected option, for example, all non-highlighted tracks are hidden.
Click the track name in the Show/Hide Tracks list. Clicking directly on the track name located in the Show/Hide Tracks list toggles between hiding and showing the track. You can even move a track around by clicking and dragging it to where you want it in relation to the others.
If the Show/Hide Tracks list isn’t showing, click the double arrow at the bottom-left corner of the window to open it (see Figure 1-6).
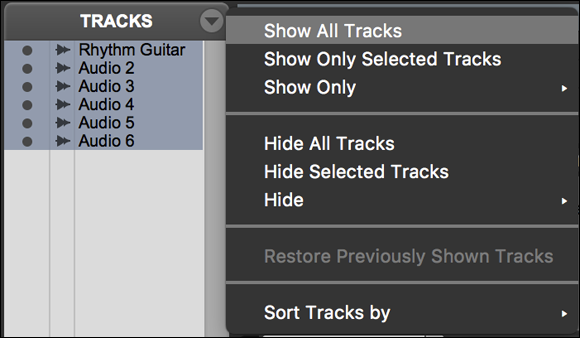
FIGURE 1-5: Use this menu to set how you want to see your tracks.

FIGURE 1-6: To show the Show/Hide Tracks list, click the arrows in the lower left of the Edit or Mix windows.
You can also use the Show/Hide Tracks list drop-down menu to sort tracks by name, type, edit group, mix group, or voice, as shown in Figure 1-7. This menu is opened by clicking and holding the Show/Hide Tracks list title.
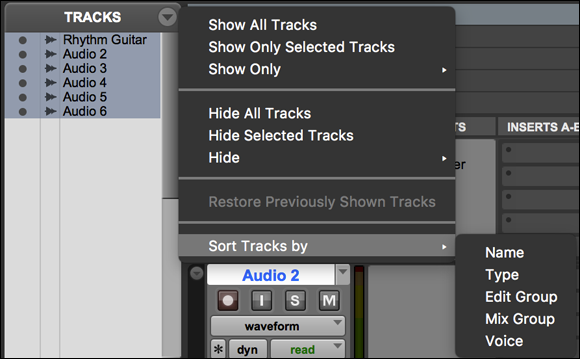
FIGURE 1-7: You can sort your tracks in the Edit or Mix window.
Assigning track color
To make all your tracks easier to keep track of when you’re working, you can assign color groups to the waveform display for each track in the Edit window. To do this, choose Setup ⇒ Preferences from the main menu and then click the Display tab in the Preferences dialog box. This opens the Preferences dialog box, as shown in Figure 1-8.
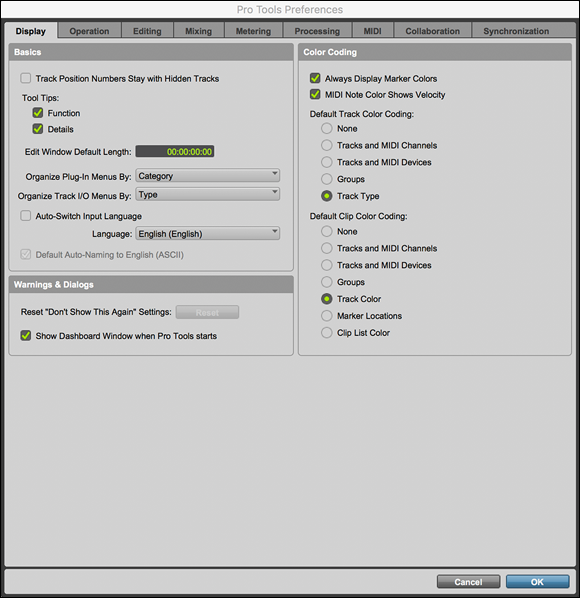
FIGURE 1-8: Choose how to color-code your tracks.
On the right side of this dialog box is the Default Track Color Coding section. Here you can choose from several radio buttons:
- None: Makes the display for all the tracks the same color.
- Tracks and MIDI channels: Assigns colors to each waveform display based upon the audio track number and the MIDI channels assigned for each MIDI track.
- Tracks and MIDI Devices: Bases the colors for the waveform display on the audio track number and the MIDI device used.
- Groups: Colors the waveform display for your tracks according to a track’s group membership.
- Track Type: Assigns colors according to the type of track in your session.
Changing track size
You can alter the viewed size of tracks in the Edit or the Mix windows. This can be a godsend, for example, when you have a ton of tracks in a session, and you want to see them all onscreen (pick a small size) or if you have a track that you want to edit (choose a giant-size one). Here are your options:
Edit window: The Edit window allows you to choose from several different-size track views. Your options include Micro, Mini, Small, Medium, Large, Jumbo, Extreme, Fit to Window, and Expanded Track Display. You access these options by clicking the Track Height Selector (the little arrow to the left of the track name) or the ruler bar at the far-left side of the waveform display of the track, as shown in Figure 1-9.
To make track size adjustments even easier, you can simply drag your track larger or smaller by clicking and dragging your mouse up or down at the bottom of your track.- Mix window: In the Mix window, you can toggle between Narrow and Regular channel strip views by choosing View ⇒ Narrow Mix Window or View ⇒ Regular Mix Window, respectively, as shown in Figure 1-10. Pressing Option+⌘ +M (Mac) or Shift+Ctrl+M (PC) also toggles between the two views.

FIGURE 1-9: Change track height here.
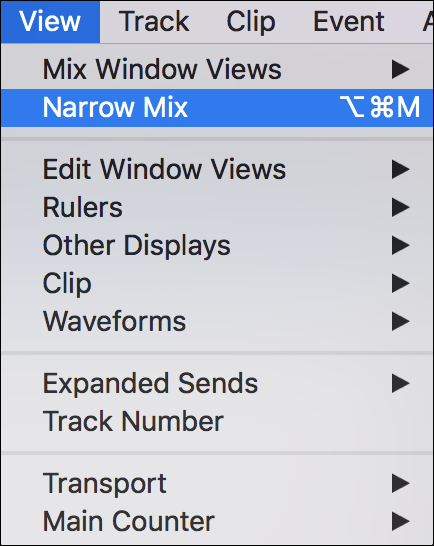
FIGURE 1-10: Choose between Regular and Narrow channel strips in the Mix window.
Moving tracks around
You can move tracks around and arrange them in your Mix or Edit windows as you want them. This feature is handy if you have a group of tracks that you want to have next to each other, such as percussion and drums. I place any submixed tracks together to help me keep track (sorry, I can’t help myself) of them all without having to move all over the Edit or Mix windows. The following steps show you one way to do this:
- Locate the name of the track you’d like to move in the Tracks list, as shown in Figure 1-11.
- Click the track name and then drag the track up or down to where you want it.
Release the mouse button.
The track stays put where you dragged it.

FIGURE 1-11: Click and drag to move tracks around.
Moving the track around in one window changes its location in the other.
Deleting tracks
To delete a track, follow these steps:
- Select the track by clicking its name in either the Edit or the Mix windows.
- Choose Track ⇒ Delete from the main menu.
- Click OK.
Grouping Tracks
In Pro Tools, creating and managing groups of tracks is a snap. I strongly recommend taking advantage of Pro Tools grouping features because they let you perform lots of different tasks — edits, for example — on more than one track at a time.
Keeping track of grouped track parameters
When you group tracks, you can choose whether the grouped functions include edit, mix, or both windows.
Edit groups
Edit groups include the following functions:
- Audio editing functions
- Automation editing functions
- MIDI editing functions
- Track view
- Track height
- Track timebase
Mix groups
Mix groups include the following functions:
- Automation mode
- Input monitoring
- Main mute
- Main pan
- Main volume
- Plug-in bypass
- Plug-in controls
- Record enable
- Send level
- Send mute
- Solo
- Send pan
Defining group attributes
You can create groups by choosing Track ⇒ Group from the main menu, or New Group from the Group drop-down menu (the menu you open by clicking and holding the Group title in the Groups list section of the Edit or the Mix window). The Create group dialog box appears (see Figure 1-12); here, you can choose the following parameters for your group:
- Name: Enter a name for your group in the Name field.
- Type: You can choose from three options:
- Edit: When you want the group listed just in the Edit window
- Mix: When you want the group listed just in the Mix window
- Edit/Mix: When you want your group listed in both windows
- ID: The group ID is a single letter that defines your group. This lets you see which group a track is in at a glance. (The group ID for a track is located beneath the track’s level meters in the mix window.) A total of 104 groups are available, so you can go crazy if you want to.
- VCA: You can add your group to a VCA Master Track from the drop-down menu if you want to create a submix of the group.
- Group attributes: There are three attribute pages where you can choose the following:
Tracks: You can choose the tracks for your group by clicking the track in the available list and clicking the Add button.
As an alternative you can choose the tracks for your group from within the Mix or Edit windows by Shift-clicking the tracks you want in your group.- Attributes: You can choose which parameters are linked for this group.
- Globals: This is essentially a template for you to choose parameters for your groups.
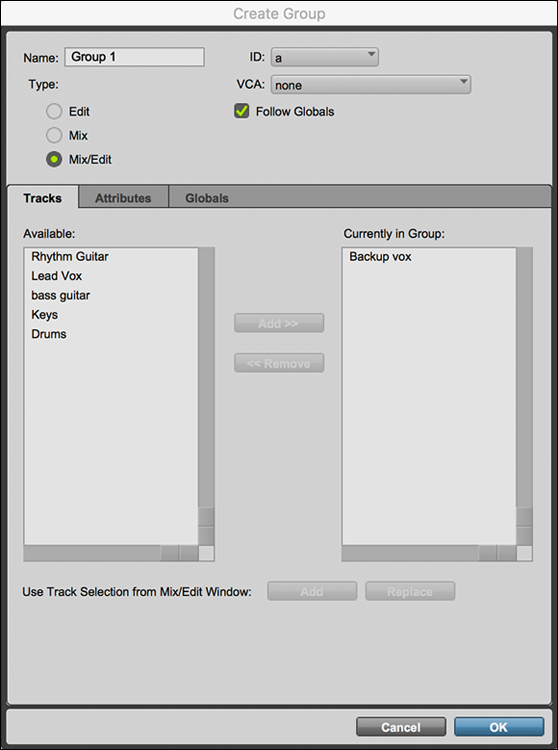
FIGURE 1-12: The Create Group dialog box lets you create a new group.
Which window you use as your starting point doesn’t matter. Whatever groups are created in one window automatically get created in the other window.
If a track in a group is hidden in the Show/Hide Tracks list, that track won’t be affected by edits done to that group. All mix operations — with the notable exception of Record Enable — do apply to hidden tracks, though.
Enabling groups
Before you can work with grouped tracks, you need to enable the group, which you do by clicking the group name in the Groups list. (You’ll find the Edit Groups list in the lower-left side of the Edit window; the Mix Groups list is in the lower-left side of the Mix window. If they aren’t visible, click the double arrow at the bottom-left corner of the Mix or the Edit window, respectively.) Highlighting in blue means the group is enabled. Click the group again to disable it. The blue highlight will disappear.
You can also enable and disable groups using a keystroke on your keyboard in the Mix window by simply pressing the key for the group ID. To do the same thing in the Edit window, you need to first make sure that the Keyboard Focus (A-Z) button to the right of the Edit Groups name is highlighted, as shown in Figure 1-13. (How will you know that it’s highlighted? That’s easy. In its highlighted state, a yellow border surrounds the box.)

FIGURE 1-13: Highlight the Edit Group List Keyboard Focus.
Modifying groups
After you set up some groups, you don’t have to treat them as if they were set in stone. You can add — or subtract — group members, change the group name, or just delete the group altogether. These options are covered in the following sections.
Renaming a group
Follow these steps to rename a group:
Double-click the area to the left of the group name in the Groups list.
The Modify Groups dialog box appears.
The Edit Groups list is located in the lower-left side of the Edit window; the Mix Groups list is in the lower-left side of the Mix window. If they aren’t visible, click the double arrow at the bottom-left corner of the Mix or the Edit window, respectively.- Type in your new name in the Name field.
Click OK.
Your group gets a spanking new name.
Adding a track to a group
You can add a track to an existing group by doing the following:
Double-click the area to the left of the group name in the Groups list.
The Modify Groups dialog box appears.
- Select tracks from the Available window.
Click the Add button.
The selected tracks instantly appear in the Currently in Group window.
Click OK.
The selected tracks are added to the group selected in Step 1.
Deleting groups
You can delete unwanted groups by doing the following:
Click the name of the group in the Groups list.
Again, you find the Edit Groups list in the lower left of the Edit window, and the Mix Groups list in the lower left of the Mix window. If they aren’t visible, click the double arrow at the bottom-left corner of the Mix or Edit the window, respectively.
Click the Groups drop-down menu (opened by clicking and holding the Group title in the Groups list section of the Edit or Mix window) and choose Delete Active Group.
 You’ll be asked whether you’re sure you want to do this because after you do, there’s no changing your mind. Proceed if you’re sure you don’t ever want to use that group again.
Your group is history.
Soloing and Muting
Soloing and muting tracks is a big part of the mix process. By being able to hear only those tracks you want to hear at a given time, you can find unwanted sounds lurking in your tracks by soloing the suspected track, or you can turn off the lead vocal when you tweak the backup vocals. You can solo and mute each track in the Edit window by clicking the Solo or the Mute button (respectively), located underneath the track name, as shown on the left side of Figure 1-14. You can do the same thing in the Mix window by clicking the Solo and Mute buttons located above the volume fader, as shown on the right side of Figure 1-14. Check out Book 1, Chapter 4 for more on these windows and the location of the Solo and Mute buttons.
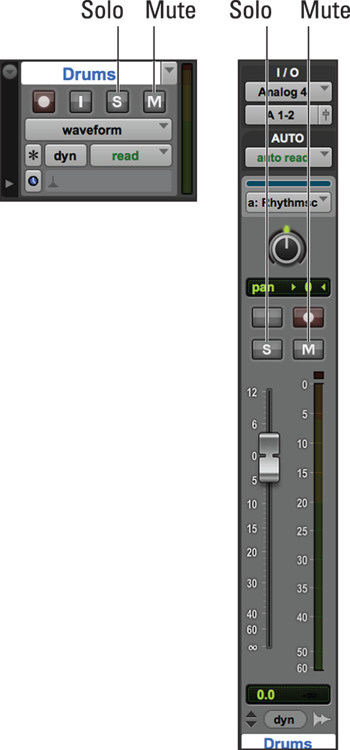
FIGURE 1-14: The Solo and Mute buttons are located on each track in the Edit (left) and Mix (right) windows.
Soloing a track turns the mute function on for the rest of the tracks. You can solo and mute more than one track at a time. Choose the appropriate button for each track.
Managing Track Voices
Pro Tools offers a limited number of voices. The number of voices available to you depends on the version of Pro Tools you have. Here’s a list of total voices available in the various Pro Tools systems:
- Pro Tools | First: 16 tracks at 44.1 or 48kHz
- Pro Tools: 128 tracks at 44.1 or 48kHz, 64 tracks at 88.2 or 96kHz, or 32 tracks at 176.4 or 192kHz
- Pro Tools HD: 256 tracks at 44.1 or 48kHz, 128 tracks at 88.2 or 96kHz, or 64 tracks at 176.4 or 192kHz
- Pro Tools HDX: 768 tracks at 44.1 or 48kHz, 384 tracks at 88.2 or 96kHz, or 192 tracks at 176.4 or 192kHz
Even though some of these track counts are really high, it’s not unlikely that you’ll have more than the number of available tracks in a session. Given this probability, Pro Tools offers you ways to manage your voices so you can hear all your tracks (or at least the important ones). This can be done one of two ways: setting voice assignments for each track, and setting voice priority. The next two sections give you the skinny on each method.
Assigning voices
In Pro Tools, the controls for each track let you choose between Off and Dyn for voice assignments. Figure 1-15 shows the Voice Assignment menu in the Edit (left) and the Mix (right) windows. With a tracks voice assignment set to Off, the track won’t play. If you have the track’s voice set to Dyn, Pro Tools automatically turns that track on and off according to how many voices are available for playback and where this particular track sits in the Voice Priority listing. (See the next section for more on voice priorities.)

FIGURE 1-15: You can choose the voice assignment for each track in the Edit (left) and Mix (right) windows.
For example, if you have a session containing more tracks than you can have, only your Pro Tools version’s allotted amount will play at any one time. Now, if you have one track (rhythm guitar) that plays only during the verse and another track (lead guitar) that plays only during the chorus, you can get these two tracks to trade off so that only one at a time uses the available voice — and everybody’s happy because every note recorded will get heard.
Imagine, though, that both guitar parts have to play in the bridge section of the song. In this game of musical chairs, one part won’t find one of the available “slots” — and won’t play. Which part ends up being silenced is determined by how high up the part sits in the list of tracks. You can choose how high by setting the voice priority of each track, something I cover in the next section.
Setting voice priority
Because Pro Tools lets you have more tracks in your session than the total number of voices available in your version of the software, you might need to do some finagling among the available voices if you want every track (or at least the most important ones) to be heard throughout the song. To pull off this trick, you have to set the voice priority of each track.
Voice priority is determined by the track’s position in the tracks list in the Edit and the Mix windows: The higher its place in the list, the higher its priority for voice assignment. You can increase the voice priority of a track in the following ways:
- Using the Show/Hide Tracks List: Click and hold with the pointer over the track you want, and drag that track up the list.
- Using the Edit Window: Click and drag the name of the track up the list.
- Using the Mix Window: Click and drag the name of the track to the left on the list.
The higher up the list a track is, the higher its priority and the stronger its claim on the available voices when you assign voices.
Freeing up a voice from a track
Because you can’t make every track the highest priority, here are other ways to free up (or at least control) how your available voices get used. If you can identify a voice that’s less crucial at a given moment, you can free that voice from a track by doing one of the following:
- Turn the voice assignment to Off. From the Voice Assignment menu, choose (logically enough) Off. (See the “Assigning voices” section, earlier in this chapter, for more on the Voice Assignment menu.)
- Turn off any output or send assignments for that track.