
Chapter 3
Recording Electronic Instruments with MIDI
IN THIS CHAPTER
![]() Recording MIDI performances
Recording MIDI performances
![]() Playing back tracks
Playing back tracks
![]() Understanding overdubbing
Understanding overdubbing
![]() Recording system-exclusive data
Recording system-exclusive data
Recording MIDI in Pro Tools is much like recording audio. The advantage with MIDI is that you record only the performance data and not the sound itself. This allows you flexibility when choosing the sound that you ultimately want for your song.
In this chapter, you discover how to record MIDI in Pro Tools. You walk through enabling your tracks and recording your MIDI data. You also get a chance to overdub by using punch and loop recording.
 Instrument tracks can be used the same way as MIDI tracks by recording MIDI information and passing it along to an instrument (in this case, by inserting an instrument into the track), which plays the notes and creates the sound.
Recording MIDI Performances
If you already read through Book 3, Chapter 5, you pretty much know the basics of recording MIDI performances because the process is very similar to recording audio tracks. The only significant difference is that you can set your system to wait until it receives MIDI data before starting to record. (This keeps you from having to click the Record button in the Transport window.) The following sections detail how to record single or multiple MIDI and instrument tracks.
Enabling recording for MIDI and instrument tracks
You can record-enable your MIDI and instrument tracks the same way you enable recording for audio tracks. Let me count the ways:
- To record-enable a single track: Click the Record Enable button, which you can find in either the track’s channel strip (in the Mix window) or the track menu (in the Edit window). The Record Enable button blinks red to let you know it’s engaged.
- To record-enable all tracks: Option-click (Mac) or Alt-click (PC) the Record Enable button on any track.
- To record-enable selected tracks: Shift-click to select the tracks you want in the playlist and then Shift+Option-click (Mac) or Shift+Alt-click (PC) the Record Enable button of one of the selected tracks.
Setting the Wait for Note option
One of the nice things about recording MIDI in Pro Tools is that you can set your session to start recording only after it starts receiving MIDI data. This feature — Wait for Note — allows you to make sure that your first note is timed exactly where Record Start Time is set.
To enable the Wait for Note feature, do the following:
Set your Transport window to display MIDI controls by choosing View⇒ Transport⇒ MIDI Controls from the main menu.
The Transport window expands to include MIDI controls.
- Click the Wait for Note button to highlight it, as shown in Figure 3-1.
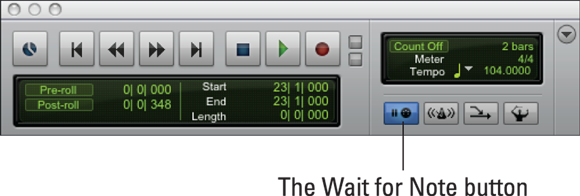
FIGURE 3-1: Engage Wait for Note to start recording the instant a MIDI note is received.
Recording MIDI tracks in Pro Tools requires that you get a few tasks out of the way first — namely, choose the Record mode, create a track, set levels, enable recording, and turn on a click track (if you’re using one). Those steps are all covered in detail in Book 3, Chapter 4; when you’ve got ’em done, you’re ready to record some MIDI.
The next sections give you a basic overview of what you can do at that point: Record a single track or multiple tracks, undo or cancel takes, record additional takes and audition takes, use playlists to organize the whole mess, or choose some takes to listen to.
Monitoring MIDI inputs
Even after you get your MIDI devices all hooked up and record-enabled, you still won’t hear what you’re playing unless you make some connection to the analog outputs of your MIDI device and route them to an audio track in Pro Tools.
To monitor your MIDI device through Pro Tools, do the following:
- Connect the analog output of your MIDI device to one of the analog inputs in your audio interface.
Choose Track⇒ New from the main menu.
The New Tracks dialog box appears.
- Use the drop-down menus of the dialog box to enter the number of tracks you want (1), the type (Audio), and whether you want your track in mono or stereo. Click Create.
- Using the new track’s Input selector, select the analog input that your device is connected to in your audio interface.
- Using the new track’s Output selector, select the main outputs for your session.
Record-enable this track by clicking the Record Enable button in either the track’s channel strip (Mix window) or the track menu (Edit window).
You should hear the sound coming from your MIDI device while you play your MIDI performance.
Hearing instrument tracks
Instrument tracks, because they are a hybrid of MIDI and Auxiliary Input tracks, are easier to set up to hear what you’re playing: All you need to do is set an output in the audio out section of the track. You do this in the following way:
Choose View⇒ Edit Window⇒ I/O from the main menu to open the I/O section of the Edit window.
The I/O section shows the inputs and outputs for each track.
- Within the I/O section of your track in the Edit window, click and hold the Output selector until the Output drop-down menu appears.
- While still holding down your mouse button, move the mouse over the Output menu until it rests on the output listing you want.
Release the mouse button to select your choice from the Output drop-down menu.
This menu closes, and the output you selected appears in the Output selector.
Recording MIDI and instrument tracks
After you record-enable your MIDI and instrument track(s) (see the “Enabling recording for MIDI and instrument tracks” section, earlier in this chapter), you can begin recording. Follow these steps to record one or more MIDI tracks:
- Click the Record Enable button located in either the track channel strip (Mix window) or track menu (Edit window) to record-enable the track(s).
Using the channel strips located in the Mix window, set the level of the instruments in your session using the fader for each audio track associated with your MIDI devices.
This is so you hear your music the way you want.
- Enable the click track and the pre-roll, if you’re using them.
 Click the Return to Zero button in the Transport section of the Transport window.
Doing so ensures that you start recording at the beginning of the session.
Click the Record button in the Transport section of the Transport window.
This step gets you ready to record; it doesn’t start the actual recording process.Click the Play button in the Transport section of the Transport window.
Pro Tools starts recording.
When you’re done recording, click the Stop button in the Transport section of the Transport window or press the spacebar on your keyboard.
The finished take appears in the MIDI Clips list as a new clip.
Retroactively recording MIDI and instrument performances
Suppose you were practicing your performance and didn’t enable the record function. It used to be a bummer to miss a great performance, but Pro Tools lets you “record” your practice session by resurrecting your data. Follow these steps to add your un-recorded MIDI performance to your track’s timeline:
- Before you practice, click the Record Enable button located in either the track channel strip (Mix window) or track menu (Edit window) to record-enable the track(s).
Using the channel strips located in the Mix window, set the level of the instruments in your session using the fader for each audio track associated with your MIDI devices.
This is so you hear your music the way you want.
Click the Play button in the Transport section of the Transport window.
Pro Tools starts playing and you can practice along. Pro Tools is in “Listen” mode and is capturing your performance in the background.
- When you’re done practicing, click the Stop button in the Transport section of the Transport window or press the spacebar on your keyboard.
If you liked your performance and want to place it in your Timeline, press Shift+C or choose Event⇒ Retrospective Record.
The finished take appears in your Timeline and MIDI Clips list as a new clip.
Playing Back Your Tracks
After you record a track, you’ll most likely want to listen to it to make sure that it sounds how you want. Pro Tools offers you many ways to play back a track. In the following sections, I guide you through a few of the many options for playing back audio clips.
Playing recorded tracks
After you record a track and click the Stop button, you can immediately hear the track by toggling off the Record Enable button on your MIDI tracks — click it to make the red light disappear — and then clicking the Play button. Leave the audio tracks associated with the MIDI devices in record-enable mode so that you hear the playback of the MIDI device from the recorded MIDI data instead of the recorded audio that was recorded to that track when you recorded your performance. You can adjust the volume by moving the fader up and down in the channel strip for the audio track associated with your MIDI device.
Setting scrolling options
Pro Tools lets you decide how you want the Edit window to scroll when a session is playing or recording. Just choose Options⇒ Scrolling from the main menu to see the choices displayed in Figure 3-2. The following list gives you the scoop on each option:
- No Scrolling: When you choose this, the Edit window remains where it while as the session plays. You can still move through the session by manually sliding the scroll bar at the bottom of the window while the session plays.
- After Playback: Choosing this takes you to where the cursor is located after the session is stopped.
- Page: Page scrolling during playback keeps the cursor visible at all times while the session plays. The cursor moves from left to right, and the Edit window follows gamely along (just like Little Bo Peep’s sheep).
Continuous: With this option the cursor is also always visible, and the session data scrolls past the cursor, which stays in the middle of the screen. This option is handy if you want to most easily see what’s coming and going.
This is the option I generally choose because I can easily keep track of where I am in the session at all times.
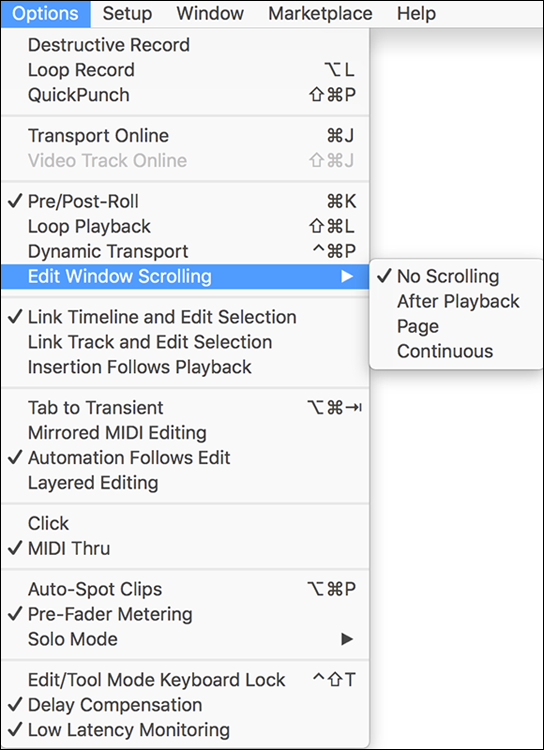
FIGURE 3-2: You can set the Edit window to scroll in three different ways.
Changing sounds
One of the great features of recording MIDI data is that you can change the sound that the recorded performance plays. This lets you decide what sound you use in your song after you have played the part.
MIDI tracks
You can change the playback sound of a recorded MIDI track in one of two ways:
- Change the MIDI device or channel. Click the Output selector for the MIDI track and scroll to a different MIDI channel or MIDI device.
- Change the MIDI patch. Open the Patch drop-down menu located in the Track Controls section of the Edit window, as shown in Figure 3-3. After the Patch dialog box opens, as shown in Figure 3-4, choose a patch from the list and then click Done to close the window.

FIGURE 3-3: The MIDI Patch drop-down menu is located in the Track Control section of the Edit menu.
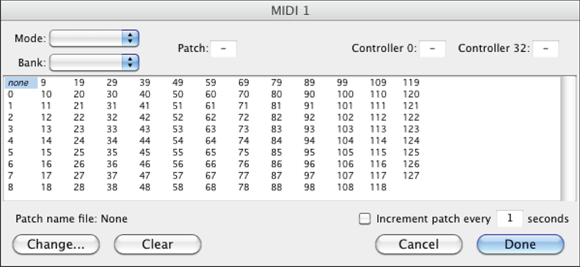
FIGURE 3-4: Use the Patch dialog box to choose a different patch for your MIDI device.
Instrument tracks
Because instrument tracks are a hybrid between a MIDI track and an Auxiliary input track, you make changes to the sound your track plays differently. Here’s how to change the sound of an instrument track:
Double-click the plug-in in the Insert section of either the Edit or Mix window.
This opens a window for the software instrument.
- Make any adjustments you want to the software instrument until you like the sound.
- Close the software instrument’s window.
To change the software instrument connected to your instrument track, do the following:
- Click and hold the Insert selector for the inserted software instrument and drag to another instrument (assuming you have another one to choose).
Release the mouse button.
The window for your new software instrument opens.
- Choose the settings you want for your new instrument.
- Close the window.
Getting Rid of Unwanted Takes
If you have a take (a recorded performance) that you don’t particularly like, you can get rid of it in several different ways. You can cancel the take while you’re recording, you can undo the take after you record, or you can clear the audio clip from the Audio Clips list. All these options are detailed in the following sections.
Canceling your performance
Canceling a performance is handy when you’re in the middle of recording and you know that you’re not going to keep the take. To cancel a performance, simply press ⌘ +. (period; Mac) or Ctrl+. (period; PC). This stops the session and clears the audio clip created for this take with two keystrokes.
Undoing your take
If you already stopped recording and you know you don’t want to keep your latest try, you can undo the take by choosing Edit⇒ Undo MIDI Recording from the main menu (as shown in Figure 3-5), or by pressing ⌘ +Z (Mac) or Ctrl+Z (PC).
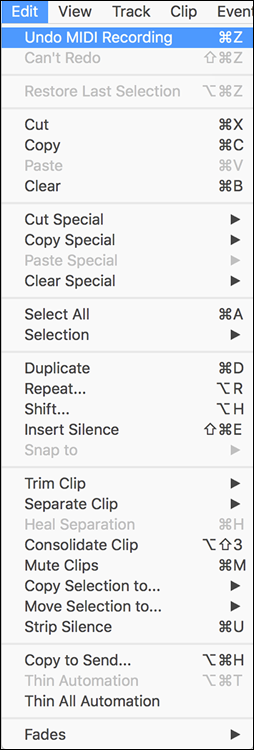
FIGURE 3-5: You can undo a take by choosing Edit ⇒ Undo MIDI Recording.
 If you punch in more than once before you stopped the recording, only the last punch is undone. The rest of the punches remain. (Read more about this in the upcoming section, “Punching in and out.”)
When you use Loop record mode, all the takes from the loop sequence are undone.
Clearing the file from the Clips list
After hearing a few of your takes, maybe you want to get rid of one or more of them. Just clear the offending takes from the Clips list. Here’s how to get that done:
Highlight the clip you want to get rid of in the Clips list by clicking it.
The Clips list is located in the lower-right corner of the Edit window. If this section of the Edit window isn’t visible, click the double arrow at the bottom-right corner of the Edit window to expand it.
Click and hold the Clips list title at the top of the list to access the Clips drop-down menu and then choose Clear Selected (as shown in Figure 3-6), or press Shift+⌘ +B (Mac) or Shift+Ctrl+B (PC).
To select more than one clip to clear, hold the Shift key while you click each clip.
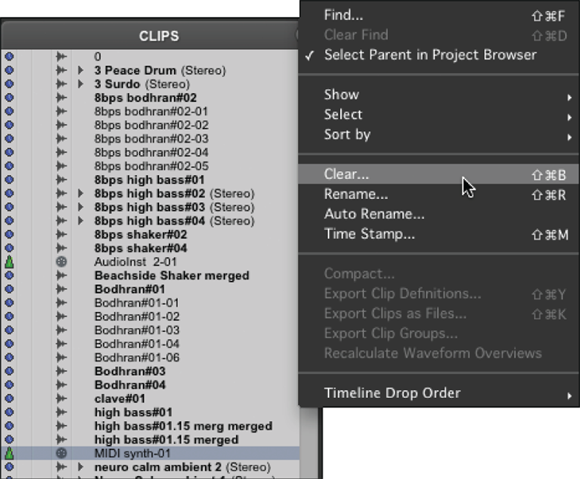
FIGURE 3-6: Get rid of a selected MIDI clip.
Overdubbing MIDI Performances
After you have some MIDI performances recorded, you can add to or change them easily. The time-honored name for this kind of recording is overdubbing, but MIDI takes it to a whole new level. In Pro Tools, you can overdub MIDI in several ways: You can punch in or out, loop, and either merge (that is, add) new data or replace existing performance information. The following sections get you up to speed on these procedures.
Using MIDI Merge/Replace
When you overdub to a MIDI track, Pro Tools offers you the option to either replace existing material or add new data to it. Which option you use depends on the position of the MIDI Merge button located in the Transport window (as shown in Figure 3-7):
- When the button is engaged (MIDI Merge mode): New material is merged with any existing MIDI data on the record-enabled track(s).
- When the button is disengaged (MIDI Replace mode): New MIDI data replaces any existing information on record-enabled track(s).
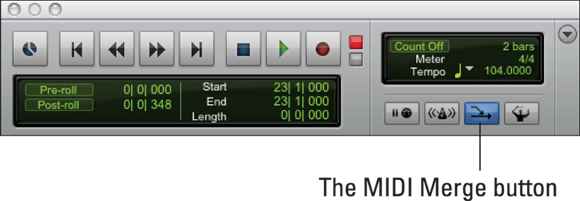
FIGURE 3-7: Engage the MIDI Merge button to add new performance data.
To engage MIDI Merge, do the following:
Open the MIDI controls section of the Transport window by choosing View⇒ Transport⇒ MIDI Controls from the main menu.
The Transport window expands to include the MIDI controls section.
Click the MIDI Merge button.
The button becomes highlighted.
Punching in and out
If you like some of your initial take and want to record over only part of it, you can set points at which to start and stop recording within the session: that is, punching in and out. Punching in or out of a track involves first setting a start and an end point. This can be done in several ways; the next sections give you the details.
Using the Start/End fields in the Transport section of the Transport window
This method is pretty straightforward. To set your start and end points via the Transport section, do the following:
- Choose View⇒ Transport⇒ Expanded from the main menu to get a nice, big view of the window.
Click in the Start field in the Transport section of the Transport window, type in the beginning of the punch section you want, and then press Return/Enter.
This field displays in the same format as the main counter. In the case of Figure 3-8, the format is Bars and Beats.
Click in the End field, type in the end of the range, and then press Return/Enter.
This field is displayed in the format selected for the main counter (like in Figure 3-8).

FIGURE 3-8: Type the start and end points to set your punch range.
Selecting a section of a track’s playlist
For those of you out there who are especially handy with a mouse, this method may have some appeal:
- Make sure that the Link Edit and Timeline Selection option is chosen under the Options menu.
 Using the Selector tool, click and drag a recorded range in your track, as shown in Figure 3-9.
The section becomes highlighted, and the session start and end points are set to match the beginning and ending of this selection.
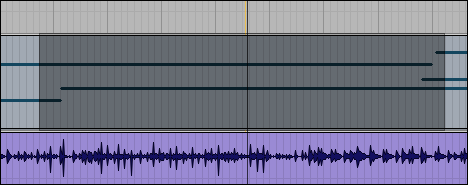
FIGURE 3-9: Drag to select a recorded range from a track’s playlist.
Dragging the start- and end-point markers along the ruler bar
The start- and end-point markers are displayed along the Timeline in the Edit window as up and down arrows — down for punch in and up for punch out. The arrows are blue when no tracks are record-enabled and red when one or more tracks are record-enabled. Setting start and end points in the Timeline consists of these steps:
- Make sure that the Link Edit and Timeline Selection option is chosen under the Options menu.
- Select the Grid edit mode (click on the Grid mode selector in the upper-left of the Edit window) if you want the markers to snap to the grid. Otherwise, use any other Edit mode.
- Click and drag the Start and End Point arrows to where you want them, as shown in Figure 3-10.

FIGURE 3-10: Set a punch range by dragging the Start and End Point arrows.
Performing the punch
After you designate the start and end points of your punch-in-and-out range, you can record to that section by doing the following:
With the Options⇒ Dynamic Transport option unchecked, Set and enable a pre-roll.
Doing so enables you to hear the previously recorded track before the punch-in happens. Here’s the quick drill. (See Book 3, Chapter 5 for details.)
- Click the Pre-Roll field in the expanded version of the Transport window and type in a pre-roll time. (Choose View⇒ Transport⇒ Expanded if you need to expand the window.)
- Click the Pre-Roll button in the expanded version of the Transport window to enable the pre-roll function.
Set and enable a post-roll.
Doing so lets you hear how your punch fits in with your previously recorded track. Here’s the quick drill. (See Book 3, Chapter 5 for details.)
- Click the Post-Roll field in the expanded version of the Transport window and type in a pre-roll time. (Choose View⇒ Transport⇒ Expanded if you need to expand the window.)
- Click the Post-Roll button in the expanded version of the Transport window to enable the post-roll function.
- Choose the nondestructive record mode by making sure that destructive, loop, and quick-punch modes are disabled in the Options menu.
 Choose either MIDI Merge or MIDI Replace mode.
See the “Using MIDI Merge/Replace” section, earlier in the chapter, for more on MIDI Merge/Replace.
Click the Record Enable button in either the track’s channel strip (Mix window) or the track menu (Edit window).
The track is record-enabled.
Click the Record button in the Transport section of the Transport window.
The Record button flashes red.
Click the Play button in the Transport section of the Transport window when you’re ready to record.
The session starts at the pre-roll time, the Record button flashes red, and you hear the previously recorded track until the pre-roll is over. The monitoring then switches to the Input source, and the Record button stops flashing (but remains red). After you hit the end of the record range, the session stops playing, or (if you enabled a post-roll) the recording stops. If the recording stops to accommodate a post-roll, the Record button starts flashing again. The monitoring then switches back to the recorded clip until the end of the post-roll period. When the post-roll is done, the session stops playing.
Punching MIDI on the fly
With MIDI, you can punch in and out of a track while the session plays. This is punching on the fly and is especially effective if you have an interface with a footswitch input and a footswitch connected to the footswitch input on your interface.
Here’s how to punch on the fly:
- Choose the nondestructive record mode by making sure that destructive, loop, and quick-punch modes are disabled in the Options menu.
- Select either MIDI Merge or MIDI Replace mode.
See the “Using MIDI Merge/Replace” section, earlier in the chapter, for more on MIDI Merge/Replace.
 Disable the Wait for Note and Countoff options in the Transport window.
 Click the Record Enable button in either the track’s channel strip (Mix window) or the track menu (Edit window).
The track is record-enabled.
Click the Play button in the Transport section of the Transport window.
The session plays.
When you reach the point where you want to start recording in the session, click the Record button or press the footswitch.
The punch begins.
- Play what you want.
When you reach the point that you want to stop recording, click the Record button or press the footswitch again.
Recording stops, but the session continues playing — and, with any luck, seamlessly.
Loop recording
Use loop recording to choose a section of the song to repeatedly record over. This makes it easy to try a bunch of takes without having to manually start and stop every time you go through the section. Loop recording can be done in a bunch of ways. I described two of ’em in the Audio Recording chapters (Book 3, Chapters 4 and 5), but I prefer using MIDI Merge mode to loop-record MIDI. (Makes sense, doesn’t it?)
To loop-record using MIDI Merge mode, do the following:
- Choose the nondestructive record mode by making sure that destructive, loop, and quick-punch modes are disabled in the Options menu.
Enable MIDI Merge mode.
The button becomes highlighted.
- Disable the Wait for Note and Countoff options in the Transport section of the Transport window.
- Enable the Link Edit and Timeline Selection option in the Options menu.
- Choose the Selector tool in the Edit window.
- Click and drag across the section of the track that you want to record over.
(Optional) Click in the Pre-Roll field in the expanded Transport window and type in a pre-roll time. Click the Pre-Roll button in the Transport window to enable the pre-roll function.
Choose View ⇒ Transport ⇒ Expanded if you need to expand the window.
If you don’t want to hear a section of the session before the loop begins, skip this step.- Click the Record Enable button located in either the track channel strip (Mix window) or track menu (Edit window) to record enable the track.
Select Loop Record mode.
You have three ways to make this selection:
- Check the Loop Record option under the Options menu.
- Press Option+L (Mac) or Alt+L (PC).
- Control-click (Mac) or right-click (PC) the Record button in the Transport window until the Loop Record icon shows up.
Click Play in the Transport section of the Transport window to start recording.
While the recording is under way, the new MIDI data appears in the track as a new clip (and in the MIDI Clips list) but doesn’t replace the previously recorded material.
- Click Stop when you finish recording.
If you designated a pre-roll, it only happens before the first time through the loop. After that, the loop goes from start point to end point, back to the start point, and so on, as many times as needed.
If you loop-record using the Loop Record mode without engaging MIDI Merge, you create a new clip in the MIDI Clips list each time you go through the loop. This is in contrast to loop-recording audio tracks, in which all the takes are stored in one audio file.
Recording System-Exclusive Data
In Pro Tools, you can record system-exclusive data — data that is unique to your MIDI device — to a MIDI track. That means that you can record changes made to your patches (prepared sounds selected from a sound bank) to your configuration as well as any real-time changes in the system. For example, you can record patch changes so that your MIDI device changes its sound while the session plays (from, say, a Chainsaw patch to a Bagpipe patch). You can also store the parameter settings for a device and have Pro Tools automatically restore those settings to your device before your session plays.
To record system-exclusive data to a MIDI track in Pro Tools, do the following:
- Connect the MIDI Out of your device to one of the MIDI In ports configured in Pro Tools.
Choose Track⇒ New from the main menu.
The New Track dialog box appears.
- Use the drop-down menus of the dialog box to enter the number of tracks you want (1), the type (MIDI), and whether you want your track in samples or ticks. Click Create.
- Using the new track’s Input selector, set the input of the track to the MIDI In port that’s connected to your device.
- Choose the non-destructive record mode by making sure that destructive, loop, and quick-punch modes are disabled in the Options menu.
Choose Setup⇒ MIDI⇒ Input Filter from the main menu.
The MIDI Input Filter dialog box appears.
- Enable system-exclusive recording by selecting the System Exclusive check box in the lower-left corner of the MIDI Input Filter dialog box (see Figure 3-11).
- Enable the Wait for Note function in the Transport window.
- Click the Return to Zero button in the Transport window to return to the beginning of the session.
Click the Record Enable button in either the track’s channel strip (Mix window) or the track menu (Edit window).
The track is record-enabled.
Click the Record button in the Transport section of the Transport window.
The Record, Play, and Wait for Note buttons flash.
Initiate the MIDI dump on your MIDI Device.
Check your MIDI device’s manual to figure out how this is done; it’s different for every device.The transfer begins.
- Click Stop when the transfer is finished.
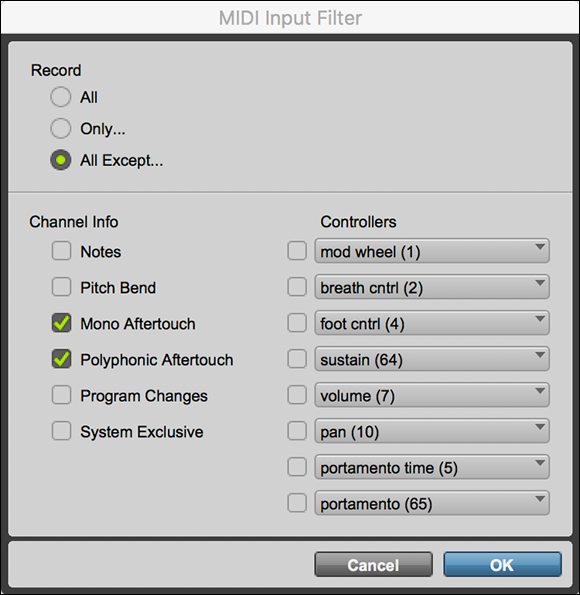
FIGURE 3-11: Enable the System Exclusive option on the MIDI Input Filter dialog box.
To send system-exclusive data back to your device, do the following:
- Make sure that the MIDI Out port of your MIDI interface is connected to the MIDI In port of your device.
- Using the Output selector of the MIDI track that has the system-exclusive data, set the output to the MIDI port that’s connected to your device.
Set your device to receive system-exclusive data.
You might need to check your owner’s manual for details on how to do this.
- Click the Return to Zero button in the Transport section of the Transport window to return the session to the beginning.
Click Play in the Transport window.
The session plays, and the system-exclusive data is received.
- Click Stop when the transfer is complete.