
Chapter 7
Making Your Mix
IN THIS CHAPTER
![]() Submixing your tracks
Submixing your tracks
![]() Mixing within Pro Tools
Mixing within Pro Tools
![]() Mixing to an external recorder
Mixing to an external recorder
The final step in mixing your music involves taking all your EQed, panned, processed, and automated tracks and recording them into a stereo pair of tracks. This is often called bouncing your mix. In the old analog days, bouncing meant sending all your tracks to two separate tracks on the same tape deck or to a different tape deck. Nowadays, with Pro Tools, you can create bounces several ways — all of which I cover in this chapter.
In this chapter, I lead you through making your mix either within Pro Tools (in-the-box) or by sending your tracks to a digital or an analog two-track machine — usually a Digital Audio Tape (DAT) or (yes, even today) a reel-to-reel tape deck.
 Unless you have a seriously great analog deck and you want to add some of that sought-after “warmth-of-analog” tape sound to your final mix, your best bet is to go with the in-the-box approach — using the Pro Tools Bounce to Disk feature and keeping your music in your computer.
Submixing by Recording to Tracks
Submixing is mixing some of your tracks down to one or two additional tracks within your session. When you record to tracks, the submixed material automatically shows up in your session. You can then turn off the voices of the tracks that you submixed and control the resulting track(s) from one (or two) fader(s). This is handy if the following scenarios apply:
- You have more tracks than your version of Pro Tools allows (Book 1, Chapter 4 describes the maximum track counts for each version of Pro Tools) in your song that you want to mix. For example, you can reduce your track count by submixing your drums or backup vocals to two tracks and then using only those two for the final mix. Book 1, Chapter 4 has more on available tracks.
- You have MIDI tracks and want to record the audio output from your MIDI devices to audio tracks before doing your final mix. Your MIDI tracks are just instrument-control data; they contain no recorded sound. At some point in the process of mixing, you need to record the actual audio output from your sound source to your audio tracks.
- You want to record your final mix in real time and still be able to move the faders and other controls while your session plays. Some recordists get antsy when Bounce to Disk mode (see the upcoming section, “Mixing in-the-Box”) creates the bounce offline because it prevents them from adjusting any controls as the mix is created. (Hey, call it a control issue.)
To create a submix by recording to tracks, follow these steps:
- Set your effects, panning, and EQ settings for the tracks you want to submix.
- Using the Output selector, assign the outputs for all tracks you want to submix (including any auxiliary tracks that your Send effects are routed to) to one of the stereo bus paths (buses 1 and 2, for instance).
Choose Track ⇒ New from the main menu.
The New Track dialog box appears.
- Use the drop-down menus in the New Track dialog box to enter the number of tracks you want (1), the type (Audio), and whether you want your track in mono or stereo.
- If you created a stereo track to submix to, set the panning of the right track to hard right and that of the left track to hard left (see Book 6, Chapter 2).
- Set the Input selector for the track you create in Step 4 to the same bus path that you chose for the tracks you want to submix (buses 1 and 2, in this case).
- Using the new track’s Output selector, select the main output for your session as the output path for the track.
Make sure that your Edit and Timeline selections are linked by choosing Options ⇒ Link Edit and Timeline Selections from the main menu.
Linking Edit and Timeline selections means the Timeline selection range follows the selection you make in a track’s playlist.
 With the Selector tool, select the section of the session that you want to submix.
If you want to record the entire session, be sure to put your cursor at the beginning of the session before you record it. If you want to record only part of the session, select the part you want. (Book 5, Chapter 2 details this process.)
- Click the Record Enable button on the new track.
- Click Record in the Transport window.
Click Play in the Transport window.
The submix process begins.
Press Stop in the Transport window when you finish.
If you selected part of the session to record, the session stops playing automatically when it reaches the end of your selection.
 Be sure to let the session play until the last bit of reverb or other effect is finished playing to avoid cutting off the effect.
Mixing in-the-Box
Mixing in-the-box refers to using the Bounce to Disk feature in Pro Tools to create your final mix. The Bounce to Disk feature processes your audio tracks in real time (you can hear the session while it plays) but offline, meaning that you can’t manipulate any controls when the bounce is happening.
Pro Tools creates a new file with the settings that you choose in the Bounce dialog box. What you get is a file that you can import back into your session; then you can play back your Bounced mix and evaluate how it sounds. The advantage of using the Bounce to Disk feature over recording to tracks (as described earlier in the “Submixing by Recording to Tracks” section) is that you don’t need to have any extra voices available to receive the bounced files.
Examining bounce options
You access the Bounce dialog box, as shown in Figure 7-1, by choosing File ⇒ Bounce To Disk from the main menu.

FIGURE 7-1: Use the Bounce dialog box to select several bounce options.
Here, you set the following options:
- Source: Use the Bounce Source drop-down menu to select any output or bus path as your source for the bounce. (Figure 7-2 gives you a peek at some of the choices.)
- File Type: Use this drop-down menu to set the file type for the bounced file. You have many choices — Book 2, Chapter 4 details them all — but for your final mix, these common, Pro-Tools-supported file types are the ones to choose from:
- WAV: This file type, which is the standard for older, PC-based Pro Tools systems, is currently the most commonly used file type. (One big reason is that WAV files are compatible with both Macs and PCs.) This is the type I generally choose.
- AIFF: Audio Interchange File Format files used to be native to Macs. AIFF files can be imported without converting into any Pro Tools session — including those on a PC — but because WAV is the standard, I skip this type. If you use a Mac and you plan to do your mastering on your Mac with Pro Tools, this file type is a fine choice.
- MP3: MPEG-2 Audio Layer III is the standard for music distributed digitally. When you choose this option, a new dialog box opens. I cover creating MP3s of your music and describe this dialog box in Book 7, Chapter 1.
- Format: This drop-down menu determines whether your bounced file is in Mono, Multiple Mono, or Stereo Interleaved. These formats do have some differences that are good to know:
Mono (Summed): Choosing this option creates a single audio file that contains all the material without any panning information.
 Because any stereo information is summed, getting too high of a combined signal is easy. This results in clipping (distortion). If you want to record in this format, make sure that you reduce your levels so that the left and right channels peak at no more than –3db, although –6dB is better. (Chapter 1 in this mini-book has more on setting levels.)
Multiple Mono: This format puts the left and right channels of your stereo mix in separate files, labeling the files with the
.Land.Rfilename extensions, respectively. Multiple mono is the file format supported by Pro Tools, which makes it the one to use if you intend to master your music yourself within Pro Tools. If you plan to use a professional mastering engineer, call him to see what file format works with the mastering equipment (it will either be multiple mono or stereo-interleaved).- Stereo Interleaved: This format contains all stereo information in a single stereo file. Panning information is retained. Any tracks set to even-numbered outputs end up on the right side of the stereo file; tracks set to odd-numbered outputs go to the left side of the stereo field.
- Resolution: Use this setting to choose one of three bit rates for your bounced files: 16, 24, or 32 float. (Book 1, Chapter 1 has more on resolution.) For your final mix, choose 24 bit (maximum resolution). You can reduce it as needed later, either when you master your music yourself or when you have a professional do it for you.
Sample Rate: You can save your file with any of several sample rates, but I recommend saving it with the same rate as the files in your session. Check out Book 1, Chapter 1 for all the details about sample rates.
If you intend to have your music mastered by a professional, make sure to ask her what she prefers. Some mastering engineers want the files at the highest sample rate possible while others would rather have you not change the rate.- Conversion Quality: If you choose a sample rate different from the files in your session — which I don’t recommend — you’re prompted to choose a level of quality for the conversion. Choose the highest quality possible for your mix material, but keep in mind that the higher the quality you choose, the longer it takes to do the conversion process.
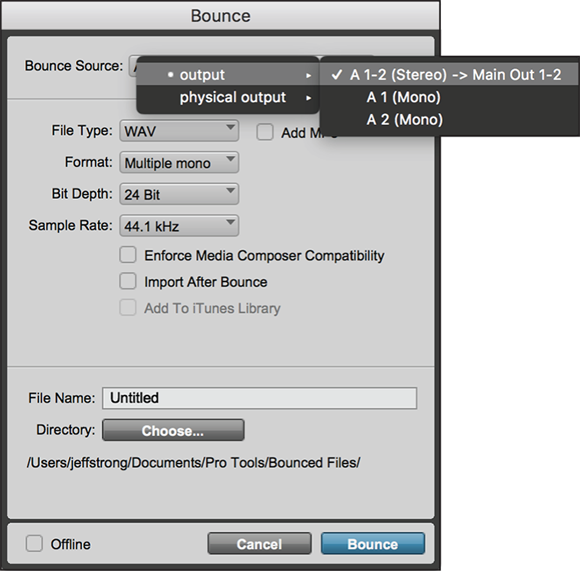
FIGURE 7-2: The Bounce Source drop-down menu shows you your choices.
Performing the bounce
To use the Bounce to Disk feature, first make sure that all your tracks are the way you want them. Check all routing, automation, effects, and EQ settings to make sure they’re right. Then do the following:
Choose File ⇒ Bounce to Disk from the main menu.
The Bounce dialog box appears. (Refer to Figure 7-1.)
- Set your Bounce options to the settings you want.
Click Bounce.
The Save Bounce As dialog box opens.
In the Save As dialog box, choose a destination point for this file, enter the name of this mix, and then click Save.
The session plays while the bounce happens.
Using an External Master Deck
You can mix to an external device instead of mixing within Pro Tools. This section explains how to mix to both analog and digital recorders.
You can mix to an external digital device (such as a DAT deck) or, for you “classic technology” fans, to an analog device (such as a reel-to-reel tape recorder). Just follow these steps:
Connect your device to your audio interface.
For digital recorders, run a cable from the digital outputs of the interface to the digital inputs of your device. You’ll need to use either an optical or a coaxial connection, depending on the interface.
For analog recorders, run a cable from two of the analog outputs of the interface to the inputs of your device.
- (Optional) If you want to be able to monitor this device while it records, connect the device’s outputs to your monitors (speakers) or plug your headphones into the headphone jack (if your device has one).
Using the Output selectors, set the output of your tracks, auxiliary inputs, and Master fader to the physical outputs of your interface.
These must correspond to the output you connected your device to.
- Enable recording in your external device.
- Click Play in the Transport window of your Pro Tools session.
- Adjust your input levels on your external device.
- Rewind the session.
Start recording on the external device and immediately press the spacebar or click Play in the Transport window.
The session plays, and you record it into your external device.
Click Stop in the Transport window or press the spacebar when the music is done.
You have a mix recorded into your external device (look out, world, here it comes …).