
Chapter 2
Selecting Material to Edit
IN THIS CHAPTER
![]() Selecting parts of clips
Selecting parts of clips
![]() Changing and extending selections
Changing and extending selections
![]() Playing selections
Playing selections
Before you can edit any audio clips, you have to make a selection. Pro Tools offers many ways to select material. You can select from a single track, grouped tracks, or the entire track list. You can select from a track’s playlist or from the Timeline ruler. And you can make adjustments to the length and position of the selected material. All these options are covered in this chapter.
Selecting Track Material
![]() When you select material to edit, the selection becomes highlighted. And, if you have the Edit and Timeline Selection Linked option chosen, you see little arrows in the Timeline ruler designating the Start and End points of the selection. Figure 2-1 shows a selection, whereas you can see the handy Link Timeline and Edit Selection button right here in the margin. The arrows are blue if no tracks are enabled for recording and red if tracks are enabled for recording.
When you select material to edit, the selection becomes highlighted. And, if you have the Edit and Timeline Selection Linked option chosen, you see little arrows in the Timeline ruler designating the Start and End points of the selection. Figure 2-1 shows a selection, whereas you can see the handy Link Timeline and Edit Selection button right here in the margin. The arrows are blue if no tracks are enabled for recording and red if tracks are enabled for recording.

FIGURE 2-1: With Edit and Timeline selections linked, arrows in the Timeline ruler show where a selection starts and ends.
 If you haven’t chosen the Link Timeline and Edit Selection option, Edit markers — instead of arrows — mark your selection, as shown in Figure 2-2.

FIGURE 2-2: When Edit and Timeline selections aren’t linked, Edit markers do the same duty.
Selecting part of a clip
You can select material one of three ways:
- Drag within a track’s playlist, as shown in Figure 2-3. Do this by clicking and dragging your start and end points within the track’s playlist.
- Drag along the Timeline ruler, as shown in Figure 2-4. Do this by clicking and dragging your start and end points along the Timeline ruler or by moving the Start and End Point arrows to where you want them. Doing this selects all the unhidden tracks in the session.
- Enter values in the Start and End fields of your Expanded section in the Transport window, as shown in Figure 2-5. Do this by highlighting a track and typing in your start point in the Start field and then pressing Return/Enter. Type in your end point in the End field and press Return/Enter, or type in the length of the selection in the Length field and press Return/Enter.

FIGURE 2-3: Drag within a track’s playlist to select part of that clip.

FIGURE 2-4: You can make selections in all tracks by dragging along the Timeline ruler.
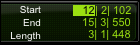
FIGURE 2-5: Enter Start and End values to select a section of a clip.
 When you make a selection within a track that is part of a group, all tracks in the group — except those that are specifically hidden — are selected.
To create a selection that extends farther than the width of your computer screen, click the start point, scroll to the end point, and then Shift-click the point. You can toggle back and forth from the start and end points by pressing the left or right arrow keys, respectively.
Selecting across multiple tracks
You can select more than one track to edit in Pro Tools in several ways:
- Drag across the tracks you want with the Selector tool. (Click the Selector tool button at the top of the Edit window to, well, select it.) This only works if the tracks you want to include are adjacent to one another.
- Group the tracks you want to select and click-drag on one of the tracks within that group. Any hidden tracks in the group will not be selected. (For more on groups and grouping, see Book 3, Chapter 5.)
- Drag along the Timeline ruler to select all the tracks.
- To select all the tracks along with any conductor tracks (those dealing with Meter and Tempo changes), press Option (Mac) or Alt (PC) while dragging along the Timeline ruler.
Selecting an entire clip
You can select an entire clip one of two ways:
 Click in that clip with the Grabber tool.
To enable it, click the Grabber tool button located at the top of the Edit window.
 Double-click the clip with the Selector tool.
To enable it, click the Selector Tool button located at the top of the Edit window.
Selecting two clips and any space between them
To select two or more clips and include any space that separates them, follow these steps:
- Select the Grabber tool by clicking the Grabber tool button at the top of the Edit window.
- Click in the first clip with the Grabber tool.
Shift-click the next clip.
To add more clips, Shift-click each one you want until you have them all chosen.All clips selected become highlighted, along with any spaces that exist between them.
Selecting an entire track
You can select all the clips in a track one of two ways:
- Triple-click one of the clips in the track.
- Click in the track with the Selector tool and then choose Edit ⇒ Select All from the main menu or press ⌘ +A (Mac) or Ctrl+A (PC).
Call up the Selector tool by clicking the Selector button located at the top of the Edit window.
Selecting all clips in all tracks
You can select all clips located in the tracks of your session (except the hidden ones) in any of four ways:
- Choose All from the Edit Groups list drop-down menu. This menu is accessed by clicking and holding the Edit Groups title in the Edit Group List section of the Edit window. If the Edit Group List isn’t visible, click the double arrow at the bottom-left corner of the Edit window.
- Triple-click any clip within a track in the playlist section of the Edit window.
- Press Return and then ⌘ +A (Mac) or press Enter and then Ctrl+A (PC) on your keyboard.
- Double-click anywhere along the Timeline ruler (the session’s timeline).
If you want to include the conductor events in your selection (tempo or meter changes) of all clips in the tracks, make sure that you have the Edit and Timeline Selection Linked option chosen and then press Option (Mac) or Ctrl (PC) while you double-click the Timeline ruler.
Selecting on the fly
You can make selections while your session is playing by using the arrow keys. Follow these steps:
Engage the Link Timeline and Edit Selection button or choose Options ⇒ Link Edit and Timeline Selection Linked from the main menu.
Alternatively, you can engage the Link Timeline and Edit Selection button at the upper-right of the Edit window.
Click the track somewhere before the place you want to start your selection.
This is where the session will start playing back. If you want to select a point near the beginning of the session, you can skip this step and just start playing from the beginning.
- Click Play in the Transport window or press the spacebar on your keyboard to start the session playing.
- Press the down-arrow key (↓) on your keyboard when your playback reaches the point where you want the selection to begin.
- Press the up-arrow key (↑) when your playback reaches the point where you want the selection to end.
- Click Stop in the Transport window or press the spacebar on your keyboard to stop the session.
To scroll back to the selection start point, press the left-arrow key (←); to scroll to the selection end point, press the right-arrow key (→).
If you have either the Scroll After Playback or Page Scroll During Playback options selected under Scroll Options in the Operations menu, these options toggle off when you select on the fly. To reactivate one of them after you make your selection, you need to scroll down the Operations menu and check that option again (version 6.0 and later).
Selecting with the Selection Indicator fields
You can use the Selection Indicator fields to enter either the Start and End points or the length of a selection. The following sections describe how to do this.
Making a selection with the indicators
Here’s how to make a selection by using the indicators:
With the Selector tool, click in the track you want to select.
Choose the Selector tool by clicking the Selector tool button at the top of the Edit window.- Click in the Start field, type in the start point that you want, and then press Return/Enter.
- Click in the End field, type in the location of the end of the selection, and then press Return/Enter.
You can also enter the length of the selection after entering the start point. The end point is automatically entered in the End field.
Changing a selection using the indicators
Here’s how to change the values in any of the indicator fields without typing in a value:
- Press the slash (/) key on your keyboard to move from one selection indicator to the next.
- Press the period (.) key or the left-arrow (←) and right-arrow (→) keys to move from one time field in an indicator to the next.
- Press the up-arrow key (↑) to increase the value in the field or the down-arrow key (↓) to decrease it.
Selecting objects using the Object Grabber tool
You can select individual clips within or across tracks by using the Object Grabber tool. This allows you to choose non-contiguous clips wherever they are in your session.
Selecting objects
Selecting non-contiguous clips in your session is really simple:
Choose either Slip or Grid Edit mode from the Edit mode selector.
This tool is not available within Spot or Shuffle modes.
- Engage the Object Grabber tool from the Grabber tool options (click-hold over the icon to see your options as shown in Figure 2-6).
Click the clip to select it.
A yellow line appears around the edges to let you know it’s been selected.
Shift+click any other clips you want to include in your selection.
If you want to remove a selected clip from the group, Shift+click it again to deselect it.
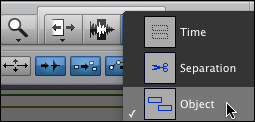
FIGURE 2-6: The Object Grabber Tool lets you choose non-contiguous clips from within single or multiple tracks.
Selecting objects from within a time-based selection
You can select or deselect objects that are within a time-based selection. This is handy if you want to edit a lot of clips and only exclude a few. In this case, do the following:
Choose the Selector tool and drag across the section you want to edit.
You can choose the Selector tool by clicking the Selector tool button at the top of the Edit window.
Double-click the Object Grabber tool.
This tool must first be selected from the Grabber tool options. Also make sure you’re in either Slip or Grid Edit mode otherwise the tool won’t work.
- Shift+click to include any clips that were not initially selected (partially selected clips are excluded from the switch from time-based selection to object-based) or to exclude any clips that you may not want to edit.
Making a selection with the Tab to Transients function
Transients are the initial attack in an instrument. In Pro Tools, you can move from one transient in a clip to another by using the Tab to Transients button and then pressing the Tab key. To use this function to choose Start and End points for a selection, do the following:
 Click the Tab to Transients button.
The button here in the margin shows you what to look for.
- Make sure that you have the Edit and Timeline Selection Linked option enabled by selecting Options ⇒ Link Timeline and Edit Selection or by clicking the Link Timeline and Edit Selection button.
- With the Selector tool, click in the audio track somewhere before the start point of the area you want to select.
Press the Tab key on your keyboard repeatedly to move from transient to transient until you get to the start point.
If you go too far, you can back up by pressing Option (Mac) or Ctrl (PC) when you press Tab.Press the Shift key while you tab through the transients to get to the end point.
You can back up the start point by pressing Shift+Option+Tab (Mac) or Shift+Ctrl+Tab (PC).
Making Changes to Your Selection
Try as you might, after you make a selection on one of your tracks, you might find that your selection just doesn’t cut it. Maybe you end up with too much or too little material at the beginning or end of the selection. Or you decide that you want to move the entire selection over in time to encompass different material. Perhaps you decide that you want to include other tracks in the selection. You also might want to change the track onto which you made your selection. Luckily, you don’t have to start over selecting material to do this. You can make these adjustments to a selection quickly and easily in Pro Tools. This section describes these ways to change what you selected.
Changing a selection’s length
After you make a selection, if you want to change its start or end point (say, skip the first two bars of your selection), you can do so by doing one of the following:
- With the Selector tool, Shift-click at the point you want outside the current selection.
- With the Selector tool, Shift-drag either the start or end point to where you want it.
- Drag the Playback marker (or Edit marker if the Edit and Timeline selections are unlinked) for the start or end point in the Timeline ruler (the section in the Edit window with the time markers located above the track playlists).
- Type in the new start or end point value in the Start or End field of the Expanded section of the Transport window and then press Return/Enter.
Nudging selections
Sometimes you want to move a selection very slightly forward or back in the Timeline to make sure you cover the exact material you want to edit. Pro Tools lets you use the Nudge function to move either your entire selection or just its start or end point so you can fine-tune your selections.
Nudging the entire selection
You can move a selection by the increments set up in your Nudge Value menu so that you can move across the material without actually moving that material itself. (The latter move is done after you finish making a selection; see Chapter 3 of this mini-book.) Follow these steps:
- Make your selection using one of the procedures listed earlier in this chapter.
Click and hold on the Nudge Value drop-down menu, located next to Nudge below the Counter section of the Edit window.
The Nudge Value menu pops up.
Select the desired value for your nudge in the drop-down menu, as shown in Figure 2-7.
For more on using the Nudge feature, go to the next chapter (Chapter 3 of this mini-book).
Press the Shift key along with either the + key or – key.
Doing so “nudges” your selection to the right or left, respectively, by the designated nudge value.

FIGURE 2-7: Select the nudge value in the Nudge Value drop-down menu.
![]() If you have the Commands Keyboard focus function enabled by depressing the Command Focus button, you can skip pressing the Shift key while you use the + or – keys.
If you have the Commands Keyboard focus function enabled by depressing the Command Focus button, you can skip pressing the Shift key while you use the + or – keys.
Nudging the start point
Follow these steps to move the start point of a selection by the nudge value:
- Make your selection using one of the procedures listed earlier in this chapter.
Click and hold the Nudge Value drop-down menu, located next to Nudge below the Counter section of the Edit window.
The Nudge Value menu pops up. (Refer to Figure 2-7.)
Select the desired value for your nudge in the drop-down menu.
For more on using the Nudge feature, check out Book 5, Chapter 3.
- Press Option+Shift (Mac) or Alt+Shift (PC), and then press the + or – key on your keyboard to “nudge” the Start point to the right or left, respectively, by the designated nudge value.
Nudging the end point
To nudge the end point of a selection, follow these steps:
- Make your selection using one of the procedures listed earlier in this chapter.
Click and hold the Nudge Value drop-down menu, located next to Nudge below the Counter section of the Edit window.
The Nudge Value menu pops up. (Refer to Figure 2-7.)
Select the desired value for your nudge in the drop-down menu.
For more on using the Nudge feature, go to Book 5, Chapter 3.
- Press ⌘ +Shift (Mac) or Ctrl+Shift (PC) and press the + or – key on your keyboard to move the end point the designated nudge value to the right or left, respectively.
Extending selection lengths
Sometimes, the best way to get all the material in your selection is to redefine its boundaries. Pro Tools offers you three ways to extend your selection: to the start or end point of the selected clip, to include an adjacent clip, or to markers (memory locations). These options are covered in the following sections.
Extending to the start or end point of a selected clip
Follow these steps to extend your selection to the start or end point of the clip:
Select a portion of the clip by using the Selector tool, or simply click anywhere in that clip.
Choose the Selector tool by clicking the Selector button at the top of the Edit window.- Press Shift+Tab to extend the selection to the end of the clip or press Shift+Option+Tab (Mac) or Shift+Ctrl+Tab (PC) to extend your selection to the start of the clip.
Extending a selection to an adjacent clip
Use the following steps to extend a selection to include an adjacent clip:
- With the Grabber tool, click the first clip to select it.
- Press Shift+Control+Tab (Mac) or Shift+Windows+Tab (PC) to include the following clip. Or, press Shift+Control+Option+Tab (Mac) or Shift+Windows+Ctrl+Tab (PC) to include the previous clip.
Extending a selection to a memory location (marker)
Memory locations (markers) are flags you can place within the session to make navigating your session faster. I usually make a habit of putting a marker at the beginning of each verse and chorus to help me find them quickly. To extend a selection to a marker or memory location, follow these steps:
- Click the start or end point in a track or make a selection in one of the ways listed earlier in this chapter.
Shift-click a marker in the Markers ruler (located above the track playlist section of the Edit window) or a memory location in the Memory Locations window.
The Memory Locations window is opened by clicking any of the markers in your session or by clicking the Marker icon at the left of the Markers ruler.
Moving and extending selections between tracks
You can take a selection on a track and extend it to include other tracks, or you can even move the selection to another track. For example, this is handy if you select the snare drum and then decide that you want to include the rest of the drum tracks in your edit. Another example is selecting one rhythm guitar track but deciding that you want to edit another rhythm guitar track instead. The following sections cover these options.
Moving a selection to another track
After you make a selection, if you decide that you’d rather edit a different track instead — while still using the same start and end points as the selection you already made — you can move the selection from one track to another. This process is done by following these steps:
- Click the Commands Focus button to enable the Commands Focus function.
- Make a selection, using one of the procedures listed earlier in this chapter.
- Press P to move the selection to the previous (above) track, or press ; (semicolon) to move the selection to the following (below) track.
Extending a selection to an adjacent track
To include adjacent tracks in your selection — as in the case of adding drum tracks to a selection you made on the snare drum track — you can do this by following these steps:
- Click the Commands Focus button to enable the Commands Focus function.
- Make a selection in a track in one of the ways listed earlier in this chapter.
Press Shift+P to include the previous (above) track, or press Shift+; (semicolon) to include the following (below) track.
Figure 2-8 shows what happens when you extend a selection to include an adjacent track.
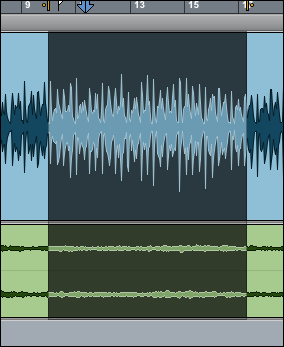
FIGURE 2-8: Pressing Shift+; (semicolon) includes the adjacent track in a selection.
If you got overzealous in extending your selection to adjacent tracks, you can remove the bottom track from this group by pressing Control+Option+; (semicolon; Mac) or Windows+Alt+; (semicolon; PC).
Managing Memory Locations
Memory locations let you quickly move from one position in a session to another with the click of a button. You can have up to 200 memory markers in each session.
Dealing with the New Memory Location dialog box
Whenever you create a memory location, a dialog box opens (as shown in Figure 2-9), where you choose the parameters of the marker. This box contains two sections: Time Properties and General Properties.
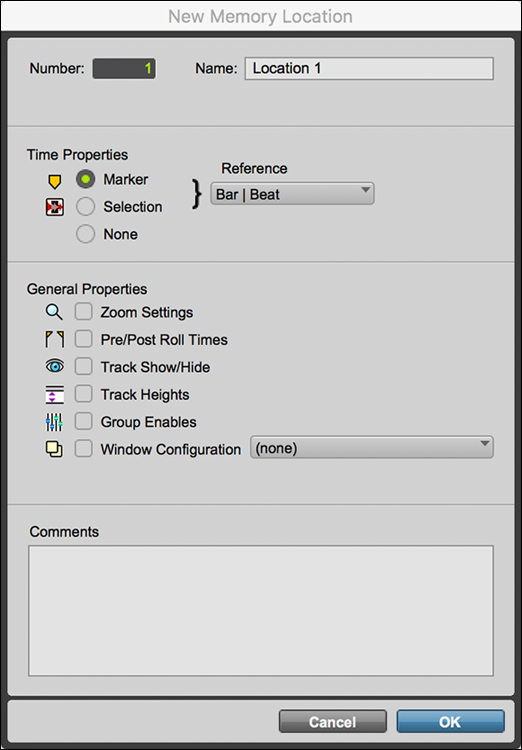
FIGURE 2-9: The New Memory Location dialog box lets you define the location’s properties.
Setting time properties
In the Time Properties section of the New Memory Location dialog box, you can choose from three options — Marker, Selection, and None — as well as whether you want the reference in bar/beat (the location in your session related to measures) or absolute time (the location in your session related to the clock in minutes and seconds from the start of the session).
The following list fills you in on what each of the three options here means:
- Marker: This option marks a specific location and is designated by a yellow icon in the Markers ruler — the ruler located at the top of the playlist section of the Edit window. If you set the reference for the location marker to Bar/Beat, the icon is a chevron (Figure 2-10, left). If you set the reference to Absolute, it appears as a diamond (Figure 2-10, right).
- Selection: Using this option marks a selected range within a track or multiple tracks.
- None: This type of memory location is called a General Properties memory location. It actually doesn’t contain any time-based information; rather, it memorizes just the selections from the General Properties section of the dialog box. (See the next section for more on the General Properties area.) This is a good option if you just want to remember a zoom or pre- and post-roll setting for part of the session.

FIGURE 2-10: Marker memory locations.
Choosing general properties
In the General Properties section of the Memory Location dialog box (refer to Figure 2-9), you can set preferences for the information that you store with the memory location. These include
- Number: This is the marker number for your session. You can renumber any memory location by clicking in the field and typing the number you want for the location.
- Name: You can enter a name in this field to help you remember what the memory location is for.
- Zoom Settings: Use this option to store the horizontal and vertical zoom settings for the tracks.
- Pre/Post Roll Times: This option, which stores the pre- and post-roll times, is handy when using the Selection memory location for setting record ranges.
- Track Show/Hide: This setting allows you to store track layouts in your session (as far as them being shown or hidden, anyway).
- Track Heights: This option lets you store the height of tracks in your session.
- Group Enables: This setting stores both Edit and Mix groups for easy recall of them when mixing or editing.
- Window Configuration: This drop-down menu lets you choose one of your saved window configurations. You can find out more about configuring windows in Book 2, Chapter 3.
- Comments: You can enter any comments or reminder in this section. This is handy for remembering what the marker is marking.
Creating memory locations
You create memory locations differently depending on the type — Marker, Selection, None — that you want. The following sections detail those ways.
Marker memory locations
Creating a Marker memory location requires these steps:
Get all your Settings ducks in a row for your session so that the session is set up the way you want it to be.
Settings here can include zoom settings, track heights, or any of the setting options listed in the previous section, “Dealing with the New Memory Location dialog box.”
Link your Edit and Timeline selections by clicking the Link Timeline and Edit Selection button, pressing Shift+/, or choosing Options ⇒ Link Timeline and Edit Selection from the main menu.
The Link Timeline and Edit Selection button is shown here in the margin.
Open the Markers Ruler (if it’s not already displayed) by choosing View ⇒ Ruler Markers from the main menu.
The Markers ruler appears just above the playlist section of the Edit window.
Press Control (Mac) or Windows (PC) and position your cursor where you want the memory location in the Markers ruler. When the cursor changes to a Grabber tool with a +, go ahead and click.
or
Choose the Selector tool by clicking the Selector button at the top of the Edit window.
- Click within any track where you want the memory location to go.
Click the Marker button located at the far left of the Memory Location ruler next to the Marker title.
The New Memory Location Dialog box opens. (Refer to Figure 2-8.)
- Select the Marker option and then use the Reference drop-down menu to choose whether you want the marker reference in bars/beats or absolute time, depending on whether you prefer to work referencing measures or the time from the start of the session.
- Enter a name for the marker in the Name field and select the check boxes in the General Properties section that you want to include in the marker.
Click OK.
A Marker icon appears at the location you specify in Step 4.
Selection memory locations
If you have a section of the session that you think you want to go back to — such as with a drum edit — you can store that selection by creating a Selection memory location. To create a Selection memory location, follow these steps:
- Configure your session with the settings you want to save.
Select a section of a track or tracks that you want to memorize.
For more on how to select stuff, see the “Selecting Track Material” section, earlier in the chapter.
Press Enter on the number pad section of your keyboard.
The New Memory Location dialog box opens. (Refer to Figure 2-9.)
- Choose the Selection option and then use the Reference drop-down menu to choose whether you want to use the bars/beats or absolute-time reference option.
- Enter a name for the location and select any of the options in the General Properties section of the dialog box.
Click OK.
The memory location appears in the Memory Locations window (opened by choosing Window ⇒ Memory Locations from the main menu). This window shows all the memory locations for your session.
To recall this memory location, simply click it in the Memory Locations window.
General Properties memory location
If you just want to store a zoom or pre-roll setting (or any other of the General Properties parameters) for your session, you can do so by creating a General Properties memory location. To create this type of memory location, follow these steps:
- Configure your session to the settings that you want to save.
Click the plus sign (+) to the right of Markers in the rulers field.
The New Memory Location dialog box opens. (Refer to Figure 2-8.)
- Select None.
- Enter a name and select the parameters you want to save from the list in the General Properties section.
Click OK.
The location is stored and appears in the Memory Locations window. This window shows all the memory locations for your session and is opened by choosing Window ⇒ Memory Locations from the main menu.
To recall this memory location, simply click it in the Memory Locations window.
Creating Marker memory locations on the fly
You can create memory locations while the session plays. You can create any type of memory location — Marker, Selection, or General Properties (none) — on the fly, but the most common are Marker memory locations. This “on-the-fly” business can be handy for marking the sections of your song or locations where you want to go back to make edits. Follow these steps to create Marker memory locations on the fly:
Enable the Auto-Name Memory Locations When Playing option on the Editing tab of the Preferences dialog box.
Note: To get to the Preferences dialog box, choose Setup ⇒ Preferences from the main menu.
Choose Window ⇒ Memory Locations from the main menu, as shown in Figure 2-11.
The Memory Locations window appears. (See Figure 2-12.)
Note: You can also call up this window by pressing ⌘ +5 (Mac) or Ctrl+5 (PC).
In the Memory Locations window, click the Name button and then choose the Default to Marker and the Auto-Name Memory Location options from the drop-down menu that appears.
If you don’t choose this option, the new memory locations created on the fly are of the same type as the last one made.
Set your session’s time scale to bars:beats if you want the memory locations to reference bars/beats.
Use the arrow to the right of the Main Counter display located at the top of the Edit window to make this selection.
- Play your session by clicking Play in the Transport window or by pressing the spacebar on your keyboard.
- Press Enter on the number pad of your keyboard when you want to place a marker.

FIGURE 2-11: The Memory Locations option in the Window menu.

FIGURE 2-12: The Memory Locations window.
Getting to know the Memory Locations window
After you create a memory location, it appears in the Memory Locations window, as shown in Figure 2-12. (You access this window by choosing Window ⇒ Memory Locations from the main menu.) You can recall, view, name and edit your stored memory locations by using the window’s drop-down menu, as shown in Figure 2-13. (You call up the window’s drop-down menu by clicking the button next to the word Name in the Memory Locations window.)
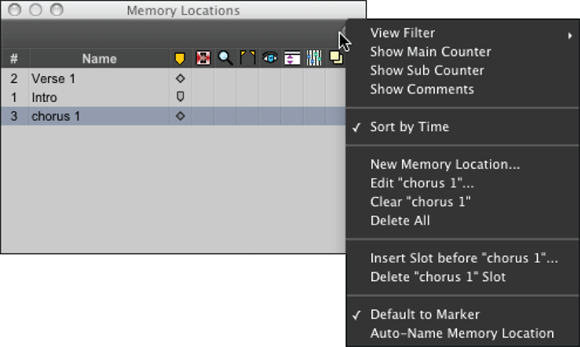
FIGURE 2-13: Click Name in Memory Locations to call up this menu.
Your choices on the drop-down menu for the Memory Locations window are as follows:
View Filter: By selecting this option, a series of icons appears in the window, which lets you hide or show memory locations by their properties. The icons in this selection are (from left to right in Figure 2-14):
- Marker
- Selection Memory Location
- Zoom Settings
- Pre/Post-Roll
- Show/Hide Track
- Track Heights
- Group Enables
Descriptions of these properties can be found in the “Dealing with the New Memory Location dialog box” section, earlier in this chapter.
- Show Main Counter: Selecting this option opens a column in the window that list the main time scale for Selection memory locations as well as the locations for Marker memory locations, as shown in Figure 2-14. General Properties memory locations have nothing listed in these columns.
- Show Sub Counter: Selecting this option opens two columns in the window that list the secondary (sub) time scales for Selection memory locations as well as the locations for Marker memory locations, as shown in Figure 2-15. General Properties memory locations have nothing listed in these columns.
- Show Comments: Here you can see any notes about the memory location that you entered when in the Comments section of the New Memory Locations dialog box. You can also add some comments by double-clicking the location in this dialog box. Double-clicking opens the New Memory Location dialog box, where you can make any changes you want.
- Sort by Time: By selecting this option, you sort your Marker memory locations by their Timeline positions in the session, followed by the Selection and General Properties locations in the order they were created. When this option isn’t selected, memory locations are listed according to their assigned numbers (the order in which they were created).
- New Memory Location: Choose this option if you want to add a new location.
- Edit Memory Location: Selecting this option opens the New Memory Location dialog box, where you can make changes to any of the settings.
- Clear Memory Location: Choosing this option deletes the selected memory location from the list.
- Delete All: This option removes all the memory locations in the session.
- Insert Slot: This option creates a new memory location before this memory location in the list and renumbers all the following locations.
- Delete Slot: This option deletes the selected memory location and moves the rest of the memory location in the list up and renumbers them.
- Default to Marker: Choosing this option makes any memory locations that you create on the fly (see previous section) Marker memory locations.
- Auto-Name Memory Location: Choosing this option automatically names memory locations created on the fly and keeps the New Memory Location dialog box from opening when you create on the fly. These names are consecutively numbered, but you can change the name later. To change the name, simply click the marker in the Markers ruler in the Edit window; when the New Memory Location dialog box opens, enter a new name in the Name field.
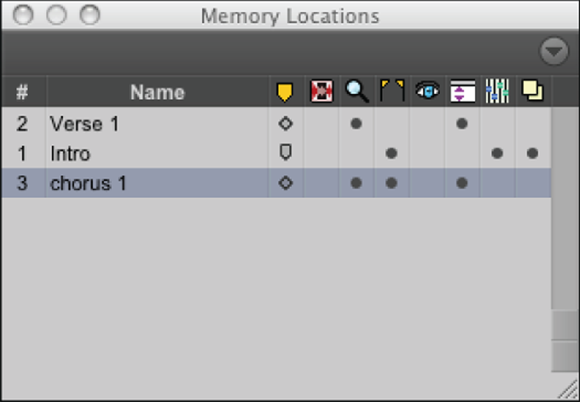
FIGURE 2-14: Showing the View Filter icons.
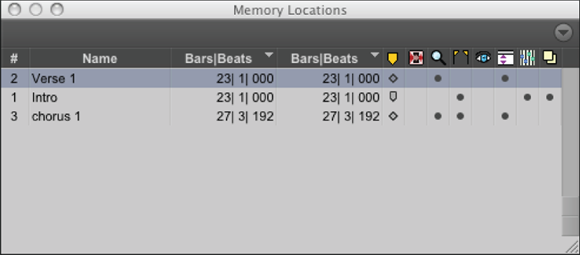
FIGURE 2-15: Enabling the Show Main Counter option expands the Memory Locations window to include these counters.
Recalling memory locations
You can recall memory locations from the Memory Locations window. Choose Window ⇒ Memory Locations from the main menu to call the window up, or press ⌘ +5 (Mac) or Ctrl+5 (PC). Marker memory locations can also be recalled by clicking the Marker icon in the Markers ruler located directly above the track playlist section of the Edit window.
Recalling from the Memory Locations window
Follow these steps to recall a memory location from the Memory Locations window:
Open the Memory Locations window by choosing Window ⇒ Memory Locations from the main menu or by pressing ⌘ +5 (Mac) or Ctrl+5 (PC).
Refer to Figure 2-11 for a peek at what this window looks like.
- If your Link Timeline and Edit Selections option isn’t enabled and you want to recall a Selection memory location, click the Link Timeline and Edit Selection button to enable the option.
Click the memory location you want in the Memory Locations window to recall it.
or
Press the memory location number followed by a period (.) if you have the Numeric Keypad mode set to Classic mode. If your numeric keypad is set to Transport mode, press period (.) followed by the memory location number followed by another period (.).
To select your Numeric Keypad Mode options, first choose Setup ⇒ Preferences from the main menu. After the Preferences dialog box appears, click the Operations tab and then select the appropriate mode check boxes.
Recalling markers from the Markers ruler
You can recall a Marker memory location in the Markers ruler by following these steps:
Display the Markers ruler in the session by choosing View ⇒ Rulers ⇒ Markers from the main menu.
This ruler appears directly above the track playlist section of the Edit window.
Click the marker.
The General Properties settings stored in the marker are instantly recalled.
Editing memory locations
You can perform quite a few editing functions on your various memory locations including renaming them, deleting them, editing their properties, copying them, and pasting them. These functions are detailed in the following sections.
Renaming a memory location
To rename a memory location, follow these steps:
Double-click the memory location in the Memory Locations window or Markers ruler.
The Edit Memory Location dialog box makes an appearance. (Refer to Figure 2-8.)
- Enter the new name in the Name field.
- Click OK.
Changing a memory location’s properties
You can change the properties of a stored memory location a number of different ways, depending on the change you want to make. This section details changing general properties, location types, and selection ranges.
First off, you can redefine General Properties settings by using these steps:
- Set up your new General Properties settings (zoom, track height, and so on).
- Open the Memory Location window by pressing ⌘ +5 (Mac) or Ctrl+5 (PC) or by choosing Window ⇒ Memory Location from the main menu.
Control-click (Mac) or right-click (PC) the memory location in the Memory Location window.
You can also Control-click (Mac) or right-click (PC) the Marker icon in the Markers ruler if you want to redefine a Marker memory location.
The Edit Memory Location dialog box opens.
Enter the General Properties you want to include in this marker; optionally, enter a new name.
This only stores the settings you have in your session; it doesn’t create them. You need to make sure that your screen is the way you want it before saving the settings.- Click OK.
You can change your memory location type — Marker, Selection, None — by doing the following:
- Open the Memory Location window by pressing ⌘ +5 (Mac) or Ctrl+5 (PC) or by choosing Window ⇒ Memory Location from the main menu.
Double-click the name of the memory location (in the Memory Location window) or the Marker memory location (in the Markers ruler).
The Edit Memory Location dialog box opens.
- Select Marker, Selection, or None; optionally, enter a new name.
- Click OK.
You can change the selection range of a Selection location by following these steps:
- Open the Memory Locations window by choosing Window ⇒ Memory Locations from the main menu or by pressing ⌘ +5 (Mac) or Ctrl+5 (PC).
Select a range of material within your session.
For more on how to select stuff, see the “Selecting Track Material” section, earlier in the chapter.
Control-click (Mac) or right-click (PC) on the name of the Selection memory location you want to change in the Memory Locations window.
The Edit Memory Location dialog box opens.
- (Optional) Enter a new name for the Selection memory location in the Name field of the Memory Location dialog box.
Click OK.
Your new selection is saved with the Selection memory location.
You can move a Marker memory location one of these ways:
Drag a marker by grabbing the icon in the Markers ruler and dragging it to its new location.
The Markers ruler is located just above the track playlist section of the Edit window. If it’s not visible, select View ⇒ Rulers ⇒ Markers from the main menu.- Align a marker by clicking with the Selector tool on the new location along the Timebase ruler or within a track’s playlist and then Control-clicking (Mac) or right-clicking (PC) the name of the marker location in the Memory Locations window.
- Align the marker to the start of a clip by selecting the clip with the Grabber tool, and then Control-clicking (Mac) or right-clicking (PC) the name of the marker location in the Memory Locations window.
Copying and pasting memory locations
You can copy single or multiple markers in a session by following these steps:
- Choose the Selector tool by clicking the Selector Tool button at the top of the Edit window.
Drag along the Markers ruler to select the portion of the session that contains the markers you want to copy. To select all the markers in the session, double-click anywhere in the Markers ruler.
If the beginning of your selection includes a marker, press ⌘ (Mac) or Ctrl (PC) for the Selector tool to appear because it will automatically disappear when your cursor is located directly over an existing marker.
- Choose Edit ⇒ Copy from the main menu or press ⌘ +C (Mac) or Ctrl+C (PC) to copy the selection onto the Clipboard.
If you want to paste the selection somewhere else in the session, follow these steps:
- Place your cursor along the Markers ruler where you want to paste the markers.
- Press ⌘ +V (Mac) or Ctrl+V (PC) or choose Edit ⇒ Paste from the main menu.
Playing Selected Material
After you make a selection, you’re free to give it a listen. The following sections cover a variety of ways of doing this.
Playing your selection
To play your selection, simply click the Play button in the Transport window or press the spacebar on your keyboard. All the tracks in the session will play during the selected range. If you want to hear only the track(s) in which you made your selection, you have one of two choices:
- Hide or mute the tracks you don’t want to hear.
- Solo the track(s) you do want to hear.
Using pre- and post-rolls
You can set Pro Tools to play a designated length of time before and after your selection by using pre- and post-rolls. The following sections show you how to set your pre-rolls and post-rolls as well as how to audition them.
Setting and enabling pre- and post-rolls
To set pre- and post-rolls, do the following:
Choose View ⇒ Transport ⇒ Expanded from the main menu.
The Pre- and Post-Roll fields appear in the window.
- Click in the Pre- or Post-Roll field in the Transport window, type in a number, and then press Return/Enter.
- Press ⌘ +K (Mac) or Ctrl+K (PC) or choose Options ⇒ Pre/Post-roll from the main menu to enable the Pre- and Post-Roll feature.
Auditioning pre- and post-rolls
If you just want to hear the pre- or post-roll, you can audition them by doing the following:
- To audition the pre-roll: Press Option+← (Mac) or Alt+← (PC). The pre-roll plays to the start of the selection or to the position of the cursor in the selected clip.
- To audition the post-roll: Press ⌘ +→ (Mac) or Ctrl+→ (PC). The post-roll plays from its beginning or from the current cursor location.
Auditioning start and end points
When you audition start and end points, you get to listen to just the beginning or end of a selection without having to listen to the whole thing. This kind of auditioning is done in the following ways.
Auditioning the start point
You can audition the start point of a selection either with or without listening to the pre-roll along with it. Both options are covered in this section.
- To audition just the start point of a selection: Press ⌘ +← (Mac) or Ctrl+← (PC). The selection plays for the length of time designated in the Post-Roll field of the Transport window.
- To audition the start point of a selection along with the pre-roll: Press ⌘ +Option+← (Mac) or Ctrl+Alt+← (PC). The pre-roll plays along with the length of the selection, as designated in the Post-Roll field of the Transport window as long as you have the Pre/Post-roll Playback function enabled. (Choose Options ⇒ Pre/Post-roll from the main menu.)
Auditioning the end point
Pro Tools lets you audition the end point of your selection, either with or without hearing the post-roll too. Here’s how to use these options:
- To audition just the end point of a selection: Press Option+→ (Mac) or Alt+→ (PC). The selection starts at the point equal to the pre-roll amount from the end of the selection.
- To audition the end point of a selection along with the post-roll: Press ⌘ +Option+→ (Mac) or Ctrl+Alt+→ (PC). The selection starts at the point equal to the pre-roll amount from the end of the selection and continue until the end of the post-roll.
Looping your selection’s playback
If you have a section of the song that you want to listen to repeatedly (say, if you’re trying to find a chair-squeak to edit out), you can loop a selection with the Loop command. This enables you to create looped sections and to make sure that your start and end points play seamlessly. Follow these steps to loop a selection:
- Engage the Link Timeline and Edit Selection option by choosing Options ⇒ Link Timeline and Edit Selection from the main menu or by clicking the Link Timeline and Edit Selection button.
- Make a selection by using one of the techniques listed in the “Selecting Track Material” section, earlier in this chapter.
- Choose Options ⇒ Loop Playback from the main menu, or Control-click (Mac) or right-click (PC) the Play button in the Transport window.
Click Play in the Transport window or press the spacebar on your keyboard.
If you have the pre-roll engaged, playback will begin with it; otherwise, it starts at the beginning of your selection. When the selection loops, the pre-and post-rolls won’t play after the starting pre-roll (if you have the function engaged).
- Click Stop in the Transport window or press the spacebar on your keyboard to stop playback.