
Chapter 3
Using Equalization
IN THIS CHAPTER
![]() Understanding equalization (EQ)
Understanding equalization (EQ)
![]() Inserting EQ in a track
Inserting EQ in a track
![]() Getting to know the EQ options in Pro Tools
Getting to know the EQ options in Pro Tools
![]() Equalizing your tracks
Equalizing your tracks
Equalization (EQ) comprises changing the frequency response of the data in the session’s track to make the track sound how you want. The main goal when EQing during mixing is to get the instruments in your song to blend together smoothly (Book 6, Chapters 1 and 2 explore the process of mixing your tracks).
In this chapter, you discover the types of equalizers used in Pro Tools, and I walk you through applying EQ to your tracks. This chapter also offers some basic EQ settings for a variety of instruments to get you started EQing your songs.
Exploring Equalization
The most useful tool you have for mixing is equalization. You use equalizers to adjust the various frequencies of your instruments so that there’s enough room for each of them in your stereo tracks. Pro Tools offers three types of equalizers — parametric, low-shelf/high-shelf, and low-pass/high-pass. I outline these types of EQ in the following sections.
Parametric
![]() Using the parametric equalizer allows you to choose the frequency that you want to change as well as the range of frequencies around that frequency. With a parametric EQ, you dial-in the frequency that you want to change and then set the range itself (referred to as the Q) that you want to affect. This type of EQ is called a peak, or notch, EQ in Pro Tools; it’s designated by the icon shown here in the margin.
Using the parametric equalizer allows you to choose the frequency that you want to change as well as the range of frequencies around that frequency. With a parametric EQ, you dial-in the frequency that you want to change and then set the range itself (referred to as the Q) that you want to affect. This type of EQ is called a peak, or notch, EQ in Pro Tools; it’s designated by the icon shown here in the margin.
Q is a number that signifies the range of frequencies that the EQ affects — usually between one-half and two octaves. Pro Tools offers settings from 0.10 to 10, with the lower numbers allowing larger ranges of frequencies to be EQed.
 You choose your Q setting based on what you hear in the mix. Just as you can experiment with different frequencies to adjust in the mix, you can also try different Q settings to find the best possible frequency range to use.
 The beauty of using a parametric EQ is that you can take a small band (range) of frequencies and then boost (increase) or cut (decrease) them. This capability enables you to get the various instruments in a mix to fit with one another. (This technique is carving out frequencies.) When you’re mixing, the parametric EQ is the most useful equalizer because you can adjust the frequency response of each instrument so that the other instruments can be heard clearly in the mix. The only downside to using parametric EQs is that they need processing power to run. If you have a lot of EQing to do, you might end up stressing your system pretty hard. (Yet another reason to have a powerful computer.)
Low-shelf/high-shelf
A shelf equalizer affects a range of frequencies above (high-shelf) or below (low-shelf) the target frequency. Shelf EQs are generally used to roll off the top or bottom end of the frequency spectrum. For example, you can set a low-shelf EQ to roll off the frequencies below 250 hertz (Hz), which reduces the amount of rumble (low-frequency noise) in a recording. You generally use the shelf EQ to adjust the lowest and highest frequencies and the parametric EQ to adjust any in-between frequencies when you mix.
![]()
![]() In Pro Tools, the low- and high-shelf EQs are designated with the icons seen here in the margin. The low-shelf is the left-facing fork, (top) and the high-shelf is the right-facing art in the margin (bottom).
In Pro Tools, the low- and high-shelf EQs are designated with the icons seen here in the margin. The low-shelf is the left-facing fork, (top) and the high-shelf is the right-facing art in the margin (bottom).
Low-pass/high-pass
Believe it or not, sometimes your track just sounds better if you eliminate a few carefully chosen frequencies. You just need to know which ones to target. That’s where a couple of Pro Tools capabilities can help with the needed audio acrobatics: low-pass (ducking the high frequencies you don’t want) and high-pass (jumping over the low frequencies you don’t want).
![]()
![]() This type of EQ is actually called a filter because, um, it filters out frequencies either higher (low-pass) or lower (high-pass) than the target frequency. A low-pass filter is used for eliminating unwanted high frequencies, and a high-pass filter is useful for getting rid of unwanted low frequencies. In Pro Tools, the low- and high-pass filters are designated with the icons seen here in the margin. The low-pass filter is the downward slope (top) and the high-pass filter is the upward slope (bottom) art in the margin.
This type of EQ is actually called a filter because, um, it filters out frequencies either higher (low-pass) or lower (high-pass) than the target frequency. A low-pass filter is used for eliminating unwanted high frequencies, and a high-pass filter is useful for getting rid of unwanted low frequencies. In Pro Tools, the low- and high-pass filters are designated with the icons seen here in the margin. The low-pass filter is the downward slope (top) and the high-pass filter is the upward slope (bottom) art in the margin.
Dialing In EQ
Before you start EQing your tracks, you need to know how to insert the EQ plug-in in a track and how to actually make those adjustments with one of the EQ plug-ins in Pro Tools. The following sections detail these procedures.
Inserting an EQ plug-in in a track
To EQ a track, you first need to insert the Pro Tools AudioSuite plug-in in the track. To do so, follow these steps:
- Choose View⇒ Mix Window⇒ Inserts from the main menu to make sure that the Inserts section is showing in the Mix window.
Click the top arrow on the left side of the Inserts section of the track’s channels strip.
The Inserts drop-down menu appears, as shown in Figure 3-1.
To fit the type of track you have, select the Multi-Channel Plug-In or the Multi-Mono Plug-In option.
If your track is stereo, use Multi-Channel; if it’s mono, use Multi-Mono.
Select the 1-Band EQ3, 4-Band EQ-3, or 7-Band EQ 3 option.
Your chosen EQ plug-in window opens. (The 1-Band EQ 3 option lets you set one EQ parameter, whereas the 4-Band EQ 3 option lets you work with four parameters. I bet you can guess how many parameters you work with in 7-Band EQ-3.) For more on which option would work best for you, check out the following section.
Adjust the parameters that you want to EQ.
You can find the particulars for each kind of EQ — parametric, low-shelf/high-shelf, and low-pass/high-pass — later in the chapter.
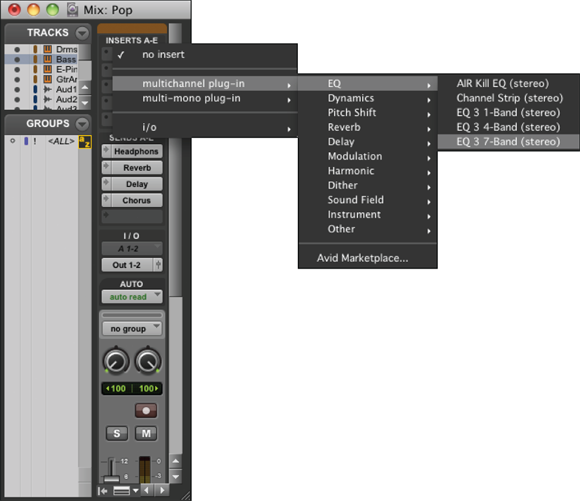
FIGURE 3-1: Select the EQ plug-in to insert into your track.
If you want to EQ a bunch of tracks at the same time and use the same settings (submixes, for example), you can do this the following way:
- Select one of the buses from the Output selector in each track that you want to submix.
Choose Track⇒ New from the main menu.
The New Track dialog box appears.
- Use the drop-down menus to enter the number of tracks that you want (choose 1), the type (choose Auxiliary Input), and whether you want your track in stereo or mono.
- Use your new track’s Input selector to select the bus that you used for the output of the submix tracks as the input for this auxiliary track.
Insert one of the EQ plug-ins from the Insert drop-down menu in this auxiliary track.
The EQ plug-in window opens.
Adjust the EQ settings to get the sound that you want.
You can find the particulars for each kind of EQ — parametric low-shelf/high-shelf, and low-pass/high-pass — later in the chapter.
Perusing Pro Tools EQ options
Using an EQ in Pro Tools comprises selecting one of the plug-ins, inserting it in the track that you want to affect, and setting your parameters. Pro Tools comes with three basic EQs: 1-band EQ, 4-band EQ, and 7-band EQ.
You can also use any 64 bit AAX Native or AAX AudioSuite EQ plug-in, but these have to be purchased separately. If you do an Internet search with the keywords 64 bit AAX plug-ins, you’re sure to find tons to choose from. The 1-band EQ plug-in for Pro Tools, as shown in Figure 3-2, lets you apply one EQ filter to a track. This EQ is useful if you just want to adjust one parameter. You can choose any of the types of EQs — parametric, low-shelf/high-shelf, and low-pass/high-pass — by clicking the appropriate button to engage your chosen EQ.

FIGURE 3-2: The 1-band EQ plug-in in Pro Tools lets you make one EQ setting.
4-band and 7-band EQs
The 4-band and 7-band EQs in Pro Tools, as shown in Figure 3-3, let you adjust up to four or seven (respectively) EQ filters to a track. This type of EQ is useful when you have to do some major EQing to a track. Both EQs share the same window. The difference is that with the 4-band EQ, you can select only up to four of the seven possible bands of EQ. Comparatively, the 7-band EQ lets you use them all.

FIGURE 3-3: Use the 4-band and 7-band EQs in Pro Tools to apply four or seven EQ filters to a track.
Figure 3-3 shows all seven bands. These are
- HPF (High-Pass Filter): Located to the left of the graphical display for the EQ, here you can choose the high-pass filter or the notch EQ setting.
- LPF (Low-Pass Filter): Located just to the left of the graphical display for the EQ, here you can choose the low-pass filter or the notch EQ setting.
- LF (Low Frequency): You can select between a peak or low-shelf EQ by clicking the appropriate icon next to the LF name.
- LMF (Lower-Middle Frequency): Your only option is a peak EQ.
- MF (Middle Frequency): Again, your only option is a peak EQ.
- HMF (High-Middle Frequency): Here you can adjust a peak EQ.
- HF (High Frequency): Like the LF option, this EQ can be a peak or shelf (this time a high-shield) EQ.
When you engage each band of EQ (by clicking the In button below the Q knob), a dot shows up in the graphical section of the EQ window to show you how your EQ is affecting the track the EQ is assigned to. You can check this by looking for a blue illuminated “In” button. These dots are color-coded to make it easy for you to see which band is where in the graph.
Using parametric (peak and notch) EQ
To use the parametric EQ, click the Peak EQ button in whatever EQ plug-in window — 1-band or 4-band, for example — you have open. You have three settings to adjust:
- Q: This is the range of frequencies that your EQ will affect. The higher the number, the narrower the range that gets EQed. You adjust this setting either by moving the knob or by clicking in the box and typing a value between 1 and 10.
- Freq: This is the frequency that the EQ centers around. You select the range of frequencies above and below this point by using the Q setting (see the following bullet). You can type in the frequency on the box or use the knob to make your adjustment.
- Gain: This is the amount of boost (increase) or cut (decrease) that you apply to the signal. You can either type in the amount in the box next to the Peak EQ button or use the knob to the right.
Using low-shelf/high-shelf EQ
To use low-shelf/high-shelf EQ, click the Low-Shelf and High-Shelf buttons in the EQ band you want to engage. When you use low-shelf/high-shelf EQ, you have three parameters to adjust:
- Q: This is the range of frequencies that your EQ will affect. The higher the number, the narrower the range that gets EQed. You adjust this setting either by moving the knob or by clicking in the box and typing a value between .1 and 2.
- Freq: This is the frequency that the shelf starts at. You can type in the frequency in the box or use the knob to make your adjustment.
- Gain: This is the amount of boost or cut that you apply to the signal. You can either type in the amount in the box next to the shelf button or use the knob to the right.
Using low-pass/high-pass EQ
Here’s where you tell Pro Tools which frequencies to avoid in the course of adjusting the EQ. The low- and high-pass buttons appear next to the name of the EQ band. You have two parameters to adjust:
- Q: This is the range of frequencies that your EQ will affect. With these filters, you can select between 6, 12, 18, and 24 decibels (dB) per octave. The higher the number, the more severe the filter.
- Freq: This is the frequency that the filter starts at. You can type in the frequency in the box or use the knob to make your adjustment.
With all the EQ types, you can click and drag the color-coded dot in the graphical display section to set your EQ bands. Dragging left or right changes the frequency at which the EQ is set; by dragging up and down, you can change the gain.
Equalizing Your Tracks
Only so many frequencies are available for all the instruments in a mix. If more than one instrument occupies a particular frequency range, they can get in each other’s way and muddy the mix. When you’re EQing during the mixing process, your goal is to reduce the frequencies that add clutter — and/or to enhance the frequencies that define an instrument’s sound. To do this, make a little space for each instrument within the same general frequency range, which you can accomplish by EQing the individual tracks as you mix. The first part of this chapter shows you how to get up to the point of doing some EQing. The rest of the chapter gets your hands dirty with some real EQing experience.
Here’s a good trick to use when initially trying to decide which frequencies to boost or cut: First, solo the track(s) that you’re working on and set your parametric EQ to a narrow Q setting (a high number). Next, turn the boost all the way up (move the Gain slider all the way to the right) and sweep the frequency setting as you listen (to sweep, just move the Freq slider to the left and right). Noticing the areas where the annoying or pleasing sounds are located can help you better understand the frequencies that your instrument produces. When you find a frequency to adjust, experiment with the Q setting to find the range that produces the best sound, and then adjust the amount of boost or cut until it has the effect that you want.
After you determine the frequencies that you want to work with, do your EQing to the individual track while the instrument is in the mix (not soloed). You want to make the instrument fit as well as possible with the rest of the instruments, and to do this you need to know how your instrument sounds in relation to all the music going on around it.
Your goal when making adjustments in EQ is to make all the tracks blend together as well as possible. In some instances, you may have to make some radical EQ moves. Don’t be afraid to do whatever it takes to make your mix sound good — even if it means having cuts or boosts as great as 12dB.
General EQ guidelines
Although some instruments do call for specific EQ guidelines, you need to think about some general considerations when EQing, regardless of the instrument involved. When it comes to the audible frequency spectrum (about 20 Hz to 20 kHz), certain frequencies have special characteristics. Table 3-1 describes these frequencies.
TABLE 3-1 EQ Frequency Sound Characteristics
Frequency |
Sound Characteristic |
20–100 Hz |
Warms an instrument or adds boominess to it. |
100–200 Hz |
Is muddy for some instruments but adds fullness to others. |
350–450 Hz |
Sounds boxy. |
750–850 Hz |
Adds depth or body. |
1–2 kHz |
Adds attack or punch to some instruments and creates a nasally sound in others. |
2–5 kHz |
Increases the presence of instruments. |
5–8 kHz |
Sounds harsh in some instruments. |
8 kHz and above |
Adds airiness or brightness to an instrument. |
To adjust frequencies via Pro Tool EQ plug-ins, use the Frequency knob to choose the frequency you want to EQ and the Gain knob to control the amount of EQ that you boost (move the knob to the right) or cut (move the knob to the left) from your track.
You’re generally better off cutting a frequency than boosting one. This belief goes back to the days of analog EQs, which often added noise when boosting a signal. This can still be a factor with some digital EQs, but the issue is much less. Out of habit, I still try to cut frequencies before I boost them, and I recommend that you do the same (not out of habit, of course, but because if a noise difference exists between cutting and boosting, you might as well avoid it).
The exact frequencies that you end up cutting or boosting depend on three factors: the sound you’re after, the tonal characteristic of the instrument, and the relationship between all the instruments in the song. In the following sections, I list a variety of frequencies to cut or boost for each instrument (Table 3-2 shows an overview). If you don’t want to follow all the suggestions, choose only the ones that fit with your goals.
TABLE 3-2 EQ Recommendations per Instrument
Instrument |
Frequency |
Adjustment (dB) |
Purpose |
Vocals |
150 Hz |
+2–3 |
Adds fullness |
200–250 Hz |
–2–3 |
Reduces muddiness |
|
3 kHz |
+2–4 |
Adds clarity |
|
5 kHz |
+1–2 |
Adds presence |
|
7.5–10 kHz |
–2–3 |
Cuts sibilance |
|
10 kHz |
+2–3 |
Adds air or brightness |
|
Electric guitar |
100 Hz |
–2–3 |
Reduces muddiness |
150–250 Hz |
+2 |
Adds warmth |
|
2.5–4 kHz |
+2–3 |
Adds attack or punch |
|
5 kHz |
+2–3 |
Adds bite |
|
Acoustic guitar |
80 Hz |
–3 |
Reduces muddiness |
150–250 Hz |
+2–3 |
Adds warmth |
|
800–1000 Hz |
–2–3 |
Reduces boxiness |
|
3–5 kHz |
+2–3 |
Adds attack or punch |
|
7 kHz |
+2–3 |
Adds brightness |
|
Bass guitar |
100–200 Hz |
+1–2 |
Adds fullness |
200–300 Hz |
–3–4 |
Reduces muddiness |
|
500–1000 Hz |
+2–3 |
Adds punch |
|
2.5–5 kHz |
+2–3 |
Adds attack |
|
Kick drum |
80–100 Hz |
+1–2 |
Adds body or depth |
400–600 Hz |
–3–4 |
Reduces boxiness |
|
2.5–5 kHz |
+1–2 |
Adds attack |
|
Snare drum |
100–150 Hz |
+1–2 |
Adds warmth |
250 Hz |
+1–2 |
Adds depth or body |
|
800–1000 Hz |
–2–3 |
Reduces boxiness |
|
3–5 kHz |
+1–3 |
Adds attack |
|
8–10 kHz |
+1–3 |
Adds crispness |
|
Tom-toms |
200–250 Hz |
+1–2 |
Adds depth |
600–1000 Hz |
–2–3 |
Reduces boxiness |
|
3–5 kHz |
+1–2 |
Adds attack |
|
5–8 kHz |
+1–2 |
Adds presence |
|
Large tom-toms |
40–125 Hz |
+1–2 |
Adds richness |
400–800 Hz |
–2–3 |
Reduces boxiness |
|
2.5–5 kHz |
+2–3 |
Adds punch or attack |
|
Hi-hats |
10+ kHz |
+3–4 |
Adds brightness or sheen |
Cymbals |
150–200 Hz |
–1–2 |
Reduces rumbling |
1–2 kHz |
–3–4 |
Reduces trashiness |
|
10+ kHz |
+3–4 |
Adds brightness or sheen |
|
Drum overheads |
100–200 Hz |
–2–3 |
Reduces muddiness |
400–1000 Hz |
–2–3 |
Reduces boxiness |
|
High percussion |
500– Hz |
–6–12 |
Cuts boxiness |
10+ kHz |
+3–4 |
Adds brightness or sheen |
|
Low percussion |
250 Hz and below |
–3–4 |
Reduces muddiness |
2.5–5 kHz |
+2–3 |
Adds attack |
|
8–10 kHz |
+2–3 |
Adds brightness |
|
Piano |
80–150 Hz |
+2–3 |
Adds warmth |
200–400 Hz |
–2–3 |
Reduces muddiness |
|
2.5–5 kHz |
+2–3 |
Adds punch or attack |
|
Horns |
100–200 Hz |
+1–2 |
Adds warmth |
200–800 Hz |
–2–3 |
Reduces muddiness |
|
2.5–5 kHz |
+2–3 |
Adds punch or attack |
|
7–9 kHz |
+1–2 |
Adds breath |
The parametric EQ is the type of EQ you use most when trying to get your tracks to fit together. This EQ gives you the greatest control over the range of frequencies you can adjust. The other EQ types (high-shelf, low-shelf, high-pass, low-pass) can often be used successfully for the top or bottom frequencies listed in the sections that follow.
Equalizing vocals
For the majority of popular music, the vocals are the most important instrument in the song. You need to hear them clearly, and they should contain the character of the singer’s voice and style. One of the most common mistakes in mixing vocals is to make them too loud. The next most common mistake is to make them too quiet. (The second mistake most often occurs when a shy or self-conscious vocalist is doing the mixing.) You want the lead vocals to shine through, but you don’t want them to overpower the other instruments. The best way to do this is to EQ the vocal tracks so they can sit nicely in the mix and still be heard clearly. The following guidelines can help you do this.
Lead
The lead vocal can go a lot of ways, depending on the singer and the style of music. For the most part, I tend to cut a little around 200 Hz and add a couple dBs at 3 kHz and again at 10 kHz. In general, follow these guidelines:
- To add fullness, add a few dBs at 150 Hz.
- To get rid of muddiness, cut a few dBs at 200–250 Hz.
- To add clarity, boost a little at 3 kHz.
- For more presence, add at 5 kHz.
- To add air or to brighten, boost at 10 kHz.
- To get rid of sibilance, cut a little between 7.5 and 10 kHz.
Backup
To keep backup vocals from competing with lead vocals, cut the backup vocals a little in the low end (below 250 Hz) and at the 2.5–3.5 kHz range. To add clarity, boost a little around 10 kHz without letting it get in the way of the lead vocal.
Equalizing guitar
For the most part, you want to avoid getting a muddy guitar sound and make sure that the guitar attack comes through in the mix.
Electric
Electric guitars often need a little cutting below 100 Hz to get rid of muddiness. A boost between 120 and 250 Hz adds warmth. A boost in the 2.5–4 kHz range brings out the attack of the guitar, and a boost at 5 kHz can add some bite.
Acoustic
Acoustic guitars often do well with a little cut below 80 Hz and again around 800 Hz–1 kHz. If you want a warmer tone and more body, try boosting a little around 150–250 Hz. Also, try adding a few dBs around 3–5 kHz if you want more attack or punch. A few dBs added at 7 kHz can add a little more brightness to the instrument.
Equalizing bass
Bass instruments can get muddy pretty fast. The mud generally happens in the 200–300 Hz range, so I either leave that alone or cut just a little if the bass lacks definition. I rarely add any frequencies below 100 Hz. If the instrument sounds flat or thin, I boost some between 100–200 Hz. Adding a little between 500 Hz–1 kHz can increase the punch, and a boost between 2.5–5 kHz accentuates the attack, adding a little brightness to the bass.
One of the most important things to keep in mind with a bass guitar is to make sure that it and a kick drum can both be heard. You need to adjust the frequencies of these two instruments to make room for both. If you add a frequency to a kick drum, try cutting the same frequency from the bass.
Equalizing drums
The guidelines for EQing drums depend on whether you use live acoustic drums or a drum machine. (A drum machine probably requires less EQ because the sounds were already EQed when they were created.) The type and placement of your mic or mics also affect how you EQ the drums. (You can find out more about mic placement in Book 3, Chapter 3.)
Kick
You want a kick drum to blend with the bass guitar. To do this, reduce the frequencies that a bass guitar takes up. For example, if I boost a few dB between 100 and 200 Hz for a bass guitar, I generally cut them in the kick drum (and maybe go as high as 250 Hz). To bring out the bottom end of a kick drum, I sometimes add a couple of dBs between 80 and 100 Hz. A kick drum can get boxy sounding (you know, like a cardboard box), so I often cut a little between 400 and 600 Hz to get rid of the boxiness. To bring out the click from the beater hitting the head, try adding a little between 2.5 and 5 kHz. This increases the attack of the drum and gives it more presence.
Snare
A snare drum drives the music, making it the most important drum in popular music. As such, it needs to really cut through the rest of the instruments. Although the adjustments that you make depend on the pitch and size of the drum and whether you use one mic or two during recording, you can usually boost a little at 100–150 Hz for added warmth. You can also try boosting at 250 Hz to add some depth. If the drum sounds too boxy, try cutting at 800 Hz–1 kHz. A little boost at around 3–5 kHz increases the attack, and an increase in the 8–10 kHz range can add crispness to the drum.
If you use two mics during recording, you might consider dropping a few dBs on the top mic in both the 800 Hz–1 kHz range and the 8–10 kHz range. Allow the bottom mic to create the crispness. I generally use a shelf EQ to roll off the bottom end of the bottom mic below, say, 250–300 Hz. Depending on the music (R&B and pop, for instance), I might use a shelf EQ to add a little sizzle to the bottom mic by boosting frequencies higher than 10 kHz.
For many recording engineers and producers, their snare drum sound is almost a signature. If you listen to different artists’ songs from the same producer, you’ll likely hear similarities in the snare drum. Don’t be afraid to take your time getting the snare drum to sound just right. After all, if you become a famous producer, you’ll want people to recognize your distinct sound. And you want it to sound good anyway.
Tom-toms
Tom-toms come in a large range of sizes and pitches. For mounted toms, you can boost a little around 200–250 Hz to add depth to the drum. A boost in the 3–5 kHz range can add more of the sticks’ attack. For some additional presence, try adding a little in the 5–8 kHz range. If the drums sound too boxy, try cutting a little in the 600 Hz–1 kHz range.
For floor toms, you can try boosting the frequency range of 40–125 Hz if you want to add some richness and fullness. You might also find that cutting in the 400–800 Hz range can get rid of any boxy sound that the drum may have. To add more attack, boost the 2.5–5 kHz range.
Hi-hats
Most of the time, hi-hats are pretty well represented in the rest of the mics in the drum set. Depending on which mics are picking up the hi-hats, though, you can use a hi-hat mic to bring out their sheen or brightness. To do this, try boosting the frequencies higher than 10 kHz with a shelf EQ. You might also find that cutting frequencies lower than 200 Hz eliminates any rumble created by other drums that a hi-hat mic picks up.
Cymbals
With cymbals, I usually cut anything below 150–200 Hz with a shelf EQ to get rid of any rumbling that these mics pick up. I also drop a few dBs at 1–2 kHz if the cymbals sound kind of trashy or clanky. Adding a shelf EQ higher than 10 kHz can add a nice sheen to the mix.
Overhead mics
If you use overhead mics to pick up both the drums and the cymbals, be careful about cutting too much low end because doing so just sucks the life right out of your drums. Also, if the drums coming through the overhead mics sound boxy or muddy, work with the 100–200 Hz frequencies for the muddiness and 400 Hz–1 kHz frequencies for the boxiness. Depending on your mics, you may also find adding a little between 10kHz and 12kHz can add some sizzle.
Equalizing percussion
High-pitched percussion instruments (shakers, for example) sound good when the higher frequencies are boosted a little bit — say, higher than 10 kHz. This adds some brightness and softness to their sound. You can also roll off many of the lower frequencies, lower than 500 Hz, to eliminate any boxiness that might be present from miking too closely. (See Book 3, Chapter 3 for more on mic placement.)
Lower-pitched percussion instruments, such as maracas, can also have the lower frequencies cut a little: Use 250 Hz and lower. Try boosting frequencies between 2.5 and 5 kHz to add more of the instruments’ attack. To brighten them up, add a little bit in the 8–10 kHz range.
Equalizing piano
For pianos, you often want to make sure that the instrument has both a nice attack and a warm-bodied tone. You can add attack in the 2.5–5 kHz range, and warmth can be added in the 80–150 Hz range. If your piano sounds boomy or muddy, try cutting a little between 200 and 400 Hz.
Equalizing horns
You find a variety of horns, from tubas to soprano saxophones, so to offer blanket recommendations for all of them would be ridiculous (although I’m no stranger to the ridiculous). So, with this thought in mind, I often start the EQ process for these instruments by looking at the 100 to 200 Hz range to add warmth to thin-sounding instruments. Next, I approach the 400 to 800 Hz range to get rid of any muddiness that occurs — unless it’s a really low horn like a tuba. For really low horns, I often look for the muddiness a little lower — say, in the 200 to 400 Hz range. To add some more attack to a horn, you can tweak the 2.5 to 5 kHz range a bit, and to add some of the breath of the instrument, look toward the 7 to 9 kHz range.