
Chapter 6
Performing MIDI Operations
IN THIS CHAPTER
![]() Quantizing MIDI notes
Quantizing MIDI notes
![]() Flattening and restoring MIDI performances
Flattening and restoring MIDI performances
![]() Changing note velocity and duration
Changing note velocity and duration
![]() Transposing, selecting, and splitting MIDI notes
Transposing, selecting, and splitting MIDI notes
![]() Adjusting MIDI Real-Time Properties
Adjusting MIDI Real-Time Properties
Pro Tools offers a handful of MIDI operations (located under the MIDI section of the main menu) where you can transform a mediocre track into a stunning performance. (Well, almost, depending on how well you use these operations.) These operations allow you to make changes to the MIDI performance data on a track.
In this chapter, you get a chance to dig in to some of the most powerful MIDI editing operations in Pro Tools. With these operations in hand, you can do some really cool things, such as change the key of a song, alter the characteristics of a performance, or correct timing problems. This chapter also leads you through the MIDI Operations window and shows you how to perform each of the operations in the window.
Getting Used to the MIDI Operations Window
Logically enough, the MIDI Operations window is where you do all your MIDI operations. This window, as shown in Figure 6-1, is accessed by choosing any one of the Event operations listed under the Event section of the main menu, or by choosing Event⇒ Event⇒ Event Operations Window from the main menu.

FIGURE 6-1: The Event Operations window lets you perform many MIDI operations on selected MIDI data.
After this window is open, you can select the operation you want to perform from the drop-down menu at the top of the window.
To close the window, press Return (Mac) or Enter in the alphanumeric section of the keyboard (PC) after you click the Apply button to apply the operation.
From the Event Operations window, you can use the following commands as a fast way to navigate and adjust parameters:
- Press Tab to move forward through the fields in the window; conversely, press Shift+Tab to move backward through the fields.
- Use the up-arrow (↑) and down-arrow (↓) keys to adjust values up and down in your selected field.
- In a highlighted field, press ⌘ (Mac) or Ctrl (PC) while you drag your mouse to adjust the value up or down in your selected field’s text box.
- When adjusting the sliders, press ⌘ (Mac) or Ctrl (PC) to increase the resolution of the sliders while you use them to adjust the values in your selected field.
- Play a note on your MIDI controller to select a note in fields with pitch and velocity settings.
Performing MIDI Event Operations
MIDI Event operations are all done from the Event Operations window (see the previous section). The operations you can perform are listed in the drop-down menu at the top of the window. You have the following operations available to you (as shown in Figure 6-2):
- Quantize: Lets you adjust the timing of your selected notes and to the Quantize operation, except you use a groove template to create a grid to quantize to if you choose.
- Change Velocity: Use this to adjust the volume of the attack or the release of selected MIDI notes.
- Change Duration: User this to alter the length of recorded MIDI notes.
- Transpose: User this to change the pitch of selected notes.
- Select/Split Notes: Use this to choose specific MIDI notes or a range of notes in a selection, or copy or cut the selected notes.
- Input Quantize: Use this to set a Quantize value that your recorded performance is adjusted to automatically while you record it.
- Step Input: Use this option to input notes manually, one at a time. You can control the duration, velocity, and location of each note.
- Restore Performance: Use this option to return to saved performance settings.
- Flatten Performance: Use this option to tweak performance data and lock it in before you do any more tweaking.
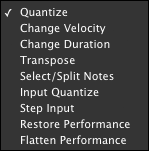
FIGURE 6-2: The Event Operations window includes a pop-up menu where you can select from several MIDI Operations.
Stay tuned: The following sections look at each of these MIDI operations in greater detail. If you want to perform any one of them, here’s how:
Select the note(s) you want to change.
Book 5, Chapter 2 describes how to make these selections.
- Select the MIDI operation you want to perform from the Event section of the main menu. (Or, choose Event⇒ MIDI⇒ Operation Window from the main menu and choose the operation you want from the window’s drop-down menu.)
Make the settings you want in the available fields.
Check out the section for each operation to see what to adjust.
- Apply the operation by clicking Apply or by using the keyboard:
- To keep the MIDI Operations window open: Press Enter in the number pad section of the keyboard.
- To close the MIDI Operations window: Press Return (Mac) or Enter in the alphanumeric section of the keyboard (PC) to apply the operation and close the MIDI Operations window.
Grid/Groove Quantize
The Grid/Groove Quantize MIDI operation lets you adjust the timing of your selected notes. This is great when you want to conform the rhythmic placement of your MIDI notes to a grid or you have a problem with a really bad drummer and you want to fix his timing mistakes.
The Grid/Groove Quantize version of the MIDI Operations window, as shown in Figure 6-3, contains the following fields:
- What to Quantize: From this section, choose which part of the note to quantize:
- Note On: Selecting this check box sets the quantization to the start of the selected notes.
- Note Off: Selecting this check box quantizes the ends of the notes.
Preserve Note Duration: Selecting this check box produces different results depending on whether you choose Attacks or Releases.
With Attacks selected, Preserve Note Duration keeps the end of the note intact. With Releases selected, the start of the note is left intact. If both Attacks and Releases are selected, the Preserve Note Duration option is dimmed.
- Quantize Grid: Here is where you choose the resolution of the quantize grid, from whole notes to sixty-fourth notes. If you choose sixteenth notes, for example, your notes will move to the nearest sixteenth note when you quantize.
- Note selector: Choose the note value of your quantize grid from this drop-down menu. Click the note to select it.
- Tuplet: This check box allows you to select odd note groupings, such as triplets. When you select this option, you need to fill in the tuplet value. For example, to create a regular eighth-note triplet, enter 3 in Time 1; for a quarter-note triplet, enter 3 in Time 2.
- Offset Grid By: Use this option to move the Quantize grid forward or backward in time by the selected number of ticks. This is helpful for creating a groove that lies slightly ahead of — or behind — the beat.
- Randomize: Using this option adds a level of randomness to the quantizing of your selection — no, not to mess up the rhythm, but to keep it from being too rigid. You can select values between 0 and 100%. Lower values place the randomized notes closer to the grid.
- Options: Select these items to fine-tune your Grid/Groove Quantize operation by specifying which notes to quantize and by how much:
- Swing: This option and slider allows you create a swing feel (a dotted-quarter, eighth-note triplet). You specify a percentage (from 0 to 300%); selecting 100% provides a triplet feel.
- Include Within: Here you specify a range of notes to include. Selecting this option quantizes only selected notes that fall within the boundaries you set here (from 0 to 100%); the smaller the number, the narrower the range of notes affected.
- Exclude Within: Here you specify a range of notes to exclude from quantization. Any selected notes that fall within the boundaries you set here (between 0 and 100%) won’t be quantized.
- Strength: This is, in my opinion, the most useful function in the Pro Tool Grid/Groove Quantize operation. You can use it to move your quantized notes by a percentage (from 0 to 100%) rather than just snapping them right to the grid. Higher numbers keep more strictly to the grid than do the lower values.

FIGURE 6-3: The Grid/Groove Quantize options let you align your MIDI notes to a time grid.
 Using the options in these four sections well helps keep a natural feel in your performance.
The following list explains your options when you want to take the groove from a recorded performance and apply it to the MIDI sequence of your track. Just choose one of the templates from the Groove Clipboard in the Quantize Grid drop-down menu located in the Grid/Groove Quantize version of the MIDI Operations window (as shown in Figure 6-4).
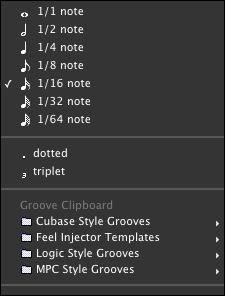
FIGURE 6-4: Select a groove template from the Quantize Grid drop-down menu.
When you select your groove template, the Grid/Groove Quantize menu options appear, as shown Figure 6-5.

FIGURE 6-5: The Grid/Groove Quantize function lets you align your notes to a groove template.
 One limitation of Pro Tools is that you can’t create your own groove templates. Instead, you either have to use what comes with Pro Tools (which are pretty good), buy one from Avid, or hunt one from a third-party maker. Of course, there’s an off chance that you may find some downloadable ones on the Internet. To find out, I recommend checking out the Avid User Conference website at
 http://duc.avid.com/ (do a search for Digigroove template).
The options in the Grid/Groove Quantize version of the MIDI Operations window include the following:
Groove template selector: From this drop-down menu, choose a groove template to apply to your selection. (These templates are located in the Groove folder within the Pro Tools folder on your system’s hard drive.)
After you choose your template, its content, meter, and tempo information show up in the Comments section in the middle of the window. To see these settings, simply click the Show Comments button.
- Pre-Quantize: When you have the timing field enabled (see the next section), selecting this check box applies the setting in the Quantize version of the MIDI Operations window to the template before you apply your selection using the Grid/Groove Quantize settings.
- Randomize: Selecting this check box adds a level of randomness to the quantizing of your selection — no, not to mess up the rhythm, but to keep it from being too rigid. Use the slider to select values between 0% and 100%. Lower values place the randomized notes closer to the grid.
- Options: Here’s where you can tinker with your groove:
- Timing: This option lets you adjust the timing of the quantization applied. A setting of 0% makes no change to the selection; a setting of 100% places the notes right at the groove template’s grid settings. A setting of 200% moves the selected notes twice the distance from the template’s grid locations.
- Duration: This setting changes the duration of the notes to fit the groove template. A setting of 0% makes no change, a setting of 100% matches the notes to the groove template, and a setting beyond that increases or decreases the duration of the original notes according to their ratio to the notes in the groove template.
- Velocity: This field changes the velocity — the volume — of the quantized notes. Like with the other fields (Timing and Duration), the lower the number, the less the velocity changes.
- Slider Settings: You can recall and save the slider settings of the options with a template.
- Recall with Template: Selecting this check box resets all the option settings to those that are saved with the template.
- Save: Click this button to save your current option settings. If you choose Save, you can add any comments about the template, and they show up in the Comments section of the Grid/Groove Quantize options of the MIDI Operations window.
Change Velocity
The Change Velocity version of the MIDI Operations window, as shown in Figure 6-6, allows you to adjust the volume (velocity in MIDI-speak) of the attack or release of selected MIDI notes.
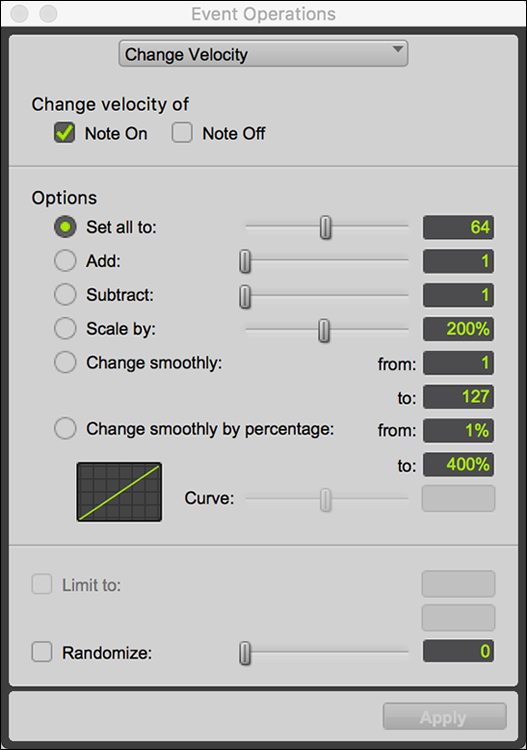
FIGURE 6-6: Use the Change Velocity options to adjust the volume of selected notes.
This operation is a lifesaver for times when you have a drummer playing an electronic kit and just one note is weak — or when you need to tame overly aggressive cymbals.
The Change Velocity options in the MIDI Operations window contain the following fields:
- Change Velocity Of: Here you choose between the initial attack of the note (the Note On check box) or the release value (the Note Off check box).
- Set All To: Selecting this radio button sets all the velocities of the selected notes to the value in the field. You can ether type the value in or move the slider to adjust the value up or down.
- Add: Here you add a specified value to your existing one. You can either enter the value in the field or use the slider. Your selected notes will change velocity by the number you specify.
- Subtract: Here you subtract a specified value to your existing one. You can either enter the value in the field or use the slider. Your selected notes will change velocity by the number you specify.
- Scale By: Here you set a scale for how much the velocities of your selected notes are to change — a percentage between 1 and 400. (Again, you can use the slider or type in a number.)
- Change Smoothly: Use this option to change the velocity of selected notes gradually over time. This is useful for creating crescendos and decrescendos. Type in the beginning and end values in the From and To fields, respectively.
- Change Smoothly by Percentage: This option is similar to Change Smoothly (see the preceding bullet) except that you specify a percentage of change instead of typing in specific numbers. This field is also where you can use a curve graph to specify how much the notes’ velocity must increase or decrease; choose a percentage value between –99 and +99. The curve graph then shows how your setting is implemented.
- Limit To: Select this option if you want to set a minimum and maximum range for your Change Velocity settings. You type those values into the fields. This field will be editable when you check the Randomize options (listed below).
- Randomize: Here, you create a random velocity change, specifying it as a percentage value between 0 and 100%. For example, if you choose a Set All To value of 60 and a Randomize setting of 40%, you end up with Change Velocity values from 48 to 72.
 Be careful if you’re changing groups of notes. Using Add or Subtract for that purpose can change the relationships between various notes. If you like the way the original notes sound together, try using the Scale option instead. This keeps the relationships between notes intact.
Change Duration
Use the Change Duration operation to alter the length of recorded MIDI notes. The Change Duration version of the MIDI Operations window, shown in Figure 6-7, contains the following fields:
- Set All To/Add/Subtract/Scale option. This check box allows you to choose among several options:
- Set All To: Select this radio button to set the duration of selected notes to the values in the accompanying fields.
- Add: Here, you add a specified value to your existing one.
- Subtract: Here you subtract a specified value to your existing one.
- Scale By: Here you set a scale for how much the velocities of your selected notes are to change — a percentage between 1 and 400.
- Legato: This option lets you lengthen your selected notes in one of two ways:
- Gap: Select this option to lengthen the notes to a point where a specified gap exists between your selected notes and the following ones.
- Overlap: Use this option if you want to extend the length of your select notes and have them overlap the following notes.
- Remove Overlaps and Leave Gap: This option lets you remove any overlaps between notes of the same pitch. You designate the amount of the gap in the field to the right.
- Transform Sustain Pedal to Duration: This option transforms sustain pedal data for a note and applies it to the duration of the note. Checking the Delete sustain events after transformation box removes the sustain data from the MIDI track.
- Change Continuously: This option gives you two different ways to change the duration of your selection over time. These are:
- In Ticks: Here you change the length of notes gradually over time, entering ticks in the From and To fields to specify beginning and end times for the change in duration. You can also enter a Curve value to modify the shape of the change. You can either drag the slider or enter a value in the field from –99 to +99.
- By Percentage: In this field, you apply the duration change smoothly (see the previous bullet) by a percentage rather than by entering quarter notes and ticks. You can also adjust the curve of the change, using values from –99 to +99.
- Limit Range: Use this setting to specify a minimum and maximum change duration for the settings you choose.
- Randomize: Use this field to create a random change in duration, based on the setting you choose in the fields described here.
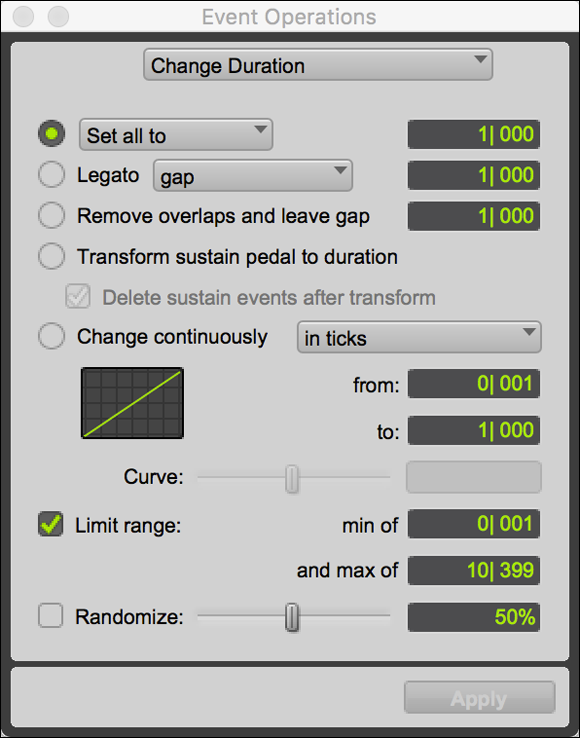
FIGURE 6-7: The Change Duration function lets you adjust the length of selected notes.
The Change Duration operation is useful for changing the feel of the music by making your selection either more staccato or legato.
Transpose
Use the Transpose operation to change the pitch of selected notes. Checking out the Transpose version of the MIDI Operations window, as shown in Figure 6-8, you see that the Transpose operation offers these ways of changing pitch:
- Transpose By: Use this setting to transpose by octaves or semitones (one half-step). You can either type in the value or use the sliders to adjust the setting.
- Transpose: Here you type in the note and octave that you want to transpose from (in the From field) and to (in the To field). You can also use the slider to adjust the settings if you prefer.
- Transpose All Notes To: Selecting this option changes all your selected notes to the note you designate in the field.
- Transpose in Key: Here you can transpose your selected notes by scale steps.
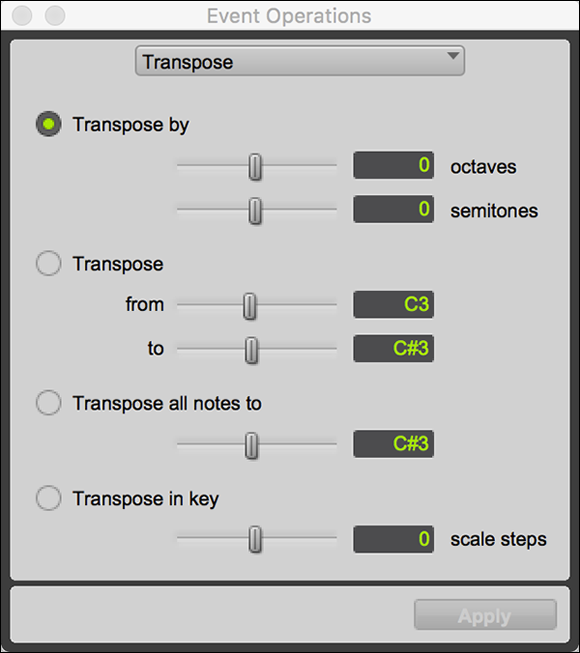
FIGURE 6-8: Use the Transpose function to change the pitch of a selection.
Transposing using this MIDI operation makes it easy to change the pitch — in effect, the musical key — of the entire song or clip. This is especially helpful if you decide that the song needs to be in a different key for your singer to sing well.
Select/Split Notes
The Select/Split Notes operation allows you to choose specific MIDI notes or a range of notes in a selection and to move them from the track or copy them to another track. Your options, as shown in the Select/Split Notes version of the MIDI Operations window you see in Figure 6-9, include the following:
- All Notes: Use this option to select all the notes in your selection.
- Notes Between: Use this option to specify the range of notes to select. You can either use pitch references (C1, B1, and so on) or MIDI note numbers (0–127) for your selection.
- Top: Using this option chooses the highest note or notes (depending on the number you enter) in each chord.
- Bottom: Using this option selects the lowest note or notes (depending on the number you enter) in each chord.

FIGURE 6-9: Use the Select/Split Notes function to select specific notes or note ranges.
You can also choose other criteria to include in your selection of notes, including
- Velocity Between: Here you can select the minimum and maximum velocities to be included in your selection.
- Duration Between: Use this option to designate minimum and maximum note durations.
- Position Between: You can also control the location of your selected notes within certain beat and tick locations in each bar. Again, a minimum and maximum value determines the start and end points.
After you choose your selection parameters, you need to choose whether you want to select the notes or to split them. Selecting the Select Notes radio button simply selects them, but selecting the Split Notes option allows you to choose from two options:
- Copy: This command copies your selected notes.
- Cut: This command removes the selected notes from the original track.
The new location of your copied or cut notes is based upon your choice from the To drop-down menu:
- Clipboard: Your notes are placed on the Clipboard.
- A New Track: This places your selected notes into a new MIDI track.
- A New Track per Pitch: This places each pitch in its own new track.
If you want to include all continuous MIDI data, select the Include All Continuous MIDI Data check box.
To select notes, do the following:
Make a selection on a track or tracks that contain the notes you want to select.
Book 5, Chapter 2 has all you need to know about making selections.
Choose Event⇒ MIDI⇒ Select/Split Notes from the main menu.
The Select/Split Notes version of the MIDI Operations window appears.
Enter your note or note range in the window.
Again, your choices here are All Notes, Notes Between, Top, and Bottom.
- Choose the action for the selected notes (Select Notes or Split Notes).
- Click Apply.
The Select/Split Notes operation is handy for selecting the snare drum from a drum sequence before you change its note (pitch) or quantize it.
The Select/Split Notes operation is also handy for taking tom-toms from a drum sequence and moving them to their own track where you can edit, pan, and effect them separately from the rest of the drums. Another useful thing you can do with Select/Split Notes (keeping the drum-track theme going) is to make a copy of all the kick-drum notes and put them in another track where you can process them and add them to the original kick during mixdown. (Hey, why not get your kicks while you can? Sorry about that.)
To actually split notes from a MIDI track, do the following:
Make a selection on a track or tracks that contain the notes you want to select.
Book 5, Chapter 2 has all you need to know about making selections.
Choose Event⇒ MIDI⇒ Select/Split Notes from the main menu.
The Select/Split Notes version of the MIDI Operations window appears.
Enter your note or note range in the window.
Again, your choices here are All Notes, Notes Between, Top, and Bottom.
- Choose the Split Notes action and then choose to copy or cut the selected notes from the track.
- Select the location you want your split material to go: the Clipboard, a new track, or a new track per pitch.
- Click Apply.
To place the split notes that you placed on the Clipboard into another track, do the following:
- Position your cursor in the destination track at the same point as the start point of your Split Note operation.
- Press ⌘ +V (Mac) or Ctrl+V (PC) to place the copies or cut notes from your Clipboard into the track.
Input Quantize
Use the Input Quantize operation to set a Quantize value that your recorded performance is adjusted to automatically as you record it. The fields you can adjust in the Input Quantize version of the Operations window (see Figure 6-10) are the same as with the Grid/Groove Quantize operation.

FIGURE 6-10: The Input Quantize function allows you to automatically adjust note timing while it’s recorded.
Unless your timing is really bad (or the person you record can’t walk and chew gum at the same time), I suggest that you disable this function and quantize — if needed — after your performance is saved. Otherwise it’s incredibly easy to overdo the quantizing and end up with a performance with absolutely no human feel to it.
Step Input
Use the Step Input MIDI operation to add MIDI to a track manually. This can be handy if you want to “create” a performance that you’re unable to play in real-time. This can be time-consuming, but it would likely be quicker than learning to play a really difficult part before recording it.
Figure 6-11 shows the Step Input options in the MIDI Operations window. Here’s a run-down on the parameters you choose from:
- Enable: This enables the Step Input function while also disabling any tracks that were record-enabled. If you have a default MIDI through instrument chosen (in the MIDI preference menu), it is also disabled.
- Destination Track: This is the track where your MIDI notes are added.
- Step Increment: In this section, choose the spacing and duration of your new MIDI notes. You can choose between whole, half, quarter, eighth, sixteenth, thirty-second, and sixty-fourth notes. As well, you can also choose
- Tuplet: Use this to input triplets by dividing the step increment selected for Step Increment into the value chosen in the tuplet fields. For example, if you want to input triplets, select the quarter note in the Step Increment field, select the Tuplet check box, and then enter 3 and 2 in the fields to the right (so that is reads 3 in Time 2). This places three notes between quarter notes instead of two.
- Note Length: Use this slider to choose a percentage of the note increment you select in the Step Increment section. For example, if you want a staccato pattern and you chose eighth notes as your step increment, you might want to select a 50% value. This will play the note for only half the total eighth-note duration.

FIGURE 6-11: Use Step Input to add MIDI notes manually.
You also have a few options that you choose from when step inputting notes:
- Use Input Velocity: Selecting this radio button assigns the velocity that you play on your instrument to the note.
- Set Velocity To: Use this slider to choose a velocity for this note so you don’t have to worry about playing it at the right volume on your instrument.
- Enable Numeric Keypad Shortcuts: Selecting this check box allows you to enter your Step Input options via keyboard shortcuts.
- Undo Step: Clicking this button removes the last step input. If you have a note depressed on your MIDI instrument, clicking this changes the title to Decrement and removes the last step increment that you added to your track.
- Next Step: Clicking this button moves you to the next increment, adding a rest to your track. If you have a note depressed on your MIDI instrument, this button reads Increment and lengthens your note by the step increment value that you entered in the Step Increment section earlier.
- Redo Step: Clicking this button replaces the note that was removed by your previous Undo step operation.
Follow these steps to step input MIDI notes:
Choose Event⇒ MIDI⇒ Step Input.
The Step Input options in the MIDI Operations window open.
Select the Enable check box.
This enables the Step Input function.
- Choose the MIDI or Instrument track from the Destination Track drop-down menu.
- Choose your note parameters (listed earlier in this section).
Play the note on your MIDI instrument.
Your note is placed in the designated track.
Your cursor moves to the next step in your track. Repeat Steps 3–5 for each additional note you want to add.
Restore Performance
Restore Performance returns you to a saved performance settings. This operation is like having an Undo for all the other operations listed in this chapter. Your performance returns to one of two earlier states:
- The settings saved by using the Flatten Performance command (see the next section) if you used it.
- Its original settings (if you haven’t saved any other settings).
Using the Restore Performance version of the MIDI Operations window, you can select from several areas to restore. (See Figure 6-12.)
- Timing (Quantization): Selecting this check box restores the note’s start time. If the Duration check box is cleared, the duration of the notes changes back to what it was originally.
- Duration: Selecting this check box restores the length of the note. If you don’t have the Timing check box selected, the start times of your notes don’t change but the end times may.
- Velocity: Selecting this check box restores the volume of the note.
- Pitch: Well, you know what this restores.

FIGURE 6-12: Use Restore Performance to revert your selection to its original state.
If you use the Grid/Groove Quantize operation when you recorded, you can remove it by using this operation. Choose the Timing (Quantization) option, and your original performance is resurrected in all its pristine beauty.
Flatten Performance
Flatten Performance is the operation you use when you want to save the performance data of a selection — timing, duration, velocity, and pitch — as the “original” setting that the Restore Performance operation (see the previous section) returns you to. The Flatten Performance version of the MIDI Operations window is shown in Figure 6-13.

FIGURE 6-13: The Flatten Performance function lets you lock in selected notes.
Using this operation allows you to tweak performance data and lock it in before you do more tweaking. If you don’t like the extra tweaking, you can just go back to these settings. It’s a little added insurance when you’re messing creatively with MIDI data.
Use the Flatten Performance operation to save the following data:
- Timing (Quantization): The note’s start time. If the Duration check box is cleared, the duration of the note changes back to what it was originally.
- Duration: The length of the note.
- Velocity: The volume of the note.
- Pitch: Well, you know what that is.
Recognizing MIDI Real-Time Properties
Pro Tools allows you to adjust a variety of MIDI properties in real time while your song plays. This is done from the MIDI Real-Time Properties window. This feature is handy if you want to make adjustments to certain MIDI data, such as quantize, note duration, delay, velocity, and transpose, either across an entire track or a selected clip. This section details this process.
Access the Real-Time Properties window by selecting a MIDI or instrument track or clip and by choosing Event⇒ MIDI Real-Time Properties from the main menu. The Real-Time Properties window opens, as shown in Figure 6-14. You can also see and edit real-time properties within the Edit window by choosing View⇒ Edit Window⇒ Real-Time Properties.

FIGURE 6-14: Perform MIDI operations in real time here.
The Real-Time Properties window consists of the following parameters to adjust:
- Quantize: This section is where you choose the resolution of the quantization. Your choices range from whole notes to sixty-fourth notes. If you choose sixteenth notes, for example, your notes will move to the nearest sixteenth note when you quantize.
Note: From this drop-down menu, choose the note value of your quantize grid. Open the drop-down menu by clicking the note. From here, you can drag to the note value you want as well as add either triplet or dotted note options. You can also select a groove template to quantize to.
When you select a note for your grid value. The following options appear in the window:
- Swing: From this field, create a swing feel (dotted-quarter, eighth-note triplet). You specify a percentage (from 0 to 300%); selecting 100% provides a triplet feel.
- Tuplet: Select this check to select odd note groupings, such as triplets. When you select this option, you need to fill in the tuplet value. For example, to create a regular eighth-note triplet, choose 3 in Time 1; for a quarter-note triplet, choose 3 in Time 2.
- Offset: Selecting this option allows you to move the Quantize grid forward or backward in time by the selected number of ticks. This is helpful for creating a groove that lies slightly ahead of — or behind — the beat.
- Strength: This is, in my opinion, the most useful function in the Pro Tool Quantize operation. You can use it to move your quantized notes by a percentage (from 0 to 100%) rather than just snapping them right to the grid. Higher numbers keep more strictly to the grid than do the lower values. Checking this check box results in a text field appearing where you enter the percentage value for this operation.
- Include: Here you specify a range of notes to include. Selecting this option quantizes only selected notes that fall within the boundaries you set here (from 0 to 100%); the smaller the number, the narrower the range of notes affected.
- Random: Selecting this option adds a level of randomness to the quantizing of your selection — no, not to mess up the rhythm, but to keep it from being too rigid. You can select values between 0 and 100%. Lower values place the randomized notes closer to the grid.
- Duration: From this section, you can change the duration of your selected notes. You have several options to choose from a drop-down menu located next to the Duration properties option, including
- Set: Select this option to set the duration of your selected notes to your desired duration, such as quarter notes or eighth notes. Or you can type in a specific number of ticks.
- Add: Here you can add a specific amount to each selected note. You can choose between typing in a certain tick value or choosing one of the notes values that appear in the drop-down menu to the right of the data field.
- Subtract: As with Add, selecting this option allows you to subtract your desired value from your selected notes. Again, you can choose between typing in a tick value or choosing a note value.
- Scale: Select the scale option to adjust the duration of your selected notes by the percentage to designate in the data field. Your options range from 0% to 400%.
- Legato/Gap: Selecting this option extends your selected notes to the next note, regardless of how far away it is.
Legato/Overlap: Select this option to extend your selected notes to the next note and beyond, creating an overlap (hence the name). Enter the amount of overlap you want in the data field to the right.
You can narrow the effects of your real-time adjustments for note durations by setting a minimum note duration that will be changed by the settings you chose from the preceding above by selecting the Min and/or Max fields and then entering the value that you want.
- Delay: Use this property to move your selection a designated amount of time forward or backward in your session. This can be helpful when dealing with latencies or creating different feels, such as being “on top of” (just ahead of) or “behind” (just after) the beat. From the drop-down menu, choose to either delay or advance your selection. You enter the amount of this delay or advance in the field using either ticks or samples, which you choose from the drop-down menu to the right.
- Velocity: You’ve likely seen this option before. Use this to change to velocity (volume of the note strike) of your selection. Engaging this option opens the Real-Time Properties window to include the following parameters:
- Dyn: Use this parameter to select a percentage value for the velocity change you want to implement in your selection. You can choose percentages between 0 and 300%.
- Absolute Value: This unlabeled check box sits to the right of the Dyn option. Here, you can enter the amount of absolute change of velocity change you want to all selected notes. You can enter a value between –127 and +127.
- Min: Selecting this check box engages a minimum velocity that will be affected by the selections you make in previous options.
Max: Selecting this check box engages a maximum velocity that will be affected by the selections you make in previous options.
Selecting both affects only the selected notes that reside between the minimum and maximum values.
- Transpose: Use this option to change the pitch of your selected notes by the values you select; use one of the following options that exist in the drop-down menu located to the right of the Transpose title (it’s now showing “In” key with the text box to the right):
- By: Selecting this transposes your selection by your chosen interval. Choosing this option from the drop-down menu opens two data fields in which you can enter octave (the left field) or semitones (the right field).
- To: Use this to transpose your selection to a specific pitch. Just select this option form the drop-down menu and enter the pitch in the data field that appears.
- In: Use this option to transpose in a specific key. Selecting this option from the drop-down menu adds a data field in which you can enter a value between –11 and +11. Each number represents a key step.
You can perform the Real-Time Properties functions by using these steps:
Open the Real-Time Properties window by choosing Event⇒ MIDI Real-Time Properties or View⇒ Edit Window⇒ Real-Time Properties.
The Real-Time Properties window opens. Figure 6-14 show the Real-Time Properties window that appears when you choose Event⇒ MIDI Real-Time Properties option.
- Select the track or clip(s) you want to make changes to, according to the following procedures:
Track: Click the track to select it.
The name of the track will be highlighted, and that track will show up in the Apply To section of the Real-Time Properties window.
Clip: Use the Grabber tool and click the clip to which you want to apply real-time changes.
To select multiple clips, hold down the Shift key while grabbing.
Engage the property you want to use by clicking the particular property (Quantize, Duration, Delay, Velocity, or Transpose) within the Real-Time Properties window.
The property becomes highlighted, and the window expands to include the controls for your chosen property.
Select the parameters that you want for your MIDI property. You can do this while your session plays, or you can start your session after you make your selection.
You’ll hear the effects that your settings have on your selection while your song plays.
- Make any adjustments you want until you get the effect or change that you’re looking for.