
Chapter 4
Adding to Your Audio Editing Palette
IN THIS CHAPTER
![]() Getting to know the Smart tool
Getting to know the Smart tool
![]() Fixing waveforms
Fixing waveforms
![]() Silencing clips
Silencing clips
![]() Using processing plug-ins
Using processing plug-ins
![]() Performing fades and crossfades
Performing fades and crossfades
Aside from the basic editing methods — the ones I describe in the first three chapters of this mini-book — Pro Tools offers some extra goodies that can make the editing process easier. And what might I mean by goodies? In this particular case, I’m talking about the aptly named Smart tool, the Pencil tool, processing plug-ins, fades, and crossfades. This chapter lays out these tools and helps turn you into a Pro Tools editing pro (or at least an informed amateur).
Signing On to the Smart Tool
The Smart tool in Pro Tools is, well, smart. This tool consists of three tools I describe in Chapter 3 in this mini-book — the Trimmer, the Selector, and the Grabber. But the Smart Tool is more than just these three tools. The Smart tool actually changes how it works, depending on what you try to do with it. For example, if you place the cursor close to the start or end point of a clip, the Trimmer tool is activated. And if you place the cursor somewhere else within the clip, the Selector or the Grabber appears, depending on where you put the cursor.
To use the Smart tool, click the button located above the Selector tool in the Edit window, as shown in Figure 4-1.
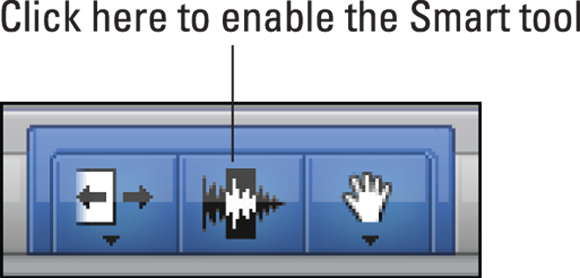
FIGURE 4-1: The Smart tool: the button under the Selector tool.
Using the Smart tool in Waveform view
When you’re using the Smart tool with a track set to Waveform view, each Edit tool in the Smart tool set (Trimmer, Selector, Grabber) becomes active according to where you place the cursor in the clip. (See Book 2, Chapter 3 for more on setting your view to Waveform view.) While you’re in Waveform view, you can also perform fades and crossfades. This section details each of these editing tools and/or techniques.
Trimmer tool
To activate the Trimmer tool when you’re in the Smart tool mode, position your cursor near the start or end point of the clip you want to work with. The Trimmer cursor appears, as shown in Figure 4-2. You can trim or extend a clip by clicking and dragging the start or end point to the left or right.

FIGURE 4-2: Put the cursor near the start or end point to activate the Trimmer tool.
Selector tool
You enable the Selector tool when you’re in the Smart tool mode by positioning your cursor in the upper half of the clip, as shown in Figure 4-3. When you see the Selector cursor, you can drag across the clip to make a selection.

FIGURE 4-3: Put the cursor in the upper half of the clip to enable the Selector.
Grabber tool
When you place the cursor in the lower half of a clip — but not near the start or end point — you enable the Grabber tool, as shown in Figure 4-4. To grab the clip, click it when the Grabber cursor appears. You can then drag the clip to another place.
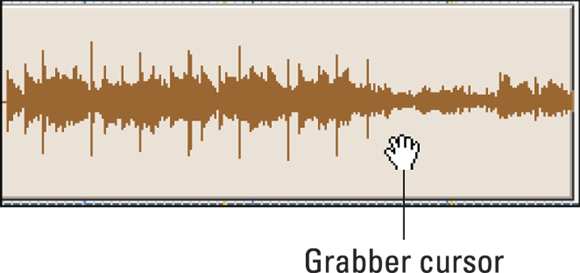
FIGURE 4-4: The Grabber appears when the cursor is in the lower half of a clip.
Fading in or out
Fade-ins and fade-outs are editing techniques by which you make the volume of the clip increase from silence or decrease to silence, respectively. These techniques are useful when you want to eliminate abrupt changes in sound, such as clicks, when a clip starts or ends. You can use the Smart tool to perform a fade-in or fade-out by placing the cursor in the upper corner of the clip near the start point (for a fade-in) or the end point (for a fade-out) and waiting until the Fade icon appears, as shown in Figure 4-5. Then you can select the Fade length by dragging your cursor to the right (to fade in) or left (to fade out). (For more on fade-ins and fade-outs, see the “Performing Fades and Crossfades” section, later in this chapter.)
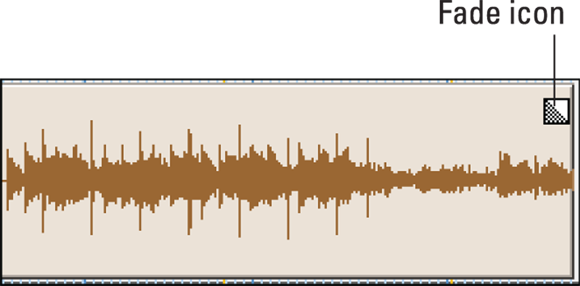
FIGURE 4-5: Getting the Fade icon.
Creating crossfades
A crossfade occurs when the volume of the first of two adjacent clips decreases to silence while the second of these two clips increases from silence. This smoothes the transition from one clip to another. You can create a crossfade between two adjacent clips by placing the cursor at the bottom corner where the two clips adjoin and waiting until the Crossfade icon appears, as shown in Figure 4-6. After the icon appears, you can drag to the left or right to set the crossfade length. (The “Performing Fades and Crossfades” section, later in this chapter, has more on crossfades.)

FIGURE 4-6: To get the Crossfade icon, put the cursor at the bottom where clips adjoin.
Using the Smart tool in Automation view
To add to the versatility of the Smart tools (outlined in the previous sections), each tool in the set — Trimmer, Selector, and Grabber — performs differently when you have a track set to one of the Automation views (Volume, Panning, Mute, and Send Levels). (Book 2, Chapter 3 has more on track views; Book 6, Chapter 6 has more on automating a mix.)
Automating the Trimmer tool
To select a clip in one of the Automation views with the Smart version of the Trimmer tool, position your cursor in the top 25 percent of the clip. The Trimmer icon appears, as shown in Figure 4-7. You can move your cursor up and down to change the automation value or to create breakpoints (places where changes occur in the automation curves). If you want finer control of the Trimmer tool and your work, press ⌘ (Mac) or Ctrl (PC) after you begin trimming.
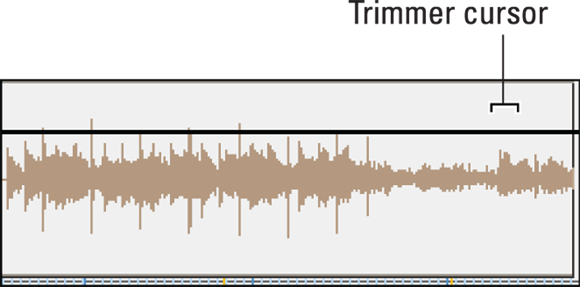
FIGURE 4-7: To get the Trimmer tool, put the cursor in the upper 25% of a clip.
Automating the Selector tool
To use the Selector tool in Smart mode when you have one of the Automation views set for a track, position your cursor in the lower 75 percent of the clip, as shown in Figure 4-8. You can then make your selection.

FIGURE 4-8: To get the Selector tool, put your cursor in the lower 75% of a clip.
Automating the Grabber tool
To use the Smart version of the Grabber tool in a track set to one of the Automation views, press ⌘ (Mac) or Ctrl (PC) with your cursor placed in the clip, as shown in Figure 4-9.
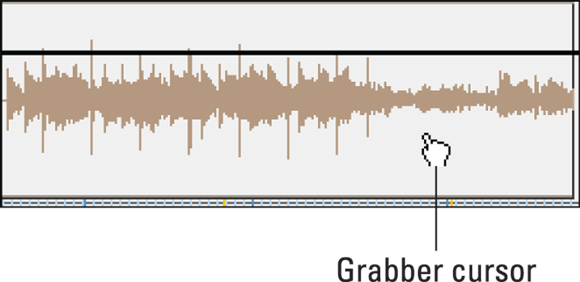
FIGURE 4-9: To get the Grabber tool, press ⌘ or Ctrl.
You can use the Grabber tool in several different ways when you have a track set to an Automation view. Here are two especially handy ways:
- Editing existing breakpoints: Just position the cursor near one of these points, and the Grabber magically appears. You can increase the resolution of your movements to fine control by pressing ⌘ (Mac) or Ctrl (PC) after you start moving the breakpoint.
- Constraining the Grabber vertically: To keep the Grabber from moving right or left, press Shift — or, if you set the tool to fine control, press ⌘ +Shift (Mac) or Ctrl+Shift (PC).
Perusing the Pencil Tool
In spite of all your effort to keep from creating any of the digital distortions known as overs — also referred to as clipping — you might have one pop through every now and then. No worries; use the Pencil tool to redraw the waveform and get rid of that nasty critter. (Is that cool, or what?) You can also use the Pencil tool to remove other unwanted pops or clicks that show up in your precious tracks.
![]() The Pencil tool, as shown here in the margin, is active only when you zoom way into a waveform, as shown in Figure 4-10.
The Pencil tool, as shown here in the margin, is active only when you zoom way into a waveform, as shown in Figure 4-10.

FIGURE 4-10: You can use the Pencil tool if you zoom way in.
 Using the Pencil tool to redraw a waveform is a destructive act; it changes your original audio file permanently. Before you redraw, make a copy of the original clip (using the Duplicate function under the AudioSuite menu) so you don’t lose the good stuff in the original file. The next section tells you precisely how to do that.
Creating a copy of the original file
I strongly recommend making a copy of a clip before you edit it with the Pencil tool. (See the Warning icon in the previous section.) Here’s how to do just that:
- Select the clip you want to work on.
Choose AudioSuite ⇒ Other ⇒ Duplicate from the main menu.
The Duplicate dialog box appears, as shown in Figure 4-11.
- Enable the Use in Playlist option on the right, and make sure that Playlist is chosen in the top-center field.
Click the Process button (lower right).
You now have a copy of the original clip that’s put in the track in place of the original. (The original still resides in the Audio Clips list.)

FIGURE 4-11: The Duplicate dialog box.
Using the Pencil tool to redraw a waveform
To redraw a waveform (after you make a copy of it — see the previous section for why), follow these steps:
- Find the area in the clip that you want to edit.
 With the Zoom tool, repeatedly click the spot you want to edit until you get into the sample level.
The waveform looks like a single wavy line. (Refer to Figure 4-10.)
- Select the Pencil tool.
Locate the exact spot to edit.
Your target, typically a moment of distorted sound, is usually easy to see because it looks like a sharp peak in the waveform. (See the left side of Figure 4-12.) If it isn’t apparent, you might need to adjust the horizontal until you can see it clearly. (For more on adjusting the horizontal zoom, see Book 2, Chapter 3.)
 If you have trouble seeing the problem, use the Scrub tool to listen to the audio.
Draw over the waveform to round over the spot that was chopped off when the note got clipped. (See the right side of Figure 4-12.)
 Take it easy when making changes to the waveform. All you want to do is smooth out the peak — not change the sound too much.
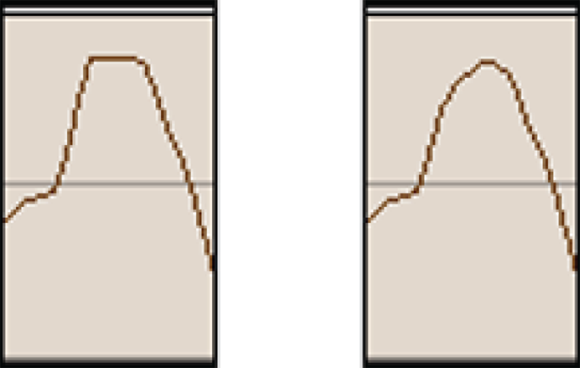
FIGURE 4-12: The Pencil tool fixes a chopped-off peak (left) of a waveform (right).
Silencing Selections
Pro Tools offers a couple of ways to manage silence in selections: You can strip silence from clips to reduce the size of your audio files, and you can insert silence into clips where you don’t want any sound. I cover both of these options in the following sections.
Stripping silence
Using the Strip Silence command allows you to take a selection that meets a minimum sound level and silence it. This divides the clip that the silence was stripped from into smaller clips. This lets you isolate sound effects or musical passages so that you can quantize them or locate them at specific synch points within your session. (Check out Chapter 3 in this mini-book for more on synch points.) Stripping silence from clips also allows you to compact your audio file farther than you can if you didn’t strip the low-volume parts to silence. (See the “Compacting a file” section, later in this chapter.) This technique saves hard-drive space by making your audio files smaller.
Understanding the Strip Silence window
Whenever you use the Strip Silence command (see the following section), a window opens (see Figure 4-13) where you can set the parameters under which the silence will be stripped from a clip. These parameters include
- Strip Threshold slider: This setting determines the signal level below which the audio is silenced.
- Min(imum) Strip Duration slider: This parameter makes sure that if you have a really small section that falls below the threshold, you don’t end up with a ton of sections where silence was stripped and didn’t need to be.
- Clip Start Pad slider: This parameter adds a specified amount of time to the beginning of each clip created when you use the Strip Silence command.
- Clip End Pad slider: This parameter is essentially the same as the previous one except that it adds time after the end of a clip stripped from silence.
- Strip button: This performs the strip function and clears everything within the “silence” threshold determined by your settings in this window.
- Rename button: Clicking this button opens the Rename Selected Clips dialog box (see Figure 4-14), where you choose how new clips are named after silence has been stripped.
- Extract button: This parameter strips the audio specified in the strip silence settings and leaves the rest. This is the opposite effect of stripping the silence and leaving the audio. This is handy for keeping ambient noise so you can use it somewhere else. For example, if you want to replace a drum part, you can pre-record the drum and mix it in with the ambient noise to match the basic sound of the original track.
- Separate button: This separates the clips created by the strip silence command. Each section of audio resides in its own clip.

FIGURE 4-13: Use the Strip Silence window to remove silence.
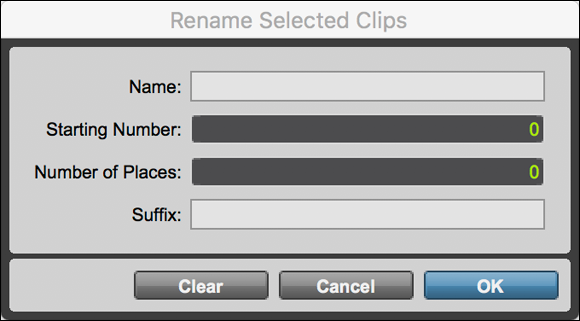
FIGURE 4-14: Set the name format for each new clip created by the Strip Silence command.
Using the Strip Silence command
To strip silence from audio clips, follow these steps:
Select a clip or part of a clip.
Chapter 2 in this mini-book has more on making selections.
Choose Edit ⇒ Show Strip Silence from the main menu.
The Strip Silence window opens. (Refer to Figure 4-13.)
- Click the Rename button to set your clip name preferences.
Adjust the parameter sliders until rectangles appear in the clip and any material you want to remove resides outside the rectangles, as shown in Figure 4-15.
This might take some time. If you want to increase the resolution of the sliders, press ⌘ (Mac) or Ctrl (PC) while you move them.
When you have the rectangles where you want them, click the Strip button in the Strip Silence window.
Any part of the clip not in the rectangles is removed; each rectangled section then becomes a new clip, using the naming scheme that you choose in the Rename dialog box.
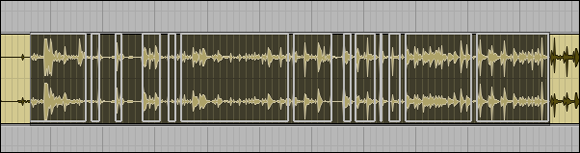
FIGURE 4-15: Adjust the sliders to put unwanted stuff outside the rectangles.
Inserting silence
If you’re like most people, you keep the session rolling — even when you don’t play anything during certain passages — to keep the feel happening throughout the tune. In this case, it’s not uncommon to have passages where pretty much nothing is recorded (well, except for maybe a cough or a chair-squeak). Rather than cutting those sections from your track, you can insert silence into those sections instead. With the Insert Silence command, you can quickly and easily put silence anywhere you want within a track.
Inserting silence into tracks works differently for each Edit mode. This can often prove confusing, so to help you keep things straight, I not only show you how to insert silence, but also let you know what conditions apply when you use the different Edit modes.
Inserting an amount of silence
You insert silence into a track with the following steps:
 With the Selector tool, select the part of a clip that you want to silence; then click and drag across the section of the clip that you want to select.
Choose Edit ⇒ Insert Silence from the main menu or press Shift+⌘ +E (Mac) or Shift+Ctrl+E (PC).
The selected section is silenced.
Understanding the results
When you’re using the Insert Silence command, each Edit mode treats certain conditions differently. The difference depends on the mode in use at the time:
- Shuffle mode: If the track(s) you selected is set to Waveform view, all audio and automation data is cleared, and all subsequent clips are shuffled the amount of the silence.
- Slip mode: If the track(s) you selected is set to Waveform view, all audio and automation data is cleared. On the other hand, if your track is set to one of the Automation views, only the data from that view is removed.
- Grid mode: All audio and automation data is cleared. This is essentially the same as using the clear command; see Chapter 3 in this mini-book. All the clips stay where they are in the session when the silence is inserted.
Performing Fades and Crossfades
As I mention earlier in this chapter, you use fade-ins and fade-outs to make the volume of the clip increase from silence or decrease to silence, respectively. Both techniques are useful when you want to eliminate abrupt changes in sound, such as clicks, when a clip starts or ends. A crossfade combines a fade-out and a fade-in that happens at the junction of two adjacent clips to make a smooth transition between these two clips.
You can create fade-ins, fade-outs, and crossfades faster and easier than ever before in Pro Tools. You can use fades to bring clips in and out of a mix or to make a seamless transition from one adjoining clip to another. One of the key aspects of fades is creating a curve (how the fade happens) that fits the material you want to fade. Pro Tools gives you many options for shaping your curves.
Dealing with the Fades dialog box
Whatever kind of fade you create — fade-in, fade-out, or crossfade — you make the fade from the settings in the Fades dialog box. You access the Fades dialog box by choosing Edit ⇒ Fades ⇒ Create from the main menu. After you get the dialog box up on your computer screen (as shown in Figure 4-16), you can adjust the following parameters to meet your needs:
- Audition: Clicking this button plays the fade or crossfade so that you can hear what your settings will sound like.
- View First Track: Pro Tools lets you select more than one track to crossfade at one time. (The crossfade, however, takes place on each track and not across tracks.) The View First Track button allows you to view and audition the first of the tracks selected.
- View Second Track: In a selection that includes more than one track, this button shows you the second track. If you have more than two tracks selected, you can’t view beyond the second.
- View Both Tracks: Clicking this button lets you view and audition both tracks selected for crossfading.
- Fade Curves Only: Enabling this button shows the fade curves but not the waveforms for the audio you want to fade or crossfade.
- Fade Curves and Separate Waveforms: This button lets you see both the fade curves and the waveforms for each track. The fade-out waveform shows up above the fade in waveform.
- Fade Curves and Superimposed Waveforms: This button superimposes the two waveforms one on top of the other and shows the fade curves.
- Fade Curves and Summed Waveforms: This button shows the fade curves and a single waveform depicting the sum of both original waveforms. Being able to see the sum of both waveforms makes it easier to see the overall volume of the audio.
- Zoom In: The Zoom In button increases the visual height of the waveforms. You can return to the default setting by ⌘ -clicking (Mac) or Ctrl-clicking (PC).
- Zoom Out: Clicking the Zoom Out button decreases the visual height of the waveform. ⌘ -clicking (Mac) or Ctrl-clicking (PC) returns the view to the default setting.
- Out Shape settings: Here, select the shape of the fade out curve. You have three options:
- Standard: This setting uses a basic fade-out shape that you can adjust by clicking the curve and then dragging the curve how you want it.
- S-Curve: This setting creates an S-shaped curve that you can adjust by clicking the curve and then dragging to the shape you want — well, as long as it’s an S shape.
- Presets: Clicking here presents you with a drop-down menu containing seven preset curves for you to choose from, as shown in Figure 4-17. You can change a preset by clicking one of the end points and dragging it.
- Link settings: You have the following three choices on how you want the fade-out and fade-in curves of your crossfades to relate to one another:
- Equal Power: This option keeps the relative volume of the Fade Out and Fade In clips the same. This selection is best for material that differs greatly in sound character, such as the fading out of one instrument and the fading in of another.
- Equal Gain: This setting keeps the Fade In and Fade Out selections from summing together and overloading the track, resulting in clipping (distortion). This setting is best used for selections that have the same relative volume and phase, such as one drum loop to another.
- None: This setting leaves the two fades independent of one another. This gives you more flexibility to create unique fades. If you want to edit the Fade In curve only, press Option (Mac) or Alt (PC) while you drag the curve. To adjust the Fade Out only, press ⌘ (Mac) or Ctrl (PC) while you drag the curve.
- In Shape settings: Here, select the shape of the Fade In curve. Like with Out Shape setting, you have these options:
- Standard: This setting uses a basic fade-in shape that you can adjust by clicking the curve and then dragging the curve how you want.
- S-Curve: This setting creates an S-shaped, fade-in curve that you can adjust by clicking the curve and then dragging it to the shape you want (as long as it’s an S shape).
- Presets: As you might have guessed, you can choose from seven preset curves here, which are mirror images of the curves found in the Out Shape Presets menu. You can change them by clicking one of the end points and dragging it.

FIGURE 4-16: The Fades dialog box.
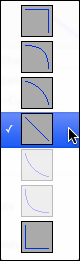
FIGURE 4-17: Choose from seven preset curves to make quick work of creating fades or crossfades.
Creating crossfades
The three types of crossfades are centered, pre, and post. These different flavors — and the actual process of creating a crossfade — are covered in the following sections.
Creating a centered crossfade
A centered crossfade, the most common type of crossfade, is great for when the material in the two clips fits well together, such as with two different takes of a lead vocal part that end up being your final vocal track. Centered crossfades are fades where the crossfade happens evenly between the two clips, incorporating audio on both sides of two clips’ splice points (where they meet). For this type of crossfade to work, you need audio data after the end point of the first clip and before the start point of the second clip.
To create a center crossfade, follow these steps:
- With the Selector tool, drag from the point where you want the crossfade to start (in the first clip) to where you want the crossfade to end (in the second clip), as shown in Figure 4-18.
Choose Edit ⇒ Fades ⇒ Create from the main menu or press ⌘ +F (Mac) or Ctrl+F (PC).
The Fades dialog box opens. (Refer to Figure 4-16.)
Enter your crossfade preferences in the Fades dialog box as listed in the earlier section, “Dealing with the Fades dialog box.”
Make adjustments to the view, the Fade In and Fade Out curves, and the Link option — auditioning the crossfade periodically as you go — until you have the crossfade you want.
When you’re happy with the sound of the crossfade, click OK.
Your crossfade is calculated. You can change the duration of the fade by trimming it; see the “Trimming a crossfade” section later in this chapter.
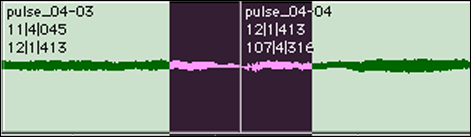
FIGURE 4-18: Use the Selector tool to drag across where you want the crossfade.
Creating a pre-crossfade
A pre-crossfade happens before the start point of the second clip, as shown in Figure 4-19. This is a good type of crossfade to use when you have an initial attack (a cymbal crash, for example) that happens right at the start point of the second clip. In this example, if the second clip isn’t at full volume when the crash happens, you lose the impact of the cymbal. The pre-crossfade ensures that you get the full impact of the cymbal. For this crossfade to work, audio data has to be in place before the start point of the second clip.

FIGURE 4-19: A pre-crossfade ends at the start point of the second clip.
Follow these steps to create a pre-crossfade:
- With the Selector tool, click in the clip at the point where you want the pre-crossfade to begin.
- Shift-drag or press Shift+Tab to select to the end of the clip.
Choose Edit ⇒ Fades ⇒ Create from the main menu or press ⌘ +F (Mac) or Ctrl+F (PC).
The Fades dialog box makes its appearance. (Refer to Figure 4-16.)
- Choose your Fade settings and audition them, adjusting the settings as you go until you have the fade that you want.
Click OK.
The fade is created.
Creating a post-crossfade
A post-crossfade happens after the end of the first clip, as shown in Figure 4-20. This type of crossfade is useful for when you have a sound that continues all the way up to the end of the first clip (to keep the drum theme going: a hi-hat note, for instance) and you want to make sure that the last hi-hat doesn’t drop off in volume while it’s being hit. This type of crossfade works only if the first clip contains audio data after its end point.
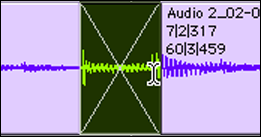
FIGURE 4-20: A post-crossfade begins at the start of the second clip.
Follow these steps to create a post-crossfade:
- With the Selector tool, click in the clip at the point where you want the fade to end.
- Shift-drag or press Shift+Option+Tab (Mac) or Shift+Alt+Tab (PC) to select back to the clip’s start point.
- Choose Edit ⇒ Fades ⇒ Create from the main menu or press ⌘ +F (Mac) or Ctrl+F (PC) to open the Fades dialog box. (Refer to Figure 4-16.)
- Choose your fade settings and audition them, adjusting the settings as you go until you have the fade you want.
Click OK.
The fade is created.
Removing a crossfade
![]() To remove a crossfade, select the crossfade with the Grabber tool and then press Delete (Mac) or Backspace (PC). You can also choose Edit ⇒ Fades ⇒ Delete from the main menu.
To remove a crossfade, select the crossfade with the Grabber tool and then press Delete (Mac) or Backspace (PC). You can also choose Edit ⇒ Fades ⇒ Delete from the main menu.
Trimming a crossfade
Here’s how to change the boundaries of a crossfade:
- Select the crossfade by double-clicking with the Selector tool or by grabbing with the Grabber tool.
 With the Trimmer tool, click and drag either side of the crossfade.
Fading in and out
A fade-in happens when you make the volume of the clip increase from silence to smooth the transition into the clip. Comparatively, a fade-out is a decrease in volume that’s useful when you want to smooth the transition leaving a clip. These types of fades are often used when you have accent parts that come and go in the song — keyboard or guitar licks that counterpoint the lead vocal, for instance — and you want them to seamlessly flow in and out of the song. Without a fade into or out of the clip, you might hear abrupt changes in the sound because of the background noise in those parts.
You can fade a single clip in or out via the Fades dialog box. Creating these fades saves you the trouble of performing automation curves to fade in or out. (Of course, you can still do that, but it does use more of your computer’s processing power. I explain the process in Book 6, Chapter 6.)
Fading in to the beginning of a clip
To fade in to a single clip, follow these steps:
With the Selector tool, select the beginning of the clip you want to fade into.
To make this process work, you have to begin your selection point before (or at) the start point — not after it.Choose Edit ⇒ Fades ⇒ Create from the main menu or press ⌘ +F (Mac) or Ctrl+F (PC).
The Fades dialog box appears. (Refer to Figure 4-16.)
- Choose your parameters in the dialog box and audition the fade, making adjustments to the settings until you get the fade to sound how you want.
Click OK.
The fade is created, and the Fade curve appears in the selected clip.
You can also fade in without opening the Fades dialog box. When you do this, Pro Tools uses the setting you select in the Fades menu.
To fade in without using the Fades dialog box, follow these steps:
- Click an insertion point somewhere within the clip, as shown in Figure 4-21.
Press Control+D (Mac) or Windows+D (PC) or select Edit ⇒ Fades ⇒ Fade To Start from the main menu.
The Fade is created, and the curve appears in the selected clip.
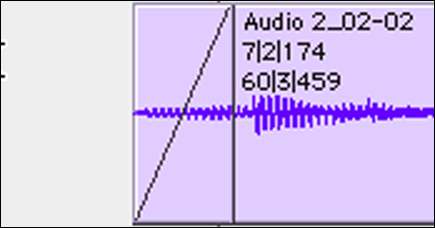
FIGURE 4-21: Creating a fade-in without opening the Fades dialog box.
Fading out at the end of a clip
To fade out from a single clip, follow these steps:
With the Selector tool, select the beginning of the clip you want to fade.
Your selection point needs to stop after or at the end point — not before it — for this process to work.Choose Edit ⇒ Fades ⇒ Create from the main menu or press ⌘ +F (Mac) or Ctrl+F (PC).
The Fades dialog box appears. (Refer to Figure 4-16.)
- Choose your parameters in the dialog box and audition the fade, making adjustments to the settings until you get the fade to sound how you want.
Click OK.
The fade is created, and the Fade curve appears in the selected clip.
You can also fade out without opening the Fades dialog box. When you do this, Pro Tools uses the setting you select in the Fades menu.
To fade out without using the Fades dialog box, follow these steps:
- Click an insertion point prior to the end of the clip, as shown in Figure 4-22.
Press Ctrl+G (Mac) or Windows+G (PC) or select Edit ⇒ Fades ⇒ Fade To End from the main menu.
The Fade is created, and the curve appears in the selected clip.
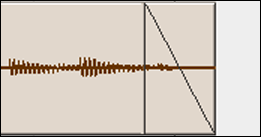
FIGURE 4-22: Fading out without opening the Fades dialog box.
Creating batch fades
You can create more than one fade at a time by using the Batch Fades command and selecting multiple clips at a time.
Here’s the way to create batch fades:
- With the Selector tool, choose the first clip you want to fade.
Click and drag across the clips you want to include in the batch.
Make sure that the entire last clip that you want to fade is selected, as shown in Figure 4-23.Press ⌘ +F (Mac) or Ctrl+F (PC) or choose Edit ⇒ Fades ⇒ Create from the main menu.
The Batch Fades dialog box appears, as shown in Figure 4-24.
- In the Batch Fades dialog box, choose your In Shape and Out Shape, the Link option, fade Placement, the crossfade length (in milliseconds), and whether you want to create a new fade, create new fade-ins and fade-outs, or adjust existing fades.
Click OK.
The fades are calculated.
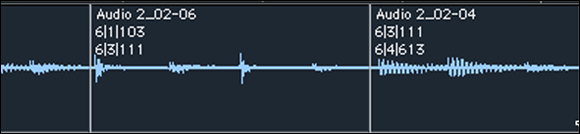
FIGURE 4-23: Select across multiple clips to perform batch fades.
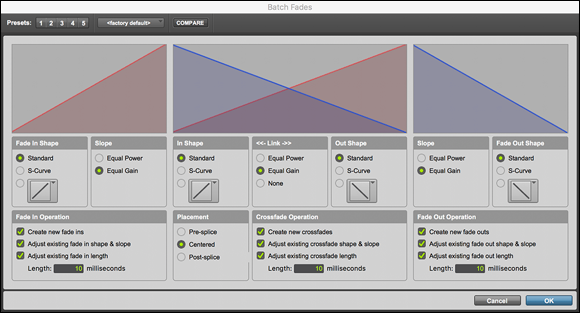
FIGURE 4-24: Use the Batch Fades dialog box to create fades on more than one clip at a time.
 You can trim or extend each of the fades later.
Cleaning Up Your Session
After you finish all your editing, you probably have a ton of clips in your Audio Clips list. Things can get cluttered up pretty quick, so before I start mixing the song, I like to clean up my session by consolidating clips, getting rid of any unused clips, and compacting the clips that I want to use. Doing these things makes it easier to deal with the clips in the session and frees up hard drive space. It can also make playing the tracks easier on your hard drive, depending on how many tracks you have in your session.
Consolidating selections
You can consolidate clips that make up a section of a song by using the Consolidate command. In effect, you take a bunch of clips — for instance, the various assembled takes of your guitar part that create the parts for a song’s verse — and make them into one clip. This makes moving or copying this section easier and also makes for a less cluttered track playlist.
To consolidate selections, follow these steps:
- Select the clips you want to consolidate using either the Selector tool or the Grabber tool. Or, if you want to select all the clips in the track, triple-click anywhere in the track’s playlist.
Choose Edit ⇒ Consolidate Clip from the main menu or press Option+Shift+3 (Mac) or Alt+Shift+3 (PC).
The selected clips are replaced by a new clip, which contains all the audio from the selection, including any muted clips.
Automation data is not consolidated. If you have clips that you want to consolidate and you want to keep any automation data at all, your best bet is to do a bounce procedure for that selection. (I cover bounce procedures in Book 6, Chapter 7.)
Removing unused clips
You can easily get rid of any clips that are not being used in your session. Here’s how:
- Open the Audio Clips drop-down menu by clicking and holding the Audio Clips title at the top of the Audio Clips list located on the right side of the Edit window.
Choose Select ⇒ Unused in the Audio Clips List drop-down menu or press Shift+⌘ +U (Mac) or Shift+Ctrl+U (PC).
All clips in the list that aren’t included in any tracks in the session are highlighted.
Choose Clear from the Audio Clips list drop-down menu.
The Clear Clips dialog box appears, as shown in Figure 4-25, asking whether you want to remove the clips from the session or delete the audio files from your hard drive. Choose the option you prefer.
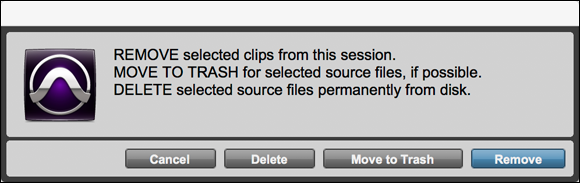
FIGURE 4-25: Get rid of any clips you aren’t using in your session.
Removing the clips from your present session ensures that you have the clip to use in another session, but it won’t reduce the amount of stuff on your hard drive. If you want to free up space and know that you won’t use the clip in another session, delete it to save hard-drive space.
Compacting a file
You can compact an audio file (make it smaller) by using the Compact Selected command from the Audio Clips drop-down menu. Compacting an audio file in Pro Tools deletes any audio data that’s not being used. This reduces the amount of space taken up in your hard drive, which makes backing up your data a quicker process.
Compacting an audio file is like taking all the pieces of tape that were cut from reels of recorded tape and — gasp! — throwing them away. (Well, okay, that’s what it would have been like in the days before digital audio.) My point is that after you compact a file, you’re committed to the results. This is one of the few editing tasks that you can do that you can’t undo afterward.
You want to compact an audio file only after you do all your editing and you’re sure you don’t want any of the unused data. (You’re sure. Right?)
To compact a clip, follow these steps:
- From the Audio Clips list, choose the clip(s) you want to compact.
Open the Audio Clips drop-down menu by clicking and holding the Audio Clips title at the top of the Audio Clips list and then choosing Compact.
The Compact Selected dialog box appears, as shown in Figure 4-26.
In the Padding field, enter the amount of padding you want on your clips.
Padding is how much data on either side of the clip’s start and end points might contain fade information. If you have fades in the clip, set your padding amount to the length of the fade to ensure that your fades still work.
Click the Compact button.
Pro Tools deletes all the data outside the clip and its padding.

FIGURE 4-26: Remove extra data from your clips, increasing available hard drive space.