
Chapter 4
Examining Software Basics
IN THIS CHAPTER
![]() Getting to know Pro Tools conventions
Getting to know Pro Tools conventions
![]() Configuring system settings
Configuring system settings
![]() Understanding sessions
Understanding sessions
![]() Managing files
Managing files
Pro Tools software is one of the simpler and easier-to-use audio programs available. However, as with any software, you need to know some basic conventions to get it to work efficiently. This chapter covers the basics so you can better understand your software as well as get your system configured properly. This chapter also shows you how to open, set up, and navigate sessions (which I talk about in the second half of the chapter), as well as how to manage file formats and file types.
Keeping Software Straight
Pro Tools comes in several versions. Although the versions sport only minor differences, knowing the differences can help you better understand your own system. Read on to find out the details.
Looking at Pro Tools versions
Avid, the maker of Pro Tools software, offers three versions of the software: Pro Tools | First, Pro Tools, and Pro Tools | Ultimate. Though these versions function almost identically, there are some differences in their overall capabilities, which I outline in this section.
 You can see the differences between all the current Pro Tools versions at
 www.avid.com/US/products/family/pro-tools/compare.
Pro Tools | First and Pro Tools
Pro Tools | First and Pro Tools are host-based systems. They use a third-party audio interface that acts as an interface between the analog-and-digital world and the software. Pro Tools software relies on the processing power of your computer’s CPU to work: That is, all the recording, playback, mixing, editing, and other processing you do depends on the power of your computer. So: The more powerful your computer, the more you can do with your host-based Pro Tools system.
This section provides a short rundown on the differences between the three host-based Pro Tools systems (these differences can change, so check out www.avid.com/pro-tools/comparison for the most up-to-date comparisons).
PRO TOOLS | FIRST
This version of Pro Tools is free. It offers up to 16 simultaneous audio tracks (at 48 and 96 kHz resolution) and sample rates up to 96 kHz. You’re also limited to four maximum inputs and simultaneous recording tracks. This version is a great option for you if you’re just getting into recording and you want to get a feel for Pro Tools or if your recording needs are modest.
PRO TOOLS
Pro Tools is Avid’s fullest-featured host-based version, offering enough tracks and inputs for most musicians. This version offers you up to 128 simultaneous audio tracks (at 48 kHz) and 32 maximum inputs and simultaneous recording tracks.
PRO TOOLS | ULTIMATE
Pro Tools | Ultimate is a processor-based system, providing special computer chips that go into the computer to handle all the processing needs of the software. This takes the load off the computer and guarantees certain levels of performance. Pro Tools TDM (the precursor to Ultimate) has been the professional standard because Avid hardware (with its own built-in processors) offered a stable, reliable, and predictable level of performance. It follows that putting the same processors in your computer can give you the same performance. Your track limits are much higher with the Ultimate systems compared with the host-based — up to 256 audio tracks for the basic and 768 audio tracks for HDX hardware— and these track counts are guaranteed by the Avid DSP (Digital Signal Processing) chips. The downside is that Ultimate systems are much more expensive than the host-based versions (HDX is even more so).
As a way of offsetting the higher cost, Avid offers a few features to Ultimate users that host-based users don’t have, such as more (and better) plug-ins — as well as a few extra editing and mixing options. As far as using this version in your home studio, it comes down to how many inputs and simultaneous tracks you need.
Even if you decide you don’t need such power, the good news is that any recordings you do in your host-based system can be opened in an Ultimate system (at a commercial studio, for instance) to mix or otherwise process your tracks. This is handy if you want to record at home and then take it to a pro to mix.
Differences between Macs and PCs
Aside from the obvious hardware and operating system (OS) differences between Apple- and Windows-based computers, Mac and PC versions of the Pro Tools software are nearly identical. The only significant difference you’ll find between the two is the keyboard shortcuts used to perform certain tasks. Throughout the book, I give both versions of the shortcuts.
Getting Set Up
Before you can do any work in Pro Tools, you have to set up both your Playback Engine and your Hardware settings. This section walks you through how to do this basic preparation.
Playing with the Playback Engine settings
One of the first things you need to do before you start using Pro Tools in earnest is to configure your Playback Engine so that Pro Tools recognizes your audio interface. The Playback Engine dialog box is also where you can tweak various options — hardware buffer size, host engine, and playback buffer size, for example — so your system runs at top efficiency. Getting there — where “there” looks a lot like Figure 4-1 — involves choosing Setup⇒ Playback Engine from the main menu. As for what all these options actually mean, the following sections take care of that.

FIGURE 4-1: Adjust your system’s performance from the Playback Engine dialog box.
H/W Buffer Size
In this context, H/W stands for hardware, and the hardware buffer size controls the amount of memory used to handle the processing of audio (as well as plug-ins, such as reverb). The lower this setting, the lower the latency (the time it takes to get sound into and back out of your system) that you hear when you record.
I suggest keeping this setting as low as possible while recording, especially when you do overdubs (I usually go with 32 or 64 samples). How low you can go depends on how many tracks you record at once — and whether you want to use plug-ins reverb while recording. Using lots of tracks and lots of plug-ins requires lots of memory, which force you (rats!) to bump up the hardware buffer size. Higher buffer sizes mean higher latencies, which can make overdubbing tracks more difficult, so I reserve high buffer sizes for when I’m done recording all my tracks.
When you’re ready to mix, go ahead and raise the buffer size. This puts less stress on your system and allows you to have more plug-ins running before you run into performance problems.
Host Engine
The Host Engine lets you choose to suppress error messages when you play your session and to allow for dynamic plug-in processing:
Ignore Error During Playback/Record: This check box allows you to avoid seeing an annoying error message if Pro Tools experiences any errors while you play back or record. Selecting the Ignore Error During Playback/Record check box may result in clicks or pops in the audio if an error occurs. This is no big deal when you play back your session, but it can be a problem when you record because these clicks and pops will likely show up in your audio tracks.
I recommend leaving this check box unchecked whenever you record. The only time I select this check box is when I’m working on a rough mix and don’t want any error messages to stop the flow of my creative process.
Minimize Additional I/O Latency: Selecting this option when you choose to ignore errors during playback or record sets the maximum additional I/O latency to 128 samples, the minimum additional latency needed to ignore errors. Selecting this option adds stress to your computer, so be aware that choosing it may cause some issues with performance if you have a lot of tracks or a less powerful computer.
If you’re getting a lot of error messages, reconsider how many plug-ins you’re using — or maybe upgrade your computer so it can handle more.- Dynamic Plug-in Processing: This check box dynamically reallocates your computer processing power to optimize your plug-in performance by only using processing power when there is data for your plug-in to process. I recommend checking this box to free up processing power for other tasks.
The Video Engine
If you’re working with video, enabling the video engine will allow you to import, play, and edit a variety of video formats without having to transcode it.
Setting hardware settings
When Pro Tools recognizes your hardware (see the “Playing with the Playback Engine settings” section), your next step is to configure your hardware settings within the software program. This is done via the Hardware Setup dialog box, shown in Figure 4-2. (To get there, choose Setup⇒ Hardware from the main menu.) From this dialog box, click Launch Setup App to open the Audio Device window, shown in Figure 4-3.

FIGURE 4-2: The Hardware Setup dialog box.
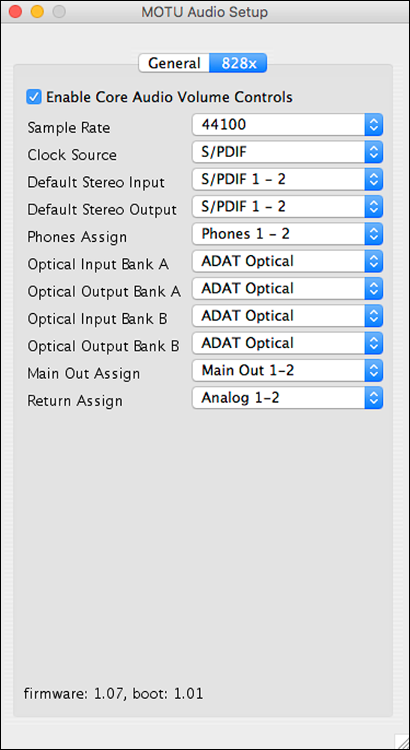
FIGURE 4-3: The Audio Device window.
Peripherals
Located in the upper-left portion of the Hardware Setup dialog box, the Peripherals pane shows what hardware you chose within the Playback Engine window (see “Playing with the Playback Engines settings” section earlier in this chapter). In the case of Figure 4-2, it’s the MOTU 828x. Your audio interface should appear here.
Launch Setup App
Click this button to open the setup menu for your device. Your device’s menu probably won’t look like this, but Figure 4-3 will allow you to configure the inputs and outputs for your device. You’ll find a variety of options for your device, including the inputs and outputs of your interface, but two key ones that are universal are the Sample Rate and Clock Source.
SAMPLE RATE
From the Sample Rate drop-down menu, choose the sample rate in which to work. Depending on your hardware, you can choose 44.1, 48, 88.2, 96, 176.4, or 192 kHz. Check out Book 1, Chapter 1 for the nitty-gritty of sample rates.
 The Sample Rate drop-down menu is editable only when you don’t have a session open. If you have a session open (as is the case of Figure 4-1), this area shows the sample rate chosen when this session was created but won’t allow you to make any changes. To choose a different sample rate, follow these steps:
- Close your open session.
- Choose Setup ⇒ Hardware Setup from the main menu and make your choice.
Click OK and then open a new session.
The new session is in the sample rate you just chose.
CLOCK SOURCE
From the Clock Source drop-down menu, you choose your source for the digital master clock, which controls the sample rate capture and playback. This makes sure that if you have more than one device (a separate analog-to-digital [A/D] converter connected to your audio interface, for example), all devices are synchronized. If you just use the audio interface, simply choose Internal from this menu. If you have other digital devices, such as a digital mixer or an external converter, choose the device that has the best clock as your clock source. In this case, you can choose from the following options:
- Internal: Uses the digital clock inside the audio interface.
- S/PDIF (RCA): Synchronizes to a signal sent via the coaxial S/PDIF input.
- Optical: Synchronizes to a signal coming in the Optical input. The optical format that is used is based upon whether you select ADAT or S/PDIF in the upcoming “Optical Format” section.
For more on ADAT, S/PDIF, and Optical connections, check out Book 2, Chapter 1.
Before you can use one of the digital connections as a clock source, you have to first connect the device to your audio hardware — then you adjust the setting in the Hardware Setup dialog box. Otherwise the device won’t show up in the dialog box.
If you have more than one digital device connected (such as a digital mixer connected to your audio interface), do some experimenting by recording with different clock sources and then compare the chosen sources to see which one gives you the best sound. (Digital clocks vary in quality.) Also, if you have more than three digital devices connected to your system, consider using a specialized master clock and distribute this clock source to all your devices. This will likely give you a better sound because then all your devices follow the same clock timing.
Disk Playback
The Disk Playback setting allows you choose the amount of memory (RAM) you dedicate to pre-buffering the audio data from your hard drives. You can choose some or even all of your computer’s RAM for this purpose. A higher setting will improve the performance of audio hard drives. This can be handy if you want to offline bounce high track-count sessions as quickly as possible. The trade-off is that you won’t be able to use that RAM for other operations. For most sessions, choose Normal from the pop-up menu, and Pro Tools will optimize the amount of RAM used for pre-buffering.
The ins and outs of inputs and outputs
Pro Tools allows you to assign your Input, Output, Insert, and Bus routings as you want. You do this within the I/O Setup dialog box, as shown in Figure 4-4. Choose Setup ⇒ I/O to get there.

FIGURE 4-4: Set your system’s routings from the I/O Setup dialog box.
Input
From the Input tab of the I/O Setup dialog box, choose and change the name of the inputs coming from your Avid hardware. Simply clicking the Default button brings up the inputs of the hardware that you connected. To change the name of any of the inputs, double-click the current name, type in your new one, and then press Return/Enter. Whatever name you choose shows up in the Input section of the channel strip in the Mix and Edit windows.
Customizing the names of your inputs and outputs makes setting up sessions and remembering where everything is routed much easier. For example, if you use the S/PDIF inputs as your main microphone inputs (you’d have an external preamp and an A/D converter between your mic and the interface), you can name them mic 1 and mic 2 instead of S/PDIF.
Instead of choosing the default setup, you can start from scratch and set up your own Input routings by clicking the New Path or New Sub-Path buttons. You can also delete paths if you choose. Additionally, you can import or export routing settings by clicking the Import Settings or Export Settings buttons. This can save you time if you have custom settings that you want to use in all your sessions.
Output
Clicking the Default button on the Output tab of the I/O Setup dialog box displays the outputs of the hardware connected to your system. Like with the Input tab of the I/O Setup dialog box, you can change names for the outputs if you want. The Output tab, however, has three additional options, as shown in Figure 4-5. These options do the following:
- Monitor Path: This output allows you to set a monitor output that is different than your Master Fader output. (Book 3, Chapter 1 has more on Master Fader tracks.)
- Audition Paths: This is the output where audio regions — the representations of the audio files in your tracks — play. (Book 5, Chapter 1 has more on audio regions.)
- AFL/PFL Path: You can assign outputs for After Fader Listen (AFL) and Pre Fader Listen (PFL) on soloed tracks. (Book 3, Chapter 1 has more on soloing tracks.)

FIGURE 4-5: The Output tab of the I/O Setup dialog box includes additional parameters.
Bus
The Bus tab of the I/O Setup dialog box has the 32 available buses for your send/return effects, such as reverb. (Check out Book 6, Chapter 5 for more on send/return effects.)
Insert
Use the Insert tab of the I/O Setup dialog box to set the routing for any of your insert effects, such as compressors and limiters. (See Book 6, Chapter 4 for more on insert effects.)
Click the Default button for all the settings in the various tabs of the I/O Setup dialog box, and you’ll be up and running quickly.
Mic Preamps
This tab allows you to assign PRE (Avid’s Eight-channel microphone preamp) to your session. Unless you have a PRE connected this tab will not allow you to do anything.
H/W Insert Delay
This tab allows you to set the delay time for any external hardware effects units you have connected to your audio interface. Here you enter the delay time in the proper channel; when you have the Delay Compensation Engine running, Pro Tools will apply this delay amount to the tracks assigned to the appropriate input channel. This tab is only necessary if you have an external effects unit connected and routed to your Pro Tools session.
Dealing with Sessions
Before you can do any recording, editing, or mixing in Pro Tools, you have to set up a session in which to work. A session in Pro Tools is simply a song file that contains all the audio and MIDI tracks, plug-ins, and mixer settings for all your tracks. Session files don’t actually contain the audio data; instead, they just have the audio files attached to them.
Creating a new session
To create a new session, choose File ⇒ Create New from the main menu or press ⌘ +N (Mac) or Ctrl+N (PC). The Dashboard (shown in Figure 4-6) opens. Here you can choose the following.
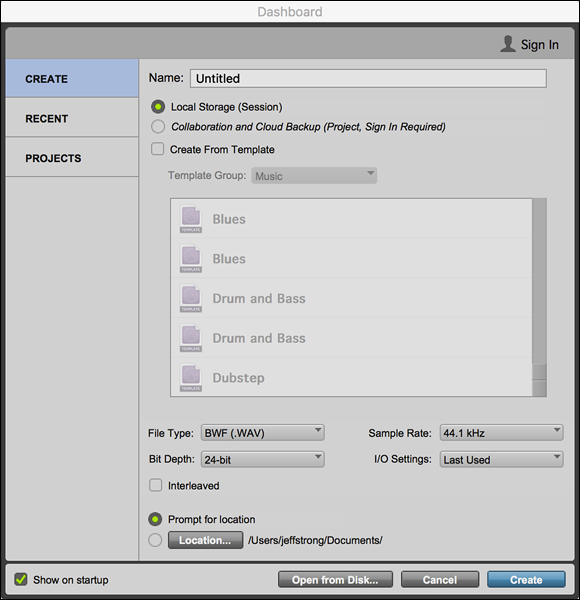
FIGURE 4-6: The New Session dialog box is where you set up a new song file.
Create
Choose this option to create a new session in one of three ways:
- Local Storage (Session): This option opens a session with no tracks or routing assignments. Choose this option if you want to customize your session.
- Collaboration and Cloud Backup (Project, Sign In Required): Choose this option when you want to create a new session that you want to collaborate with others on the cloud. You’ll need to login in to your Pro Tools Master Account and navigate to the artist community.
Create from Template: Choosing this option opens a menu of saved templates. To get started I recommend choosing this and taking a look at your options — you may find one that fits your needs pretty well. When you choose a template, all the tracks and setting assigned to that template automatically show up in your session. This can be a real timesaver if you want to create a complicated session with lots of tracks and send routing. You still need to choose the session parameters listed below to create your session.
If you plan to create a lot of sessions with specific tracks and signal routing settings, I highly recommend that you save your empty session (without the audio tracks) as a template to save you time later.- File Type: This drop-down menu lets you choose between BWF (Broadcast WAV File) or AIFF files. Choose the one that works best for you. (I always use WAV files because they’re compatible with other software I use. Your needs may be different.) If you aren’t transferring your files from one program to another, I suggest using the default BWF option.
- Sample Rate: Here you choose the sample rate of your session. Your options depend on the Avid hardware you have. For example, if you have an Mbox Mini, your choices are between 44.1 kHz and 48 kHz. If you have an Mbox, you can choose between 44.1 kHz, 48 kHz, 88.2 kHz, and 96 kHz. If you have an Mbox Pro, or Eleven Rack, you can choose from six options: 44.1 kHz, 48 kHz, 88.2 kHz, 96 kHz, 197.4 kHz, and 192 kHz.
- Bit Depth: Depending on your version of Pro Tools, you can choose between a 16-bit rate, a 24-bit rate, or a 32-bit float rate (the 32-bit rate is only available with Pro Tools 10, HD or HDX). For most sessions select the 24 Bit radio button.
- I/O Settings: From this drop-down menu, you can choose between the most recently used setting, a stereo-mix setting, or from a list of other saved settings.
When you click OK on your setting, you’ll be asked what you want to name the file and where you want to save it in the Save dialog box. Choose your name and location and click Save.
The higher the sample rate you select in the New Session dialog box, the more work your computer processor has to do. You often have to balance your desire for the highest-resolution music possible against the capabilities of your system.
The sample rate you choose depends on your goals, intended final format (CD, for example), and the speed of your computer’s processor. For example, if your session is going to have a ton of tracks and end up on a CD or be used for online distribution, your best bet is to choose 44.1 kHz because that’s where you’ll end up when you record to CD or this is the quality most online distributers want. Keep in mind, too, that using a whole slew of tracks means that your computer needs as much processing power as possible to handle mixing and processing tasks. In this case, recording at 96 kHz would likely put too much strain on your computer and deprive you of the power to do what you want during mixing.
On the other hand, if you suspect you won’t use very many tracks and want the highest resolution possible — or if you have a very powerful computer and won’t go crazy creating multiple tracks — 88.2 kHz or 96 kHz may better meet your goals.
I recommend getting to know your system before you record a lot of music with it. Experiment with different sample rates and track counts to see what your computer can handle. With this information, you can get a good sense of how hard you can push your system before you reach the limits of its performance.
Recent
Choose this option to choose from recent sessions. This is the same window that opens when you choose File ⇒ Open Session from the main menu.
Projects
Choose this option to choose from collaboration project sessions. This is the same window that opens when you choose File ⇒ Open Project from the main menu. If you aren’t signed into your Pro Tools account, click the Sign In button in the upper right. After you’re signed in, you’ll see your projects listed, if you have any.
Opening sessions
To open a session, choose File ⇒ Open Session from the main menu or press ⌘ +O (Mac) or Ctrl+O (PC). The Open Session dialog box appears, as shown in Figure 4-7. Choose the file you want to open and then click Open.

FIGURE 4-7: The Open Session dialog box.
 If you have a session with more than 24 tracks and you want to keep those additional tracks, don’t open it in a Pro Tools version earlier than 5.3 (or if you do, don’t save it there) because any additional tracks will be lost when you click Save.
Saving sessions
You have four options for saving sessions in Pro Tools: Save Session, Save Session As, Save Session Copy In, and Save As Template. As well, you can always return to a previously saved version of your session with the Revert to Saved command. These options are detailed in the next sections.
Save Session
This is the same Save command that you find in any computer program. As usual, you choose File ⇒ Save to save your session. You can also initiate a save by pressing ⌘ +S (Mac) or Ctrl+S (PC).
I highly recommend that you get used to saving from the keyboard often to prevent losing any data while you work. You can also turn on the Auto Save function and have Pro tools save your session automatically. Here’s how:
- Choose Setup ⇒ Preferences to access the Preferences dialog box.
- On the Operations tab, select the Enable Session File Auto Backup check box.
Save Session As
Choose File ⇒ Save Session As to save your session with a new name and/or location. Figure 4-8 shows the Save Session As dialog box.
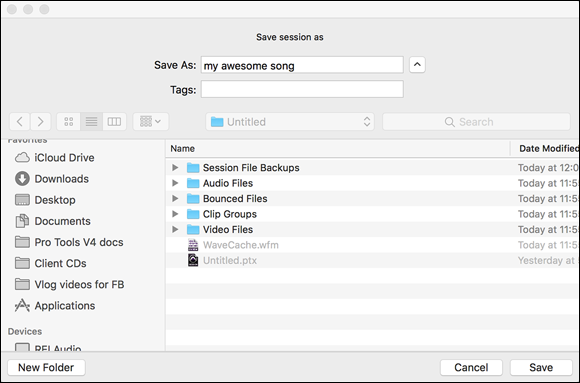
FIGURE 4-8: Choose the session name and location here.
Use Save Session As to save a variation of a session that you’ve been working on. I do this a lot when I’m mixing because this way, I can have a bunch of different mixes to choose from. The good thing about this command is that it saves only the session data and not the audio or MIDI files, so the session won’t take up much room on your hard drive.
Save Session Copy In
If you want to transfer your files from one program to another (Pro Tools to Logic, for example), using the Save Session Copy In command can be useful. Choosing File ⇒ Save Session Copy In opens the dialog box you see in Figure 4-9. Here, you can change the filename, location, and file type, among other options:
Session Format: From this drop-down menu, choose the Pro Tools version you want to save in. Your options include to save the session as a project or as the latest version, as well as PT7–9 or PT5.1–6.9.
Keep in mind that you may lose some data if you save this session in an earlier version.Session Parameters: Use this section of the dialog box to choose the audio file type, sample rate, and bit depth. You can choose from the same options that you had when you first opened the session.
Note: If you choose Session (Pro Tools 5.1 -> 6.9), you can also choose to force Mac/PC compatibility. If you want to share this session between a Mac and a PC, you need to select the Enforce Mac/PC Compatibility check box.
- Items to Copy: The Items to Copy section includes options for audio files, plug-in settings, and movie or video files that may be part of the session. If you plan on taking this session to another computer, use Items to Copy function when you choose what you want to copy.

FIGURE 4-9: The Save Session Copy In dialog box allows you to change the type of file your session is formatted in.
Relying on Revert to Save
The Revert to Save command (choose File ⇒ Revert to Save) is a handy feature if you did a bunch of work since you last saved your session and want to undo it without having to use the Undo command (located under Edit menu) to backtrack through the steps and undo each one.
Personally, if I’m in the position of wanting to undo a bunch of stuff and haven’t used the Save command since starting those changes, I choose to save the session with the Save As command. This way, I have those changes just in case I do decide to keep them. If I go that route, the changes will be sitting in a separate session file, safe and (ahem) sound.
Creating a session template
To make your life easier, you can create a session template with all the options you want already in place — track settings, window views, mixer settings, and so on — so all you have to do when you open a new session is open the template and save it with your new session name.
A variety of session templates comes with your Pro Tools software. To use them, choose the Pro Tools Session Templates folder from the Software CD-ROM and drag it onto your hard drive. Open the template session and rename it as your new session. You can use this folder for all your templates so that finding them again is easy. Choose File ⇒ Open session from the main menu, select the template folder from the Open Session dialog box, and scroll to the template you want to use.
To prepare a template, start by opening a new session and then creating your session as you want. After you set all the options to your liking, save the session file with a name that you’ll remember (like killer session template 1) so you can find it easily.
To transform the session file you saved into a session template, use the following steps:
Choose File ⇒ Save As Template.
The Save Session Template dialog box opens (Figure 4-10).
- Select Install template in system or Select location for template.
- If you choose to install your template in the system, you choose the category and assign a name; your template will go into the default template folder.
- If you choose the select the location for your template, a navigation box appears when you click OK; then you can put the template anywhere you choose.
In the Include Media selector, you can chose to have certain media included in your session template. For example, you may want to use a series of rhythm-section audio files to use in multiple sessions. Check this box and each time you create a new session based on this template, the files will be there for you.
Your template is saved in the location that you chose when you opened the session.
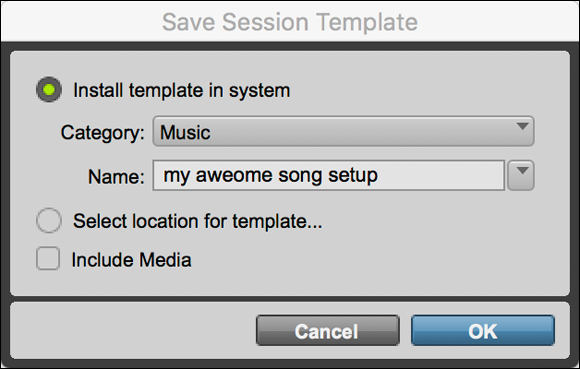
FIGURE 4-10: Use the Save Session Template to create a template for your session.
Getting to Know Audio and MIDI Files
Every time you click the Record button with a track engaged (as I describe in Book 3, Chapter 1, where you can find more on tracks) you create an audio or MIDI file. This section walks you through what these files are and how to deal with them.
Understanding audio files
An audio file is the data created from recording onto an audio track. Audio files in Pro Tools are clips. You can import, export, and edit these clips in a staggering variety of ways. (Book 6 shows you many of the ways to edit audio.) Whenever you create a new audio file, this clip is added to the Clips list, where you can manage it (as shown in Figure 4-11). The Clips list is located on the right side of the Edit window. If the list isn’t visible, click the double arrows at the bottom-right of the Edit window. This expands the Edit window to include the Clips list view.

FIGURE 4-11: Audio files created by recording into an audio track show up in the Clips list.
Meeting MIDI files
MIDI files are created whenever (you guessed it) you record MIDI data into a MIDI track. MIDI tracks don’t contain actual sounds; instead, they consist of the MIDI performance and system instructions used to control a MIDI instrument. To have the MIDI data become sound, you have to record the output of your MIDI sound module (what it does in response to the MIDI file’s instructions) onto an audio track. Then these sounds are contained in an audio file.
MIDI files show up in the Clips list (along with your session’s audio files), where you can mange them. MIDI regions have a small circular MIDI jack-type icon to help you identify them. You can choose to see only the MIDI regions in the Clips list by choosing Show from the Clips drop-down menu and the selecting the MIDI option (or by clearing the Audio, Auto Generated, and Groups options).
Finding your session files
Whenever you open a session in Pro Tools, the program has to go out and find all the audio and MIDI files associated with that session before the session will actually open. If Pro Tools can’t find the files — you moved them, for instance — the Missing Files dialog box opens. There you can choose to skip the file, let Pro Tools search for it automatically, or search for it manually. (See Figure 4-12 for a look at the Missing Files dialog box.) I always choose the automatic-search option — it finds the missing file nearly every time. The only time that hasn’t worked for me is when I’ve moved a file to another hard drive. (Then I select the Manually Find & Relink radio button.)
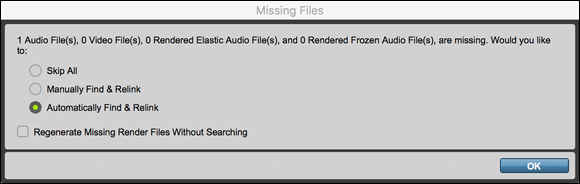
FIGURE 4-12: The Missing Files dialog box helps you locate truant files.
After your session opens, all the audio and MIDI files (regions) for that session are displayed in the Audio Regions list in the Edit window. Not only can you manage the files from these lists, but you can also import files that were originally recorded in another session — or even using another recording program (such as Logic or Nuendo).