
Chapter 2
Preparing to Record MIDI
IN THIS CHAPTER
![]() Configuring MIDI devices
Configuring MIDI devices
![]() Creating MIDI and instrument tracks
Creating MIDI and instrument tracks
![]() Setting inputs and outputs
Setting inputs and outputs
![]() Creating a click track
Creating a click track
As you can read in Book 4, Chapter 1, working with Musical Instrument Digital Interface (MIDI) lets you record performance data and add the sounds later. This gives you some advantages over recording audio. First, your MIDI tracks take up less room on your hard drive (not a big deal in today’s world, but worth mentioning). Secondly — and the most compelling reason for working with MIDI data — you can wait to choose the exact sound you want from your performance. This lets you tweak the sound as well as your performance. Of course, the drawback is that you can easily spend more time than you need when trying different options.
In this chapter, I walk you through setting up your system and session to record MIDI in Pro Tools. Along the way, you discover how to set up your devices, create MIDI tracks, and enable them for recording. You also get a chance to create a click track to play along with, which makes editing MIDI faster and easier.
Setting Up Your MIDI Devices
Setting up your MIDI device varies according to whether you use a Mac or a PC. Either way, though, setting up a MIDI device takes only a couple of minutes. Enabling MIDI devices is as easy as adding a printer to your system. The following sections walk you through what you need for each platform.
Enabling MIDI devices in Mac OS X
Before you can record MIDI in Mac OS X, you need to complete three overall procedures, in this order:
- Set up your MIDI devices in OS X.
Enable the MIDI channels.
This lets you choose the MIDI channels on which each device receives and sends data.
Enable the input devices in Pro Tools.
That way, you can actually use those devices in Pro Tools.
To configure your MIDI devices in OS X, follow these steps:
- With your MIDI cables, connect the devices you want to use with Pro Tools to either the Avid hardware or to a separate MIDI interface.
 Click the Audio MIDI Setup icon (as shown in the margin) on the Dock.
If this icon isn’t showing, go to Applications ⇒ Utilities ⇒ Audio MIDI Setup.
The Audio MIDI Setup window opens. If this MIDI Studio window isn’t open, choose Window ⇒ MIDI Studio Window.
Click the MIDI Devices tab of the Audio MIDI Setup window.
A message appears that tells you your system is being scanned. After the scan is complete, your MIDI interface should appear in the tab’s window, along with any devices connected to it, as shown in Figure 2-1.
 If one or more of your devices don’t appear …
 - Double-check your cables for proper connection.
- Click the Rescan MIDI icon.
If your device still doesn’t appear …
- Click the Add Device icon.
- In the dialog box that appears, enter the name, manufacturer, and model number of the device. Then click OK.
After your devices appear in the MIDI Devices tab of the Audio MIDI Setup window, close the window by choosing Audio MIDI Setup ⇒ Quit Audio MIDI Setup from the main menu (or press ⌘ +Q).
You can also close this window by clicking the red X in the upper-left corner of the window.
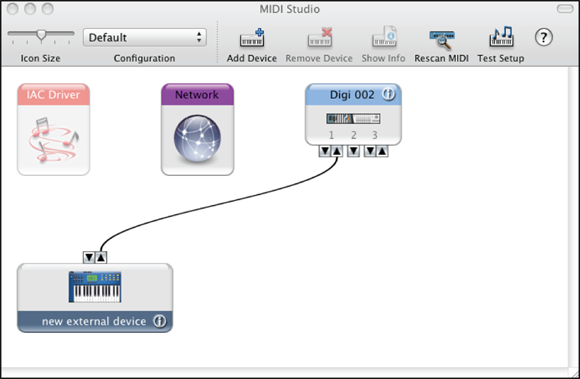
FIGURE 2-1: The Audio MIDI Setup window shows the MIDI devices connected to your MIDI interface.
To enable MIDI channels in your devices, follow these steps:
- Click the Audio MIDI Setup icon (as shown in the margin) on the Dock.
The Audio MIDI Setup window opens. (Refer to Figure 2-1.)
Click the MIDI Devices tab of the Audio MIDI Setup window.
All MIDI devices connected to your MIDI interface should appear in the tab’s window.
Double-click the device for which you want to activate MIDI channels.
The Device window appears.
Click the More Properties tab to expand the window.
The window expands to include Basic and Expert tabs containing settings you can make to your device.
- Click the Basic tab.
In the Transmits and Receives section of the Basics tab, click the channel number(s) through which you want to transmit and receive data.
Blue highlighted channels are active.
- Click OK to close the Device window.
- Close the Audio MIDI Setup window by clicking the red X in the upper-left of the window or by pressing ⌘ +Q.
You can receive MIDI data from other software programs through the Pro Tools inputs. This is useful if you want to use a separate MIDI sequencer (such as Logic) to record and edit your MIDI performances before you bring them into Pro Tools. If you collaborate with someone who uses software other than Pro Tools, this option can be very handy. (For more on using inputs, see Chapter 3 in this mini-book.)
 If you use any control surfaces (such as a Mackie Control) or if you want to sync your system to another using MMC (MIDI machine control), you must enable the devices for these tasks in the MIDI Input Enable dialog box, along with your other MIDI devices.
To enable input devices in Pro Tools, follow these steps:
Choose Setup ⇒ MIDI ⇒ Input Devices from the main menu.
The MIDI Input Enable dialog box opens, displaying all the MIDI ports in your system, as shown in Figure 2-2.
- Select the check boxes for the devices you want to use.
- Click OK.
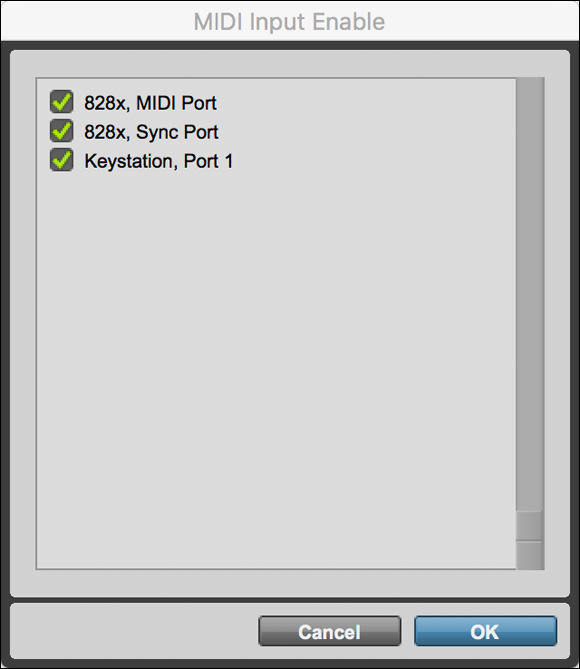
FIGURE 2-2: Use the MIDI Input Enable dialog box to select your MIDI devices.
Enabling MIDI devices in Windows
This section details how to set up your MIDI devices in Windows.
Here’s how to configure MIDI devices in Windows:
Install the drivers for your MIDI device as described in the device’s manual.
If you use the MIDI ports in your audio interface, this step was done when you installed the software, as I describe in Book 1, Chapter 2.- With your MIDI cables, connect the devices you want to use with Pro Tools to either the Avid hardware or to a separate MIDI interface.
Turn on the power for the device.
Your device should show up in your MIDI tracks’ Input and Output selector drop-down menus. If not, restart your computer. If this still doesn’t work, you may need to go into the Device Driver menu and manually move the driver for your device into the Device Driver folder.
To enable input devices in Pro Tools, the steps are just like those you’d use for a Mac:
Choose Setup ⇒ MIDI ⇒ MIDI Studio from the main menu.
The MIDI Input Enable dialog box opens, showing the MIDI ports in your system.
- Select the check boxes for the devices you want to use.
- Click OK.
Running MIDI Thru
MIDI Thru allows you to hear what your MIDI instrument is playing while the track it’s assigned to is record-enabled. Pro Tools also lets you set up a default MIDI Thru instrument, so you don’t have to choose a device each time you enable a MIDI track. Pro Tools uses the designated MIDI Thru instrument automatically.
To enable MIDI Thru, all you have to do is choose Options ⇒ MIDI Thru from the main menu.
When you enable MIDI Thru, you also need to disable Local Control in each of your devices to keep them from receiving double messages and creating stuck notes (notes that continue playing indefinitely). This is done within each of your MIDI devices. Consult your device’s manual for details on how to do this.
If you do end up with some stuck notes, choose Event ⇒ All MIDI Notes Off from the main menu or press ⌘ +Shift+. (period; Mac) or Ctrl+Shift+. (period; PC).
Here’s how to set the default MIDI Thru instrument:
Choose Setup ⇒ Preferences from the main menu.
The Preferences dialog box opens.
- Click the MIDI tab.
- Choose the MIDI device — as well as the channel you want to use to play the MIDI data — from the Default Thru Instrument drop-down menu, as shown in Figure 2-3.
- Click OK.

FIGURE 2-3: Choose the default MIDI Thru instrument for your session.
Managing the MIDI Input filter
Use the MIDI Input filter to ignore certain MIDI data while recording. For example, you can have Pro Tools ignore after-touch (extra pressure you place on the keyboard keys to change the sound that’s playing) or pitch bend (raising or lowering the pitch as the note plays) messages when you record a drum part using your keyboard. This can be handy if you want to avoid recording system-exclusive data — that is, messages pertain only to the device and not related to performance information — when recording a MIDI performance.
To set the MIDI Input Filter parameters, follow these steps:
Choose Setup ⇒ MIDI ⇒ Input Filter from the main menu.
The MIDI Input Filter dialog box opens, as shown in Figure 2-4.
- Select the Record options:
- All: Selecting All means that Pro Tools will record all the MIDI messages received.
- Only: Selecting Only means that only the parameters that you select in the upcoming Step 3 are recorded.
- All Except: Selecting All Except sets your system to record all the MIDI data it receives except for the check boxes that you select in the upcoming Step 3.
- Depending on the mode you chose (see Step 2), select the check boxes in the Channel Info and Controllers sections that correspond to what you want to include or exclude from the recording process.
- Depending on the choice you made in Step 2 and whether you want to include any system-exclusive data in your recording, select or clear the System Exclusive check box.
- If you choose All in Step 2: Selecting or clearing this check box doesn’t matter because system-exclusive data is recorded either way.
- If you choose Only in Step 2: Selecting this check box means that system exclusive data is recorded.
- If you choose All Except in Step 2: Selecting this check box means that system-exclusive data is not recorded.
- Click OK.
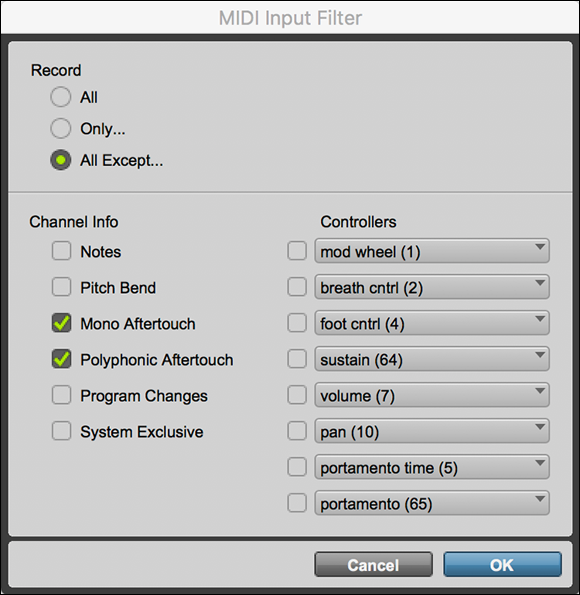
FIGURE 2-4: Choose MIDI parameters to record along with your performance data.
Quantizing your inputs
You can have Pro Tools automatically quantize your performance — that is, adjust the position of each note’s timing so that it fits within a specified time frame. This can be useful if you want the timing of your performance to fit a selected grid exactly.
Be careful with quantizing. Stop short of doing too much because sucking the life out of a performance is very easy.
To quantize your input, follow these steps:
Choose Event ⇒ Event Operations ⇒ Input Quantize from the main menu.
The Input Quantize dialog box opens, as shown in Figure 2-5.
Select the Enable Input Quantize check box to quantize and enter the rest of the options/parameters in the dialog box.
Here’s a rundown on what each of these parameters means:
From the What to Quantize section, choose the part of the note to quantize:
Attacks: This check box sets the quantization to the start of the selected notes.
With Attacks selected, using the Preserve Note Duration option keeps the end of the note intact.
Releases: Selecting this check box quantizes the ends of the notes.
With Releases selected, the start of the note is left intact.
If both Attacks and Releases are selected, the Preserve Note Duration option is dimmed.
- Preserve Note Duration: Selecting this check box produces different results depending on whether you choose Attacks or Releases.
The Quantize Grid section is where you choose the resolution of the quantize grid, from whole notes to 64th notes.
- Note Selector: From this drop-down menu, choose the note value of your quantize grid. Click the note to select it.
- Tuplet: Select this check box to select odd note groupings, such as triplets. When you enable this option, you need to fill in the tuplet value. For example, to create a regular eighth-note triplet, choose 3 in Time 1; for a quarter-note triplet, choose 3 in Time 2.
- Offset Grid By: This field lets you move the quantize grid forward or backward by the selected number of ticks. This is helpful for creating grooves that lie slightly ahead or behind the beat.
- Randomize: This option adds a level of randomness to the quantizing of your selection. This can further help with keeping your rhythm from being too rigid. You can select values from 0–100%. Lower values place the randomized notes closer to the grid.
In the Options section, you can include other options with your quantize operation, including:
- Swing: Select this check box to create a swing (a dotted quarter-eighth note triplet) feel. Use the slider to specify a percentage (from 0 to 300), with 100% being a triplet feel.
- Include Within: Selecting this check box only quantizes the notes that fall within the boundaries created with this setting. Your setting ranges are from 0–100%, with the smaller number affecting the narrower range of notes.
- Exclude Within: Selecting Exclude Within allows you to exclude any notes within the boundaries set in this field. Like with Include Within, you can set your boundaries from 0–100%.
- Strength: This is, in my opinion, the most useful function in the Pro Tool’s quantize operation. Enabling this check box allows you to move your quantized notes by a percentage rather than just snapping them right to the grid. Your setting range runs from 0–100%, with the higher numbers keeping more strictly to the grid than lower values.
- Press Return/Enter to close the window.
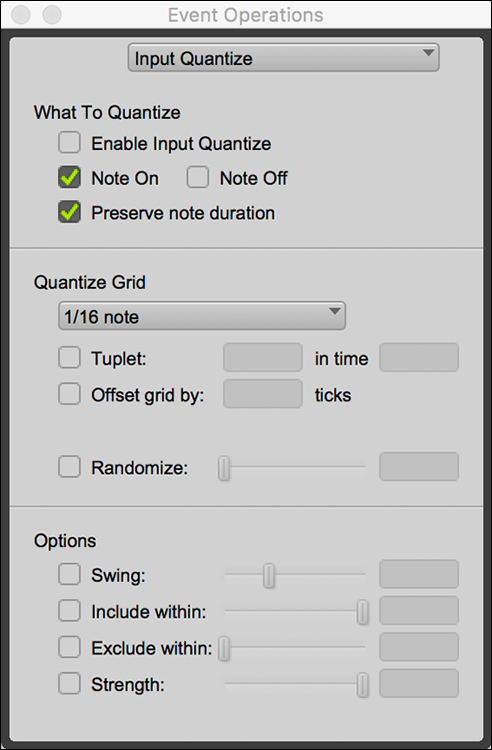
FIGURE 2-5: Here you can adjust the timing of your performance automatically while it’s being recorded.
Offsetting MIDI tracks
Pro Tools lets you offset your MIDI tracks to be a specified amount of time in your session. This can be especially handy if you record your MIDI track while listening to your sound device through the Avid interface; you may notice some delay (also called latency) in the sound. This delay is the result of the time it takes the sound to travel through the interface, into the computer, and then back out the interface to your speakers. Depending on the Buffer setting you have in your session, this latency may be large enough to bother you. (Book 1, Chapter 4 has more on Buffer settings.)
The way around this problem is to offset your MIDI tracks by moving them to a point earlier in your session by the amount of the delay. This makes Pro Tools play the MIDI track(s) earlier so you can hear them on time.
To offset all your MIDI tracks, follow these steps:
Choose Setup ⇒ Preferences from the main menu.
The Preferences dialog box opens.
Click the MIDI tab.
Refer to Figure 2-3 to see the MIDI tab of the Preferences dialog box.
Enter a negative number equal to your H/W buffer setting in the Global MIDI Playback Offset field.
This offset amount uses samples (the individual snapshots of the audio in your session) as the unit of measure.
Click OK.
Your specified offset will compensate for the latency.
To offset a single track, follow these steps:
Choose Event ⇒ MIDI Track Offsets from the main menu.
The MIDI Track Offsets window opens.
On the row for the track you want to offset, double-click the Sample Offset column.
The field is highlighted.
Enter the offset value in the Sample Offset column.
A negative number moves the track to an earlier point in the session; a positive number moves it later. Enter a value equal to the H/W buffer setting (as described in Book 1, Chapter 4).
- Press Return/Enter to save the value and close the window.
Getting Ready to Record
Setting up MIDI and instrument tracks involves first creating the tracks for your session and then setting the inputs, outputs, and MIDI channels for the tracks you created. This section spells out how to do all these tasks.
Creating MIDI and instrument tracks
Of course, before you can manipulate a MIDI track, you have to have one. To create a new MIDI track, follow these steps:
Choose Track ⇒ New from the main menu.
The New Tracks dialog box appears, as shown in Figure 2-6.
- Enter the number of tracks you want to create.
- Select MIDI Track or Instrument Track from the drop-down menu.
If you select an instrument track, you also need to choose between Mono or Stereo.
If the plug-in you plan on using is a multichannel plug-in or if you intend to have any stereo information on it, I suggest choosing Stereo.
Click Create.
Your new track(s) appear in both the Edit and the Mix windows.

FIGURE 2-6: Use the New Tracks dialog box to create new MIDI and instrument tracks.
When you create a new track, a default name is used — something not entirely useful (like MIDI 1 or Inst 1). You can rename this track by following these steps:
Double-click the track name in the Edit window.
The track’s dialog box appears.
- Type in the new name and add any comments about the track in the appropriate fields.
Click OK to close the window.
Your track gets a (hopefully more helpful) new name.
Setting inputs, outputs, and MIDI channels
For MIDI and instrument tracks, like with audio tracks, you need to select the input and output sources for your MIDI data to be able to record and play back your tracks. Where MIDI tracks differ from audio tracks is that you also need to set the MIDI channel(s) through which the MIDI data for each track travels. You can set the inputs and outputs for your MIDI tracks in either the Edit or the Mix window. If you want to set these in the Edit window, make sure that you set up the window so that it displays the Input and Output sections.
To view the Input and Output sections on a MIDI track, choose View ⇒ Mix Window ⇒ I/O View. To see the MIDI Input and Output section for instruments tracks, choose View ⇒ Mix Window ⇒ Instruments.
To set the input on a MIDI or instrument track, follow these steps:
Click the MIDI Input Selector drop-down menu.
You find the selector in the Track Controls section of the Edit window and above the track’s fader in the Mix window for MIDI tracks. In instrument tracks, you can find the MIDI input/output selector controls at the top of the track’s channel strip in the Mix window. In the Edit window, it will be to the right of the main track selection controls.
- Drag through the menu to the MIDI device and channel you want.
- Release your mouse button.
To set the output for your MIDI track, follow these steps:
Click the MIDI Output Selector drop-down menu.
You find the selector in the Track Controls section of the Edit window and above the track’s fader in the Mix window.
- Drag through the menu to the MIDI device and channel you want.
- Release your mouse button.
With instrument tracks, you also need to choose a physical output to route the audio signal created by your instrument track’s plug-in. Here’s how:
Click the Audio Output Selector drop-down menu.
You find the selector in the Track Controls section of the Edit window and above the track’s fader in the Mix window.
- Drag through the menu to the output device (bus or hardware) and channel you want.
- Release your mouse button.
You can assign multiple destinations for your MIDI tracks by pressing Control (Mac) or Windows (PC) when you select your input and output assignments.
Any devices and MIDI channels that are already assigned to another track are listed in bold letters. This makes it easy to keep from accidentally assigning two tracks to the same device and channels (although you can if you want).
Creating a click track
Click tracks (a metronome to play to) are useful for making sure that your performance data lines up with the bars and beats of your session. Having your MIDI line up allows you to do a variety of editing tasks much faster and more accurately.
To create a click track, you need to set a tempo and a meter and then enable the click in the Transport window. I cover the steps for these procedures in the following sections.
Setting the tempo
To set the tempo and meter of your session, or a section within your session, do the following:
Disengage the Tempo Ruler Enable button in the expanded Transport window. If the Tempo Ruler Enable button isn’t showing in the Transport window, choose View ⇒ Transport ⇒ Expanded.
The little Conductor guy turns gray. If it’s already gray, leave it alone.
- Double-click in the Tempo box in the expanded section of the Transport window (see Figure 2-7).
Type the tempo number you want and then press Return/Enter. You can also click-drag the number with your mouse and release when you get to the number you want.
Your tempo is set.

FIGURE 2-7: Change the tempo here.
Choosing the meter
You can set the meter for the session by doing the following:
Double-click the Meter button in the expanded Transport window or choose Window ⇒ Show Tempo/Meter from the main menu.
Check out Book 2, Chapter 3 for more on expanding the Transport window.
The Tempo/Meter Change dialog box appears.
Choose Meter Change from the drop-down menu.
The Meter Change dialog box appears, as shown in Figure 2-8. It has the following four parameters to adjust:
- Snap to Bar: Select this check box to have any meter events align to the first beat in the nearest bar. (See the section on setting up tempo and meter events in Book 3, Chapter 4.)
- Location: The number you enter in this field determines the beginning of the meter (time signature) event. For songs with only one time signature, you enter 1/1/000.
- Meter: Use these fields to type in the meter that you want to use.
- Click: From this menu, choose the note value for the clicks that are played in each measure. Choosing a quarter note means you’ll hear four clicks in a 4/4 measure.

FIGURE 2-8: Designate the meter in the Meter Change dialog box.
Configuring your device
Of course, to play a click track in Pro Tools, you need a device to create the sound (details, details). This can be an external MIDI sound module (such as a drum machine or keyboard) or the DigiRack Click plug-in.
Follow these steps to configure the click-track device:

 Choose Setup ⇒ Click/Countoff Options from the main menu or double-click the Click or the Countoff button in the Transport window.
The Click/Countoff Options dialog box appears, as shown in Figure 2-9.
Use the Output drop-down menu to choose the device to play your click.
If you’re using an external device, choose the port and MIDI channel that your device is connected to. If you’re using the Click plug-in, choose None.
Choose when you want the click to be played by selecting from the options at the top of the window.
You can select During Play and Record, Only During Record, or Only During Countoff.
- Enter the MIDI note, velocity, and duration for the accented and unaccented notes of the click in the appropriate fields.
Select whether you want a countoff as well as the number of bars you want.
Selecting Only During Record means that there’s no countoff when you play back the track. If you select one of the other options and decide that you still don’t want any countoff, type 0 bars in the Bars field.
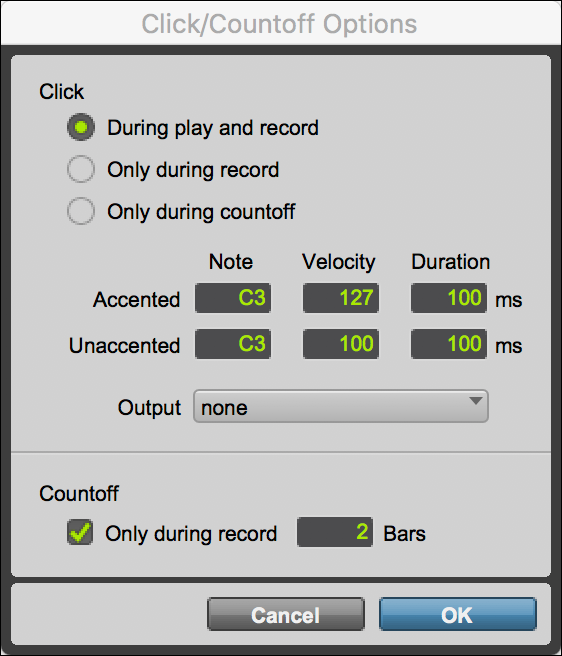
FIGURE 2-9: Configure your click-track device.
The next order of business is to enable your click track, which you can do in one of two ways:
- Choose Options ⇒ Click from the main menu.
Click the Click button in the MIDI section of the Transport window. When Click is engaged, this button is blue.
You can engage the countoff by clicking the Countoff button in the MIDI section of the Transport window. This button displays the number of bars that the countoff is set for. This button is blue when it’s engaged.
If you want to use the Click plug-in — rather than an external device — to play the click, do the following:
If you haven’t completed Steps 1–5 in the preceding list and you want to use the internal click-track plug-in, you can simply choose Track ⇒ Create Click Track. Then you’re all set to go.
- Create a new instrument track by choosing Track ⇒ New from the main menu or pressing Shift+⌘ +N (Mac) or Shift+Ctrl+N (PC).
- Use the Output selector to set the output of the track to the main outputs (the outputs you use for your monitors, which are usually 1 and 2).
- Make sure that the Inserts option is chosen under the Mix Window Shows menu. (Choose View ⇒ Mix Window to check.)
Choose Click from the Inserts drop-down menu (click and hold over the arrow, and then choose Plug-In ⇒ Instrument ⇒ Click) for the track you just created, as shown in Figure 2-10.
Your chosen click plays according to your choice in the Click/Countoff Options dialog box.

FIGURE 2-10: Choose the Click plug-in.
My usual device for creating a click track is a drum machine or other decent drum sound from an external device. The Click plug-in, as handy as it is, doesn’t have the most pleasing sound.