
Chapter 5
Editing MIDI Data
IN THIS CHAPTER
![]() Understanding MIDI and instrument track views
Understanding MIDI and instrument track views
![]() Selecting MIDI data
Selecting MIDI data
![]() Editing in the Edit window
Editing in the Edit window
![]() Understanding the MIDI Event window
Understanding the MIDI Event window
Historically, MIDI editing in Pro Tools hasn’t been as elaborate as what you find in some programs (such as Logic or Sonar), but the most recent version is as powerful as any other music creation software.
In this chapter, you explore the MIDI-editing functions available to you in Pro Tools. You examine the many uses of the Pencil tool, discovering ways to edit MIDI notes, controller data, and system-exclusive messages.
Working with MIDI and Instrument Tracks
Working with MIDI and instrument tracks is almost the same as working with audio tracks. (The latter are covered in great detail in Book 5, Chapters 1 and 2.) The following sections explain track views, selecting MIDI data, understanding clips, and setting default program changes.
Taking a look at track views
You can adjust the track view for MIDI and Instrument tracks by clicking the Track View selector in the Track Controls section of the Edit window, as shown in Figure 5-1. The track views for MIDI and Instrument tracks include the following options:
- Blocks: In Blocks view, clips are displayed as blocks, each showing only the clip name. This view takes up the least amount of processing power to show and redraw, which makes this the best option after all your editing is done and you’re ready to start mixing.
Clips: Clips view shows the clips in the track, also displaying notes in the track in the piano-roll fashion that you can see in Figure 5-2. The notes can’t be edited, but the clips can be. This view is useful when you want to move or edit the clips in your track.
 When you edit in Clips view on a MIDI or Instrument track, you edit continuous controller events (volume, pitch bend, after-touch — see Book 4, Chapter 3) along with the clip because such events are connected to the clip and not to the track’s playlist.
Notes: Using Notes view displays the location, pitch, and duration of the notes in the track in piano-roll format (as shown in Figure 5-3). You can edit or insert MIDI notes in this view.
 MIDI notes are shown as small rectangles. The horizontal range represents the location and duration of the note; the vertical placement shows the note’s pitch.
Along the left side of the track’s playlist is a representation of a keyboard with up and down arrows, which allow you to scroll through the octaves of the notes. This is necessary because not all the possible MIDI notes can be displayed in the track’s playlist at one time. A single line at the top or bottom of the track display designates any notes that can’t be displayed (because they’re above or below the octave being displayed).
 You can also scroll through the octaves in the playlist by using the Grabber tool and dragging the piano-roll display up and down.
- Velocity: This view displays — and allows you to edit — velocity (note volume) settings for each note in the track. (You can still see the piano-roll data in the background.)
- Volume: Volume view shows automation volume curves with breakpoints — markers that show shifts in the automation level — displayed as dots along the line. Note data, in piano-roll format, is shown in the background. In this view, you can edit the volume data but not the underlying notes.
- Pan: This view displays and allows you to adjust panning automation data (far left at the top and far right at the bottom) with the piano-roll display in the background.
- Mute: This view shows mute automation settings for the track and allows you to mute or unmute the track. Note data, in piano-roll format, is shown in the background.
- Pitch Bend: Pitch Bend view shows any pitch bend data in the track as a line graph with editable breakpoints. The piano-roll data is shown in the background but can’t be edited.
- Mono After Touch: This view shows after-touch data — the velocity of the note after the initial touch of the keyboard — as a line graph with editable breakpoints. The piano-roll data is shown in the background to help you know where you are in the session.
- Program Change: This view displays program-change information for the track with the piano-roll data in the background (uneditable, of course). Use this view to add or edit program-change events.
- Sysex: This view shows system-exclusive data — messages exclusive to the MIDI device — for the track.
- Controllers: This view shows continuous controller data, such as modulation wheel, breath controller, foot control, expression, and sustain with the piano-roll data in the background. Use this view to add or edit continuous controller data for your track.

FIGURE 5-1: Use the MIDI Track View selector to choose between track views.
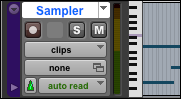
FIGURE 5-2: The Clips view shows MIDI clips for the track.

FIGURE 5-3: Notes view is where you edit notes for a MIDI or Instrument track.
![]() You can toggle between the two most-used MIDI track views: Clips and Notes. Do this by pressing Control (Mac) or Windows (PC) while you press the minus key on the main section of the keyboard. Or simply press the minus key (from the main keyboard, not the number pad) after engaging the Command Keyboard Focus button. (See Book 2, Chapter 3, for more on the Command Keyboard Focus feature.)
You can toggle between the two most-used MIDI track views: Clips and Notes. Do this by pressing Control (Mac) or Windows (PC) while you press the minus key on the main section of the keyboard. Or simply press the minus key (from the main keyboard, not the number pad) after engaging the Command Keyboard Focus button. (See Book 2, Chapter 3, for more on the Command Keyboard Focus feature.)
Selecting track material
You can select track material the same way you select material from audio tracks — well, okay, with a few variations. The following sections tell you about those variations; Book 5, Chapter 2 covers the selection stuff about audio tracks that’s perfectly applicable to MIDI and Instrument tracks. (You may want to skim through Book 5, Chapter 3 to refresh your memory about selection basics.)
MIDI notes are selected from Notes view; clips are selected from Clips view.
Selecting notes with the Pencil tool
![]() You select notes with the Pencil tool by clicking the notes. (No big deal, right?) To select more than one note, press the Shift key while you click each note. Selected notes become highlighted.
You select notes with the Pencil tool by clicking the notes. (No big deal, right?) To select more than one note, press the Shift key while you click each note. Selected notes become highlighted.
Using the Selector tool
![]() When you use the Selector tool to select notes, certain conditions apply. They’re pretty straightforward:
When you use the Selector tool to select notes, certain conditions apply. They’re pretty straightforward:
Before a note can be included in a selection, its start point must be in the selection range.
In Figure 5-4, for example, the note whose start point begins before the selection range is not selected. (You can tell it’s not selected because it’s not highlighted.)
- Notes with end points outside the selection range are still selected.
- When you select notes with the Selector tool, you also select (automatically) all the underlying automation and controller data pertaining to the notes.
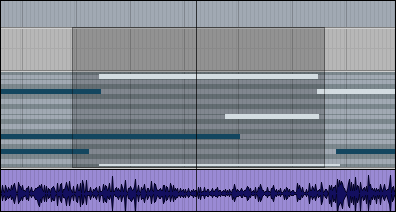
FIGURE 5-4: The Selector tool selects notes only if the start time is included in the selection range.
Grabbing with the Grabber tool
When you select a series of notes with the Grabber tool, all notes partially or fully contained in the Grabber selection are selected, as shown in Figure 5-5. Notes selected with the Grabber tool don’t include automation or controller data.

FIGURE 5-5: The Grabber tool selects notes whenever any part of the note is in the selection.
Selecting notes from the mini keyboard
You can select all the notes in a track that have the same pitch by clicking the represented MIDI note in the mini keyboard, which is located along the left side of the track’s playlist display, as shown in Figure 5-6.
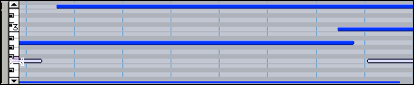
FIGURE 5-6: Select notes of a desired pitch from the mini-keyboard.
Recognizing clips
The procedures for working with MIDI clips are the same as those for audio clips. Book 5, Chapter 1 describes how to select and view clips in a track’s playlist, as well as how to work with clips in the Clips list. The procedures for working with the MIDI Clips list are the same as those for working with the Clips list, so if you check out Book 5, Chapter 1, you’re all set.
Setting MIDI patches on tracks
You can change the default program (sound patch) in use with your MIDI tracks so your MIDI device automatically resets to the program you want for your track. Here’s how to make it happen:
Click the Program button in the Track Controls section of the Edit window, as shown in Figure 5-7.
The Patch Select dialog box opens.
Click the patch number or name that you want from the list in the main section of the dialog box.
It becomes highlighted.
Depending on your MIDI device, you might need to specify a bank along with the patch number. The bank number is entered in one of the Controller fields at the top of the dialog box. Check the specification for your device to see what to enter in this field.
Click Done.
The Patch Select dialog box closes, and the patch number/name is displayed on the Program button of the Track Controls section.
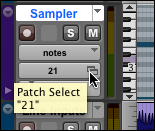
FIGURE 5-7: The Program button is located in the Track Controls.
You can have Pro Tools scroll automatically through the patches in your MIDI sound module by selecting the Incremental Patch option in the Patch Select dialog box and entering a value for the number of seconds that each patch sounds as your session plays.
Dealing with Note Chasing
Note chasing makes sure that when you start your session in the middle of a long MIDI note, the note is played. This is useful when you want to start and stop the session from anywhere and still be able to hear the notes that are recorded.
The Note Chasing feature is turned on by default, but you might want to turn it off on any tracks that play loops to ensure that the loop doesn’t get out of sync when you start and stop the session in the middle of its sequence.
To turn on and off Note Chasing, do the following:
Click the track’s Playlist selector, located in the Track Controls section of the Edit window.
The selector is the arrow to the right of the name of the track.
The Track Playlist drop-down menu opens with an option for engaging note chasing in the track.
Choose Note Chasing from the Track Playlist menu.
You deselect (uncheck) to turn the Note Chasing feature off and select (check) to turn it on.
Editing MIDI in the Edit Window
Like with audio, you do most of your MIDI editing from the Edit window. The process, again, is very similar to editing audio (described in Book 5, Chapters 1–3). The following sections offer some tips and tricks tailored to inserting, deleting, and editing MIDI data. For the most part, though, I discuss the amazing Pencil tool, the Smart tool, and the Grabber tool.
 If your MIDI clip exists in only one location (that is, it’s not shared with other tracks or sessions), any changes you make to the data in that clip change it permanently. To ensure that you don’t lose important data while editing (or if you want to be able to return to the original), make a copy of the playlist and work from there. (I explain playlists in detail in Book 5, Chapter 1.)
Perusing the Pencil tools
Pro Tools offers seven Pencil tools — Free Hand, Line, Triangle, Square, Random, Parabolic, and S-Curve — that you can use to create and edit MIDI data easily with your mouse. You select these tools by clicking and holding the Pencil Tool icon and then choosing from the drop-down menu that appears, as shown in Figure 5-8. Each tool can be used to add notes and draw velocity and controller data, but each one works a little differently, as the following sections make clear.
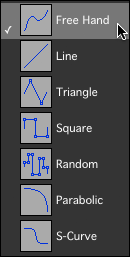
FIGURE 5-8: Pencil tools in seven shapes for creating and editing MIDI data.
Free Hand
When you insert notes, here’s what happens:
- You can place them anywhere you want and drag your mouse to specify the duration you want the note to be.
- If you simply click with the Free Hand Pencil tool to insert a note, the note duration is equal to the grid value for your session. (Grid values are boundaries you can set for your session and are set in the Grid Value drop-down menu, located just below the Pencil Tool button in the Edit window.)
- Note velocity is determined by the setting you have in the MIDI tab of the Preferences dialog box. Choose Setup ⇒ Preferences to access the Preferences dialog box.
When you draw velocity or continuous controller data, here’s what happens:
- You can draw any shape you want with your mouse.
- The resolution of the lines is determined by the settings you’ve chosen for controller data in the MIDI tab of the Preferences dialog box. Choose Setup ⇒ Preferences to access the Preferences dialog box.
Line
When you insert notes, here’s what you get:
You can place as many notes as you want as a single pitch.
The note duration is equal to the current grid value in your session.- The note velocity is determined by the setting you have on the MIDI tab of the Preferences dialog box.
When you draw velocity or continuous controller data, these conditions apply:
- The line is straight from the initial mouse click through the drag and release.
- The resolution of the lines is determined by the settings you choose for controller data on the MIDI tab of the Preferences dialog box.
Triangle
When you insert notes, three conditions apply:
You can place as many notes as you want as a single pitch.
The note duration is equal to the current grid value in your session.
- The note velocity oscillates between the setting you have for Note on Velocity on the MIDI tab of the Preferences dialog box and 127 (the maximum level).
When you draw velocity or continuous controller data, here’s what you see:
- The line is a triangular pattern, which changes direction according to the current grid value in your session.
- The resolution of the lines is determined by the settings for controller data you chose on the MIDI tab of the Preferences dialog box.
Square
When you insert notes, here’s the skinny:
You can place as many notes as you want as a single pitch.
The note duration is equal to the current grid value in your session.
- The note velocity alternates between the setting you have for Note on Velocity on the MIDI tab of the Preferences dialog box and 127 (the maximum level).
When you draw velocity or continuous controller data, it works this way:
- The line is a square pattern, which repeats according to the current grid value in your session.
- The resolution of the lines is determined by the settings you chose for controller data on the MIDI tab of the Preferences dialog box.
Random
When you insert notes, here’s what you get:
You can place as many notes as you want as a single pitch.
The note duration is equal to the current grid value in your session.
- The note velocity changes randomly between the setting you have for Note on Velocity on the MIDI tab of the Preferences dialog box and 127 (the maximum level).
When you draw velocity or continuous controller data, the line is a random pattern, which changes value according to the current grid value in your session.
Custom note duration
![]() When you insert a note by using one of the Pencil tools and you want a different value than the grid setting in your session, you can choose the Custom Note Duration option, which is located at the bottom of the Pencil tool drop-down menu. Enabling this option adds the Notes button shown here in the margin beneath the Pencil Tool icon on the Edit Window toolbar.
When you insert a note by using one of the Pencil tools and you want a different value than the grid setting in your session, you can choose the Custom Note Duration option, which is located at the bottom of the Pencil tool drop-down menu. Enabling this option adds the Notes button shown here in the margin beneath the Pencil Tool icon on the Edit Window toolbar.
The Custom Note Duration option lets you specify a note duration other than your current grid setting.
To choose a custom note duration when you’re inserting a MIDI note, do the following:
Click and hold the Pencil icon in the Edit window toolbar.
The Pencil tool drop-down menu appears.
Choose Custom Note Duration from the Pencil tool drop-down menu.
The Notes button appears beneath the Pencil icon on the Edit Window toolbar.
- Choose which Pencil tool you want to use from the drop-down menu.
- Using the Notes button beneath the Pencil Tool button, choose a note duration.
- Using the Pencil tool you select in Step 3, insert the note in your track.
Adding MIDI events
You can add MIDI notes or controller data (collectively called MIDI events) to a MIDI or Instrument track by using the Pencil tool. (See the preceding section for more about the Pencil tools.)
Inserting notes
To use the Pencil tool to insert a note, do the following:
- From the Track View drop-down menu in the Track Controls section of the Edit Window, set the track view to Notes.
- Click and hold the Pencil icon and then choose the Pencil tool you want to use from the Pencil Tool drop-down menu that appears.
- Locate the place you want to add your MIDI note in the track’s playlist area.
- With the Pencil tool you select in Step 2, click in the playlist to insert a note with a duration equal to the grid value.
When you use the Free Hand tool, you can set the note to whatever duration you want. Do so by clicking the start point of the note in the track’s playlist, dragging to the end point you want, and then releasing the mouse button.
If you want to hear the MIDI note while you insert it, first make sure that you have the Play MIDI Notes When Editing preference chosen on the MIDI tab of the Preferences dialog box. (Choose Setup ⇒ Preferences to access this dialog box.)
If you have Grid mode enabled as your editing mode, the inserted note is snapped to the nearest grid boundary. To disable this function, press ⌘ (Mac) or Ctrl (PC) when you insert the note. (Book 5, Chapter 1 has more on editing modes.)
Drawing velocity or continuous controller data
To draw velocity or continuous controller data in a track’s playlist, do the following:
- From the Track View drop-down menu in the Track Controls section of the Edit Window, set the track to Velocity or Controller view.
- Click and hold the Pencil icon and then choose the Pencil tool you want to use from the menu that appears.
- Locate where you want to enter your MIDI data in the track’s playlist.
- With the Pencil tool you choose in Step 2, click and drag in the track’s playlist to sketch in the velocity or the controller level you want to draw.
- Release the mouse button when you reach the end point of your edit.
Inserting program changes
To insert MIDI program changes, do the following:
- From the Track View drop-down menu, set the track to Program Change view.
- Click and hold the Pencil icon and then choose the Pencil tool you want to use from the menu that appears.
Click in the track’s playlist where you want the change to occur.
The Patch Select dialog box opens.
- Click the patch number or name in the main section of the dialog box to select it.
Click Done.
The program change is inserted, as shown in Figure 5-9.
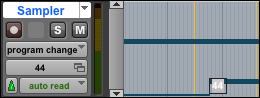
FIGURE 5-9: A program-change event appears in the track’s playlist in Program Change view.
Deleting MIDI data
You can delete MIDI notes and other data several ways. The following sections detail the process.
Deleting a MIDI note
To delete a MIDI note, do the following:
- From the Track View drop-down menu, set the track view to Notes.
- With either the Grabber tool or the Selector tool, select the note in the playlist you want to delete.
- Press Delete/Backspace on your keyboard or choose Edit ⇒ Clear from the main menu.
Instead of using Steps 2 and 3 in the preceding list, start out with the Pencil tool. Then press Option (Mac) or Alt (PC) to change the pencil into an eraser, and then click the note to delete it.
If you use the Selector tool to select the note, all automation and controller data is deleted along with the note.
Deleting a program change
To delete a program change, do the following:
- From the Track View drop-down menu, set the track view to Program Change.
- Select the program change you want to delete.
With the Grabber tool, click the event or drag across it to select it.
If you drag, you can include other MIDI events in your selection to delete them as well.- With the Pencil tool, press Option (Mac) or Alt (PC) while you click the event. You won’t need to perform Step 3 using this procedure because the event is automatically deleted.
Press Delete/Backspace on your keyboard or choose Edit ⇒ Clear from the main menu.
The event is deleted.
Changing MIDI events
In the Edit window, you can edit MIDI notes in a variety of ways including changing pitch, duration, velocity, and time location.
When you edit or move notes, you can make a copy of the note to move by pressing Option (Mac) or Ctrl (PC) while you drag the note.
Changing a note’s pitch
To change a note’s pitch, do the following:
- From the Track View drop-down menu, set your track to Notes view.
- Select the Pencil or the Grabber tool.
- Press Shift to keep the note’s start point from changing while you move it.
- Click the note and drag it up (higher pitch) or down (lower pitch) in the playlist.
- Release the mouse button when the note is where you want it.
Or you can use the following keyboard shortcut:
- Select the note with the Grabber or Smart tool.
- Press the arrow key up or down to move the note a semi tone.
- Press Shift + Arrow up or down to move the note an octave.
- Press Control + left or right Arrow (Mac) or Start + left or right Arrow (Windows) to move the note within the session’s key.
Changing a note’s duration
To change a note’s duration — its Start or End points — do the following:
- From the Track View drop-down menu, set your track to Notes view.
- Select the Pencil tool.
With the Pencil tool, click the note you want to change.
Press Shift while you click to select more than one note.- Click the Start or End point of the note and drag it left or right.
- If your edit mode is set to Grid, the note is moved along the grid boundary.
- If you’re using the Spot edit mode, the Spot dialog box appears; there, you can type in a location for the note and then click Done.
- Release the mouse button when the note is where you want it.
Or you can use the following keyboard shortcut:
- Select the note with the Grabber or Smart tool.
- Press Control + left or right Arrow (Mac) or Start + left or right Arrow (Windows) to move the note’s start time one grid value.
Press Option + left or right Arrow (Mac) or Alt + left or right Arrow (Windows) to move the end time of the note one grid value.
Adding Shift to the key command moves the note two grid values.
Changing a note’s velocity
In the MIDI world, velocity means volume. To change a note’s velocity, do the following:
- From the Track View drop-down menu, set your track to Velocity view.
- Select the Grabber tool.
- Click the diamond-shaped icon at the top of the velocity stalk — the vertical line with a diamond at the top representing the velocity level — in the track’s playlist and then drag it up or down.
- Release the mouse button when the velocity is where you want it.
Or you can use the following keyboard shortcut:
- Select the note with the Grabber or Smart tool.
Press Command + up or down Arrow (Mac) or Control + up or down Arrow (Windows) to change the note’s velocity by five units.
Add Shift to the key command to change the velocity by 15 units.
You can also use one of the Pencil tools to draw various velocity shapes. Select the desired Pencil tool and then draw a line in the track’s playlist where you want the velocities to be. (See “Perusing the Pencil tools” section, earlier in this chapter, for more on drawing velocity settings.)
You can scale the velocities of several notes by using the Selector to select the notes and then the Trimmer to drag them up or down as a unit. This lets you keep the relationship between the velocities the same as you change the overall levels.
Changing time locations
Time locations define where the Start points of your notes are placed within your session. To change a note’s time location, do the following:
- From the Track View drop-down menu, set your track to Notes view.
- Select the Pencil or the Grabber tool.
- Press Shift to keep the note’s pitch from changing while you move it.
- Click the note and drag it left or right.
- If your edit mode is set to Grid, the note is moved along the grid boundary.
- If you’re using Spot edit mode, the Spot dialog box appears; there, you can type in a location for the note and then click Done.
- Release the mouse button when the note is where you want it.
Moving notes freely
To move a note freely in the track, do the following:
- From the Track View drop-down menu, set your track to Notes view.
- Select the Pencil or the Grabber tool.
- Click the note and drag it left or right, up or down.
- Release the mouse button when the note is where you want it.
Editing note attributes
To edit a note by changing note attributes as displayed in the MIDI Event List, do the following:
- From the Track View drop-down menu, set your track to Notes view.
Click the note by using the Pencil or the Grabber tool.
The note’s attributes show up in the MIDI Event List window with a blue highlight (as shown in Figure 5-10).
- Click in the Attribute field(s) you want to change:
- Start: This field indicates the start point of the selected note. This is displayed in the main time scale setting for the session.
- End: This field controls the end point of the note, which is displayed in the main time-scale format. If this field isn’t visible, click the Options button at the top of the MIDI Event List dialog box and choose Show Note End Time from the menu that appears.
- Length/Info: This field displays the duration of the note (shown in the session’s main time scale). Changing the start or end times also changes this value. Changing this field alters the end point but leaves the start point untouched. MIDI events without length data (such as program changes or controller events) show data associated with that data, such as the program number or controller event type. If this field isn’t visible, click the Options button at the top of the MIDI Event List dialog box and choose Show Note Length from the menu that appears.
- Pitch: This field displays the pitch of the note.
- Attack Velocity: This field shows the velocity of the start of the note as a MIDI value between 0 and 127.
- Release Velocity: This field displays the release velocity of the note as a MIDI value between 0 and 127.
- Enter in the new value in the field corresponding to the attribute you want to change.
Press Return/Enter.
The note changes to match the new attributes.

FIGURE 5-10: The MIDI Event List window shows the values for the selected note.
If you want to change more than one field, press / (the front-slash key) to move between fields.
Editing program data
Because MIDI contains no sound in itself, you can create program change events to change the sound patches of your MIDI sound modules throughout the session. This can keep your computer processing resources optimized as well as keep you from using more tracks than absolutely necessary for your session.
Changing program patches
Program patches are the sounds available in your MIDI device. Here’s how to change program patches:
- From the Track View drop-down menu, set the track to Program Change view.
With the Grabber tool, double-click the program change event you want to change.
The Patch Select dialog box appears.
- In the Patch Select dialog box, select the new patch name/number. (If the patch resides on a different bank as the current patch, select the new bank as well.)
Click Done.
The Patch Select dialog box closes, and the new program is sounded when you play your session.
Moving program change markers
Program change markers are helpful little tools because they tell Pro Tools when to change the sound of your MIDI device while your session plays. To move a program change marker, follow these steps:
- From the Track View drop-down menu, set the track to Program Change view.
- Select the Grabber or the Pencil tool.
- Click and drag the Program Change Marker left or right.
- If you have Grid mode enabled, the program change event moves to the closest grid boundary.
- If you have Spot mode selected, the Spot dialog box opens; there, you can enter a new location for the marker and then click Done.
Changing continuous controller data
When you deal with continuous controller data, you are dealing with Volume, Pan, Pitch Bend, Mono Aftertouch, and MIDI controllers. All this data is represented as a line graph punctuated by a series of breakpoints. You have a choice when you want to make changes: you can edit the line itself using the Pencil tool; or you can edit the breakpoints by using the Grabber, the Pencil, or the Smart tool.
Editing lines with the Pencil tool
To edit the line graph with a Pencil tool, do the following:
- From the Track View drop-down menu, select the track view that corresponds to the parameter you want to edit (Volume, Pan, Pitch Bend, Mono Aftertouch, MIDI Controller).
- Click and hold the Pencil icon, and then select the Pencil tool you want to use from the menu that appears.
Click in the playlist where you want to start drawing and then drag your mouse to draw the new values.
The line is drawn, and breakpoints are inserted according to the resolution you set for the Pencil Tool Resolution When Drawing Controller Data option on the MIDI tab of the Preferences dialog box. (Choose Setup ⇒ Preferences from the main menu to access the Preferences dialog box.)
- Release the mouse button when you reach the end of your edit.
Editing breakpoints
If you’re not adept at drawing lines, you might want to work with breakpoints instead. Here’s how:
- From the Track View drop-down menu, select the track view that corresponds to the parameter you want to edit (Volume, Pan, Pitch Bend, Mono Aftertouch, MIDI Controller).
- Select the Grabber tool.
- Click and drag the breakpoint.
- Release the mouse button.
Scaling breakpoints
When you scale breakpoints, you move a group of breakpoints while retaining the relationship between them. You can use the Trimmer tool to scale breakpoints, as in the following step list:
- From the Track View drop-down menu, select the track view that corresponds to the parameter you want to edit (Volume, Pan, Pitch Bend, Mono Aftertouch, MIDI Controller).
- Select the Selector tool.
With your mouse, click and drag across the breakpoints you want to scale.
The selection becomes highlighted.
 Select the Trimmer tool.
Click and drag the breakpoints up or down.
The breakpoints move as a unit, but they don’t all move the same amount. Rather, they move differently to keep the relationship between the breakpoints intact.- Release your mouse button.
There are other ways to edit continuous controller data in Pro Tools. Check out Book 6, Chapter 6 to find out more.
Using the Smart tool
The Smart tool puts a new spin on three older tools: namely, the Trimmer, Selector, and Grabber tools. Basically, the Smart tool changes how it works depending on what you try to do with it. The following sections detail how this tool behaves when you work with MIDI data.
To use the Smart tool, press the button located above the Selector tool in the Edit window, as shown in Figure 5-11.

FIGURE 5-11: Enable the Smart tool by clicking the button above the Selector tool.
Check out Book 5, Chapter 4 for more details about the Smart tool.
Using the Smart tool in Notes view
When you use the Smart tool with your Track view set to Notes, the tool behaves the following way:
- Placing the cursor so that it doesn’t touch any notes or pressing ⌘ (Mac) or Ctrl (PC) enables the Selector face of the Smart tool. You can then click and drag to make a selection.
- Positioning the cursor near the middle of a note enables the Grabber face of the Smart tool.
- Placing the cursor over the start or end point of a note enables the Trimmer face of the Smart tool.
- To turn the Smart tool into an eraser, make sure the cursor isn’t touching any notes (the Selector appears) and then press Control+Option (Mac) or Windows+Alt (PC).
Using the Smart tool in an Automation or in Controller views
When you use the Smart tool in an Automation view (Volume, Mute, or Pan) or in Controller view, the tool acts the following ways:
- Trimmer: To enable the Trimmer tool, position your cursor in the top quarter of the clip. The Trimmer icon appears. You can move your cursor up and down to change the value or to create breakpoints. If you want finer control of the Trimmer tool while you work, press ⌘ (Mac) or Ctrl (PC) after you begin trimming.
- Selector: To enable the Selector tool, position your cursor in the lower three-quarters of the clip. You can then drag your selection.
- Grabber: To enable the Grabber tool, press ⌘ (Mac) or Ctrl (PC). You can do several things with the Grabber tool with a track set to an automation view:
- Edit existing breakpoints: Position the cursor near one of these points, and the Grabber appears. You can increase the resolution of your movements to fine-control by pressing ⌘ (Mac) or Ctrl (PC) after you start moving the breakpoint.
- Constrain the Grabber vertically: To keep the Grabber from moving right or left, press Shift — or, if you set the tool to fine control, press ⌘ +Shift (Mac) or Ctrl+Shift (PC).
Exploring MIDI Events
The MIDI Event List consists of all the MIDI data in your track. This list displays the location, pitch, velocity, and duration of every note as well as all other parameters for the track. The MIDI Event List window lets you edit all your track’s MIDI data in one place, which makes it one extremely helpful tool in the Pro Tools toolbox. The following sections explain the ways to best use this window to edit your track.
Exploring the MIDI Event List window
The MIDI Event List window, as shown in Figure 5-12, displays MIDI data for a selected track. You can open the window in several different ways:
- Choose Event ⇒ MIDI Event List from the main menu.
- Press Control (Mac) or Windows (PC) while you double-click the MIDI track name in the Edit or Mix window.
- Press Option+= (equal sign; Mac) or Alt+= (equal sign; PC). Pressing this combination again toggles you back to the Edit window.

FIGURE 5-12: Choose Window ⇒ Show MIDI Event List to open the MIDI Event List window.
If you have a selection made within a MIDI track and you open the MIDI Event List window, the selected note or range of notes is highlighted.
The cursor location is marked with an arrow in the MIDI Event List.
Examining MIDI Event menus
The MIDI Event List contains three menus at the top of the window: Track Selector, Options, and Insert. The following list gives you the details on the various menu options:
- Track Selector: This menu shows the track that’s listed in the window and lets you choose a different track to display.
- Options: This menu consists of the following options, as shown in Figure 5-13:
- Show Sub Counter: This option displays the event times in the sub-counter value. (Book 2, Chapter 3 has more on how to use counters.)
- Go To: Choosing this option opens a dialog box in which you enter the location in the session you want to go to.
- Scroll to Edit Selection: This automatically moves the MIDI Event List to the Edit Start or Insertion point for the session.
- Page Scroll During Playback: This option scrolls the MIDI Event List while your session plays.
- Scroll During Edit Selection: This option automatically scrolls the MIDI Event List while you move your edit point in the Edit window.
- Show Note Length: Selecting this option displays the length of the MIDI notes in the MIDI Event List.
- Show Note End Time: This option lets you display the end time of the MIDI notes in the Event List instead of the note length. (Sorry, but you can’t have both.)
- Insert at Edit Location: This option lets you designate that any inserted event is placed at the Edit Start or Insertion point.
- Insert at Playback Location: This option lets you insert notes on the fly while the session plays back.
- Insert at Playback Location with Grid: This option snaps any inserted notes placed on the fly (see the previous bullet) to the nearest grid boundary.
- View Filter: This option opens the MIDI Event List View Filter dialog box, as shown in Figure 5-14. You use this dialog box to specify which fields appear in the MIDI Event List dialog box. This, in turn, affects which events are edited when you use Cut, Copy, and Paste. Any fields that are not displayed in the MIDI Event List aren’t affected by Cut, Copy, and Paste commands. (For more about this dialog box, see Chapter 6 in this mini-book.)
- Insert: The Insert menu consists of the types of events you can insert into the track using the MIDI Event List. This menu is covered in greater detail in the “Inserting MIDI events” section, later in this chapter.
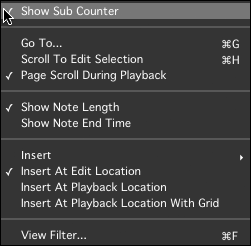
FIGURE 5-13: Use the Options menu to control various areas of display and operation.
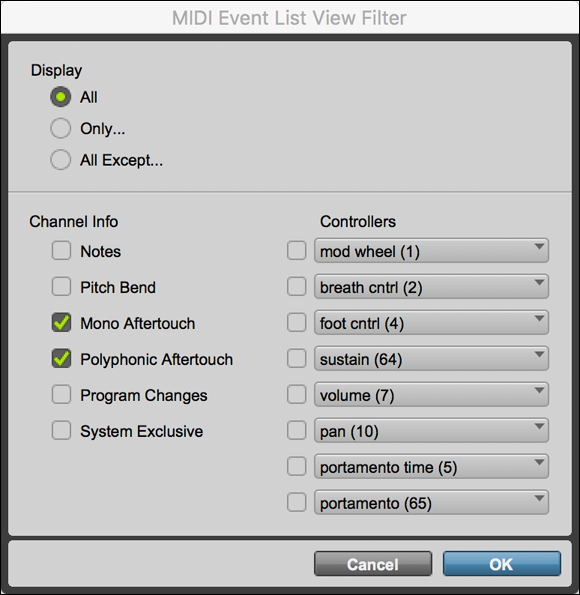
FIGURE 5-14: The View Filter dialog box lets you choose what fields are displayed in the MIDI Event List.
Although it isn’t actually a menu option, the number of Events in your current track is displayed to the right of the three menus listed in this section.
Eyeing the rest of the MIDI Event List
Below the MIDI Event menus (see the preceding section) lies the whole range of possible MIDI events for the track. (Refer to Figure 5-12.) These events are listed in order from the beginning of the session to the end and are listed in three columns. (The “Inserting MIDI events” section, later in this chapter, explores these columns further.)
Start: This column displays the location of the event’s Start point in either the main or sub-counter time format, depending on whether you have the Show Sub Counter option selected in the Options menu. (See the “Examining MIDI Event menus” section, earlier in this chapter.)
If more than one event is located at the same place in the session (like with chords, for example), the location for all but the first event is dimmed. This makes it easier to see these multiple events.To the left of the Start point is an arrow indicating the location of the cursor in the session.
- Event: This column shows the event type (indicated by the icon at the left of the column) as well as its associated values. In the case of notes, you see the note letter and octave as well as its attack and release velocities.
- Length/Info: This column shows the length or end point of the MIDI notes, depending on whether you have the Show Note Length or Show Note End Time option selected under the Options menu. (See the preceding section.)
Getting around the MIDI Event List
Here are several ways to move quickly around the MIDI Event List:
- Double-clicking the event in the list highlights your selection.
- Pressing Tab or the down-arrow key (↓) moves you to the next event.
- Pressing Option+Tab (Mac) or Ctrl+Tab (PC) or the up-arrow key (↑) moves you to the previous event.
- Using the left (←) or right arrow (→) moves you laterally in the event list.
- Pressing Shift while you double-click or pressing Tab/arrow adds events to your selection.
- Choosing Go To from the Options drop-down menu takes you to a specific location in the event list.
- Selecting the Scroll to Edit Selection option under the Options menu lets you go automatically to the beginning of the edit selection.
Editing in the MIDI Event List
Editing in the MIDI Event list isn’t for everyone. Many people prefer the visual format offered by the Edit window, but editing in the MIDI Event List window can be faster and more accurate. This section describes the process of inserting, deleting, and editing MIDI data in the MIDI Events List.
Inserting MIDI events
From the Insert menu, as shown in Figure 5-15, you can insert the following MIDI events into your track:
- Note: Selecting Note lets you enter the start time, pitch, attack velocity, release velocity, and either the end time or duration of the notes.
- Pitch Bend: When you enter pitch-bend information in the Event entry window, you include the start time and the bend amount. Positive values raise the pitch; negative numbers lower it.
- Volume: In the Volume Event entry window, enter the start time, controller number (set to 7 for volume), and the volume level (0–17). The controller name appears in the far-right column.
- Pan: The Pan Event entry window contains fields for start time, controller number (in this case, set to 10), and pan value (negative numbers pan left of center, and positive numbers pan right of center). The controller name (pan) appears in the far-right column.
- Mono Aftertouch: The Mono Aftertouch Event entry window offers fields for the start time and the after-touch level (0 and 127). After-touch is the velocity of the note after the initial attack.
- Poly Aftertouch: The Poly (polyphonic) Aftertouch Event entry window offers fields for the start time, note name, and the after-touch level (0 and 127).
- Program Change: The Program Change Event entry window has fields for the start time, program number, controller 0 value, and controller 32 value. (Controller 0 and controller 32 are for sending program bank change commands. Some MIDI devices use controller 0, others use controller 32, and still others use both. Consult the manual for your MIDI device to determine which controller value it uses.) The program name appears when you choose the program number.
- Controller: This option lets you designate which of the many controller events you want to enter. The event’s entry window for this option includes the start time, controller number, and the controller value. The controller number that you choose determines the controller parameter you change, and this parameter name shows up in the farthest column to the right.
- Another Note: This option enters the data from the previous inserted event into fields.
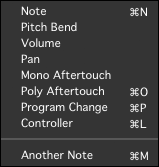
FIGURE 5-15: Insert MIDI events from the Insert menu.
To insert a MIDI note using the MIDI Event List, do the following:
In the MIDI Event List window, choose Note from the Insert menu.
The Note Event entry window opens at the top of the MIDI event list, as shown in Figure 5-16.
- Enter the note in one of the following ways:
- Type its values in the appropriate fields.
- Play the note or operation on your MIDI keyboard.
- Scroll up or down in the fields.
- Insert the note by performing one of these commands:
- Press Return/Enter to close the Event entry window when the event is accepted.
- Press Return/Enter to insert the event and keep the window open.

FIGURE 5-16: The Note Event entry window.
To insert a controller event, do the following:
In the MIDI Event List window, choose the controller event you want to insert from the Insert menu or choose Controller to specify the controller type later.
The Controller event’s entry window opens at the top of the MIDI event list, as shown in Figure 5-17. Unless you select the Controller option, the name for the event appears in the far-right column.
- Enter the value in each of the fields in one of the following ways:
- Type the value into the fields.
- Press the ↑ or ↓ key to scroll the value.
- Drag up or down in the field by pressing ⌘ (Mac) or Ctrl (PC) while you drag.
- Play the controller event on your keyboard.
- Insert the note by performing one of these commands:
- Press Return/Enter to close the Event entry window when the event is accepted.
- Press Return/Enter to insert the event and keep the window open.
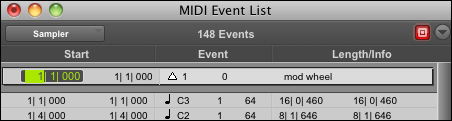
FIGURE 5-17: The Controller Event entry window.
To insert a program change, do the following:
In the MIDI Event List window, choose Program Change from the Insert menu.
The Program Change Event entry window opens at the top of the MIDI event list, as shown in Figure 5-18.
- Enter the start time for the event.
- Enter the program number or click the info column to open the Program Change window.
- Insert the note by performing one of these commands:
- Press Return/Enter to close the Event entry window when the event is accepted.
- Press Return/Enter to insert the event and keep the window open.
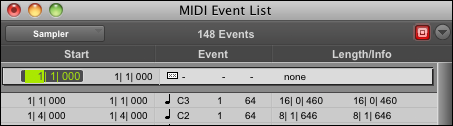
FIGURE 5-18: The Program Change event’s entry window.
Deleting events
You can delete MIDI events one of two ways:
- Press Option (Mac) or Alt (PC) while you click the event with one of the Edit tools located at the top of the Edit window.
- Select the event or events (hold the Shift key while you select more than one event) in the MIDI Event list with one of the Edit tools located at the top of the Edit window and then press Delete (Mac) or Backspace (PC) or choose Edit ⇒ Clear from the main menu.
Changing data
You can edit any MIDI event in the event list several ways, including using the familiar Cut, Copy, and Paste commands. These are covered in this section.
To select events to edit, do one of the following:
- Click the event to highlight it.
- ⌘ -click (Mac) or Ctrl-click (PC) to select several noncontiguous events.
- Shift-click the beginning and end events of a group of contiguous events.
Click and drag across multiple events.
You can remove an event from a selection by pressing ⌘ (Mac) or Ctrl (PC) while clicking it.
To cut or copy events, do the following:
- Select your event as described in the preceding list.
- Choose Edit ⇒ Cut or Edit ⇒ Copy from the main menu to place the event on the Clipboard.
To paste events, do one of the following:
- Click within the track’s playlist where you want the event to go and then press ⌘ +V (Mac) or Ctrl+V (PC) or choose Edit ⇒ Paste from the main menu.
- Choose Go To from the Options menu in the MIDI Event List window, type in the location, and then click OK.
To manually edit an event, do the following:
Double-click in the field you want to edit of the event in the list.
Alternatively, press ⌘ +Enter (in the numberpad section of the keyboard; Mac) or Ctrl+Enter (PC) when you have an event selected.
- Enter the new value in the field you want to edit.
- Insert the note by performing one of these commands:
- Press Return/Enter to close the Event entry window when the event is accepted.
- Press Return/Enter to insert the event and keep the window open.