
Chapter 2
Mastering Your Music
IN THIS CHAPTER
![]() Setting up a mastering session
Setting up a mastering session
![]() Converting your song files
Converting your song files
![]() Processing your production
Processing your production
![]() Sequencing your songs
Sequencing your songs
You’ve done everything else yourself, so why not master your music, too? Well, I hear ya. Even though I’m a firm believer in the magic that a professional mastering engineer can bring to a production — check out the preceding chapter in this mini-book for my take on that — I’m also a do-it-yourself kinda guy. If you’re like me, you at least need to give mastering a shot. After all, you have nothing to lose — except a little time — and everything to gain (or at least learn from).
This chapter walks you through how to master your music in Pro Tools. I offer some general guidelines that you can keep in mind while you work and help get you up to speed on mastering your music yourself. I also show you how to set up your mastering session in Pro Tools.
 The Pro Tools mastering steps given here use the Bounce to Disk function. You don’t necessarily have to go this route. If you want, you can also send your mastered tracks out to a digital device by following the steps in this chapter — and then use the steps that describe mixing to an external digital device (found in Book 6, Chapter 7).
Considering General Guidelines
In other chapters, I present some specific techniques and settings to get you started. Unfortunately, I can’t do that when it comes to mastering because there are just too many variables. That also means too many ways to mess up your music when you’re trying to master it. What I can do (and actually do) in the upcoming sections is walk you through the process of mastering and show you the tools to use for each step. When you’re reading these sections, keep the following in mind:
- Less is more when mastering. Do as little as possible to your music. All you really should need to do when you’re mastering is to optimize the dynamics and tonal balance of each song, get the levels between the songs even, and sequence your songs. If you find yourself doing more — having to make a lot of adjustments, for example — you might want to go back to the mixing process and try again.
- Mastering is all about compromise. Each adjustment you make to your mixed music affects all the instruments. If you use EQ to get rid of muddiness on the bass guitar, you affect not only the bass guitar, but also every other instrument in the mix.
- Don’t try to master a song right after you mix it. Give yourself time and space away from that song before you do anything else to it. In fact, I recommend that you take a few days away from any of the songs on your album between the mixing and mastering stages. A little time to reflect and rest your ears can do wonders for your ability to hear what your music needs.
- You can really master music effectively only if your monitors and monitoring environment are great. Without a good reference for how your music sounds, trying to EQ or dynamically process your music does no good. The music might sound good through your speakers but if they aren’t accurate, it probably doesn’t sound good through other people’s speakers. Before you master, make your room sound as good as you can and get to know the strengths and weaknesses of your monitoring environment by listening to a ton of commercial CDs that have a sound like the one you’re trying to get.
Setting Up a Mastering Session
The first step in mastering your music in Pro Tools is to set up a mastering session. This involves creating a new Pro Tools session and importing the mixed tracks from each song you want on your CD. This section of the chapter details that process.
Start by creating a new session for mastering:
Choose File ⇒ New Session from the main menu.
The New Session dialog box appears, as shown in Figure 2-1.
Type in the name of the file in the Save As field.
I usually call the file
masteringand include the name of the CD project that I’m working on.In the Where field, choose the folder where you want to place the new session.
I usually create a new folder called
mastered mixesso it’s easy to find the files later when I burn them to CD. (Book 8, Chapter 1 has the details on burning CDs.)Choose the session parameters that match the mixed files for your songs.
I’m talking audio file type, sample rate, I/O settings, and bit depth here. Book 1, Chapter 4 has more on the basics of setting up a new session.
Click Save.
Your new session opens.

FIGURE 2-1: Create a new session to master your songs.
 The first time you create a mastering session, save it as a template before you add any audio files (just be sure to have your tracks and routing set up beforehand). This way the next time you’re ready to master any of your music, you can simply choose this template to save some time.
The next step is to import your mixed songs into new tracks for this session:
Choose File ⇒ Import ⇒ Audio from the main menu.
The Import Audio dialog box opens.
- Using the Look In field, navigate through your folder structure to find and select the song file you want to import.
- Click Add.
- Repeat Steps 2 and 3 for all the songs you want to master in this session.
Click Done.
A dialog box opens that allows you to choose whether the files enter a new track or appear in the Regions list.
- Choose the New Track option so that you audio files end up where you can use them right away in your session.
Choose Session Start from the Location drop-down menu.
Each song you selected appears in a new track in your session. You can also find them listed in the Audio Regions list.
You now have a session that contains all the songs for your project. Having them all in one session allows you to switch from one song to the next while you master your tunes and also makes it easy for you to check loudness levels and EQ balancing while you work. (See the “Perfecting Tonal Balance” and “Balancing Levels” sections, later in this chapter.)
Optimizing Dynamics
Okay, this is where the magic in mastering happens. This is where you can make your music shine or where you can royally mess it up. (How’s that for adding a little pressure?) Before you get tense (okay, breathe), remember that you can always go back and try again. Oh, did I mention that you should make backup copies of your individual tracks and your final mix? Well, if you haven’t already done the backing-up business, now would be a good time to do that. I’ll wait.
You done? Okay, now to the job at hand — getting your music to be as loud as possible. (I’m just kidding; see the sidebar “Turn it up!” to see why.) Seriously, optimizing the dynamics of your songs doesn’t mean getting it loud enough to level a city block, but rather getting it to have life and emotion. And, yes, this also means getting it to be loud enough to sound good.
The style of your music and the arrangements that you use determine how you optimize the dynamics of your music. For example, classical music has a much broader dynamic range than rock music, and the infamous “wall of sound” type of arrangement has a narrower dynamic range than a song with sparse verses and thicker choruses.
When you’re optimizing the dynamics of your music, be sensitive to the song and try not to get sucked into the idea that you need to get the most volume out of your music. I know I’m beating this volume thing into the ground, but you’d be surprised how seductive the lure of Big Volume can be. (“C’mon, let’s get just a few more dBs out of the song …” Trust me; you’ll soon find out.)
You have two main types of tools to use when you work on the dynamics during mastering in Pro Tools — compressor plug-ins and limiter plug-ins — and each has its purpose. For the most part, if you’re trying to add punch or smoothness to your music, using a compressor plug-in does the job nicely. On the other hand, if you’re trying to squeeze a little more volume out of a song and you don’t want to change the song’s sound quality, using a limiter plug-in is your best choice.
Here are suggestions that might help you to use compression and limiting most effectively during mastering:
- Use a mild compression ratio (between 1.1:1 and 2:1) to keep from overcompressing your music.
- Apply only 1 or 2 decibels (dB) of compression or limiting at one time. If you need more than that, chain more than one compressor together by inserting more than one compressor plug-in in your track, and use these small amounts on each. If you compress or limit more than 1 or 2 dB at a time, you end up with artifacts (audible changes to your music caused by the compressor or limiter).
- Work with your attack and release times. An attack that’s too short takes the punch out of your music by cutting off the initial transients. Likewise, a release time that’s too long doesn’t recover quickly enough, and the dynamics of the vocal disappear. In contrast, if the release time is too short, you hear distortion.
- Set the threshold so that your compressor’s meters dance (bounce) to the rhythm of the music. The meter you want to watch in your Pro Tools Compressor plug-in is the one labeled Reduction, which is located below the input and output meters. Only the loudest notes (snare drum or lead vocal accents, for example) should trigger the meters — and then only by 1 or 2 dB.
- Using a multiband compressor allows you to bring out individual instruments in the mix. For example, if the bass drum seems to be getting lost, you can apply mild compression to the lower frequencies (around 80–100 Hz). This brings the instrument forward in the mix slightly.
- When you’re not sure whether what you’re doing sounds better, don’t use the processor. Any dynamics processing is going to affect the quality of your song’s sound to some extent. If adding this processing doesn’t improve the overall sound, you’re better off not using it.
You can find out more about compression and limiting in Book 6, Chapter 4.
When you’re testing compressor plug-in or limiter plug-in settings (by comparing the processed and unprocessed versions), be sure to have the volume of both versions exactly the same. Any difference in volume defeats the purpose of side-by-side comparison because people almost always prefer the louder version, regardless of whether it sounds better.
Perfecting Tonal Balance
Tonal balance of a song is how the various frequencies of the music relate to one another. You’re not concerned with how each individual instrument sounds in the mix (that’s the job for the mixing stage); instead, what you’re looking for is an overall balance of frequencies within the hearing spectrum.
For the most part, a tonal balance consists of an even distribution of frequencies from 20–10 kHz with a slight drop-off (1 or 2 dB) from 10–20 kHz or higher. “That’s great,” you say, “but what does that sound like?” Well, listen to any number of great CDs, and you’ll hear it.
When you master your music, you want to constantly compare what your song sounds like against other CDs whose sound you like. In Book 6, Chapter 1, I list a variety of excellent reference music for mixing. This music works just as well for mastering, so check them out.
When you work on adjusting the overall tonal balance of your songs, listen carefully for any frequencies that seem too loud or too soft. You can find these by listening to particular instruments in the mix or by using the parametric EQ plug-in and sweeping the frequency spectrum. To do this, set your Q fairly wide (0.6, for instance) and move the Gain slider all the way the right. Start with the lowest frequency and then slowly raise the frequency as the song plays by moving the Freq slider from left to right. Adjust any annoying frequencies by cutting them by a couple of dBs to see whether your overall mix improves.
As far as general EQ guidelines go, try these suggestions:
- If your mix sounds muddy: Add high frequencies (higher than 10 kHz) or cut low ones (200–400 Hz).
If your mix is too bright: This is common with digital recording. As a remedy, try reducing the frequencies higher than 10 kHz by using a shelf EQ or a Baxandall curve.
 To use a Baxandall curve, use a parametric EQ and set the threshold at 20 kHz with a Q setting around 1. This gradually cuts frequencies above around 10 kHz. You can adjust the Q to reach as far down as you want. Your EQ graph shows you what’s happening. Use the same EQ adjustments for both the right and left channels to keep the stereo balance intact and not alter the relative phase between the channels. For example, if you add some bass frequencies (100 Hz, for example) to the one channel but not the other, you might hear a wavering or a pulsating sound around this frequency go back and forth between the speakers.
- If you used a multiband compressor on any specific frequencies: You might need to adjust the EQ for those frequencies; compression tends to mess with frequency response.
If you need to adjust the EQ of certain instruments in the mix: Suppose that the snare drum is buried. Be careful and notice the overall effect of your adjustments on the rest of the mix. If your adjustments aren’t fixing the problem, go back to the mixing process and make your adjustments there. You’ll be glad you took the time to do that.
Any adjustments you make to the EQ during mastering affect more than just those frequencies. Such adjustments alter the entire frequency spectrum — and the relationship between all the instruments. So listen carefully while you make adjustments and back off on the additional EQ if you don’t like what you hear.
For more specific information on EQ and inserting EQ in your tracks, go to Book 6, Chapter 3.
Some people check the tonal balance of their songs against that of their favorite CDs. You do this by recording a song into your mastering program and taking a look at its frequency response by using a spectral analyzer. Pro Tools doesn’t come with a spectral analyzer, but you can buy one as a third-party plug-in. Just look for an RTAS version to ensure that it works with Pro Tools. Then do an analysis of your song and compare it with the spectral analysis of a CD you like. This technique seems to work for many people (albeit not for me, because I like using my ears instead — alas, I’m old-fashioned).
Balancing Levels
For a truly professional-sounding CD, you want all your songs to be at nearly the same relative level so your listeners (I hope you have more than one) don’t have to adjust the volume on their stereos from song to song.
Balancing the levels of your songs to one another is pretty easy. In fact, in most cases, you have very little to do after you EQ and optimize the dynamics of each song. You balance the levels from one song to the next in Pro Tools by putting each track’s fader up to 0 dB — putting them at the level you mixed them — and then soloing Track 1 and comparing the level with Track 2 by soloing back and forth.
If you use a mouse to mix, getting to this balance can be kinda tricky because you can’t press more than one button at a time. The best way I’ve found to deal with this situation is to follow these steps:
In the Track Controls section of Track 1, click the Solo button to solo the track.
You hear only Track 1 in your monitors.
In the Track Controls section of Track 1, click the Mute button so that both the Solo and Mute buttons for Track 1 are engaged.
Track 1 is silent.
In the Track Controls section of Track 2, quickly click the Solo button.
You now hear Track 2.
To switch back to hearing Track 1, click the Track 2 Solo button (disengage it). Then, as quickly as possible, click the Track 1 Mute button (disengaging the Mute button and engaging the Solo button).
You hear Track 1 again.
You get a short bit of silence when following this procedure, but you can still be able to hear the relative volumes of the two tracks.
Do this procedure for each of the tracks (Track 1 to Track 2, Track 2 to Track 3, and so on) until you check all the tracks in your mastering session.
 If you miss one of the buttons while you’re doing this quick-switch procedure, you might end up with both tracks playing at the same time. This will be very loud because the tracks are summed in the mix bus. To avoid damaging your speakers — or ears — keep your monitoring (speaker) volume down pretty low.
If you notice any differences, just raise (or better yet, lower) the levels until they are all roughly the same. Don’t get too finicky. Some variation from song to song is okay. In fact, minor differences can help to make your CD more interesting to listen to. When you’re balancing levels, just make sure that any differences aren’t enough to make the listener run to his or her stereo or snatch up the remote to adjust the volume. If one or two songs seem much lower in volume than the rest, consider going back to the volume-optimizing stage and raising those songs a bit to make them more consistent with the rest of the songs on the CD. That way, you don’t lower the volume of the entire CD because one or two songs are too quiet.
Mastering Your Mix
After you have all your songs dynamically optimized, EQed, and level-balanced (see the previous sections of this chapter), you’re ready to record your final master. This process is essentially the same as making your final mix, so check out Book 6, Chapter 7 for the steps to do this. You need to do one more thing when mastering, however, which involves getting your songs to the CD format.
Most likely, your session’s songs are recorded at 24 bits, using any number of possible sample rates (44.1, 48, 88.2, or 96 kHz), but your final master should be 16-bit at 44.1 kHz (this is the CD standard — anything else won’t record as an audio CD and player in your CD player; also, most online distribution services prefer CD quality to work from). Making this change can reduce the sound quality of your music if it’s not done right. The following sections detail how to change the sample rate and bit depth as you create a final master version of your music.
If you’re mastering sound for video, you’ll want to keep your music in 24 bits and import it into your video editing software. Your video encoding will alter the audio, but it will do it properly in conjunction with the video.
Making the most of your bits
Getting your music from 24-bit to 16-bit means either dithering or truncating your files. The following sections explain how these processes differ, giving you pointers on which one to use so your music sounds as good as possible.
Dithering
Dithering adds random noise to your music when 8 bits get cut from your pristine 24-bit files. This random noise helps keep the quiet sections of your song (fades-outs, for instance) from sounding grainy when those 8 bits are removed. Several types of dithering are available, each of which produces a slightly different result in a piece of music.
Pro Tools comes with two dithering plug-ins: Dither and POWr Dither. Each plug-in has different noise-shaping options, which use filters to move the random noise to inaudible frequencies. I’m confident that you’ll find at least one of them works well for your music. Figure 2-2 shows these plug-ins.

FIGURE 2-2: Pro Tools comes with two dithering plug-ins: Dither (top) and POWr Dither (bottom).
To dither a song, simply insert one of the two dithering plug-ins into one of the inserts in your master fader, and then follow the steps (as detailed in Book 6, Chapter 7) for mixing your music. The dithering happens automatically while your song is mixed — or, in this case, mastered.
Truncation
Truncation simply cuts off the last 8 bits of information. This option works well for material that doesn’t have quiet sections: for example, hard rock with punchy endings that don’t fade out.
To master your music using truncation, follow the steps in Book 6, Chapter 7 for mixing your song and then choose 16-bit as your Bounce to Disk resolution — or use one of the digital outputs to send your signal out of Pro Tools. Either technique cuts off the last 8 bits without otherwise processing the signal. This is the difference from dithering.
To dither or not to dither (and which dithering option to use)? Those are the questions for which no universal answer exists. The only way to know which sounds better on your music is to try each of them. For the most part, songs with quiet passages and fade-outs often sound better if you dither ’em.
Mastering to 16 bits
When you master — regardless of whether you using the dithering approach — make sure you select the 16-bit option under the Resolution drop-down menu (located in the Bounce dialog box, as shown in Figure 2-3). If you have a dithering plug-in inserted into your Master fader, your music is dithered while it’s being bounced; if you don’t use a dithering plug-in, your music is truncated.
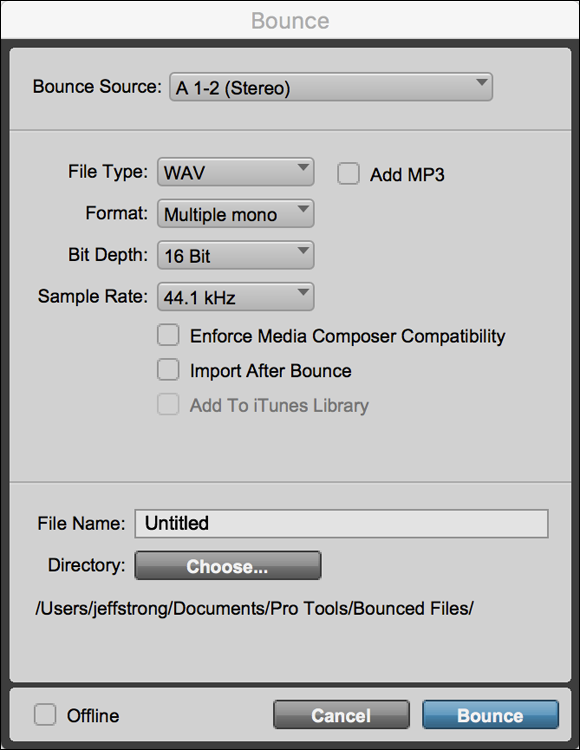
FIGURE 2-3: Choose 16 from the Resolution drop-down menu to bounce to 16 bits.
Settling on a sample rate
If you recorded at any sample rate other than 44.1 kHz, you need to set the bounce sample rate to 44.1 kHz. To accomplish this, simply choose 44.1 kHz in the Sample Rate drop-down menu of the Bounce Menu.
Choosing a bounce mode
Pro Tools lets you choose to bounce in real time or offline (using the check box in the lower left — refer to Figure 2-3). Offline is usually faster than bouncing in real time, depending on the power of your computer. A straightforward five-minute song (one without a ton of tracks or plug-ins) can often be bounced in a minute or less, so the time difference can be significant. The downside to offline bouncing is that you can’t use any external audio sources, such as MIDI-connected synthesizer or drum machines or audio processor like hardware compressors.
Sequencing Your Songs
Sequencing your songs is choosing the order of the songs on the CD as well as the amount of silence between songs. Chances are that when you recorded your songs, you had an idea about the order in which you wanted them to appear on your final CD. If you don’t know how you want to arrange your songs, here are some things to consider:
- Consider each song’s tempo in the sequencing equation. Some CDs work well if songs with a similar tempo are grouped together, and others work best when contrasting songs follow one another.
- Think about a song’s lyrics and how they relate to the lyrics from the other songs on your CD. If you want to tell your listener a story, consider how the order of the songs can best tell that story.
- Think about the chords that you used in each song and how they relate to another song you might want to place before or after it in the sequence. The ending chord of one song might conflict with the beginning chord of another — or lead right in.
For most of us, sequencing has more to do with the actual process of placing each song in its proper place on the CD than with trying to decide where that proper place might actually be.
Most of the sequencing process involves deciding how much time to place between the songs on your CD. No set amount of time has to be placed between songs. Choose what seems right for the two songs you’re working with. Sometimes you might want just a second or two; other times, four or five seconds is more appropriate. For example, if you have a mellow ballad followed by an upbeat song, you might want to leave a little more time between these two songs so that the listener is prepared for the faster song. Try leaving a space that lasts about four to six beats at the slower song’s tempo, for instance. On the other hand, if you want two tunes to flow together, you can leave less time between them. Use your ears, thinking about how you want your listener to respond when the music moves from one song to another.
You don’t sequence your songs in Pro Tools; instead, this is done within the CD-burning program you use. After you bounce your mastered tracks in Pro Tools to 16-bit files with a 44.1 kHz sampling rate, you can then import them into your CD-burning software and arrange them the way you want. This includes arranging the order of the songs and setting the amount of silence between songs. Check out your CD-burning program for specifics on how it handles these operations.