
Chapter 3
Getting into Editing
IN THIS CHAPTER
![]() Working with clips
Working with clips
![]() Using Edit commands
Using Edit commands
![]() Editing clips
Editing clips
![]() Working with looped material
Working with looped material
Pro Tools offers you many options for editing the audio files in your sessions, include cutting file segments, copying them, pasting them, clearing them, basting them, and marinating them. (Okay, maybe not the last two, but you get the point.) You can also edit by trimming segments, moving them, aligning them, locking them, and so on.
In this chapter, you discover the many Edit commands of Pro Tools and you begin to edit clips — the term for audio file segments — using the various Edit functions that Pro Tools is famous for. I also fill you in on creating loops you can use to build your song (if that’s the way you want to work).
Editing Clips
Clips are the defined areas of the track in which you do your editing. Each audio file is represented in your session by a clip (or series of clips). A clip can be the entire file, or it can be bits and pieces of a file. When you edit in Pro Tools, you’re not actually making any changes to the audio file. (Later in this chapter, I explain some exceptions to this.) Instead, you make changes to the way Pro Tools plays those files by editing the clips that represent the file.
For example, if you decide that a track really does sound better without that accordion solo and you cut that section of the clip containing that part, the section isn’t really erased from your hard drive: It’s simply not played back when you listen to your session. This allows you to make a stunning variety of edits without having to worry about ruining your original audio file.
Being able to create, capture, separate, trim, and heal clips is essential to being able to edit in Pro Tools. I explain these procedures in the following sections.
Creating clips
Whenever you record or import an audio file in Pro Tools, you create a clip of that entire file. You can edit that clip. However, after you cut, separate, paste, or perform any other edit to it, you’re creating new clips from the original file. You have several ways to create new clips with which to work, including capturing selections, separating selections, and trimming to a selection. These are all covered in the following sections.
 When you create a new clip, it appears in the track’s playlist — the area next to the Track Controls section of the Edit window that contains the visual representations of the audio files (clips) — as well as in the Audio Clips list, located on the right side of the Edit and the Mix windows.
Using the Capture Clip command
Use the Capture Clip command to create a new clip within an existing one. The new clip is still part of the original clip, but it has its own name. If you want to create a clip that can be moved around separately from the original, use the Separate Clips command, as detailed in the next section. To use the Capture Clip command, follow these steps:
 Choose the Selector tool from the top of the Edit window.
- Click and drag the track’s clip in the playlist section of the Edit window where you want to create a new clip.
- Choose Clip ⇒ Capture from the main menu or press ⌘ +R (Mac) or Ctrl+R (PC).
In the Name Clip dialog box that appears, enter the name of this clip and then click OK.
The new clip is created, and the clip’s name appears in the Audio Clips list menu in the track’s playlist.
Employing the Separate Clips command
If you want to create a clip that can be moved around separately from the original, use the Separate Clips command. Here’s how it’s done:
- Choose the Selector tool from the top of the Edit window.
Click and drag on the track’s clip in the track’s playlist where you want to create a new clip.
 To select more than one track, drag across the desired tracks.
Choose Edit ⇒ Separate Clip from the main menu or press ⌘ +E (Mac) or Ctrl+E (PC).
Here you have three options of where to create the clip:
- At Selection: Choose At Selection to create a new clip with boundaries at the selection start and end points.
- On Grid: Choose On Grid to create a clip according to the current grid resolution.
- At Transients: Chose At Transients to automatically create clip boundaries on detected transients within a selection. The program does this with the same method as when you employ the Tab to Transients feature.
In the Name Clip dialog box that appears, enter the name of this clip and then click OK.
The new clip is created, and its name appears in the Audio Clips list menu. You can now move, copy, cut, or otherwise edit this clip.
If you don’t want to have to type in a name for this new clip, you can use the Pro Tools Auto-Name feature, which automatically gives your new clips such exciting names as kick drum_02. To activate this feature, choose Setup ⇒ Preferences from the main menu, click the Editing tab in the Preferences dialog box when it appears, and then select the Auto-Name Separated Clips check box on that tab.
If you have a bunch of takes that you recorded in succession (when you loop-record, for example) and you want to separate them all at the same place, select the Separate Clip Operates on All Related Takes check box on the Editing tab of the Preferences dialog box. (Choose Setup ⇒ Preferences from the main menu to get to the Preference dialog box.) If you do this, make sure that both the Take Clip Names That Match Track Names and Take Clips Lengths That Match options are also selected on the second Editing tab of Preferences dialog box.
Using the Separation Grabber tool
If you want to separate and move a clip in one step, you can use the Separation Grabber tool, located in the Edit Tools section of the Edit window. You can toggle between the Grabber tool and the Separation Grabber tool by clicking and holding the Grabber button and choosing the Separation option from the pop-up menu that appears, as shown in Figure 3-1.
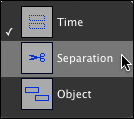
FIGURE 3-1: Toggle the Grabber and Separation Grabber tools.
To use the Separation Grabber tool, follow these steps:
With the Selector tool, drag over the part of the clip you want to separate in the playlist section of the Edit window.
This selection can be across multiple tracks or clips within a single track.
 Click and hold the Grabber tool and choose the Separation option from the pop-up menu that appears.
Click the selection you made in Step 1 and drag the selection to where you want.
Pro Tools automatically creates three new clips: the separated section as well as the parts before and after this section. These three sections all show up in the Audio Clips list menu.
If you want to leave the original clip as it is and grab a section from it to put somewhere else, press Option (Mac) or Alt (PC) when you drag the selection with the Separation Grabber tool. The original clip remains intact, and your selection is simply copied and moved.
Trying the Trim to Selection command
Use the Trim to Selection command to choose a section of a clip and remove the unselected parts of that clip. Follow these steps to trim unwanted parts from a selection:
- Choose the area you want to keep by selecting it in the track’s playlist with the Selector tool.
Press ⌘ +T (Mac) or Ctrl+T (PC) or choose Edit ⇒ Trim Clip ⇒ To Selection from the main menu, as shown in Figure 3-2.
The unselected parts of the clip disappear.

FIGURE 3-2: Use the Trim to Selection command to get rid of unselected parts of a clip.
Healing clips
Use the Heal Separations command to recombine clips that you separated. Here are some restrictions to this process:
- You can’t heal clips that come from different audio files.
- Your clips must be in the same places they were when you separated them.
To heal two clips, follow these steps:
- Using the Selector tool, select a portion of both clips along with the spot to be healed, as shown in Figure 3-3.
Choose Edit ⇒ Heal Separation from the main menu or press ⌘ +H (Mac) or Ctrl+H (PC).
Your two clips become one again.

FIGURE 3-3: Select the area you want to heal.
If the selection doesn’t heal (because one clip has been moved, for instance), you can use one of the following remedies:
- Find what’s hidden. This procedure expands the clip to include hidden material. In this case, the hidden material is the stuff from the deleted clip.
- Choose Slip Edit mode (from the Edit mode options at the top-left portion of the Edit window).
- Delete one of the two clips.
- With the Trimmer tool, expand the existing clip to its original size. (See the “Trimming clips” section, later in this chapter, for more on the Trimmer tool.)
- Delete both clips and drag the original clip into the track from the Audio Clips list. Chapter 1 in this mini-book has more on this procedure.
Placing clips in tracks
All the clips for your session are located in the Audio Clips list; you can use this list to drag a clip (or clips) into any track.
Placing a clip in a track
Follow these steps to place a clip in a track:
Select the clip you want to place in a track by highlighting it in the Audio Clips list.
The Audio Clips list is located on the right side of the Edit and the Mix windows.
- Click the clip’s name and drag it into the track where you want it.
Depending on the Edit mode that you select (from the options located at the upper-left corner of the Edit window), your clip is placed in one of several possible ways:
- In Shuffle mode: Placing a clip while in Shuffle mode slides existing clips to make room for the one you’re placing. This places clips end to end: They touch one another automatically.
- In Spot mode: Placing a clip while in Spot mode opens a dialog box where you can enter the position of the clip you’re placing. This mode allows you to place a clip at a precise point.
- In Slip mode: Placing a clip while in Slip mode lets you drag the clip anywhere you want within the track’s playlist, allowing you to overlap another clip or be separated from it.
- In Grid mode: Placing a clip in Grid mode places the clip to the nearest grid boundary. Pro Tools lets you temporarily disable the grid by pressing ⌘ (Mac) or Ctrl (PC) while you drag your selected clip into a track.
You can adjust the grid value for your session by opening the Grid Value drop-down menu, as shown in Figure 3-4. (To open this menu, click and hold the arrow to the right of the Grid title in the center of the Edit menu, right below the Edit tools.)

FIGURE 3-4: Use the Grid Value drop-down menu to choose the grid value of your session.
Placing a clip at the Edit Insert point
You can designate an Edit Insert point by clicking your cursor within a track in the playlist section of the Edit window; you can then place your clip right at this point. You can have either the clip’s start or end point snap to the Edit Insert point.
To designate an Edit Insert point, start by locating your cursor at the place in the track where you want the clip placed, as shown in Figure 3-5. Then, depending on where you want your clip to end up, do one of the following:
- To place the start of a clip at the Edit Insert point: Press Control (Mac) or Windows (PC) while you drag the clip from the Audio Clips list to the track.
- If the clip is already in the track and you want to move it: Press Control (Mac) or Windows (PC) while dragging with the Grabber tool.
- To place the end of a clip at the Edit Insert point: Press ⌘ +Control (Mac) or Ctrl+Windows (PC) while you drag the clip from the Audio Clips list to the track.
- If the clip already resides in the track: Press ⌘ +Control (Mac) or Ctrl+Windows (PC) while dragging with the Grabber tool.
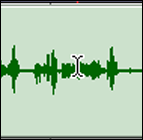
FIGURE 3-5: Click a clip to identify the Edit Insert point.
Using clip synch points
A synch point is a specific location in your session where you can have clips align. This lets you place a specific point in the clip (the synch point) precisely where you want without regard to the placements of start or end points of that clip. You can assign a clip synch point in Pro Tools anywhere within the session. This feature is helpful when you want to place a sound at a precise point in the session, like when you’re spotting (positioning) sound effects for video. With a synch point, you first mark the location sound effect that you want to place (breaking glass, for instance) in the clip with this sound and then place that clip where you want the glass to start breaking in your session. This makes it easy to spot that sound even when the sound doesn’t begin at the start point of a clip.
Creating a synch point
To define a clip’s synch point, follow these steps:
- With the Selector tool, click within a track where you want your synch point to be.
Choose Clip ⇒ Identify Synch Point from the main menu, as shown in Figure 3-6, or press ⌘ +, (comma; Mac) or Ctrl+, (comma; PC).
A small arrow appears at the bottom of the clip, as shown in Figure 3-7, to show you where you placed the synch point.

FIGURE 3-6: Define a synch point from the Edit menu.

FIGURE 3-7: An arrow at the bottom shows where the synch point is.
You can remove the synch point by choosing Clip ⇒ Remove Synch Point from the main menu.
Each clip can have only one synch point at a time. To change the location of this synch point, simply select a new place in the clip and choose Clip ⇒ Identify Synch Point again from the main menu. The old synch point is removed, and a new one appears at the new location.
Placing a clip’s synch point at an Edit Insert point
After you have a synch point defined, you can use it to place or align a clip within your track’s playlist. To place the synch point of the clip to the Edit Insert point in the track’s playlist, do the following:
- With the Selector tool, click a point in the target clip to define your Edit Insert point.
Press Shift+Control (Mac) or Shift+ Windows (PC) while dragging the clip you want to insert — the one containing the synch point you added, following the procedure outlined in the previous step list — from the Audio Clips list into the track.
The clip’s synch point snaps to the selected position in the track’s playlist.
or
If the clip with the synch point already resides within the track, switch to the Grabber tool and then press Shift+Control (Mac) or Shift+Windows (PC) while clicking the clip.
The clip’s synch point snaps to the selected position in the track’s playlist.
Aligning clips
Pro Tools lets you align the start, end, or synch point of clips to the start point of another clip. This can be helpful for arranging clips in songs to get synchronized playback.
Aligning a start point of a clip with the start point of a clip on another track
To align a start point of a clip with the start point of a clip on another track, follow these steps:
- With the Grabber tool, click the clip in the playlist of the track you want to align to.
If the clip you want to move already exists in the playlist of the track from Step 1, press Control (Mac) or Windows (PC) and then click the clip you want to move.
The clip automatically moves into position.
or
If the clip you want to move resides in the Audio Clips list, press Control (Mac) or Windows (PC) and then click and drag the clip onto the track’s playlist.
Both start points are aligned.
Aligning the end point of a clip with the start point of a clip on a different track
To align the end point of a clip with the start point of a clip on a different track, follow these steps:
- With the Grabber tool, click the clip you want to align to in the track’s playlist.
If the clip you want to move is located in the playlist of the track from Step 1, press ⌘ +Control (Mac) or Ctrl+ Windows (PC) and then click the clip.
The clip automatically moves into position.
or
If this clip isn’t already in the track’s playlist, press ⌘ +Control (Mac) or Ctrl+Windows (PC) and click and drag the clip you want to move from the Audio Clips list onto the playlist.
The end point of the clip you moved is aligned to the start point of the first clip you chose.
Aligning a clip’s synch point with the start point of another track’s clip
To align the synch point of a clip with the start point of a clip on a different track, follow these steps:
- With the Grabber tool, click the clip you want to align to in the track’s playlist.
If the clip you want to move is located in the playlist of the track from Step 1, press Shift+Control (Mac) or Shift+Windows (PC) while clicking with the Grabber tool on the clip.
The clip automatically moves into position.
or
If the clip doesn’t already exist within the track’s playlist, you can place and align a clip from the Audio Clips list by pressing Shift+Control (Mac) or Shift+Windows (PC) while clicking and dragging the clip from the Audio Clips list.
The synch point of the second clip aligns to the start point of the first, as shown in Figure 3-8.

FIGURE 3-8: You can align the synch point from one clip to the start point of another.
Trimming clips
![]() You can trim clips by using the Trimmer tool, choosing Edit ⇒ Trim Clip from the main menu, or nudging the start or end point of a clip. The Trimmer tool, as shown here in the margin, consists of two options: the Standard Trimmer and the Time Trimmer. These trimming options are detailed in the following sections.
You can trim clips by using the Trimmer tool, choosing Edit ⇒ Trim Clip from the main menu, or nudging the start or end point of a clip. The Trimmer tool, as shown here in the margin, consists of two options: the Standard Trimmer and the Time Trimmer. These trimming options are detailed in the following sections.
Using the Standard Trimmer tool
Use the Standard Trimmer tool to shorten or lengthen (to the maximum length of the parent audio file, anyway) a clip without altering the original file. Whenever you trim a clip, a new clip is created in the Audio Clips list.
To trim a clip with the Standard Trimmer tool, first call up the tool by clicking the Trimmer Tool button. Then do one of the following:
- Place the cursor near the start or end point of a clip and drag the clip’s start or end point to shorten or lengthen, as shown in Figure 3-9.
Place your cursor where you want to trim the clip and click with your mouse, as shown in Figure 3-10.
The clip is trimmed to the start point or the end point, depending on where you place the cursor. If the cursor is located closer to the start point, you trim the start point; conversely, if the cursor is closer to the end point, you trim the end point. You can reverse the default here by pressing Option (Mac) or Alt (PC) while you trim.
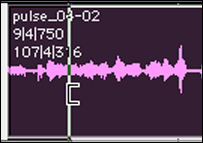
FIGURE 3-9: To trim or expand a clip, drag with the Trimmer tool.
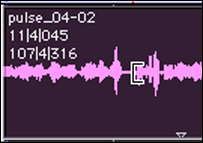
FIGURE 3-10: To trim a clip, click the Trim point with the Trimmer tool.
You can tell which way the trim is going to happen by the direction of the cursor. Figure 3-11 shows the cursor as it is set to trim the start point (left) and the end point (right).

FIGURE 3-11: Trimming the start point (left) or the end point (right).
The Trimmer tools (both the Standard Trimmer and the Time Trimmer) behave differently depending on the Edit mode you’re using. Here’s a quick rundown of the differences:
- Shuffle mode: In this mode, any adjacent clips slide over while you expand or trim the clip.
- Spot mode: In this mode, the Spot dialog box appears, prompting you to type in the exact placement of the clip’s start or end point.
- Grid mode: In this mode, any trimming or expanding that you do automatically snaps to the nearest grid boundary.
- Slip mode: In this mode, your clip moves to wherever you place it. Any other clips in the playlist remain where they are.
If you want to return the clip to its original size, you can
- Drag the original clip from the Audio Clips list to the track’s playlist.
- Drag the start or end point of the clip with the Trimmer tool to its original length.
Tackling the Time Trimmer tool
![]() Use the Time Trimmer tool, as shown here in the margin, to expand or compress a clip by using the Time Compression/Expansion (TC/E) plug-in to create a new audio file. Using the Time Trimmer is different from using the Standard Trimmer: Instead of cutting off part of the file when you trim, the Time Trimmer tool shortens how long the clip takes to play.
Use the Time Trimmer tool, as shown here in the margin, to expand or compress a clip by using the Time Compression/Expansion (TC/E) plug-in to create a new audio file. Using the Time Trimmer is different from using the Standard Trimmer: Instead of cutting off part of the file when you trim, the Time Trimmer tool shortens how long the clip takes to play.
 When you use the Time Trimmer tool to expand or compress a clip, it alters the speed at which the clip plays — and this alters how the material in the clip sounds. Compressing speeds up the clip; expanding slows it down.
To use the Time Trimmer tool, call it up by clicking and holding over the Trimmer tool button and then dragging down to select the Time Trimmer option. Then do one of the following:
- Place the cursor near the start or end point of a clip and drag the clip’s start or end point to shorten or lengthen the clip. (Refer to Figure 3-9.)
Place your cursor where you want to expand or contract the clip and click with your mouse. (Refer to Figure 3-10.)
The start or end point of the clip moves out or in depending on which way the Time Trimmer Tool cursor is facing. (See upcoming Figure 3-12.)

FIGURE 3-12: Now you see it (left), now you don’t (right): the Trim to Selection command.
The Edit mode you use determines how the Time Trimmer tool behaves and how the clips surrounding the trim react. Check out the previous section for a rundown of the different ways that the Edit modes work with the trim tools.
To return the clip to its original length, follow these steps:
- Drag the original clip from the Audio Clips list to the track’s playlist.
- Choose Edit ⇒ Undo from the main menu (assuming this was the last operation you performed).
Taking advantage of the Trim command
You can trim clips using the Trim command located in the Edit menu. (Refer to Figure 3-2.) The menu gives you three options:
- Trim to Selection: Using this command removes all the clip except the part you selected, as shown in Figure 3-12. To do this trim, select the part of the clip that you want to keep and then choose this command.
- Trim Start to Insertion: This command trims the clip from the start point to the Edit Insert point designated by your cursor, as shown in Figure 3-13. To perform this trim, start by placing your cursor where you want to trim to and then choose this command.
- Trim End to Insertion: Using this command removes that part of the clip from the Edit Insert point to the end point of the clip, as shown in Figure 3-14. Doing this trim is as simple as placing your cursor at the desired place in the clip and then choosing the command from the Edit menu.

FIGURE 3-13: The Trim Start to Insertion command.

FIGURE 3-14: The Trim End to Insertion command.
Using the Nudge function to trim a clip
You can trim or expand the start or end points of a clip using the plus (+) and minus (–) keys on the number pad section of your keyboard. (To see how to set the Nudge value, go to the next section, “Moving clips.”)
Here’s how to trim the start point by using the Nudge function:
- With the Grabber tool, select a clip.
Press Option (Mac) or Alt (PC) along with the plus (+) key to trim or the minus (–) key to expand the start point.
Each time you press the key, you move the boundary of the clip by the Nudge value.
To trim the end point with the Nudge function:
- With the Grabber tool, select a clip.
Press ⌘ (Mac) or Ctrl (PC) along with the plus (+) key to expand or the minus (–) key to trim the end point.
Each time you press the key, you move the boundary of the clip by the Nudge value.
Moving clips
You can move (that is, slide) clips in a session either within a track or across tracks. You can nudge them, shift them, and — depending on the Edit mode you’re using — move them to precisely where you want them. This section details the many ways you can move clips.
Before you do any moving, however, keep two things in mind:
- You can make a copy of a clip you want to slide by pressing Option (Mac) or Alt (PC) while you slide it. This keeps the original in its place.
- When you move a clip from one track to another, you can keep its start point from changing by pressing Control (Mac) or Windows (PC) while you slide it. This lets you move clips from track to track without losing (ahem) track of its position in the session.
Nudging
If you want to move a clip only a little bit, simply nudge it. With the Nudge function, you can set the Nudge value to be as fine or as coarse as you like.
To set the Nudge value, click and hold the arrow to the right of the Nudge title located just beneath the Counters in the Edit window to open the Nudge Value drop-down menu. Then select the scale and value you want, as shown in Figure 3-15. You can choose Bars:Beats, Min:Sec, or Samples for your Nudge scale. The values you choose depend on this scale. You can also choose to follow the main time scale for the session by selecting that option at the bottom of the dialog box.
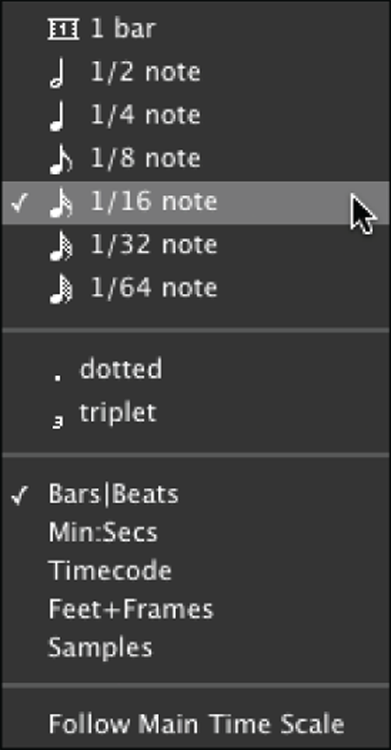
FIGURE 3-15: Set the Nudge value from the Nudge drop-down menu.
To actually nudge a clip or multiple clips, do the following:
With the Grabber tool, select the clip or clips that you want to move.
Select the Grabber by clicking its icon in the upper part of the Edit window.To select more than one clip, press the Shift key while you grab each clip.
Press the plus (+) key or minus (–) key in the numerical section of your keyboard to move it right or left, respectively.
Each press of the key moves the clip over by the Nudge value.
If you want to move the clip over faster and still use the Nudge function, you can have Pro Tools move the clip by the next higher Nudge value than the one you chose. For example, if you have the Nudge value set for quarter notes, you can nudge by half notes. Here’s the drill:
- With the Grabber tool, select the clip(s) you want to nudge.
Press Control (Mac) or Windows (PC) as well as the slash key (/) to move the material forward (right) or the M key to nudge it back (left).
 You can skip using the Control (Mac) or Windows (PC) keys if you have the Commands Focus button enabled.
You can nudge the contents within a clip without moving its start or end points. This lets you keep the clip you have as well as its start and end points while changing which material from the clip’s parent audio file is contained within the clip’s boundaries.
- With the Grabber tool, select the clip you want to nudge.
Press Control (Mac) or Windows (PC) and the plus (+) key to move the clip’s content to the right and minus (–) key to move the contents to the left.
The clip stays put, and the audio from the original file moves within it, as shown in Figure 3-16.
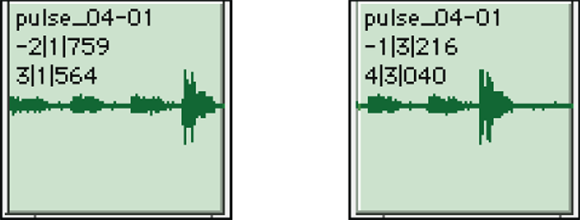
FIGURE 3-16: Nudging a clip moves the audio file within the clip.
This process works only if audio information is located outside the current clip’s boundaries.
Shifting clips
Use the Pro Tools Shift command to move clips by a specified amount. This is very handy when compensating for latency, such as with the Mbox or with some plug-ins.
To shift clips via the Shift command, follow these steps:
Select a clip, using either the Grabber or the Selector tool.
You can select clips from more than one track. (Check out Book 5, Chapter 2 for details on how to do this.)
Choose Edit ⇒ Shift from the main menu.
The Shift dialog box appears, as shown in Figure 3-17.
Enter the Shift value in the Shift dialog box as well as whether you want to shift the clip earlier or later.
This value can be in whatever time format you want: bars and beats, minutes and seconds, or samples.
Click OK.
The clip shifts by the amount you specify in Step 3.
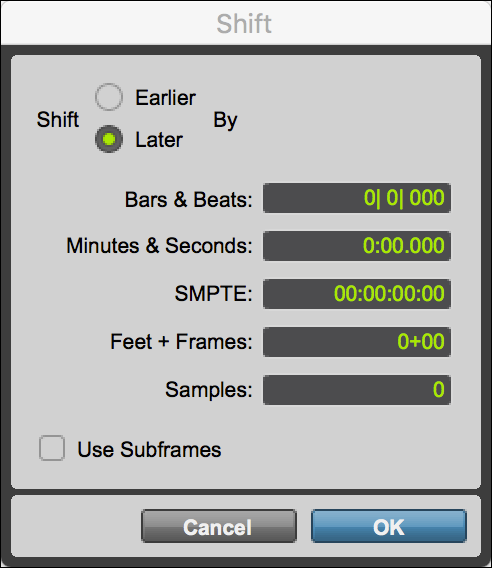
FIGURE 3-17: Shift a clip by a specific amount.
The Edit mode you’re in has no effect on how the Shift command works. Your clip moves over by the specified amount regardless of whether any other clips are present on that spot.
Moving with Edit modes
When you move or slide clips around in sessions, each Edit mode treats the clips differently. In this section, I describe how these modes work. (You select your Edit mode by clicking the corresponding mode name in the upper-left side of the Edit window.)
- Shuffle mode: You can shuffle clips by selecting the Shuffle Edit mode. This mode lets you shuffle the clips in a track around, but they always snap to one another — start point to end point.
Slip mode: In Slip Edit mode, you can move clips around at will. You can have space between them and have them overlap.
If you place a clip in a track using Slip mode and then switch to Shuffle mode, that clip stays where it is while you shuffle other clips in the track. These other clips might end up overlapping the slipped clip, or you might end up with empty space between them.- Spot mode: In Spot mode, whenever you select a clip or part of a clip, the Spot dialog box opens, prompting you to enter your destination location.
- Grid mode: In Grid mode, your clips snap to the nearest grid boundary when you move them around. Grid mode offers you two options:
- Absolute: Whenever you move a clip in Absolute mode, the start point moves to the nearest grid boundary.
- Relative: When you move a clip in Relative mode, it moves by grid increments (the square units of the grid). This allows you to move a clip around while keeping its start point at the same position relative to a grid boundary.
For example, if you have a clip that starts on the last sixteenth note of a beat and your grid value is set for quarter notes, here’s what the move looks like: Each time you move the clip by one grid increment, the clip moves by the value of one quarter note — but it stays at the last sixteenth note of the beat. This is handy for moving around drum rhythms.
You can change the grid resolution by opening the Grid drop-down menu — refer to Figure 3-4 — and choosing the grid scale and value. You open this menu by clicking and holding the arrow to the right of the Grid title situated under the Edit tools at the upper end of the Edit window.
You can show the grid in the Edit menu by clicking the Timebase ruler icon, located at the top of the Timebase ruler section of the Edit window. This grid is labeled with whatever time format you chose for your main counter. You can also select the Draw Grid in Edit Window option, on the Display tab of the Preferences dialog box, to show the grid. (Choose Setup ⇒ Preferences from the main menu to call up the Preferences dialog box.)
Locking clips
You can lock clips in place after you put them where you want them. This keeps you from accidentally moving or deleting them when you work with other clips in the session. To lock a clip, do the following:
With the Grabber tool, select one or more clips.
To select multiple clips on different tracks, press and hold the Shift key while you click each clip.Choose Clip ⇒ Edit Lock/Unlock from the main menu.
A small closed-lock icon appears at the lower-left corner of the clip, as shown in Figure 3-18.
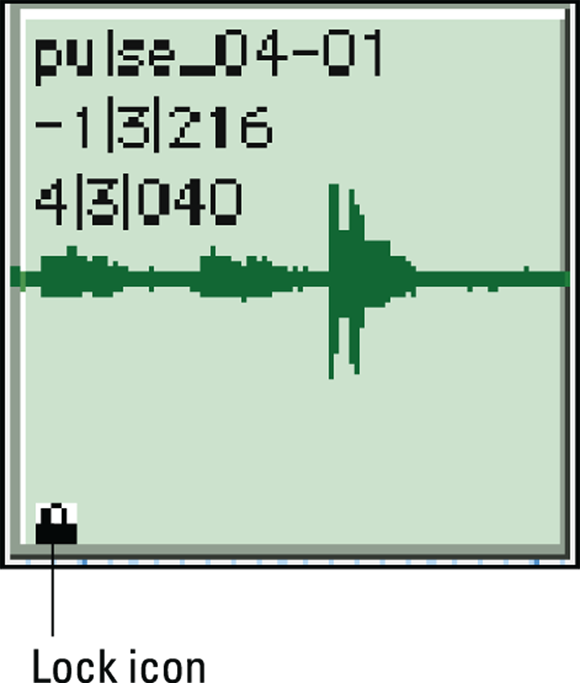
FIGURE 3-18: A small lock icon indicates a locked clip.
To unlock a clip, select the clip and choose Clip ⇒ Edit Lock/Unlock from the main menu.
In effect, because they won’t move, any clip after the locked clip is also locked when you’re in Shuffle mode. Also, in this mode, you can’t place a clip in front of the locked one if it’s longer than the space available for it.
Quantizing clips
Quantizing clips in Pro Tools involves snapping a clip’s start or synch point (if you have one defined) to the nearest grid boundary. It’s a way to align clips, which is handy for working with drum and percussion parts because you can arrange them and then quantize them to make them fit the groove of the song. To quantize a clip, follow these steps:
Set the grid value that you want in the Grid Value drop-down menu.
You open this menu by clicking and holding the arrow to the right of the Grid title, located just beneath the Edit tool sections at the top of the Edit window.
With the Grabber tool, select the clip you want to quantize.
Selecting part of a clip quantizes the entire clip because this command moves the start point (and the rest of the clip with it).
Choose Clip ⇒ Quantize to Grid from the main menu, as shown in Figure 3-19, or press ⌘ +0 (zero; Mac) or Ctrl+0 (zero; PC).
The clip’s start or synch point moves to the nearest grid boundary.

FIGURE 3-19: The Quantize Clips command moves the start or synch point of a clip to the nearest grid boundary.
Muting/unmuting clips
You can mute clips or parts of clips. This gives you more flexibility than muting an entire track. To mute a clip, do the following:
- Select a clip or a portion of one.
- To select the entire clip: Use the Grabber tool and click anywhere on that clip within the track’s playlist.
- To select a portion of a clip: Use the Selector tool and drag across the clip in the track’s playlist.
Press ⌘ +M (Mac) or Ctrl+M (PC) or choose Edit ⇒ Mute/Unmute Clips from the main menu.
When muted, the clip appears dimmed in the playlist, as shown in Figure 3-20.
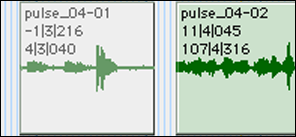
FIGURE 3-20: Muted clips are dimmed in the playlist.
To unmute a clip, follow these steps:
With the Grabber tool, select the muted clip or portion of the clip.
You select the Grabber tool by clicking the Grabber tool button at the top of the Edit window.
Choose Edit ⇒ Mute/Unmute Clips from the main menu or press ⌘ +M (Mac) or Ctrl+M (PC).
What was muted is now unmuted.
Splitting stereo tracks
When you work with stereo tracks, you usually work with both sides of the stereo file at once. If you want to edit one or another of the stereo channels independently, the first step toward doing so is splitting the stereo track into two mono tracks.
You split a stereo track into two mono tracks by following these steps:
Click the track in the Edit or Mix window with the Grabber tool to select the track you want to split, as shown in the upper part of Figure 3-21.
If you want to split more than one track, Shift-click the rest of the tracks.
Choose Track ⇒ Split into Mono from the main menu.
The tracks are split and renamed automatically, as shown at the bottom of Figure 3-21.
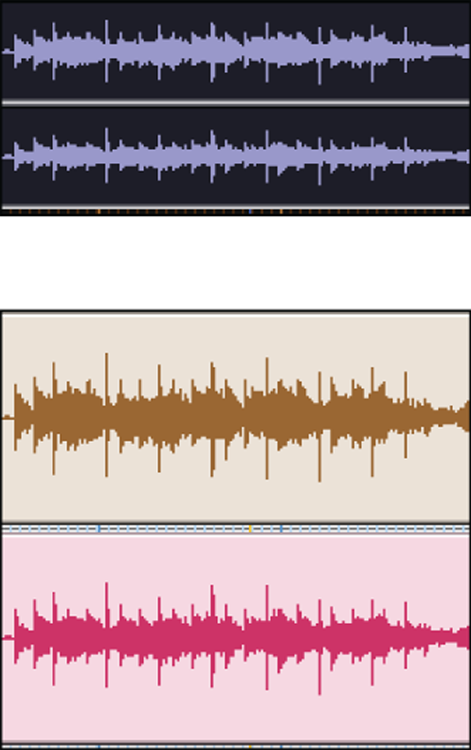
FIGURE 3-21: A stereo track (top) can be split into two mono tracks (bottom).
Examining Edit Commands
If you’ve worked with any word processing program, you’re probably familiar with Edit commands, such as cut, copy, clear, duplicate, and paste. Pro Tools, being the super-editor of audio it is, offers a few more: repeat and merge-paste. All these Edit commands are detailed in the following sections.
The view that you choose for a track affects the kinds of edits you can make using the commands in this section. If you have the Waveform view open, for example, any edit you do affects all the parameters for that track — including automation data. Comparatively, if you have one of the Automation Parameters views open, that parameter is the only one affected by the edit.
Each Edit mode treats the material in the track differently when you use the Edit commands in this section. For instance, when you use Shuffle mode, clips slide over to make room for a pasted clip (or to close the gap left from a cut clip). Likewise, in Slip mode, existing clips stay put, no matter whether a space is left after cutting or if clips overlap from pasting.
Using the Cut command
Like in most programs that have a Cut command, any selection that you cut is removed from the track and placed in the Clipboard, from which you can paste it somewhere else. Here’s how to cut a clip or selection:
Click and hold the Track View selector (located in the Track Controls section of the Edit window) and drag down the list to choose the track view you want.
This determines what data is cut from the track. (See the Remember icon just under the “Examining Edit Commands” section heading.)
Select the clip or part of the clip you want to cut.
To select the entire clip, use the Grabber tool and click anywhere on that clip within the track’s playlist. To select a portion of a clip, use the Selector tool and drag across the clip in the track’s playlist.
Press ⌘ +X (Mac) or Ctrl+X (PC) or choose Edit ⇒ Cut from the main menu.
The selection is placed on the Clipboard.
If you select only part of a clip to cut, Pro Tools creates new clips, basing them on the new clip arrangement for the track. For example, if you choose a part of a clip within the entire clip, you end up with three new clips listed in the Audio Clips list:
- The portion to the left of the selection
- The cut selection that no longer resides in the track’s playlist and now sits on the Clipboard instead
- The material to the right of the cut selection
Using the Copy command
The Copy command in Pro Tools functions just like it does in any computer software Copy function: The selected material is copied to the Clipboard. To copy a selection, follow these steps:
Click and hold the Track View selector (located in the Track Controls section of the Edit window) and drag down the list to choose the track view you want to edit.
This determines the data that is cut from the track. (See the Remember icon just under the “Examining Edit Commands” section heading.)
Select the clip or part of the clip you want to copy.
To select the entire clip, use the Grabber tool and click anywhere on that clip within the track’s playlist. To select a portion of a clip, use the Selector tool and drag across the clip in the track’s playlist.
Choose Edit ⇒ Copy from the main menu or press ⌘ +C (Mac) or Ctrl+C (PC).
The selection is placed on the Clipboard. And, if you’re not dealing with the entire clip, a new clip corresponding to your selection is created in the Audio Clips list.
Clearing selections
In Pro Tools, using the Clear command removes the selected material from a track without putting it in the Clipboard and without adding a clip to the Audio Clips list corresponding to the selection you cleared. To clear a selection, do the following:
Choose the Waveform Track view if you want to clear all the data from the selection (or choose the Automation Parameters view if you only want to clear data from that parameter). To select a track view, click and hold the track view selector (located in the Track Controls section of the Edit window) and drag down the list.
This determines the data that is cut from the track. (See the Remember icon just under the “Examining Edit Commands” section heading.)
Select the clip or part of the clip you want to copy.
To select the entire clip, use the Grabber tool and click anywhere on that clip within the track’s playlist. To select a portion of a clip, use the Selector tool and drag across the clip in the track’s playlist.
Choose Edit ⇒ Clear from the main menu or press ⌘ +B (Mac) or Ctrl+B (PC).
The selection is cleared from your session.
If you clear only part of the clip, Pro Tools creates new clips from the remaining material in the clip.
Performing a paste
When you paste a selection, the pasted material comes from the Clipboard, the result of a Copy or a Cut command. To paste a selection, do the following:
With the Selector tool, place your cursor where you want to paste the material in the appropriate track.
If you want the selection to be right at the start or end point of a clip, you can move the cursor to the right or left to put it there:
- Press Tab to move the cursor to the right.
- Press Option+Tab (Mac) or Ctrl+Tab (PC) to move the cursor to the left.
Press ⌘ +V (Mac) or Ctrl+V (PC) or choose Edit ⇒ Paste from the main menu.
The material on the Clipboard is placed at the selection point.
If you paste a selection at an Edit Insert point (putting the cursor at a single point) in Shuffle mode, the material to the right of the cursor slides over to the end of the pasted section. If you paste into a selected section of the track, the pasted material replaces the selected material.
Using the Duplicate command
Using the Duplicate command in Pro Tools is essentially the same as copying and then pasting the start point of the selection right after the end point of the copied section. Duplicate makes quick work of creating loops. To duplicate a selection:
Select the clip or part of the clip you want to duplicate.
To select the entire clip, use the Grabber tool and click anywhere on that clip within the track’s playlist. To select a portion of a clip, use the Selector tool and drag across the clip in the track’s playlist.
Choose Edit ⇒ Duplicate from the main menu or press ⌘ +D (Mac) or Ctrl+D (PC).
The selection is copied and pasted at the End point.
If you want to construct loops, make sure that you set the main time scale of your session to Bars:Beats. Also, use the Selector tool to drag your selection; or if you’d rather type in a specific value, type in the number of bars or beats in the start and end points in the Event Edit area. This ensures that your selection is duplicated and placed in the proper time location. Using the Grabber tool might result in the material moving by a few samples in one direction or another.
Performing a repeat
If you want to duplicate a selection more than once (when creating looped sections, for instance), you can use the Repeat command. The Repeat command works the same way as the Duplicate command except that when you choose Edit ⇒ Repeat from the main menu (or press Option+R, Mac or Alt+R, PC), the Repeat dialog box opens, as shown in Figure 3-22, where you can enter the number of times you want to repeat the Paste part of the procedure.
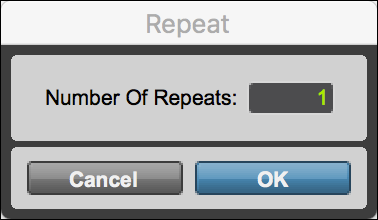
FIGURE 3-22: Specify how many times you want the selection to repeat.
Each repeated selection is placed immediately after the previous one.
Exploring Elastic Audio
Chances are, at some point, you’ll have a track that works well overall but has a few timing issues. Rather than re-record and hope for a better take, you can fix the timing of your note using Elastic Audio (of course, you can also re-record just the section you want to fix with a punch recording; check out Book 3, Chapter 5). This section introduces you to the Elastic Audio process and shows you how to fix the timing of an audio performance.
Enabling Elastic Audio
Before you can use Elastic Audio, you must enable it in each track you want to work with. Follow these steps:
Choose the Elastic Audio algorithm appropriate for your material from the Elastic Audio Plug-in Selector pop-up menu located at the bottom of the track.
You have four options, as shown in Figure 3-23:
- Polyphonic: Polyphonic is for material that has harmonic content, such as rhythm guitar or keyboards, playing chords.
- Rhythmic: Rhythmic is ideal for drums and percussion instruments, as well as other highly percussive parts.
- Monophonic: Monophonic is your choice for bass or lead guitar or any other instrument playing single notes.
- Varispeed: Varispeed is used when you want to change the speed of the track for special effects.
Choose Real-Time or Rendered processing from the Elastic Audio Plug-in Selector pop-up menu.
The default is Real-Time. This is the option you want to use while you’re working on your track. Real-time processing requires processing power. After you’re done adjusting your track, you may want to switch to Rendered to free up the resources for other tasks. You can always switch back to Real-Time if you want to make other changes. When Real-Time processing is chosen, you’ll see a green dot to the right of your Elastic Audio algorithm selection (see Figure 3-24).

FIGURE 3-23: Choose the Elastic Audio processing algorithm most like your material.
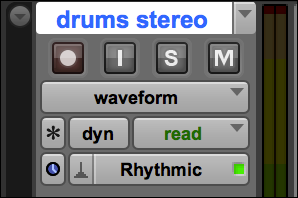
FIGURE 3-24: Real-time processing is indicated with the green light.
Viewing Elastic Audio events
There are two views that you can have of your Elastic Audio events in a track: Analysis and Warp. You can find them in the track view pop-up menu (see Figure 3-25). Both views show you the detected event markers for your material and let you add subtract or move them, but each has it benefits:
- Analysis view: Analysis view is ideal for when you have material that doesn’t have clear transients for the automatic detection of events. In this view, you can easily add or edit the events so you can then apply Elastic Audio processing.
- Warp view: Warp view is the view I recommend you begin with. You can easily warp and time-adjust your audio from this view.
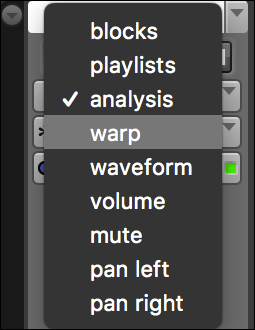
FIGURE 3-25: You can view Elastic Audio events two ways in your tracks: Warp and Analysis.
Quantizing audio tracks
There are a number of ways you can adjust the timing of an audio track in Pro Tools, but the easiest (not to mention, most easily reversible) way to do this is with the Elastic Audio Quantize feature. Here is how it’s done:
- Enable Elastic Audio on your track by choosing the algorithm from the Elastic Audio pop-up menu that most closely matches your material.
- Choose Real-Time processing if it’s not already chosen.
- Select Warp View from the Track view selector pop-up menu.
Take a look at the event markers that are detected for your track and adjust any that are not where you want them.
There won’t be anything to adjust unless your material doesn’t have clear transients, such as with legato passages of polyphonic instruments.Select Waveform View from the Track view pop-up menu and select the material you want to edit with one of the selection tools.
For more on selecting material, check out Book 5, Chapter 1.
- Choose Event ⇒ Event Operations ⇒ Quantize from the main menu or pressOption+0 (Mac) or Alt+0 (PC) to open the Quantize menu, as shown in Figure 3-26.
- Select a note value appropriate for your material from the Grid pop-up menu.
- Click Apply to apply the quantization to your track.

FIGURE 3-26: The Event Operation Quantize menu lets you adjust the timing of selected material.
Elastic Audio is nondestructive so if you don’t like what you see, you can undo it, adjust the quantize value, and redo as often as you like.