
Chapter 3
Choosing and Setting Up Your Hardware
IN THIS CHAPTER
![]() Exploring audio interface options
Exploring audio interface options
![]() Checking out the Eleven Rack
Checking out the Eleven Rack
![]() Connecting your audio interface
Connecting your audio interface
With the release of Pro Tools 9 software in 2010, you no longer needed to have an Avid (actually, Digidesign because that was its name at the time) audio interface to use the program. This was a huge change for Pro Tools — and one that put it on par with all the other audio-recording programs out there. Avid also changed (pared down) its interface options, making it easier to choose one. By 2014, Avid shook up Pro Tools again by discontinuing all of its host-based audio interfaces used for Pro Tools and Pro Tools | First except the Eleven Rack guitar interface and processor. Many of Avid’s native interfaces (used for Pro Tools | Ultimate) are still available, though they’re changing, too. For the latest on what Avid offers, go to www.avid.com/pro-tools-ultimate/hardware.
 Not only has Avid stopped selling its host-based audio interfaces (and many native ones as well), but it has been systematically ending support for these interfaces after five years. At the time of this writing (Spring 2018), all but a very few discontinued interfaces are supported. This means that, even if you find a used Avid interface, it may not work with Pro Tools for long. For a comprehensive list of Avid audio hardware, availability, and end of support dates go to
 http://avid.force.com/pkb/articles/en_US/FAQ/End-of-support-dates.
The good news is that there is no shortage of high-quality audio interfaces that you can use with Pro Tools. This is also the bad news because you truly do have a lot of choices — so many that it may be hard to decide. In this chapter, I describe what to look for in an audio interface; give an overview of third-party (but related) interfaces; introduce you to Avid’s last hardware option, the Eleven Rack; and walk you through the simple setup process.
Examining Audio Interface Specifications
You can use any Core Audio (Mac) or ASIO (Windows) audio interface with Pro Tools and Pro Tools | First. Your choice will come down to how many and what type of inputs and outputs you want and the interface type your computer has (see Book 1, Chapters 1 and 2 for details about interface connection types). This section explores these specs.
Throughout this chapter, I describe a lot of connector types. Some of these may be familiar to you, and others may seem a bit like rocket science. (What is an S/PDIF, anyway, and will it blow up if you plug it in?) If you start getting a little dizzy from all these new terms, check out Book 2, Chapter 1, where I explain all types of analog and digital connectors in detail.
Despite the differences between the various audio interfaces, they share many things, including
- Analog inputs: Analog inputs allow you to plug your guitar, keyboard, or other instruments into your interface. You can find audio interfaces with as few as two and as many as eight analog inputs.
- Analog outputs: Analog outputs allow you to connect speakers or an external mixer to your audio interface. Unless you want to mix with an external analog mixer, you only need two analog outputs.
- Preamps:Preamps boost the signal from microphones so that you can record them directly into Pro Tools. You need at least one, though most audio interfaces have two or more. When choosing an audio interface, remember that you can use external preamps and plug them into an analog input if you want more (or a different sound) than a particular interface offers. I discuss preamps in detail in Book 1, Chapter 1.
- Phantom power:Phantom power is a small current (48 volts, written 48V) that’s sent from your interface to your microphone (through the mic cable) and is necessary for your condenser microphone to work. Phantom power is available only on your preamp channels and can be toggled on and off.
- S/PDIF: Use a Sony/Philips Digital Interface Format (S/PDIF) connector to plug an external converter into your interface, allowing you to bypass the analog-to-digital (A/D) or digital-to-analog (D/A) conversion process. Some people prefer this if they have separate converters whose sound they prefer over the ones contained in the interface.
- ADAT Lightpipe: The ADAT Lightpipe connectors, also known as ADAT optical, allow up to eight channels of digital information coming and going through your device. As with S/PDIF, this allows you to bypass the conversion process in your interface. ADAT Lightpipe is useful if you have an external digital mixer and you want to mix with that.
BNC wordclock: This is a special type of connector for sending and receiving wordclock signals. (BNC stands for Bayonet Neil-Concelman, for the dude who created it. It’s essentially a cable connector. A wordclock is the digital clock used to calculate the sample rate for your audio.) Use this connector to send and receive wordclock data to synchronize your digital hardware, which is necessary only if you have a bunch of digital devices connected. For example, if you have separate A/D or D/A converters connected to your audio interface, you may want to connect them via the BNC wordclock to ensure that they all operate from the same digital clock to help optimize the sound of each unit.
You can also send and receive wordclock data via the S/PDIF connection, but this limits your optical jack input and output options to S/PDIF. This disengages ADAT optical and you lose the eight inputs and outputs that would be available through them.
Exploring Some Popular Audio Interfaces
As I mention earlier in this chapter, there is no shortage of audio interfaces that will work with Pro Tools software. This means that you may have a tough time narrowing your choices. In this section, I help you do exactly that. Here, I show the three audio interface brands that Avid has worked with over the years and give you a list of places you can look further for your interface.
Your budget, as well as the number of inputs and outputs and the interface format (USB, PCI, Thunderbolt), will be the most important determinants in which audio interface you choose. All the interfaces listed in this section work with Pro Tools and give you everything you need to make great recordings.
Apogee
Recently, Avid partnered with Apogee to offer two interfaces: the Pro Tools | Duet and Pro Tools | Quartet. Though they are no longer officially associated with Avid, you can still get them directly through Apogee. They’re both excellent-sounding devices using USB 2.0. Here is what they offer:
- Duet: The Duet has two analog inputs with preamps and phantom power, two analog ¼-inch outputs, one headphone output, and a MIDI in/out connection. There are no digital S/PDIF or Optical ADAT inputs or outputs.
- Quartet: The Quartet has four analog inputs with preamps and phantom power, six analog ¼-inch outputs, one headphone output, Optical input/output for either ADAT (eight channels) or S/PDIF (two channels). It also contains MIDI in/out and BNC wordclock connections.
Focusrite Scarlett
Focusrite designed the Mbox, one of Avid’s first and most popular USB interfaces. The Mbox series has been discontinued, but Focusrite has continued working closely with Avid. In fact, the Focusrite Scarlett series is the only third-party interface officially approved for use with Pro Tools. This series connects via USB 2.0 and includes
- Solo: The solo includes two analog inputs (one with a preamp and phantom power and one without), two analog 1⁄8-inch RCA outputs, and one headphone output.
- 2i2: The 2i2 has two analog inputs with preamps and phantom power, two analog ¼-inch RCA outputs, and one headphone output.
- 2i4: The 2i4 has two analog inputs with preamps and phantom power, two analog ¼-inch outputs, four analog ¼-inch RCA outputs, one headphone output, and MIDI in/out.
- 6i6: The 6i6 has four analog inputs (two with preamps and phantom power), four analog ¼-inch outputs, two headphone outputs, two channels of S/PDIF, and MIDI in/out.
- 18i8: The 18i8 has eight analog inputs (four with preamps and phantom power), two analog ¼-inch outputs, two headphone outputs, eight channels of ADAT optical, two channels of S/PDIF, and MIDI in/out.
- 18i20: The 18i20 has eight analog inputs with preamps and phantom power, ten analog ¼-inch outputs, two headphone outputs, eight channels of ADAT optical, two channels of S/PDIF, BNC wordclock, and MIDI in/out.
M-Audio
In 2005, Avid (then called Digidesign) bought the audio company M-Audio and developed a version of Pro Tools specifically for the M-audio interfaces. It also developed an upgrade path to a more comprehensive version of Pro Tools using these devices. This relationship ended in 2011 when Avid sold off M-Audio, while simultaneously opening Pro Tools to third-party audio interfaces with the release of version 9. Given that I’ve been listing audio interface makers who have a history working closely with Avid, here are M-Audio interfaces (USB 2.0) that you can successfully use with Pro Tools:
- M-Track 2x2: The M-Track 2x2 has two analog inputs (one with a preamp and phantom power), two analog ¼-inch outputs, and one headphone output.
- M-Track 2x2M: The M-Track 2x2M has four analog inputs including two with preamps and phantom power (only two inputs can be at one time), two analog ¼-inch outputs, one headphone output, and MIDI in/out.
- M-Track Eight: The M-Track Eight has eight analog inputs with preamps and phantom power, eight analog ¼-inch outputs, and two headphone outputs.
By my last count, more than 50 brands make audio interfaces that run either Core Audio (Mac) or ASIO (Windows). All these should work fine with Pro Tools. Do an Internet search for “audio interface for Pro tools” or go to dealers like the following to find a device that fits your budget and input/output needs:
- Sweetwater (
www.sweetwater.com) - Musician’s Friend (
www.musiciansfriend.com) - Guitar Center (
www.guitarcenter.com) - B&H Photo (
www.bhphotovideo.com) - Sam Ash (
www.samash.com) - Amazon (
www.amazon.com)
Exploring Avid’s Eleven Rack
The makers of Pro Tools only offer one host-based interface, the Eleven Rack. Built for guitarists, the Eleven Rack is both a recording interface and a standalone live unit. This interface has a limited number of inputs and outputs, but it makes up for this deficit by including serious power for guitar-amp modeling and effects (see Figure 3-1). This section lays it all out for you.
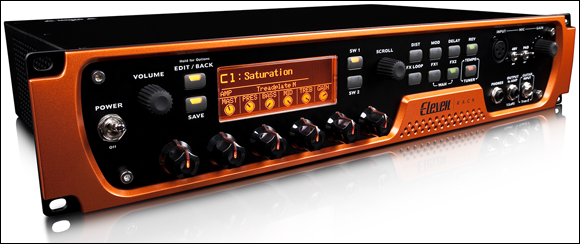
FIGURE 3-1: The Eleven Rack is USB interface designed for guitar players.
 You may want to stick with the standard rate for CD audio: 44.1 kHz.
Discovering the Eleven Rack input and outputs
The Eleven Rack has the following input and output configurations:
- XLR analog input: This input includes a preamp and phantom power for your microphone.
- Analog inputs: You get two ¼-inch analog inputs for your instruments.
- Analog outputs: There are two XLR outputs and two ¼-inch outputs for connecting to an amplifier.
- FX Sends and Returns: The Eleven Rack comes with two ¼-inch sends/returns to be able to connect an external effects unit.
- Alt In: These alternate input jacks are handy for connecting a CD player or tape deck and listening to it without having to turn on the software or listening to reference CDs from an external player while you mix.
- Digital In and Out channels: These channels comprise two channels of AES-EBU digital and two channels of S/PDIF coax (RCA), which you use to send and receive up to four simultaneous digital channels to and from the Eleven Rack. This is handy if you have external A/D and D/A converters.
- Headphone jack: You get one headphone jack.
- MIDI In and Out: The Eleven Rack has one MIDI In port and one MIDI Out port.
- Footswitch input: You can connect a footswitch to control the transport of Pro Tools, which can be handy when recording yourself — you can start and stop the session hands-free.
Connecting your gear to an Eleven Rack
Connecting audio and MIDI gear is much the same process for the Eleven Rack as for the Mbox Pro, with just minor variations on inputs and outputs. Here’s a rundown of them all:
- Volume dial: This dial controls the volume of both the headphone and main outputs for the Eleven Rack.
- Power Switch: As you may guess, this turns the Eleven Rack on and off. Expect it to take a few seconds to boot up after you hit the switch. Also, make sure that you have volume down or monitors off when you turn this puppy on, lest you hear a big pop.
- Mic Input: Use this input to connect a microphone or other instrument that utilizes an XLR connector. This input is controlled by the Gain dial on the front of the unit. With this input you have three parameters to adjust:
- Gain: This set the volume level of your input signal. You set this in conjunction with the level meter in Pro Tools software for the channel you have it routed to.
- 48v: This switch turns phantom power on and off for your mic.
- Pad: Engaging this switch drops your input level by some unstated amount (10–20dB is typical but Avid doesn’t say). This is handy for very hot (loud) microphone signals.
- Guitar Input: This is where you plug in your guitar. Avid calls this a “True Z” input because it has a variable-impedance circuit that accommodates a range of instruments such as electric and acoustic-pickup-appointed guitars, electric basses, and electric pianos. This circuit adjusts dynamically; all you need to do is plug in your instrument and start playing.
- Footswitch: Labeled Foot SW, use this jack to connect a footswitch or an expression pedal to control a host of parameters such as Wah, volume, and effects and patch settings.
- USB: This is where you connect your USB cable to go to your computer.
- Main Outputs: The mains out have a ¼-inch TRS jack (stereo) and XLR left and right jacks. These are for connecting to an amp or powered speakers. These outputs don’t have a volume control. The channel faders of your session control the signal level going to these outputs. If you want to be able to adjust the volume to a set of speakers, you need a mixer or an external volume controller.
- FX Loop: The FX Loop is for you to connect external effect units. You can use a TRS insert cable or separate TS cables (the TRS cable connects to the left/stereo jacks). There is also a “grid” switch that lifts the ground to reduce hum if line noise is a problem.
- AES/EBU: Here you can connect your professional-level digital devices by using an AES/EBU connection. This jack can either pass two channels’ data at a bit depth of up to 24 bits at 96 kHz.
- S/PDIF: Here you can connect your digital devices with a coaxial cable (RCA). This S/PDIF connection is enabled whenever you have cords connected to these jacks and when you don’t have the Optical jacks assigned for S/PDIF signals. There are no controls you have to worry about in the front.
- MIDI: You can connect your MIDI keyboard, MIDI controller, or other device to these. MIDI In is connected to the MIDI Out of your device, and MIDI Out goes to the MIDI In of the other device. There are no controls to worry about on the front panel for MIDI.
- Headphones: The ¼-inch jack on the front of the unit is where you plug in your headphones.
After you have all your gear connected, you can get started recording. I recommend that you finish Book 2 first if you haven’t used Pro Tools before. This will give you a solid foundation so you can work efficiently.
Examining Eleven Rack’s guitar-processing features
The features that make the Eleven Rack special are amp modeling and effects processing. This section gives you an overview of the various buttons and dials that control this power. (I don’t go into details about all the effects and modeling that are included. Check out the manual or noodle around to see all that you can do.)
- Edit/Back Button: Click this button to gain access to the setting for your guitar rigs (Avid’s name for your saved settings for processing and modeling). When you’re in the Rig view, you use this button to go back to a previous screen. You can also hold this button in for a few seconds to enter the user-options mode so you can tweak your settings at will. Here are the controls:
- Save Button: This saves your new settings.
- SW1 and SW2 Buttons: These buttons allow you to access a variety of menus and functions in the edit views. When a switch is active, it will be lit.
- Scroll: The scroll wheel makes windows and the sections easy to scroll through in the edit views.
- Control Button: These buttons (located above the Eleven Rack logo) toggle the associated effect on and off, and provide access to additional controls for the effect (simply push and hold).
- Tap Tempo/Tuner Button: This button lets you set the tempo for an effect (just tap quarter notes) or access the internal guitar tuner (press and hold for a second).
- Control Dials: You can use these knobs to access various controls for the amp and effects. You’ll quickly notice that these dials glow in different colors, depending on their function:
- Unlit: When a dial is unlit, it’s not actively assigned to any setting. As you may have guessed, turning it does nothing.
- Amber: This dial is currently assigned to an amp, cab, or FX-loop parameter.
- Green: In this case, the dial controls an effects parameter.
- Red: This tells you that the setting for this dial has changed from the saved setting. You can adjust it until it turns amber or green again to get back to the saved setting — or you can hit the Save button to save it. Once saved it will turn back to amber or green.
Connecting Your Audio Interface
Regardless of which interface you choose to connect with Pro Tools, the setup procedure is the same. This section lays out the process.
Connecting to a Windows computer
Follow these steps to hook up your interface:
With your computer turned on, plug a cord into the appropriate port in the audio interface and the other end of the cord into an associated port in your computer.
The port can be USB, Thunderbolt, or PCI. If you’re using USB, don’t use a USB hub. Instead, connect directly into your computer. This keeps your signal from being interrupted by having too much data trying to get through one USB cord.
 If the New Hardware Wizard opens, leave it alone. Don’t click Next — just leave it open and untouched. If the wizard starts to install anything automatically, click Cancel.
Install the software for your device and restart your computer according to the procedures that I describe in Chapter 4 of this mini-book.
You’re ready to open your Pro Tools software and get started. Check out Book 2, Chapter 4 to get familiar with Pro Tools windows.
Be sure to complete all the system setup procedures listed in Chapter 2 of this mini-book. This ensures that your system runs smoothly.
Connecting to a Macintosh computer
To hook up your interface to a Mac, simply follow these steps:
Install the software that comes with the audio interface and restart your computer.
See Chapter 2 of this mini-book for the details of this process.
With your computer turned on, plug a cord into the appropriate port in the audio interface and the other end of the cord into an associated port in your computer.
The port can be USB, Thunderbolt, or PCI. If you are using USB, don’t use a USB hub. Instead, connect directly to your computer. This keeps your signal from being interrupted by having too much data trying to get through one USB cord.
You’re ready to open your Pro Tools software and get started. Check out Book 2, Chapter 4 to get familiar with Pro Tools windows.
Be sure to complete all the system setup procedures listed in Chapter 2 of this mini-book to ensure that your system runs smoothly.