
Chapter 6
Automating Your Mix
IN THIS CHAPTER
![]() Understanding automation
Understanding automation
![]() Writing automation
Writing automation
![]() Editing automation
Editing automation
![]() Playing automated tracks
Playing automated tracks
You likely won’t have a session without a single change in level, pan, EQ, or plug-in parameters somewhere in the song. Unless you have an external mixer or control surface, you’re stuck making these changes with your mouse. The problem with all this mouse-intensive work is that you can’t move more than one fader, panning knob, or plug-in setting at a time. To be honest, the only way you can really mix within Pro Tools is by using some kind of automation feature, which Pro Tools just happens to have in spades. In fact, Pro Tools has a quite powerful automation engine that allows you to control a variety of mix parameters.
Don’t like how the guitar in the second verse sits in the mix? No problem. Just fix your automation data and mix it again. You can even save multiple versions of these settings so you can create as many mixes as you want. (Be careful here, though: When asked, most mix engineers say that they finish a mix only when they run out of time or money to keep trying things.)
This chapter gets you going on mixing the newfangled way: automatically. Well, not exactly automatically — you still need to program these mixing settings, but I show you how to do that. In this chapter, I lead you through automating the various aspects of your song — volume levels, mute and panning placement, EQ, and plug-in settings. In addition, you discover how to change your automation settings and also how to play the automation data back so you’re ready to do your final mix.
Understanding Automation
You can automate a variety of parameters in Pro Tools. Each parameter has a playlist that contains its automation data. You can write this data one parameter (or more) at a time, and you can display and edit the data even while playing the session. This section describes the parameters you can automate in audio, auxiliary, Master fader, instrument, and MIDI tracks.
Audio tracks
You can automate the following parameters in your audio tracks:
- Volume: Use this parameter to control the overall volume of the track.
- Pan: Use this to set the left/right balance of the track in the stereo field.
- Mute: This allows you to turn the track on and off.
- Send: This parameter includes volume, mute, and panning settings for the send, which is the routing section that lets you send part of your track’s signal to an effect.
- Plug-ins: You adjust these parameters within the Plug-In window.
Automation data for each of these parameters resides in a playlist that’s separate from the clips that contain your edits for that track. This allows you to move the clips in and out of the track’s playlist without changing the automation data for that track.
Auxiliary input tracks
You can automate the following parameters when you’re working with auxiliary input tracks:
- Volume: Use this parameter to set the overall volume of your Aux track.
- Pan: You can place your tracks anywhere from left to right in the stereo field.
- Mute: Use this to turn the track on and off.
Instrument tracks
You can automate the following parameters when you’re working with instrument tracks:
- Volume: Use this parameter to set the overall volume of the track.
- Pan: Use this to set the left/right balance of the track in the stereo field.
- Mute: This allows you to turn the track on and off.
Master fader tracks
You can automate only Volume on Master fader tracks. It sets the overall volume of the MIDI data.
MIDI tracks
You can automate the following parameters when you’re working with MIDI tracks:
- Volume: Use this parameter to set the overall volume of the MIDI data.
- Pan: You can place your tracks anywhere from left to right in the stereo field.
- Mute: This allows you to turn the track on and off.
- Controller data: This includes a number of MIDI settings, including options such as the modulation wheel, breath controller, and sustain.
Pro Tools stores the automation data for any MIDI track — with the exception of Mute settings — within the MIDI clip for that track. When you move a clip within a track’s playlist, the automation data (except for any Mute settings) moves along with the clip.
Accessing Automation Modes
Pro Tools offers five automation modes: Auto Off, Auto Read, Auto Write, Auto Touch, and Auto Latch. You access these modes by clicking the Automation Mode selector in the channel strip of each track in the Mix window or in the Track Controls section of the Edit window, as shown in Figure 6-1. Each mode affects how Pro Tools writes or plays back automation data for a track — which I cover in this section.
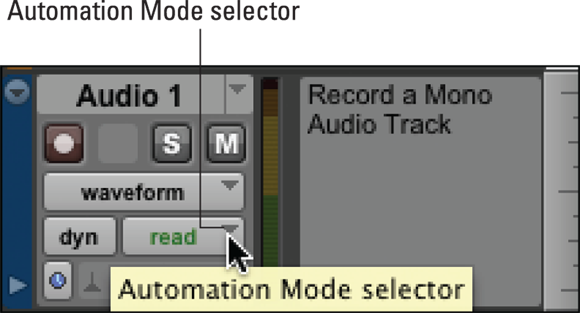
FIGURE 6-1: Access the five Pro Tools automation modes here.
Now for the particulars. Here’s what each mode actually does:
- Auto Off: This mode turns off all automation data for the selected track.
- Auto Read: This mode plays back the automation data for the selected track.
- Auto Write: This mode writes automation data for the selected parameter(s) while the session plays, thus overwriting any pre-existing automation data in the process. When you stop playback after writing automation in this mode, Pro Tools automatically switches the automation mode to Auto Touch (see the next bullet) so you don’t accidentally erase this data next time you play back the session.
Auto Touch: Auto Touch mode writes automation data only when you click a parameter with your mouse; it stops writing when you release the mouse button. (See the upcoming Remember icon for control-surface behavior in this mode.) At this point, your automated parameter returns to any previously automated position, according to the time that you set for AutoMatch on the Mixing tab of the Preferences dialog box. (See the “Setting Automation Preferences” section, later in this chapter, for more on the Preferences dialog box.) With Auto Touch, you can fix parts of your previously recorded automation data without erasing what you want to keep.
 Auto Touch engages differently, depending on the control surface you use. If you have touch-sensitive faders (like those on the Artist Mix), new automation data is written as soon as you touch a fader. If your control surface doesn’t sport touch-sensitive faders, Auto Touch mode won’t engage until you move a fader past the position it occupied in the previously written automation data (the pass-through point). After you hit that point, automation data is written until you stop moving the fader.
- Auto Latch: This mode works much like Auto Touch (see the previous bullet). After you touch or move a parameter, new automation data is written. The difference is that Auto Latch mode continues to write new automation data until you stop playback.
Setting Automation Preferences
Pro Tools writes and plays back automation data differently, depending on the preferences that you select. You set these preferences by opening the Preferences dialog box — choose Setup ⇒ Preferences from the main menu to get there — and then clicking the Mixing tab (as shown in Figure 6-2).
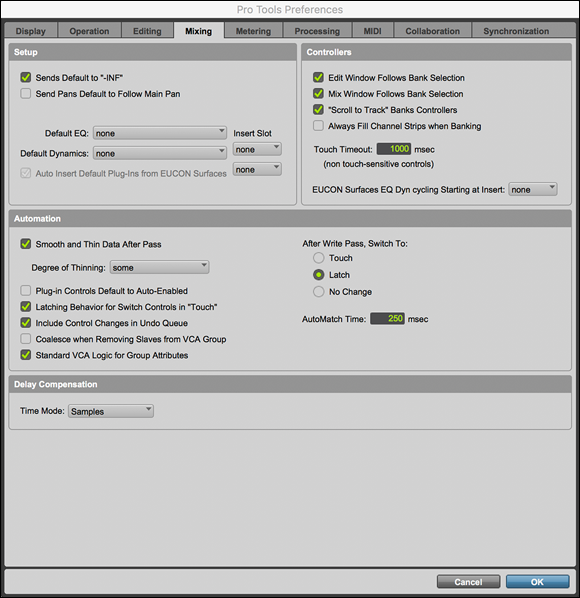
FIGURE 6-2: Use the Mixing tab in the Preferences dialog box to determine how automation behaves in Pro Tools.
The preferences in the Automation section are where you specify how automation behaves in Pro Tools:
- Smooth and Thin Data After Pass: Selecting this check box tells Pro Tools to automatically smooth (even out the rough spots) and thin automation data after you record your moves. (See the “Thinning Automation” section, later in this chapter, for more on thinning.) This can make your automation curves more manageable and also free memory for your automation data. (See the last bullet item in this section.)
- Degree of Thinning: From this drop-down menu, you determine the amount of thinning applied to automation data when you select the Smooth and Thin Data After Pass check box — or whenever you use the Thin Automation command. (See the “Thinning Automation” section, later in this chapter, for more about this command.)
- Plug-in Controls Default to Auto-Enabled: Selecting this option puts all new plug-ins in Auto-Enabled mode when you choose to write automation data.
- Latching Behavior for Switch Controls in “Touch”: Selecting this check box makes switched controls (such as mute or a plug-in bypass) latch to their existing state unless a breakpoint is encountered — in which case, the automation writing stops. If you stop your session while writing, the switch control automatically matches the underlying value.
- Include Control Changes in Undo Queue: With this check box selected, any changes to certain mixer controller data, such as a Fader level or Pan dial, are put in the Undo line-up along with any other operations to do. This means that if you choose to undo any prior operation, your control changes will be undone as well.
- Coalesce When Removing Slaves from VCA Group: By selecting this option, automation data for VCA slave tracks are automatically coalesced if you remove a track from the group. If you leave the box unchecked, you’ll be asked if you want to coalesce the data if you remove a slave track from the group.
- Standard VCA Logic for Group Attributes: Selecting this option for Main Volume, Mute, Solo, Record Enable, and Input Monitoring on slave tracks follows your settings for the VCA master. Deselecting this option allows you to link these functions with a group independent of the VCA master setting.
- AutoMatch Time: Use this setting to control the amount of time it takes for Pro Tools to return to written automation data when you stop recording new data in Auto Touch mode.
- After Write Pass, Switch To: Here, choose the automation mode that your session switches to after you record some automation data. You can choose between Touch, Latch, and No Change (maintaining the same mode you were in when you recorded your automation).
Enabling Automation
You can enable or suspend automation parameters on all tracks by using the Automation window (choose Window ⇒ Automation) or on individual or grouped tracks by using the automation drop-down menu (located in the Track Controls section of the Edit window). Here you can play with all the parameters for audio tracks that I list in the “Understanding Automation” section, earlier in this chapter, except for plug-ins, which are controlled in their respective windows.
Suspending or enabling automation across all tracks
To enable or suspend the writing of automation data across all the tracks in your session, do the following:
Choose Window ⇒ Automation from the main menu.
The Automation window appears, as shown in Figure 6-3. The default setting for this window is that all parameters are enabled: All parameters are highlighted. In the case of Figure 6-3, only the Volume parameter is enabled, meaning that when you set your track to one of the automation writing modes (Auto Write, Auto Latch, or Auto Touch), the only automation that is written is Volume data.
- To suspend automation across all tracks, perform one of the following:
- To suspend a single control: Click the name of an enabled parameter in the Automation window to deselect it. It’s no longer highlighted.
- To suspend all the available parameters: Click the Suspend button.
- To enable automation across all tracks, perform one of the following:
- To enable a single control: Click the name of the parameter in the Automation window. It becomes highlighted.
- To enable all the available parameters: Press the Suspend button to deselect it.
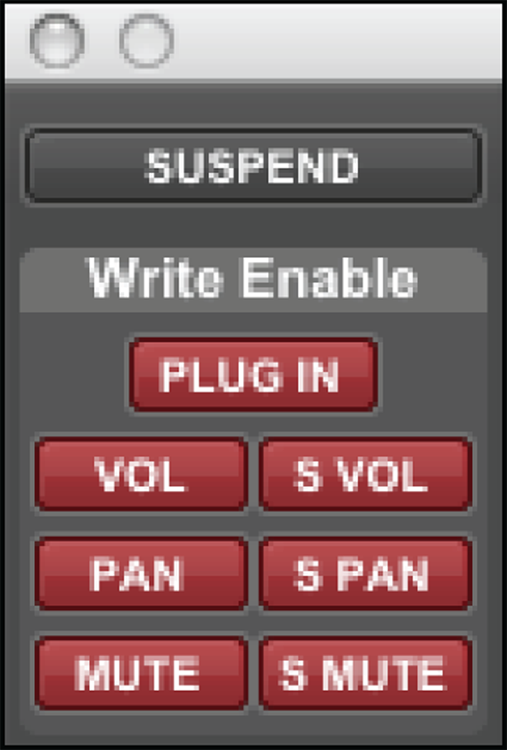
FIGURE 6-3: The Automation window.
Suspending automation for an individual track
You can suspend or enable reading or writing of automation without using the Automation window. In order to do this, though, you need to make sure that you haven’t suspended automation via the Automation window. (See the preceding section.) You can suspend or enable automation for a single track or a group of tracks in a session by doing the following:
- Click and hold the Automation selector in the Track Controls section of the Edit window and then drag to the Automation parameter (Volume, Mute, Pan, Send Level, or Send Mute) that you want to suspend or enable.
- Perform one of the following steps:
- To suspend automation writing or reading for the control selected in the automation playlist: ⌘ -click (Mac) or Ctrl-click (PC) that control — Mute, Volume, Pan, whatever — in the Track View Selector in the Track control section of the Edit window.
- To suspend automation writing and reading of a single control across all tracks: ⌘ +Option-click (Mac) or Ctrl+Alt-click (PC) or the control in one Track View Selector in the Track control section of the Edit window.
- To suspend automation writing and reading of all controls in a single track: ⌘ +Shift-click (Mac) or Ctrl+Shift-click (PC) or any control in the Track View Selector in the Track control section of the Edit window.
To enable these parameters, repeat the preceding steps to toggle between Suspend and Enable.
Writing Automation
Writing automation is easy — simply enable the parameter for which you want to write automation data, choose your automation mode, and then adjust the parameter as the session plays. The following sections detail this process.
While automation is being written, it appears in your track as breakpoints with lines (ramps) between these points. The breakpoints are placed in the track’s automation playlist: that is, the playlist section of the track when you have the Tracks view set to one of the Automation views via the Track View drop-down menu. The number of breakpoints that appear is determined by the complexity of the changes to the automation levels and also by your setting in the Degree of Thinning drop-down menu on the Mixing tab of the Preferences dialog box. (Check out the “Setting Automation Preferences” section earlier in this chapter.)
When the Smooth and Thin Data After Pass check box is enabled, choosing None from the Degree of Thinning drop-down menu (refer to Figure 6-2) creates lots of breakpoints — you might not even notice any lines between them. Comparatively, selecting Most from the drop-down menu creates many fewer breakpoints, with longer, more pronounced lines between them. Pro Tools places lines between these breakpoints to connect them. These lines follow the level from one breakpoint to another, going up, down, or staying the same. The combination of breakpoints and connecting lines represent the automation curves for your track.
 To keep from accidentally erasing or overwriting automation data, suspend the writing of automation for the parameter by using one of the methods of suspending automation listed in the preceding section.
Writing automation on a track
To write automation on a track, follow these steps:
Choose Window ⇒ Automation from the main menu.
The Automation window appears. (Refer to Figure 6-3.)
- In the Automation window, click the buttons of the parameters you want to enable.
Select Auto Write in each track you want to write to (choose Auto Touch or Auto Latch for subsequent times) by clicking the Automation selector.
Find the Automation Mode selector in the Edit menu, as you can read in Book 2, Chapter 3.
- Click Play in the Transport Window or press the spacebar to start your session.
Move the control for the parameters you want to automate.
For example, move the track’s fader (located in the Channel strip of the Mix window) up and down to record changes in the volume level of your track.
Click Stop in the Transport window or press the spacebar to stop the session.
Your automation shows up as a line with breakpoints (little dots) in the track’s playlist — that is, as long as you have the automation view visible. If this view isn’t visible, click the Track View selector in the Track Controls section of the Edit window to open the Track View drop-down menu and then select the automation parameter — Volume, Pan, Mute, Send Level, Send Mute — you want to view.
If this was your first pass writing automation and you have Auto Write mode chosen, Pro Tools automatically switches the Automation mode to Touch when you’re done.
To write over the first pass, start anywhere within the session by clicking within the track or along the Timeline where you want the automation data to start.
To overwrite switched controls (such as mute, solo, and plug-in bypasses), simply click and hold the button down while the session plays. Pro Tools writes new automation data as long as the switch is depressed, based upon the current state of the control (On or Off).
Writing plug-in automation
Here’s how to write automation data for plug-in parameters:
In the Mix window, click the name of the plug-in in the Insert section of the track’s channel strip.
The particular Plug-In window appears.
Click the Auto button in the upper-right of the Plug-In window.
The Plug-In Automation dialog box appears, as shown in Figure 6-4.
Select the parameters you want to automate by clicking them in the column on the left and then clicking Add.
The selected parameters are added to the column on the right.
Click OK.
The dialog box closes.
- Click Play in the Transport Window (or press the spacebar) to start your session.
- Carefully move the control for the parameters you want to automate.
Click Stop in the Transport window (or press the spacebar) to stop the session.
Your automation shows up as a line with breakpoints (little dots) in the track’s playlist as long as you have the automation view visible. If it’s not visible, click the Track View selector in the Track Controls section of the Edit window to open the Track View drop-down menu and select the automation parameter — Volume, Pan, Mute, Send Level, Send Mute — you want to view.
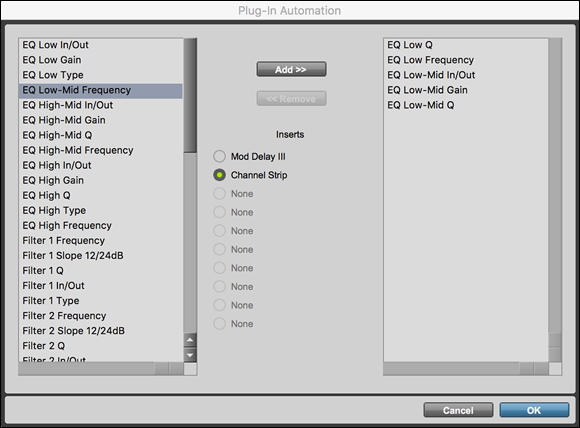
FIGURE 6-4: Use the Plug-In Automation dialog box to choose the parameters to automate.
After you finish writing the automation for the plug-in, click the Safe button in the upper-right part of the Plug-In window to make sure that you don’t accidentally record over the plug-in automation.
Writing send automation
To write automation data for Send Level, Mute, and Pan settings, follow these steps:
Choose Window ⇒ Automation from the main menu.
The Automation window appears. (Refer to Figure 6-3.)
- In the Automation window, click the buttons of the Send parameters that you want to enable.
Choose View ⇒ Mix Window ⇒ Sends from the main menu.
Doing so displays the Send controls for the track(s) you want to automate.
Select the Auto Write (choose Auto Touch or Auto Latch for subsequent times) in each track you want to write to by clicking the Automation selector.
You can find the Automation Mode selector in the Edit window. (See Book 2, Chapter 3.)
- Click Play in the Transport Window (or press the spacebar) to start your session.
- Carefully move the control for the parameters you want to automate.
Click Stop in the Transport window (or press the spacebar) to stop the session.
Your automation shows up as a line with breakpoints (little dots) in the track’s playlist, as long as you have the automation view visible. If it’s not visible, click the Track View selector in the Track Controls section of the Edit window to open the Track View drop-down menu and then select the automation parameter — Volume, Pan, Mute, Send Level, Send Mute — you want to view.
Viewing Automation
You can view automation data for a particular parameter by selecting the parameter name in the Track View selector in the Edit window, as shown in Figure 6-5. For easy reference, parameters with automation data are listed with orange text in the Track View for your track.
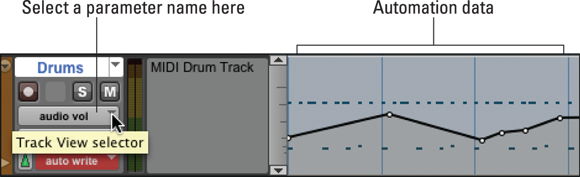
FIGURE 6-5: Select Track View for the automation parameter to display automation data in the track’s playlist.
Drawing Automation
Aside from being able to record automation data by moving the parameter while your session plays (as I discuss in the chapter up to this point), you can manually draw automation with the Pencil tool. This can be handy for those visual people (you know who you are) who prefer to see what they’re doing. Note: Just be sure you know what it’s going to sound like: It is music, after all. Seriously, using the Pencil tool to draw automation can make creating fades or correcting automation data about as quick and easy as it gets.
You can draw your automation using the Pencil tool in the Edit window. The Pencil tool lets you draw seven different shapes, as shown in Figure 6-6. Access the various pencil shapes by clicking and holding the Pencil tool.
Free Hand: With this tool, you can freely draw automation curves — the changes to the settings for your automation data. If you’re automating an audio track, the shape of the curve you draw determines the number of breakpoints (discrete levels) that Pro Tools creates. MIDI tracks follow the preferences you set on the MIDI tab of the Preferences dialog box.
Here’s how you specify that MIDI setting: - Choose Setup ⇒ Preferences from the main menu.
- Click the MIDI tab.
- Enter a value in the Pencil Tools Resolution When Drawing Controller Data text box.
- Line: Using this tool draws a straight line. For audio tracks, you get two breakpoints: one at the beginning and one at the end. MIDI tracks create breakpoints based upon the resolution setting in the MIDI tab of the Preferences dialog box.
- Triangle: Using this tool creates a sawtooth pattern that follows the current grid value. Like with the Line tool, audio tracks contain two breakpoints (one at the beginning and one at the end of each line), and MIDI tracks are stepped according to the resolution you set on the MIDI tab of Preferences dialog box.
- Square: Using this tool draws a square pattern that repeats according to the current grid setting.
- Random: Using this tool creates random levels that change according to the grid value.
- Parabolic: This tool is not available for automation.
- S-Curve: Add text here. This tool is not available for automation.
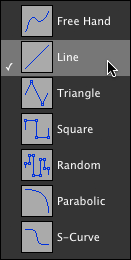
FIGURE 6-6: The Pencil Tool offers shapes to draw automation data by hand.
So here’s where automation gets visual and, well, kind of magical. To use the Pencil tool to draw automation, follow these steps:
In the Edit window, click the Track View selector in the Track Controls section of the Edit window to access the Track View drop-down menu. Then select the automation parameter you want.
The waveform fades in the track’s playlist, and the automation line appears.
 Click and hold the Pencil Tool icon until the drop-down menu appears; then drag your mouse through the menu to choose the tool you want.
Click and drag within the automation line on the track’s playlist where you want the data drawn.
The new automation data replaces any existing data.
Thinning Automation
When you write, automation breakpoints are created at a maximum density. Depending on the shape of the curve, you might not need all these breakpoints to get an accurate playback of your moves. Because every breakpoint requires at least some computer memory, removing unnecessary breakpoints can be helpful. This is thinning, which can be done automatically or with the help of the Thin command.
Automatically thinning data
Pro Tools can automatically thin your automation data for you: namely, immediately after you write it. You can make it all happen from the Mixing tab of the Preferences dialog box, which you can open by choosing Setup ⇒ Preferences from the main menu and then clicking the Mixing tab.
From the Mixing tab, you enable automatic thinning by selecting the Smooth and Thin Data After Pass check box. Then, choose how much thinning you want by specifying an amount in the Degree of Thinning drop-down menu. (Refer to Figure 6-2.) The default setting is Some. (Is that sufficiently vague, or what?)
You can always thin your automation data further — at any time — by using the Thin command. To be safe, I always keep either Little or Some selected in the Degree of Thinning drop-down menu.
Using the Thin command
If the need for thinning doesn’t become apparent until well into your creative process, you can use the Thin command to thin a selection at any time. To do so, follow these steps:
- Display the automation data you want to thin by using the Track View selector located in the Track Control’s section of the Edit window.
 With the Selector tool, select the section in the playlist that you want to thin.
- Choose Edit ⇒ Thin Automation from the main menu.
To thin all data for your selected parameter in a track, press ⌘ +A (Mac) or Ctrl+A (PC) to select all the data. Then choose Edit ⇒ Thin Automation from the main menu.
You select the degree of thinning from the Degree of Thinning drop-down menu on the Mixing tab of the Preferences dialog box. (Choose Setup ⇒ Preferences to access this dialog box.)
To check your thinning — basically to make sure that it still sounds good — play the thinned section. If you don’t like what you hear, you can choose Edit ⇒ Undo from the main menu to undo the thinning.
Editing Automation Data
At your disposal are many ways to edit automation data after it’s written. You can use one of the Edit tools (Grabber, Pencil, or Trimmer), you can cut/copy/paste, and (if you want to get drastic) you can delete your automation. These options are covered in the following sections.
Using editing commands
You can use standard Edit commands (such as Cut, Copy, Delete, and Paste) to edit your automation data. To edit using these commands, though, select the data first. Here’s how:
- From the Track View selector in either the Edit or Mix window, display the automation parameter you want to edit.
With the Selector tool, highlight the section in the playlist you want to edit.
If you’re looking at the track in Waveform or Block view (for audio tracks) or in Block, Clip, or Notes view (for MIDI tracks), your edits affect all automation data for the selected section. To edit an individual parameter, display it in the Track View.
Grouped audio tracks are all edited (except when you’re editing panning data) when you select data from one track in a group. To edit only the data on the selected track, press ⌘ (Mac) or Windows (PC) when you perform your edit.
Grouped MIDI tracks are edited individually (except for panning data) unless you press Control (Mac) or Windows (PC) while you perform your edit.
Panning data works in two opposite ways for groups of audio tracks and MIDI tracks. If you want to edit the panning data for a group of audio tracks, you have to press ⌘ (Mac) or Windows (PC) while you edit — which affects the entire group. Using this keystroke command (pressing ⌘ or Windows) on a group of MIDI tracks, however, edits panning data one track at a time.
Cut and Delete
You get rid of unwanted stuff when you cut and delete automation data, but the Cut and Delete commands treat unwanted stuff a bit differently:
Cut: When you cut a selection of automation data, Pro Tools automatically adds two new breakpoints to your remaining data and places the cut material on the Clipboard. The two new breakpoints are placed at the beginning and end of the cut section. Any slope in automation curves that exists before and after the cut section remains, as shown in Figure 6-7.
In Pro Tools, cut by choosing Edit ⇒ Cut from the main menu or by pressing ⌘ +X (Mac) or Ctrl+X (PC).
Delete: When you delete selected automation data, the remaining automation data connects at the nearest breakpoints. Any curves between the breakpoints and the beginning or end of the deleted selection are removed, as shown in Figure 6-8.
In Pro Tools, delete by choosing Edit ⇒ Delete from the main menu or by pressing Delete (Mac) or Backspace (PC).

FIGURE 6-7: Before (left) and after (right) cutting automation data from a track.

FIGURE 6-8: Before (left) and after (right) deleting automation data from a track.
Copy
Choose Edit ⇒ Copy from the main menu to place copied data held on the Clipboard so you can paste it somewhere else.
Paste
When you choose Edit ⇒ Paste from the main menu to paste selected automation data in a new location, breakpoints are created at the beginning and end points of the selection. These breakpoints make sure that the automation levels and slope (change in level) that exist before the beginning and end points of the pasted material remain the same, as shown in Figure 6-9.

FIGURE 6-9: Before (left) and after (right) pasting automation data to a track.
Editing with (surprise!) the edit tools
You can use the editing tools located in the Edit window to change automation data within a track. The three tools you can use are the Grabber tool, the Trimmer tool, and the Pencil tool. These are detailed in the following sections.
Grabber
![]() Use the Grabber tool to move, add, and delete breakpoints. To perform these operations, do the following:
Use the Grabber tool to move, add, and delete breakpoints. To perform these operations, do the following:
- Adding breakpoints: To add a breakpoint with the Grabber tool, click in the automation line where you want the new breakpoint.
- Deleting breakpoints: To delete a breakpoint from an automation line, put the Grabber tool on it and then press Option (Mac) or Alt (PC) while you click.
- Moving breakpoints: To move a breakpoint, click and drag it to where you want it.
Pencil
You can add or delete breakpoints with the Pencil tool by doing the following:
- Adding breakpoints: To add a breakpoint with the Pencil tool, click in the automation line at the place where you want the new breakpoint.
- Deleting breakpoints: To delete a breakpoint, put the Pencil tool on it and then press Option (Mac) or Alt (PC) while you click.
Trimmer
![]() Use the Trimmer tool to move selected breakpoints up or down by clicking and dragging them, as shown in Figure 6-10.
Use the Trimmer tool to move selected breakpoints up or down by clicking and dragging them, as shown in Figure 6-10.

FIGURE 6-10: Before (left) and after (right) adjusting automation levels using the Trimmer tool.
To move breakpoints left or right, select them with the Selector tool. Then, using the number pad on your keyboard, press the minus key (–) to move left or the plus key (+) to move right.