
Chapter 2
Getting Your Music on the Internet
IN THIS CHAPTER
![]() Understanding MP3 and AAC
Understanding MP3 and AAC
![]() Finding a music host site
Finding a music host site
![]() Formatting your music for the Internet
Formatting your music for the Internet
![]() Using the Internet to promote your music
Using the Internet to promote your music
To make it as a musician, you have to get the word out that you and your music exist. Traditionally, you played gigs, sold your CDs at these gigs, and tried to get your music in local stores and on local radio. If you were lucky, you’d sell a few CDs at each gig, move a handful of others through local outlets, and maybe get some radio play on a college station. Forget getting any national exposure unless you had developed a following and had a busy touring schedule.
That’s the way it used to play, but now the Internet makes it possible for any musician to get national — even international — exposure without going on the road (as much). All you have to do is get your music on the Internet and promote it well. You can then make money from your music while you sleep (or at least make your music available while you sleep).
So how do you do this? Well, that’s the purpose of this chapter. Here, you explore how you can use the Internet to promote and sell your music. You discover how to put up music files so that your potential customers can either download your music or listen to it online. You find out about some of the best ways to get your music hosted online, and you take a look at promotional ideas to get you started.
Understanding Downloadable Music Files
I’m sure you’ve heard about MP3s or maybe AAC. In fact, I’m willing to bet that you’ve already downloaded a few MP3s or AAC files off the Internet and experienced firsthand the immediacy that these file types offer. You go to a website and choose a song to download. After just a short while, you have a copy on your hard drive that you can listen to any time you want. You can even put that song on a CD or portable player and take it with you.
With all this convenience and immediacy comes a downside: That MP3 song doesn’t sound as good as one mastered to a CD. For most people, this is a small price to pay for the ability to download a song for free (well, okay, often for a buck a shot these days). After all, most people play their music on less-then-stellar-sounding stereos. (Can you say iPod?) But if you’re one of the lucky few with a stellar (or more-than-stellar) stereo system, you’re going to hear the difference, which prompts the following question: Why doesn’t a song in MP3 or AAC format sound as good as one mastered to a CD? The answer: data compression.
 MP3 is a process that compresses your music so that it takes up less hard-drive space. Data compression is necessary, or MP3s and AACs couldn’t work over the Internet. Consider the numbers: A regular CD music file can take 30 MB to 40 MB (about 10 MB per minute). That same song can take only 3 MB to 4 MB in MP3 or AAC format. This is important because promoting music on the Internet is totally dependent upon speed. A 30 MB or 40 MB file is way too big to download or to stream on the web (even for people with broadband Internet connections).
Although compression causes your MP3 or AAC file to lose fidelity as well as megabytes, I think this loss of quality is an actual advantage. After all, it’s normal that your MP3 won’t sound as good as your mastered CD in its multimeg brilliance. It doesn’t have to; you’re giving listeners just a taste of your music. By giving people this taste, along with the opportunity to purchase a CD, you help them decide whether they want to buy the high-quality version.
 Other file-compression formats being used, such as FLAC (Free Lossless Audio Coding) and AAC (Advanced Audio Coding), have improved the sound quality of MP3 and are being used by some delivery systems, such as AAC on iTunes, so you may find that encoding your music into one of the other file types works better for you. Some of the encoding software I mention later in this chapter can encode into these file types as well as MP3. You may want to try one of these on your music to see what you think works best — just make sure whatever file format you choose can be played by the people you want to hear your music.
Bit rate
Bit rate essentially determines the quality of your encoded music. When you encode your music, you have to choose what bit rate you want your file to be in, as shown in Figure 2-1. Bit rates range anywhere from 16 kilobaud per second (kBdps) to 320 kBdps. The higher the bit rate, the better the sound quality. The downside is that higher bit rates create larger files. When you convert your music to MP3, you’re constantly balancing quality with file size.
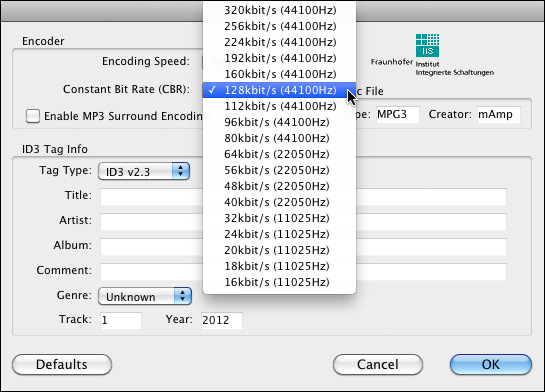
FIGURE 2-1: MP3 encoders allow you to choose the bit rate of your MP3.
The bit rate that you ultimately choose depends on how you plan to use your MP3 or AAC file. For example, if you want to put your music on a downloadable music host site (an Internet site that makes people’s MP3 or AAC music available for download), you most likely need to choose the 128-Kbps rate because this is what many host sites require for download. For Hi-Fi mode, you may choose 192 Kbps or even 256 Kbps, depending on the provider. On the other hand, if you want to stream audio on the web (and you want anyone, regardless of connection speed, to hear it), you’re better off choosing a lower rate, such as 96 Kbps or even lower, depending on your host’s requirements.
Variable bit rate (VBR) is an option that many encoders offer. VBR allows the encoder to change the bit rate while it compresses the file. The advantage to this approach is that the sections with fewer instruments — in effect, less data — can be compressed further than sections full of more critical information. The result is often a better-sounding MP3 that takes up less space. The only drawback — and it’s a big one — is that few MP3 players can read a file created with VBR. So you’re probably best off not using this approach for your web-based files.
If you’re making MP3s to listen to through your own player and it supports VBR playback, using VBR keeps your files smaller. If you do choose VBR, you’re prompted to choose an average bit rate or a minimum and maximum bit rate. Try them both and choose the one that sounds best to you.
Mode
Modes essentially refer to whether your file is in stereo or mono, only your choices include more than just plain stereo and mono. You can choose mono, stereo, joint stereo, or (sometimes) force stereo (also known as dual mono), as shown in Figure 2-2. Again, you choose the mode according to what your music needs to sound its best, and you balance quality against file size.
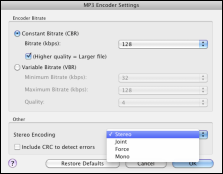
FIGURE 2-2: MP3 encoders have several modes to choose from.
Here’s a look at the various modes and how they relate to quality and file size:
- Mono: Mono takes up little room because all the stereo data from your CD is contained on one track. The sound quality can be good, depending on the bit rate you choose, but you lose all stereo-imaging data. Choose the mono mode if the loss of the stereo image won’t adversely affect your song, or if the overall sound quality is more important to you than the stereo information.
Stereo: Stereo mode consists of two mono tracks. With stereo mode, you retain all your stereo information. The drawback is that your two tracks are at half the bit rate of a mono version using the same bit-rate setting, so they don’t sound as good. For example, if you encode at 128 kBdps, each of your stereo tracks is actually only 64 kBdps. If you want each track to be at 128 kBdps, you have to encode at 256 kBdps. The resulting file is twice as large as the mono file at 128 kBdps, has no better sound quality, and takes longer to download.
Even so, it’s your call. Stereo mode is a good choice if you have a song with complex stereo panning effects that you just can’t live without, and you don’t mind a sound quality that’s slightly lower.
Joint Stereo: This mode is a cross between mono and stereo: It creates one track of audio information and one track of information that tells the player to send certain sounds through one speaker or the other (a set of instructions called steering data). You get most of the stereo information with only a slightly larger file size than you’d get with the mono mode.
For most songs, the difference in stereo image between regular stereo and joint stereo is indistinguishable — and you end up with a higher-quality recording because the higher bit rate is used. You might find that this option works better for you than the regular stereo mode. Experiment and see whether you can hear a difference.
- Force Stereo: Also known as dual mono, this mode is essentially the same as the mono mode: One track of audio data is recorded, and the stereo panning information is lost. The only difference between mono and force stereo is that force stereo makes sure that the mono data is played through both speakers of the player. Choose Force Stereo mode if you don’t mind your music being in mono but want to ensure that the player plays it through both speakers.
Creating MP3 Files
To create MP3 files, all you need (well, besides the computer) is MP3 encoding software and a CD or audio file of your music. To create an MP3 of your music, just choose the song to convert and let the encoder do the rest. Some variables can make your MP3s sound their best, such as which encoder to use and what parameters to choose. I cover these variables in the following sections.
Choosing encoding software
A bunch of MP3 encoders are available, but you’re using Pro Tools, so I’m going to recommend trying the MP3 option for Pro Tools, which is included with the Pro Tools software (I detail how to use this in the next section). If you try it and don’t like using Pro Tools for your MP3 encoding, here are some other popular programs you can use:
- iTunes (
www.apple.com/itunes): iTunes is free and can rip from CD into MP3 and AAC formats equally easily. It’s simple to use and, if you have an iPod or if you buy music from the iTunes store, you already have it loaded onto your computer. - Switch Audio Converter Software (
www.nch.com.au/switch/index.html): You can download the basic version for free, which allows you to play, rip, record, and convert MP3s and audio CDs. This program works with Windows PCs and Macs. There is also a plus version available for more encoding options that cost $30. - Toast Titanium (
www.roxio.com): This is the most common Mac-based program. This program costs about $100 and allows you to not only create MP3s, but also record your mixes to CD — plus a lot more.
A lot of MP3 encoders are available, so if you’re looking for a little more variety, I suggest doing a search for MP3-encoding software. You’ll get a lot of options.
Encoding your music
The MP3 encoding process is pretty simple. To encode using the Pro Tools MP3 option, follow these steps:
Select File ⇒ Bounce to Disk.
The Bounce dialog box makes an appearance (Figure 2-3).
- From the File Type drop-down menu, choose the MP3 option.
- From the other drop-down menus, choose the format, bounce source (these are the outputs you want to record your audio from), sample rate, and whether you want to convert during or after the bounce.
Click Bounce.
The MP3 window appears, as shown in Figure 2-4.
- Choose your encoding speed from the Encoding Speed drop-down menu.
Select the Constant Bit Rate (CBR) radio button and choose the quality of the MP3 from the drop-down menu.
For streaming audio, choose between 20 and 32 kBdps; for higher-quality downloads, choose between 128 and 192 kBdps.
Enter the ID3 Tag Info in the dialog box.
This includes the name of the song, the artist’s name, the album title, any comments you want to add, and the genre of your music.
Click OK.
The Save Bounce As dialog box opens.
- Enter the name for your MP3 file in the Save As field.
- From the Where drop-down menu, choose the location for your new MP3 file.
Click Save.
Your file is bounced (this will take a few minutes), and the MP3 shows up in the location that you specify in Step 10. You can take that file and use it in your marketing efforts.
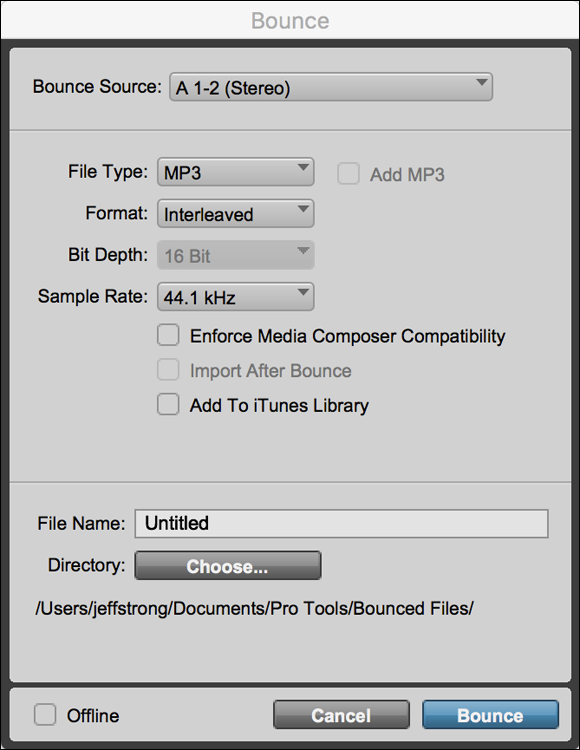
FIGURE 2-3: The Bounce dialog box has an MP3 option.

FIGURE 2-4: Encode MP3s within Pro Tools with the MP3 option.
Setting Up Your Own Music Website
No matter what else you do, you need to have your own website. A website is your calling card — a place where you can showcase yourself and your music. With your own site, you can provide a lot more information for visitors to read. You can also offer more products that may make you more money than your CDs — T-shirts for instance.
Having your own website is not without challenges. For example, you have to design and maintain the site, which can take a lot of time. You also have to pay for things like hosting (that is, a service that will host your site files on its servers so that people who visit your web address can see your site). If you intend to sell products on your site, you need to provide online ordering, which you can do with simple options like adding a Checkout button via PayPal or Google (which charge a small fee for each sale) or by setting up an account with a payment processing company, such as Stripe or Square. In all, having a website can be time-consuming and costs money, so be prepared to do a fair amount of work if you really plan on making money from your website.
Checking out musician-friendly hosting services
Some hosting services make it easy to create a website for you or your band and allow you to offer downloads or streams of your music, CDs, and other merchandise. All the following sites are geared toward musicians. The one you choose will likely depend on the fit for you or your band. Here are some options:
- Bandvista (
www.bandvista.com). Bandvista’s plans start at $10 per month, and it has hundreds of templates to start your design. - Bandzoogle (
http://bandzoogle.com). Bandzoogle has plans starting at $10 per month and also offers hundreds of templates to build your site from. - HostBaby (
www.hostbaby.com). HostBaby has one plan ($20 per month or $199 per year — your unique domain name is another $12 per year) and offers five free CD submissions to CD Baby, so it’s pretty competitive with the other sites.
 Each of these sites offers slightly different features for the money. Take a close look at their plans and keep in mind that, while all offer free trials, you’re unlikely to move from one host site to another, so choose the site that you feel best about and whose features most closely match your needs.
Designing your site
Your first step in getting a website up and running is designing it. When you design your website, keep the following points in mind:
- Make your site easy to navigate. Make sure that your visitors know where they are on your site at all times. It’s often a good idea to have a menu bar on each page so that they can at least return to the home page without having to search for it.
- Make sure your site is mobile responsive. Smartphones and tablet computers are an important segment of online users, and having a site that utilizes responsive web design means that your site will look as good on a small screen as it does on a large one.
- Include an email newsletter opt-in form. Offer something of value, such as some music, for free to get your fans on your list. Then use your newsletter to develop a relationship with them. The more you engage with your fans, the more music and merch you will sell. You need an email service provider to do this. Check out the “Connecting with an Email Newsletter” section later in this chapter.
- Make ordering your CD (or other stuff) easy. Put a Buy My CD button or link on every page. Also, consider including upsells, such as T-shirts or behind-the-scenes videos, in your shopping cart sequence.
- Double-check all your links. Nothing is worse for a web surfer than clicking on links that don’t work. If you have links on your site, double-check that each one works. And if you have links to other people’s sites, check the links occasionally to make sure that the page you’re linking to still exists.
- Test your site. Before you sign off on your site design, check it from a slow connection and multiple devices if you can (or have your web developer do this for you). You instantly get a sense of whether your site’s download time is speedy. If it’s slow to load or confusing to navigate, keep working on it until it works. You may also want to check your site using different Internet browsers and screen resolutions to make sure that your site still looks good.
- Make your site your browser’s home page. Years ago, before I knew better, I had a site down for weeks because I didn’t have it set as my default site in my browser. I didn’t find out until I got a call from a friend who told me it was down.
For more tips and tricks on creating a great website, check out Web Sites Do-It-Yourself For Dummies, 2nd Edition, by Janine Warner (John Wiley & Sons, Inc.).
When your site is live on the Internet, techniques such as search engine optimization (SEO), which makes your site appear higher in search results and social media networking can help your site and your work get noticed. SEO techniques are constantly evolving and beyond the scope of this book, but you can check out Search Engine Optimization For Dummies by Peter Kent (also from John Wiley & Sons, Inc.) to find out details. You find a brief introduction to social media networking later in this chapter.
Putting Your Music on a Music Host Site
A music host site is a website that allows you to add your music to its list of available music downloads. Putting your MP3s on a host site can give you exposure that you wouldn’t otherwise be able to get. You can direct people to the site to listen to your music and also benefit from traffic that the site itself, other musicians, and the site’s fans generate. For some of the larger sites, that can be a lot of potential listeners. Although MP3 host sites are constantly changing, a few have managed to hang around for a while:
- Bandcamp (
www.bandcamp.com): Bandcamp lets you offer downloadable music, physical CDs, and even merchandise like T-shirts. A basic plan is free (pro plan is $10 per month) to offer your music or merch, though it does take a cut of your sales. Bandcamp’s cut is 15 percent for digital sales and 10 percent for CDs or merchandise. - Soundcloud (
www.soundcloud.com): Soundcloud lets you upload your music and make it available as a download or online stream. It’s free and it’s popular, so it’s a worthwhile place to add your music. Soundcloud is very strict about ensuring no one is uploading material that he or she doesn’t own the copyright to, which is a good thing for musicians. - Reverbnation (
www.reverbnation.com): Reverbnation is kind of a one-stop-shop for releasing and promoting your music. It offers website hosting, digital distribution, email contact management, newsletter delivery, and more. It has a free plan that lets you upload and offer your music for download, but if you want to monetize it, you’ll need to pay some money. The price varies depending on what services you want to use, but its basic full-service plan runs $20 per month. - Last.fm (
www.last.fm): Last.fm is a streaming radio service with a dynamic community. You can put your music on the site plus offer links to your CDs and downloads. You can also sign up for a plan that pays you for the streaming, but it won’t amount to much unless you have a ton of plays (check out the Terms and Conditions for details).
 Be sure to read and understand the contracts (often called agreements) that each of these sites requires you to agree to. Make sure that you don’t sign away your rights to your music. If you’re not sure that you like a particular agreement, don’t sign up for the service. You can find plenty of other places to put your music on the Internet.
Engaging in Social Media Networking
People are atwitter (sorry, I can’t help myself) about social networking as a way to promote themselves. I’m personally still a bit cool on the actual sales that can be made using Twitter, Facebook, and the other social networking sites, but I won’t deny that these sites generate a lot of activity, and activity is always a good thing. So I’m not really going out on a limb to suggest that you join the social networking world, too. It can be a great way to connect with your fans (and possibly attract new ones).
Aside from the music hosting sites I list earlier in this chapter, there are some general social networking sites musicians are using. Here is a list of the most popular ones (as of mid-2018 anyway — chances are that this list will be out of date before too long):
- Facebook: Facebook is the largest, most active community on the Internet. With its size and reach it’s not going away anytime soon. So if you’re not already on Facebook, you really need to get to it. Because of its size, many of the other musician-centric sites, such as ReverbNation, have apps that allow you to connect your account to your Facebook page. This gives you the best of both worlds and makes it easier to manage your social networking.
- YouTube: There are countless artists who have made a career from posting videos on YouTube. If you have any interest in doing videos to promote yourself, you should set up a YouTube channel and start posting your videos and music. Be consistent and before you know it, you’ll have a following.
- Twitter: Twitter lets you share news and links in 280 characters. And for some reason this type of blogging (called micro-blogging) has become popular. I’m willing to bet you’re already using Twitter, regardless of how many tweets you actually create or if you just follow others. If you’re not, you should at least try it out and see if you like it.
- Instagram: Instagram is a great platform for musicians to gain fans, not just followers, for two main reasons:
- Instagram users tend to listen to (and buy) more music than people on other platforms (according a 2017 Nielson study).
- Instagram is all about documenting your life or art in a spontaneous way. Fans like this because it helps them feel connected to the artist. Artists like this because the creativity of the platform makes it easy to be active and consistent in posting.
- Google+: Google+ allows you to connect with your social circle in a myriad of ways, most of it centered on sharing in new and unique ways. Given that this is Google’s creation, there is a good chance it will become popular — and if it does become popular, you’re probably going to want to engage in it in some way.
There have been a lot of complaints and concerns about privacy and content ownership with these social networks. If either of these are an issue to you, make sure you read and understand the user agreements that you are bound by when you sign up and use these sites. If you’re unsure whether you have privacy or if you give up any rights to your music by posting it on these sites, you’re better off erring on the side of caution and limiting what you share.
Offering Free Downloads
Offering a freebie can be a good way to get people interested in your music and a way to turn people into fans. Online promotion of your music almost requires you to make downloads available to your potential fans. You can talk about your music all you want, but what people want is to hear your music. The purpose of the free download is to get your listener excited enough about your music that he buys your CD or comes to see your show.
Turning a freebie listener into a buyer isn’t that difficult. My company offers a variety of free download demos, and we have found that over 10 percent of the people who take a free demo end up buying a CD or program from us. This is an inexpensive way for us to get new customers and a very good return on investment. On top of that, by allowing our customers to try our recording first, we receive fewer requests for a refund (contrary to what most music creators do, we offer a money-back guarantee on all our CDs and programs). So you won’t be surprised to hear me suggest that you should offer free demos/downloads of your music. (I won’t suggest a money-back guarantee unless you’re doing something with a therapeutic purpose, as I am.)
Give people a taste of your music and sell an upgrade — other tracks, CDs, vinyl records, boxed sets, CD-and-T-shirt packages, tickets to a live concert stream — anything that turns a casual listener into a fan. There are some good models out there for monetizing your music if you look around.
I’m not a fan of making all your music free to download as a way of generating buzz. I see a freebie as a teaser. I believe that if you offer your fans something, they will buy it. Even if you’re “not in it for the money,” charging for your music says that you value what you do. And if you value it, your fans will too.
Selling Your Music Digitally
Digital delivery of your music will be the main source of revenue. Sure, you’ll sell a few CDs at your shows and maybe a couple more through a local store or one of the online music sites, but fewer and fewer listeners own CD players and many more prefer listening on a phone or tablet and don’t want to hassle with importing a CD into their device.
Aside from being the format of choice for listeners, digital music files is a better choice for musicians because you don’t need to invest a ton of money in a garage full of CDs that you’ll likely not sell.
There are two forms of digital distribution:
- Downloads: Downloads allow your listener to own and load the digital file onto a device so he can listen anytime, forever (or until he loses the file). You get paid once for this download, no matter how many times your buyer listens. You can sell a download directly to your listener, but most musicians will make more sales by putting their downloads on other sites, such as iTunes or Amazon.
- Streaming: Streaming delivers your music to your listener without downloading it on her device. You get paid every time your song is listened to. It’s a much smaller fee than you get for a download, but you can end up with a lot more in the long run. Unless you can build an infrastructure and fanbase to support serving the music yourself, you’ll need to distribute through existing sites. This is not a problem because there are a ton of them.
Regardless of which digital distribution method you want (choose both), you’ll need a distributor, also called an aggregator. Here are list of popular music aggregators that can get your music on most, if not all, of the most common music sites:
- AWAL (
www.awal.com): AWAL doesn’t charge an upfront fee for its distribution services, but it does take 15 percent of your sales. Depending on how much music you sell, that can add up to much more than you’ll pay through some of the other services. - CD Baby (
http://members.cdbaby.com/): Aside from allowing you to sell your physical CD, you can also sell and distribute your digital releases. As an aggregator, CD Baby charges a one-time fee for each album ($35) or single ($9.95) you want them to distribute your music beyond their site (you can get a free account and sell on their site for a 15 percent commission). They also take a 9 percent fee on all your digital sales. - Ditto (
www.dittomusic.com): Ditto charges $19 per year for one artist and no commission on sales. You can pay more for some other services, such as pre-releasing your music. - Distrokid (
www.distrokid.com): Distrokid also charges an annual fee for distributing your music and doesn’t take a percentage of your sales. Distrokid also offer other services for distribution that can add to your cost. - TuneCore (
www.tunecore.com): TuneCore charges $50 per year for each album and $10 per year for each single you upload. Like Ditto and Distrokid, Tunecore doesn’t take a commission on sales and passes on 100 percent of your revenue.
This is a very short list of music distributors. Look around for other places to sell your digitally formatted music. There are a ton of them — and more showing up every day.
Licensing Your Music
Licensing (also called “sync” licensing) gets you paid for your music and gives you exposure to audiences that may not otherwise find your music. You can license your music to film, TV, commercials, and a host of other outlets — I’ve licensed my music for dance videos and shows, conferences, and other unexpected places.
It used to be that you got lucky and someone called asking to license your music (this is how all my licensing happened), but nowadays there are services that offer listings of libraries or producers looking for music. Here three worth checking out:
- Taxi (
www.taxi.com): Taxi has been around a long time and has a very active member community, as well as a yearly “road rally” conference to help you get the most out of the service. Membership will cost you $300 plus a small fee for each submission, but for all they offer, this can be a bargain if you work to get the most out of the service. They don’t take a cut of the money you make on placements for royalties. - Audiosocket (
www.audiosocket.com): Audiosocket vets the music that it offers its buyers but doesn’t charge its artists to list their music. So, if you’re interested in offering your music through Audiosocket, complete an application and a few songs. If they accept your music and sell any, they take a 50 percent cut in the placement fee and 50 percent of the publishing royalties. - Broadjam (
www.broadjam.com): Broadjam helps you submit your music to publishers. It’s also a music hosting and download site. Membership starts at about $10 per month.
Podcasting
Podcasting is another way to offer audio online. Typically, podcasts are media feeds that your visitors can subscribe to and get updates automatically as they’re published. If you regularly update your music or if you want to have an audio blog (or video blog) that your fans can listen to (or watch), this can be a great way to keep them involved in your music.
The process of creating a podcast starts with recording the content and then putting it in an MP3 format (if you’re doing audio). You have this book, so you can create audio content easily. Just follow the steps outlined throughout the book to record and convert your music. Next, you need to host it or have a podcasting site host it for you. This process can get pretty complicated, so I recommend checking out Podcasting For Dummies, 2nd Edition, by Tee Morris, Chuck Tomasi, Evo Terra, and Kreg Steppe (Wiley). You can also check out these sites to learn more about podcasting:
- The Apple podcast page (
www.apple.com/itunes/podcasts/specs.html): This page on the Apple website contains tons of information on creating a podcast and publishing it. This is a good place to start. - Podcasting Tools (
www.podcasting-tools.com): As the URL suggests, this site has information, links, and tools for creating a podcast. This is a good place to find quality information.
If you’re ready to get started podcasting, here are a few sites worth looking into:
- Hipcast (
www.hipcast.com): Hipcast is an easy-to-use site that lets you create and publish your audio or video blogs. This site offers a seven-day free trial period, with plans starting at $5 per month. You don’t find a lot of information on this site about podcasting, but if you’re ready to give it a try, this is a good inexpensive option. - Libsyn (
www.libsyn.com): Libsyn offers plans starting at $5 per month and, for an added cost, offers Apple iOS and Android apps for mobile listeners. - PodHoster (
www.podhoster.com): PodHoster, as the name states, hosts podcasts. With this service, you record your audio and PodHoster hosts it. This is a good option for musicians who record their own music and know the ins and outs of the audio-creation process (that would be you, after you’ve read this book). PodHoster offers a 30-day free trial, with monthly plans starting at $5.
Selling Your CDs
Regardless of whether you have your own site, you can always sell your CDs on the Internet through other outlets. An advantage to selling your music through other online stores is that you can capitalize on the traffic that the store generates. A number of online retailers are out there, but the following list gives you the lowdown on some of the major players:
- CD Baby (
www.cdbaby.com): CD Baby puts your CD on its site for a small setup fee ($35). For this, you get a web page (which the people at CD Baby design) with pictures, bios, MP3s, and streaming audio. The site sells your CD for any price you set, takes $4 from the sale, and gives you the rest. You even receive an email whenever someone buys one of your CDs. Signing up is easy; just direct your browser towww.cdbaby.comand click the Sell Your CD icon. The instructions are clear, and helpful articles on the site can help you to, well, sell your CD. - Bandcamp (
www.bandcamp.com): Bandcamp is a way for you to sell, not only your CDs online, but also merchandise such as t-shirts, coffee mugs, and so on. Bandcamp doesn’t charge a monthly fee but does take a cut — 15 percent or less, depending on how much you sell and the prices you set. - Amazon.com (
www.amazon.com): If you want to sell your physical CD on Amazon.com, all you need is a “retail-ready” package (professional manufacturer and with a UPC code on it). To join, point your browser towww.amazonservices.com/and follow the prompts.
Because the Internet is constantly changing and growing, you may find other sites that allow you to sell your music online. Use your favorite search engine to search for the phrase sell your CD. This gives you a ton of other places to consider when selling your CD online.
Promoting Your Music
The whole point of making CDs and putting MP3s of your music on the Internet is to promote and sell your music. To do this, you need exposure. As with any promotion technique, there are no hard-and-fast rules except to use your imagination. Experience will be your guide, but here are some ideas to get you started:
- Start an email newsletter. An email newsletter is an inexpensive way to keep your music on people’s minds. Try to be somewhat consistent in sending it out, but don’t just send out the same message on a regular basis. Give your subscribers something. Provide new information in your email, such as a press release about where you’re playing next or a link to a new song that you’ve just uploaded. Check out the “Connecting with an Email Newsletter” section later in this chapter.
- Put your website address on everything. People can’t come to you if they don’t know that you exist. So print your website address on all your promotional materials, including the CD itself. Also, include your website address on all emails and Internet correspondence that you do (as a signature on Internet forums if you belong to any, for example).
- Network. Check out as many independent-musician sites as you can. You not only learn a lot about marketing your music, but you’ll also have an opportunity to spread the word about your music.
- Stay up to date. Keep track of where you put your music and check back often to make sure everything is working properly. Websites change and go out of business often. Unless you check the site occasionally, you might not know if your music suddenly disappears from there. Also, routinely search for new places to put your music.
- Get linked. Try to get folks to link from their sites to your own. Likewise, share the wealth and link to other sites that you like. Cross-promotion can be a good thing and allow you to pool your fan base with another band. This doesn’t take away from your sales (after all, you listen to more than one band’s CDs, right?). Visitors to your site will appreciate the link and will probably check back to see whether you added any new ones.
Connecting with an Email Newsletter
An email newsletter is an inexpensive way to keep your music on people’s minds. Try to send newsletters to your subscribers somewhat consistently, but don’t just send out the same message on a regular basis. Give your subscribers new information, such as a press release about where you’re playing next or a link to a new song that you’ve just uploaded.
Don’t send your newsletter to anyone who hasn’t asked to receive it. This is called spamming, and it’s illegal.
To build a subscriber list, encourage people to sign up for your mailing list at your gigs and on your website. Or offer them a free download when they sign up on your website, and put a subscription form on every page. (Check out my day-job website to see this in action at www.stronginstitute.com.) Always provide an easy way for users to unsubscribe from your list.
If you’re serious about sending out an email newsletter, an email service provider (ESP) can collect and manage addresses and send out your messages. The advantages of using an email service provider include ease of use, but the most important is that a good ESP will help your messages get to your subscriber. Sending emails directly from your email account can get your messages blocked — and if the email host (such as Gmail or Yahoo!) labels you as spam, they will ban your messages. The rules on this get pretty complicated, and trying to keep up with changes and be compliant is a fulltime job.
Your best solution to make sure your messages go through is to use an experienced ESP. Here are a few I recommend:
- AWeber (
www.aweber.com). AWeber has been around a long time (I’ve used them for the last five years) and has the best customer service I’ve come across in this industry. You can actually get someone on the phone. In fact, they encourage it. Their plans start at $19 per month (for up to 500 subscribers). You can try AWeber for a month for only a dollar, and they offer excellent email marketing advice (through a newsletter, videos, and blogs). - Constant Contact (
www.constantcontact.com). This is a popular ESP that is easy to use and offers a 60-day free trial. Their basic (500-subscriber) plan is $15 per month. Plans with more subscribers cost about the same as the other providers I list here. I haven’t used Constant Contact, but I have friends who are very happy with this provider. - MailChimp (
www.mailchimp.com). I also use MailChimp, and what I like about this ESP is that it’s super-easy to use and their data tracking (of clicks and whatnot) is very good. What I don’t like is that they will not get on the phone with you if you have problems. You’re stuck with instant chat or email (not the worst thing but kind of annoying if you have a complicated problem). They have a free account option that allows you to try them out and see if you like them. Once you get to a couple thousand subscribers, their cost is about the same as everyone else in this list.
You can find a lot more by doing an Internet search using “Email Service Provider” or “email marketing” as your search term.
If you choose a music-centric company to host your website (check out the “Setting Up Your Own Music Website” section earlier in this chapter), you may find that your blast email needs are taken care of and you don’t need to hire a separate ESP. However, if you end up with a lot of fans, you may find the features offered by a dedicated ESP useful.