
6
Rainbow Strip Light
In this chapter we’ll use an RGB LED strip light to create a decorative ambient strip of rainbow colors.

PARTS REQUIRED
Arduino board
Solid-core wires
RGB LED strip (WS2812B 5V 32-LED strip)
LIBRARY REQUIRED
PololuLedStrip
HOW IT WORKS
LED strip lights are often used to create ambiance as a decorative feature, such as backlighting for a TV or lighting beneath kitchen cabinets. They are low-powered, typically between 5 and 12 volts, so they’re easy to install anywhere with their own power supply—and they look good too!
Strip lights generally come in two varieties. Single-color or multicolor nonaddressable strips can only light all the LEDs in one color at a time. RGB multicolored strips are generally addressable, which means that each LED has its own chip and can be individually controlled, allowing multiple colors on different LEDs to light at a time.
We’ll be using a strip light of addressable RGB LEDs. Unlike the RGB LED from Project 5, the LEDs on a strip light are surface mounted. This means that the components are placed directly onto the surface of a printed circuit board—in this case, a flexible strip—rather than being individually inserted into a circuit.
There are two main kinds of addressable RGB strip lights. Three-pin RGB LED strips have GND, Data, and +5V connections to control the LEDs. The Data pin connects to the Arduino and uses the same pulse width modulation (PWM) function explained in Project 5 to create the colors and sequence on the strip. Four-pin RGB LED strips have GND, Clock, Data In, and +5V connections and use Serial Peripheral Interface (SPI) to control their LEDs. SPI is a communication method that allows the two-way transfer of data between devices.
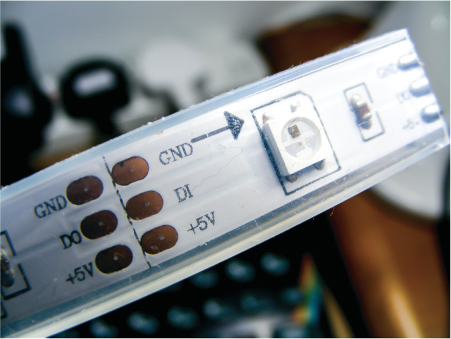
Our addressable RGB LED strip, shown in Figure 6-1, is the three-pin type using PWM. It calls on the PololuLedStrip library, created by Pololu Robotics and Electronics (https://www.pololu.com/), to control the LEDs.
FIGURE 6-1: A three-pin addressable RGB LED strip light
We’ll use our RGB LED strip to create a color output that cycles through the colors of the rainbow, fading each color in and out, as shown in Figure 6-2.
FIGURE 6-2: RGB LED strip cycling through the colors of the rainbow

THE BUILD
Download and add the PololuLedStrip library to your Arduino IDE (check the primer for guidance on saving libraries).
The setup for this project is very simple and doesn’t take long to complete. Most three-pin addressable RGB LED strips come without wires attached to the strip connections, so you’ll have to connect them. With the LEDs facing upward, begin by soldering solid-core wire to the three connections at the left end of the strip, as shown in Figure 6-3.
FIGURE 6-3: Soldering wires to the left-side connections

Connect the LED’s GND pin to Arduino GND, DI to Arduino pin 12, and +5V to Arduino +5V, as shown in the following table.
RGB LED STRIP
ARDUINO
GND
GND
DI (data in)
Pin 12
+5V
+5V
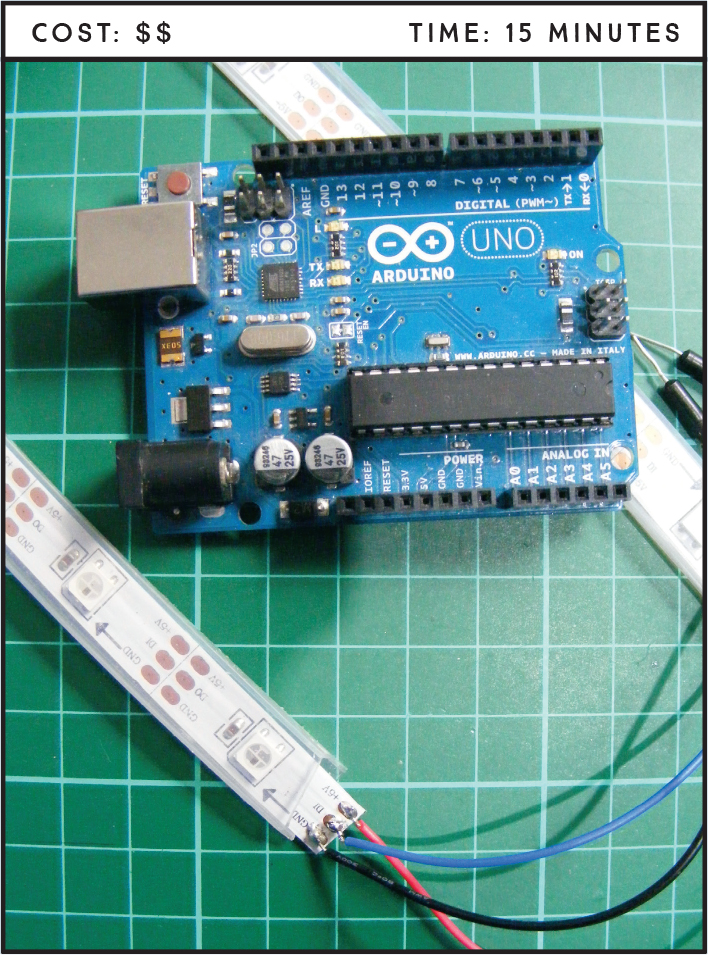
Check your setup against the circuit diagram in Figure 6-4, and then upload the code in “The Sketch” below and power the Arduino using your battery pack.
FIGURE 6-4: The circuit diagram for the rainbow strip light

THE SKETCH
The sketch first calls on the PololuLedStrip library, which we use to control the individual LEDs. Next, it defines the pin to control the data going from the Arduino to the LED strip as 12 and sets the number of LEDs on the strip to 32—you would change this if your strip had a different number of LEDs.
Next is a calculation to control the hue, saturation, and value (HSV) of our LEDs to generate the RGB colors. You can change these using an HSV chart if you want; just do a quick internet search to find a chart for reference.
The WS2812B data sheet states that the color of each LED is encoded as three LED brightness values, which must be sent in GRB (green-red-blue) order. The first color transmitted applies to the LED that is closest to the data input connector, the second color transmitted applies to the next LED in the strip, and so on.
/* PololuLedStrip Library Copyright (c) 2012 Pololu Corporation.
For more information, see http://www.pololu.com/;
http://forum.pololu.com/
Permission is hereby granted, free of charge, to any person
obtaining a copy of this software and associated documentation files
(the "Software"), to deal in the Software without restriction,
including without limitation the rights to use, copy, modify, merge,
publish, distribute, sublicense, and/or sell copies of the Software,
and to permit persons to whom the Software is furnished to do so,
subject to the following conditions:
The above copyright notice and this permission notice shall be
included in all copies or substantial portions of the Software.
THE SOFTWARE IS PROVIDED "AS IS", WITHOUT WARRANTY OF ANY KIND,
EXPRESS OR IMPLIED, INCLUDING BUT NOT LIMITED TO THE WARRANTIES
OF MERCHANTABILITY, FITNESS FOR A PARTICULAR PURPOSE AND NON
INFRINGEMENT. IN NO EVENT SHALL THE AUTHORS OR COPYRIGHT HOLDERS
BE LIABLE FOR ANY CLAIM, DAMAGES OR OTHER LIABILITY, WHETHER IN AN
ACTION OF CONTRACT, TORT OR OTHERWISE, ARISING FROM, OUT OF OR IN
CONNECTION WITH THE SOFTWARE OR THE USE OR OTHER DEALINGS IN THE
SOFTWARE.
LedStripRainbow: Example Arduino sketch that shows how to make a
moving rainbow pattern on an Addressable RGB LED Strip from Pololu.
To use this, you will need to plug an Addressable RGB LED strip from
Pololu into pin 12. After uploading the sketch, you should see a
moving rainbow. */
#include <PololuLedStrip.h>
// Create an ledStrip object and specify the pin it will use.
PololuLedStrip<12> ledStrip;
// Create a buffer for holding the colors (3 bytes per color).
#define LED_COUNT 32
rgb_color colors[LED_COUNT];
void setup() {
}
// Converts a color from HSV to RGB.
// h is hue, as a number between 0 and 360.
// s is saturation, as a number between 0 and 255.
// v is value, as a number between 0 and 255.
rgb_color hsvToRgb(uint16_t h, uint8_t s, uint8_t v) {
uint8_t f = (h % 60) * 255 / 60;
uint8_t p = (255 - s) * (uint16_t)v / 255;
uint8_t q = (255 - f * (uint16_t)s / 255) * (uint16_t)v / 255;
uint8_t t = (255 - (255 - f) * (uint16_t)s / 255) * (uint16_t)v / 255;
uint8_t r = 0, g = 0, b = 0;
switch((h / 60) % 6) {
case 0: r = v; g = t; b = p; break;
case 1: r = q; g = v; b = p; break;
case 2: r = p; g = v; b = t; break;
case 3: r = p; g = q; b = v; break;
case 4: r = t; g = p; b = v; break;
case 5: r = v; g = p; b = q; break;
}
return (rgb_color) {
r, g, b
};
}
void loop() {
// Update the colors.
uint16_t time = millis() >> 2;
for (uint16_t i = 0; i < LED_COUNT; i++) {
byte x = (time >> 2) - (i << 3);
colors[i] = hsvToRgb((uint32_t)x * 359 / 256, 255, 255);
}
// Write the colors to the LED strip.
ledStrip.write(colors, LED_COUNT);
delay(10);
}
TROUBLESHOOTING
Q. The code compiles, but the RGB LED does not light up as expected.
• If the RGB LED strip does not light, make sure that your wires are connected as shown in Figure 6-4, and that your LED strip is the WS2812B type specified.
• If you aren’t doing so already, use an external power source for the RGB LED strip.