
In the first chapter, we performed some very basic configuration for the Intel Edison. Here we need to configure our device with the required libraries and sound setup with the sound card. For this you need to connect the Intel Edison to only one micro USB port. This will be used to communicate using the PuTTY console and transfer files using the FileZilla FTP client:
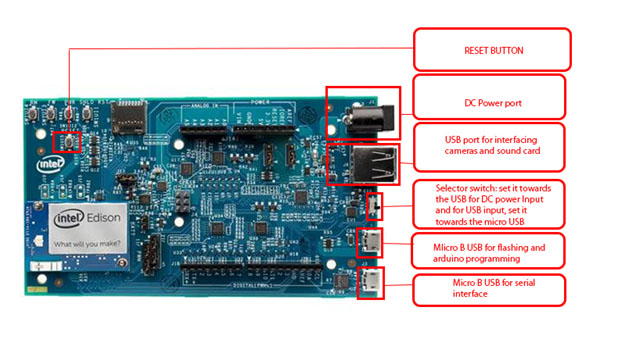
Connect the Intel Edison to the Micro B USB for serial interface to your PC.
Some of the steps were covered in Chapter 1, Setting up Intel Edison; however, we'll show all the steps from the beginning. Open your PuTTY console and log in to your device. Use the configure_edison -wifi to connect to your Wi-Fi network.
Initially, we'll add AlexT's unofficial opkg repository. To add this, edit the /etc/opkg/base-feeds.conf file.
Add these lines to the preceding file:
src/gz all http://repo.opkg.net/edison/repo/all
src/gz edison http://repo.opkg.net/edison/repo/edison
src/gz core2-32 http://repo.opkg.net/edison/repo/core2-32
To do that, execute the following command:
echo "src/gz all http://repo.opkg.net/edison/repo/all
src/gz edison http://repo.opkg.net/edison/repo/edison
src/gz core2-32 http://repo.opkg.net/edison/repo/core2-32" >> /etc/opkg/base-feeds.conf
Update the package manager:
opkg update
Install git using the package manager:
opkg install git
We will now install Edison helper scripts to simplify things a bit:
- First clone the package:
      git clone https://github.com/drejkim/edison-scripts.git ~/edison
      scripts
- Now we have to add ~/edison-scripts to the path:
      echo'export PATH=$PATH:~/edison-scripts'>>~/.profile
      source~/.profile
- Next we will run the following scripts:
      # Resize /boot -- we need the extra space to add an additional
      kernel

          resizeBoot.sh


      # Install pip, Python's package manager

          installPip.sh


      # Install MRAA, the low level skeleton library for IO
      communication on, Edison, and other platforms

          installMraa.sh
The initial configuration is done. Now we'll configure the Edison for sound.
- Now install the modules for USB devices, including USB webcams, microphone, and speakers. Make sure that your sound card is connected to the Intel Edison:
opkg install kernel-modules
- The next target is to check whether the USB device is getting detected or not. To check that, type the lsusb command:

The device that is connected to the Intel Edison is shown in the preceding screenshot. It is highlighted in the box. Once we get the device that is connected to the Edison, we can proceed further.
Now we'll check whether alsa is able to detect the sound card or not. Type in the following command:
aplay -Ll
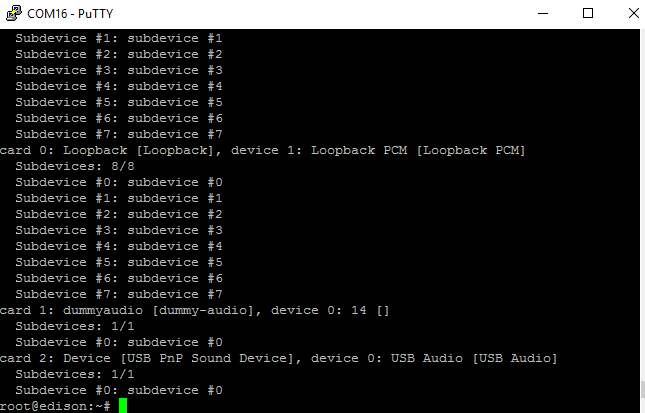
It is noted that our device is getting detected as card 2, named as Device.
Now we have to create a ~/.asoundrc file where we need to add the following line. Please note that Device must be replaced with the device name that is detected on your system:
pcm.!default sysdefault:Device
Now, once this is done, exit and save the file. Next, to test whether everything is working or not, execute the following command and you must hear something on the headphone connected:
aplay /usr/share/sounds/alsa/Front_Center.wav
You should hear the words Front Center.
Now, our target is to record something and interpret the result. So let's test whether recording is working or not.
To record a clip, type in the following command:
arecord ~/test.wav
Press Ctrl + c to stop recording. To play the preceding recording, type the following:
aplay ~/test.wav
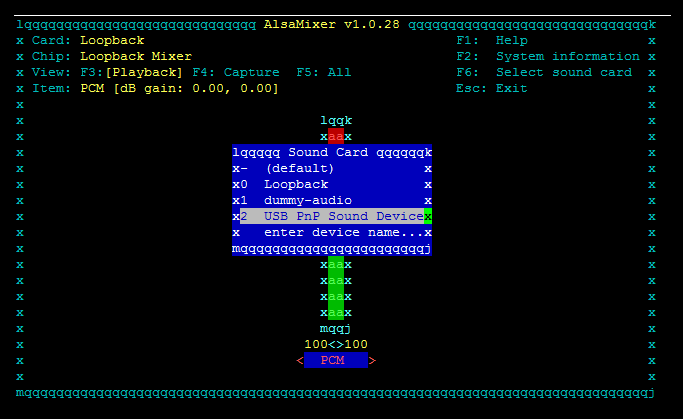
You must hear what you have recorded. If you are not able to hear the sound, type alsamixer and adjust the playback and record volumes. Initially, you need to select the device:
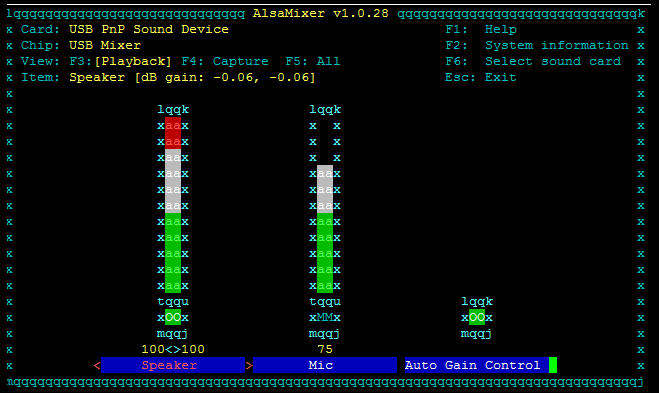
Next, adjust the volume using the arrow keys:
Now everything related to sound is set up. The next aim is to install the packages for speech recognition.
Initially, use Python's pip to install cython:
pip install cython
The preceding package takes a lot of time to install. Once that's done, there are some shell scripts that are required to be executed. I have created a GitHub repository for this that contains the required files and the code. Use the git command to clone the repository (https://github.com/avirup171/Voice-Recognition-using-Intel-Edison.git):
git clone
Next in the bin folder, you will find the packages. Before typing the commands to execute those shell scripts, we need to provide permissions. Type the following command to add permissions:
chmod +x <FILE_NAME>
Next type the filename to execute them. Installation of the packages may take a bit of time:
./installSphinxbase.sh
Next type these for adding to the path:
echo 'export LD_LIBRARY_PATH=/usr/local/lib' >> ~/.profile
echo 'export PKG_CONFIG_PATH=/usr/local/lib/pkgconfig' >> ~/.profile
source ~/.profile
Next install Pocketsphinx:
./installPocketsphinx.sh
Finally, install PyAudio:
./installPyAudio.sh
After this step, all the configurations are set up and we are good to go with the coding. PocketSphinx works with some specific sets of commands. We need to create a language mode and a dictionary for the words to be used. We'll do that using the Sphinx knowledge base tool:
http://www.speech.cs.cmu.edu/tools/lmtool-new.html
Upload a text file containing the set of commands that we want the engine to decode. Then click on COMPILE KNOWLEDGE BASE. Download the .tgz file that contains the necessary files that are required. Once we have those files, copy it to the Edison using FileZilla. Note the names of the files that contain the following extension. Ideally each file should have the same name:
- .dic
- .lm
Move the entire set to the Edison.