
Now that we know how to read the data from the sensors, our next target is to select an IoT platform where we'll upload data. We had a short discussion before about IoT platforms.
In this section, we will be dealing with dweet.io. This IoT platform is extremely simple to implement. We will be using the Node.js SDK for dweet.io. Before going into the details, let's have a look at the platform. Our target is to push the temperature data we obtained into the platform and display it on a dashboard.
dweet.io is a simple publishing and subscribing service for machines (sensors, robots, devices, and so on). It's like Twitter, but for things. Each thing is assigned a unique name and through REST services, we access, and update them. One thing to be noted is that the things we create are public. In order to create a private thing, we need to pay. Here we'll cover only the public aspect of it:
https://dweet.io/faq
- This will be one of the first steps for our weather station, as temperature is an integral part of it:

- Now click on the Play tab to enter the creation area:

- Next, we are going to provide a name to our thing:
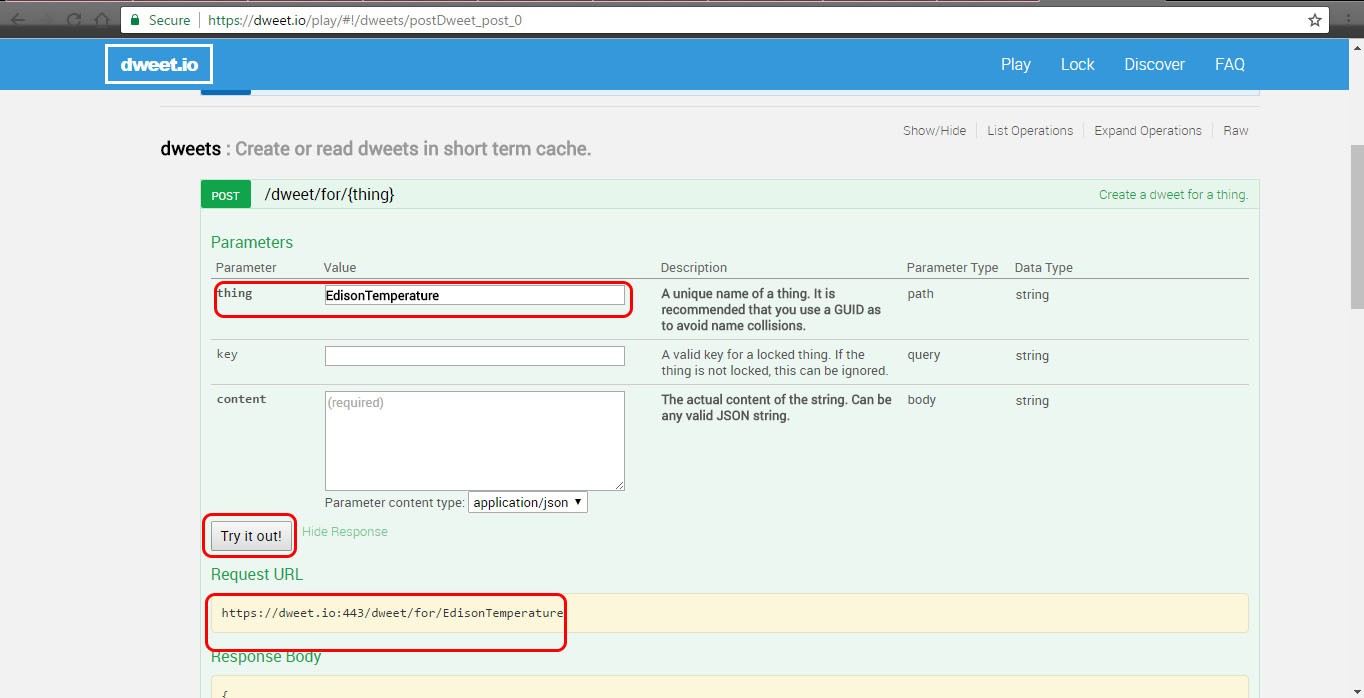
- Name your thing. The name has to be unique.
- After clicking on the Try It Out! button, you will be getting a request URL.
- Now, click on https://dweet.io/follow/EdisonTemperature to browse to your public thing page. Once the Edison is connected, we'll receive data here. So, for now, let's connect a temperature sensor to the Edison and connect it to your PC.
- In this mini project, we are going to write a Node.js program that will access the data from the sensor and upload it to here in the preceding link. Also, instead of writing the code to the Intel XDK, we'll write the code in Notepad++ and transfer it using the FileZilla client.
- But again, we don't have access to the libraries yet. So we need to add those libraries to our Edison device. For that, fire up your PuTTY Terminal and log in to your Edison:

- Next, check whether your device is connected to your Wi-Fi network using the ifconfig command:

- Next, we will install the Node.js sdk for dweet.io on our device. Execute the following command:
npm install node-dweetio -save
It may take some time for the modules to be installed depending on the speed of your Internet connection. The warnings may be ignored.
- Once installed, we'll write the Node.js script for the Edison. Now open your editor and type in the following code:
      function dweetSend()
        {
          vardweetClient = require("node-dweetio"); vardweetio =
          newdweetClient();
          var mraa= require('mraa'), var B=4275;
          var R0=100000;
          var tempPin=new mraa.Aio(0); var a=tempPin.read();
          var R=1023/a-1; R=100000*R;
          var temperature=1/(Math.log(R/100000)/B+1/298.15)-273.15;
          temperature = +temperature.toFixed(2);
          dweetio.dweet_for("WeatherStation",
          {Temperature:temperature}, function(err, dweet)
            {
              console.log(temperature); console.log(dweet.thing); //
              "my-thing"
              console.log(dweet.content); // The content
              of the dweet
              console.log(dweet.created); // The create
              date of the dweet
            });
          setTimeout(dweetSend,10000);
        }
      dweetSend();
To explain the code, let's break it into parts. As you can see, we have a main function named dweetSend, which repeats itself after every 10 seconds. Initially, we need to get data from the temperature sensor. We've connected the temperature sensor to Analog pin 3. If you have a close look at the code that was written in Arduino IDE, then you will find lots of similarities:
vardweetClient = require("node-dweetio");
vardweetio = new dweetClient();
In these lines, we import the node - dweetio library. The next piece of code is similar to the Arduino IDE, where we read the raw value of the analog read and perform required calculations:
var mraa= require('mraa'),
var B=4275; varR0=100000;
var tempPin=new mraa.Aio(0);
var a=tempPin.read();
var R=1023/a-1;
R=100000*R;
var temperature=1/(Math.log(R/100000)/B+1/298.15)-273.15; temperature = +temperature.toFixed(2);
As stated in the preceding code, we have also rounded the temperature value to two decimal places. Next, we push the value to the dweet.io thing channel. Here, we need to mention that our thing name WeatherStation, followed by the name of the parameter, Temperature, and the variable name, temperature:
dweetio.dweet_for("WeatherStation", {Temperature:temperature}, function(err, dweet)
  {
    console.log(temperature); console.log(dweet.thing); // "my-thing"
    console.log(dweet.content); // The content of the dweet
    console.log(dweet.created); // The create date of the dweet
  });
That's how the entire workflow is. So to summarize:
- Import required libraries.
- Based on the circuit, read the raw values from the used pin and process the value to get the desired output.
- Push the value to dweet.io.
Save this code with the name dweetEdison.js and to run this code, type in the following command:
node dweetEdison.js
Once you run the code by executing the preceding statement in the PuTTY Terminal, you will see the following output:

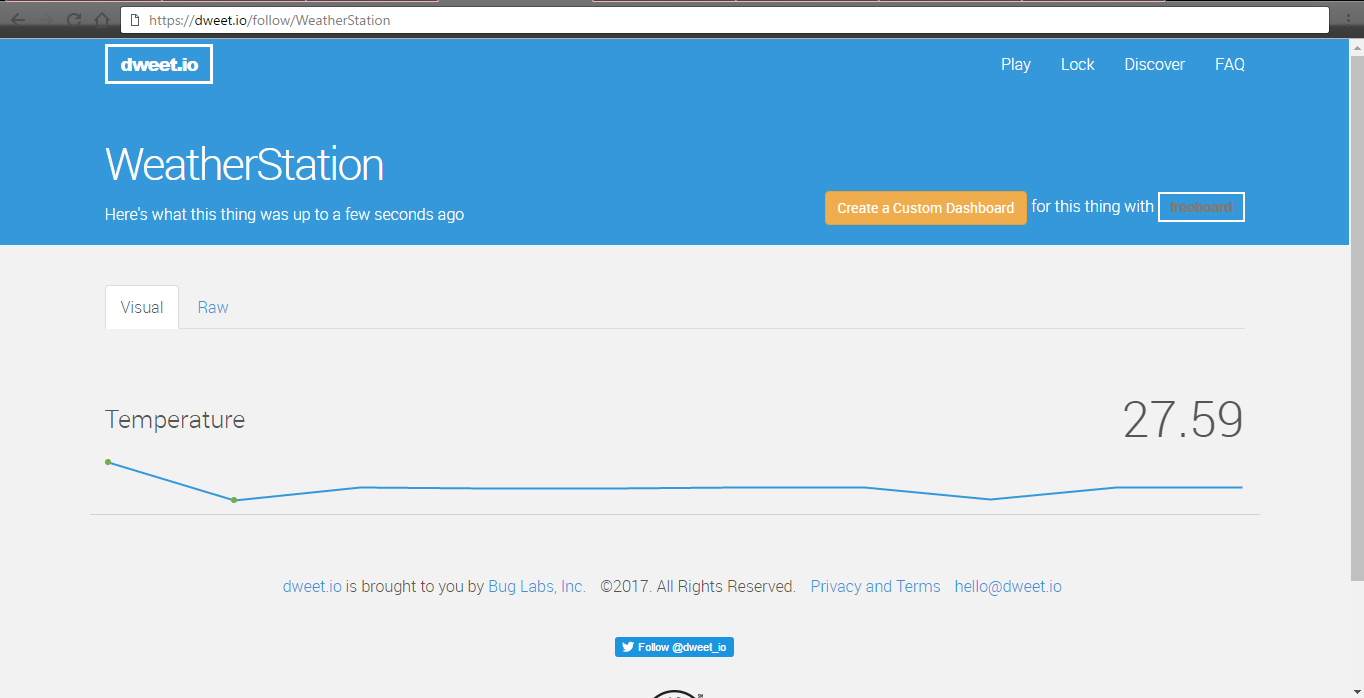
Now, once you see this, then your code is running successfully. Now we will head on to the dweet.io page and see whether our data is really getting uploaded or not. We have named our thing WeatherStation. Your thing name will obviously differ since it's unique.
Now browse to the following URL:
https://dweet.io/follow/YOUR_THING_NAME
You should have a plot or a visual like this:
The plot seems incomplete unless and until we have a gauge. There is something called freeboard.io. It's also free, but again it is public. So, browse to freeboard.io and log in or sign up if you don't have an account:
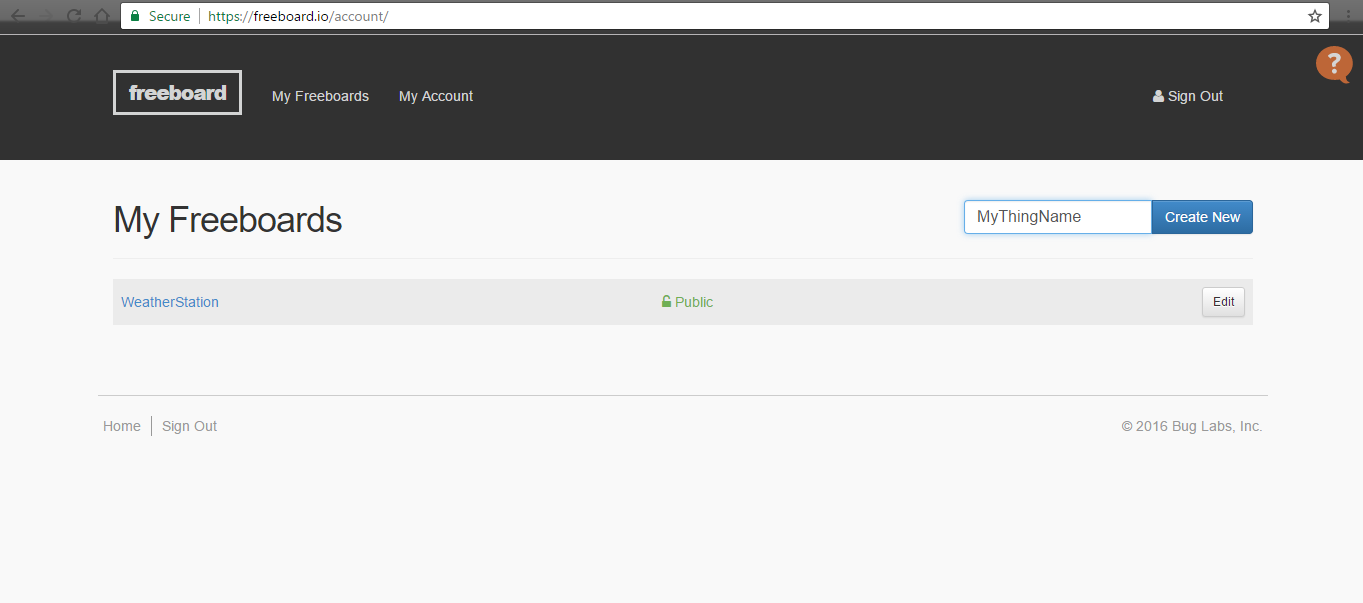
Provide a name and click on Create New. Here we have provided WeatherStation. Once you create the board, you will be automatically redirected to the board design page. Next, under DATASOURCES, click on ADD:

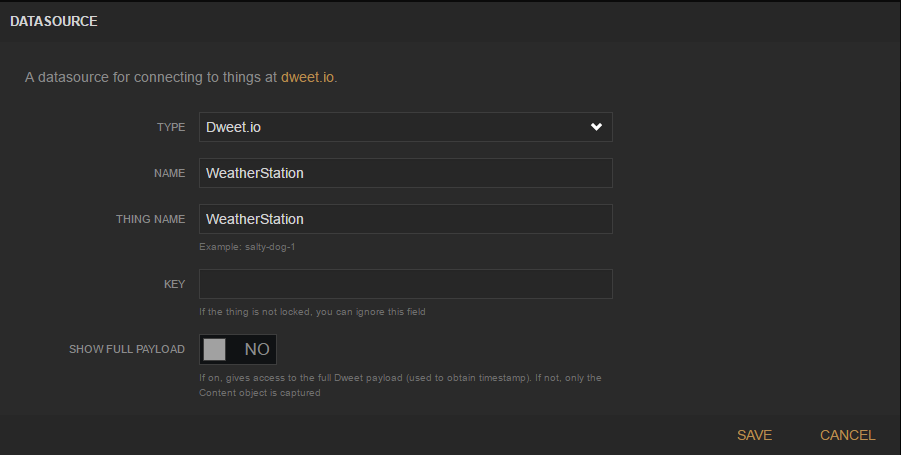
Now, once you click on ADD, you have to select a TYPE. Select Dweet.io. Under NAME, provide any name. For simplicity, make the name and the thing name the same. Since your thing in dweet.io is public, we don't need to provide a key. Click on SAVE to proceed:
Once done, we need to add a pane for our incoming data. For that, click on ADD PANE and proceed to add a new gauge. Fill in the details as shown in the following screenshot. Note that under the value field, we've written datasources["WeatherStation"]["Temperature"]. So here, WeatherStation is your thing name, which is followed by the parameter name that we want to display. Similarly, the project that will be discussed in the upcoming section of this chapter will have other parameters too:

Click on SAVE and you should have your gauge displayed on your board home page.
This gauge won't show any value as of now since your code is not running. So go back to your PuTTY console and run your Node.js code. Once your code is up and running, then the gauge should represent your incoming data, as shown in the following screenshot:

Thus we have deployed a very simple use case of uploading data from the Edison to dweet.io and displaying it on freeboard.io. In the next section, we'll deal with a live IoT project where we'll deal with more than one parameter.