
It is sometimes said that although Blender has a powerful and versatile system to define materials, it lacks a proper shader language to define completely new shaders, for example, to create materials that react to light in novel ways. This is, however, not entirely true.
Blender does not have a compiled shader language but it does a have a powerful node system to combine textures and materials and these nodes can be Python scripts. This enables users to define completely new textures and materials.
In this chapter, we will learn:
- How to write Pynodes that create simple color patterns
- How to write Pynodes that produce patterns with normals
- How to write animated Pynodes
- How to write height-and slope-dependent materials
- How to create shaders that react to the angle of incident light
To illustrate some of its power, we start by looking at a script that creates regular color patterns made of triangles, rectangles, or hexagons.
Note
Materials, shaders, and textures are terms that are often used as synonyms although there are differences in meaning. For our purposes we try to adhere to the following definitions: A texture is a basic building block, for example, a color or normal pattern or simply some function that returns a value depending on the position on a surface. A shader will take any number of textures or just a basic color and will return a color based on the influence of incident light and possibly the view direction. A material is a collection of textures, shaders, and all sorts of properties that can be applied to an object. Pynodes can be textures as well as shaders.
When we design a Pynode we basically design something that provides a function that is called for every pixel on the screen that needs to be shaded by that node (or even more than once, if oversampling is in effect). This function gets among other things the x, y, and z coordinates of the point on the object being shaded that corresponds to the pixel on the screen we are currently calculating. The function is then expected to return something useful such as a color, an intensity value, or something a little less intuitive such as a normal.
In Blender's Node editor window every material node, including a Pynode, is represented by a box which has its inputs on the left and its outputs on the right. These inputs and outputs are often called sockets and are represented by little colored circles (see the next screenshot). These sockets can be used to string nodes together; by clicking on an output socket of one node and dragging the mouse to the input socket of another node, these nodes will be connected. By combining as many different nodes as needed, very complex and powerful shaders can be created.
The power of Blender's Node system not only stems from its many predefined node types and the many ways these nodes may be connected, but also from the fact that we can write new nodes in Python that may be connected in the same way as ordinary nodes.
Pynodes need a way to access the information provided by the input sockets and a way to send their calculated results to the output sockets. The concept of a node and its sockets is structured along an object-oriented model. Let's first look at some example code to prove that this doesn't need to be scary (object-oriented veterans: look the other way or peek through your fingers to just pick up the class definition from the following example):
from Blender import Node
class MyNode(Node.Scripted):
def __init__(self, sockets):

sockets.input = [Node.Socket('Coords', val= 3*[1.0])]

sockets.output = [Node.Socket('Color', val = 4*[1.0])]
def __call__(self):
x,y,z = self.input.Coords
self.output.Color = [abs(x),abs(y),abs(z),1.0]
Before we look at this code in detail try it in Blender to see how it actually works:
- Open a new file in the text editor and give it a distinguishable name.
- Copy the example code.
- Create a simple scene, for example, a simple UV sphere at the origin with a couple of lamps and a camera.
- Assign a
Nodematerial to the sphere like you normally would. - Finally, add in a dynamic node in the Node editor (Add | Dynamic) and select the name of the file that you edited by clicking on the selection button of the dynamic node and picking the file.
The resulting network of nodes (often called a noodle) may look like this:
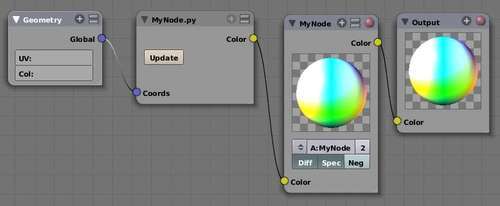
If you render the sphere the result is a colorful ball not unlike a color selection widget.
Now back to the code.
In the first line we import the Node module from Blender because we will be implementing a new type of node, but most of its behavior is already defined in the Node module.
Then we define a class MyNode, a subclass of Node.Scripted, which will behave just like a Scripted node except for the parts that we will redefine.
Next, we define the __init__() function that will be called the first time we create this type of Pynode in the node editor or any time we click on the Update button. When this happens Blender will pass two arguments to this function: self, a pointer to the node we are using, and sockets, a reference to an object that will point to our lists of input and output sockets. These are the nodes in the node editor we will receive input from or send data to.
In the highlighted line we define a list of input socket definitions; only one in this case and it is called Coords. It is a vector input because it is initialized with a list of three floats that define the default values, if this input socket is not connected to another node. Vector nodes are represented as blue circles in the node editor.
Other types of input socket are possible as well and the type is determined by the value of the val argument. Output sockets are defined in the same way. A list of three floats will define a vector socket, a list of four floats a color socket (with a red, green, blue, and alpha component), and a socket representing a simple value such as intensity is initialized by a single float. Note that we cannot distinguish between inputs that need to be filled in by the user or ones that should be connected to another node. We use input sockets for both and will have to document their intended use. Currently, there is no facility to add buttons or other widgets to a Pynode.
Other types of input socket are possible as well and the type is determined by the value of the val argument. Output sockets are defined in the same way. A list of three floats will define a vector socket, a list of four floats a color socket (with a red, green, blue, and alpha component), and a socket representing a simple value such as intensity is initialized by a single float. Note that we cannot distinguish between inputs that need to be filled in by the user or ones that should be connected to another node. We use input sockets for both and will have to document their intended use. Currently, there is no facility to add buttons or other widgets to a Pynode.
Our sample Pynode needs output as well so we define a list consisting of a single output socket called Color. It has four float values as a default specifying the red, green, blue, and alpha values respectively.
Next we define a function __call__() that is called each time a pixel is shaded. It takes no arguments but self—a reference to the current node that is used in the following lines to access the input and output sockets.
In the body of __call__() we retrieve the three components from the input socket called Coords and assign them to easy-to-remember variables. Finally, we create a new four-component list that represents our calculated color and assign it to the output socket called Color.
This is the basis to define simple textures but there is more information available to the node (as we will see in the following sections) so some pretty sophisticated effects can be designed. We end this section with a slightly more elaborate node that builds on the same principles we saw earlier but creates more useful patterns.