
In the previous chapters, we looked mainly at the scripting aspects of the individual components that make up a Blender scene such as meshes, lamps, materials, and so on. In this chapter, we will turn to the rendering process as a whole. We will automate this rendering process, combine the resulting images in various ways, and even turn Blender into a specialized web server.
In this chapter, you will learn how to:
- Automate the rendering process
- Create multiple views for product presentations
- Create billboards from complex objects
- Manipulate images, including render results, by using the Python Imaging Library (PIL)
- Create a server that creates on-demand images that may be used as CAPTCHA challenges
- Create a contact sheet
By now, you might expect that rendering can be automated as well, and you're quite right. The Blender Python API provides access to almost all parameters of the rendering process and lets you render individual frames as well as animations. This allows for automating many tasks that would be tedious to do by hand.
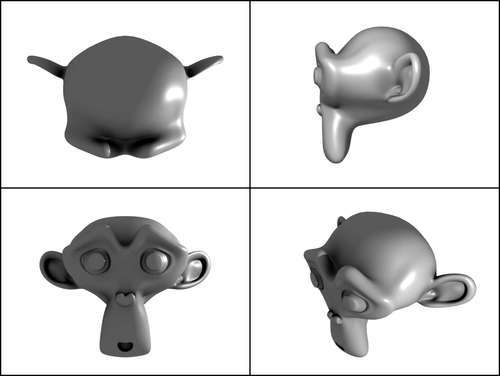
Say you have created an object and want to create a single image that shows it from different angles. You could render these out separately and combine them in an external application, but we will write a script that not only renders these views but also combines them in a single image by using Blender's image manipulation capabilities and an external module called PIL. The effect we try to achieve is shown in the illustration of Suzanne, showing her from all of her best sides.
Blender is an excellent tool that provides you not only with modeling, animating, and rendering options but has compositing functionality as well. One area that it does not excel in is "image manipulation". It does have an UV-editor/Image window of course, but that is very specifically engineered to manipulate UV maps and to view images rather than to manipulate them. The Node editor is also capable of sophisticated image manipulation but it has no documented API so it can't be configured from a script.
Of course, Blender cannot do everything and surely it doesn't try to compete with packages such as GIMP (www.gimp.org), but some built-in image manipulation functions would have been welcomed. (Each image can be manipulated on the pixel level but this would be fairly slow on large images and we still would have to implement high-level functionality, such as alpha blending or rotating images.)
Fortunately, we can access any image generated by Blender from Python, and in Python it is fairly simple to add additional packages that do provide the extra functionality and use them from our scripts. The only drawback is that any script that uses these additional libraries is not automatically portable so users would have to check that the relevant libraries are available to them.
The Python Imaging Library (PIL) that we will be using is freely available and easy to install. Therefore, it should pose no problem for the average user. However, as it is possible to implement the simple pasting functionality (we will see below) using just Blender's Image module, we do provide in the full code a minimalist module pim that implements just the bare minimum to be able to use our example without the need to install PIL. This independence comes at a price: our paste() function is almost 40 times slower than the one provided by PIL and the resulting image can be saved only in TARGA (.tga) format. But you probably won't notice that as Blender can display TARGA files just fine. The full code is equipped with some trickery to use PIL (if it's available) and our replacement module if it isn't. (This is not shown in the book.)
Note
The Python Imaging Library (PIL)
PIL is an open source package available for free from http://www.pythonware.com/products/pil/index.htm. It consists of a number of Python modules and a core library that comes precompiled for Windows (and is easy enough to compile on Linux or might even be available in the distribution already). Just follow the instructions on the site to install it (just remember to use the correct python version to install PIL; if you have more than one version of Python installed, use the one Blender uses as well to install).
What steps do we have to take to create our combined image? We will have to:
- Create cameras if needed.
- Frame the cameras on the subject.
- Render views from all cameras.
- Combine the rendered images to a single image.
The code starts off by importing all of the necessary modules. From the PIL package we need the Image module, but we import it under a different name (pim) to prevent name clashes with Blender's Image module, which we will be using as well:
from PIL import Image as pim
import Blender
from Blender import Camera, Scene, Image, Object, Mathutils, Window
import bpy
import os
The first utility function that we encounter is paste(). This function will combine four images into one. The images are passed as filenames and the result is saved as result.png unless another output filename is specified. We assume all four images to have the same dimensions, which we determine by opening the first file as a PIL image and examining its size attribute (highlighted in the next code). The images will be separated and bordered by a small line with a solid color. The width and color are hardcoded as the edge and edgecolor variables, although you might consider passing them as arguments:
def paste(top,right,front,free,output="result.png"):
im = pim.open(top)
w,h= im.size
edge=4
edgecolor=(0.0,0.0,0.0)
Next, we create an empty image big enough to hold the four images with the appropriate borders. We will not be drawing any borders specifically, but just defining the new image with a solid color onto which the four images will be pasted at a fitting offset:
comp = pim.new(im.mode,(w*2+3*edge,h*2+3*edge),edgecolor)
We already opened the top image so all we have to do is paste it in the upper-left quadrant of our combined image offset in both the horizontal and vertical directions by the border width:
comp.paste(im,(edge,edge))
Pasting the three other images follows the same line: open the image and paste it at the correct position. Finally, the combined image is saved (highlighted). The file type of the saved image is determined by its extension (for example, png) but might have been overridden had we passed a format argument to the save() method. Note that there was no reason to specify a format for the input files as the image type is determined from its contents by the open() function.
im = pim.open(right)
comp.paste(im,(w+2*edge,edge))
im = pim.open(front)
comp.paste(im,(edge,h+2*edge))
im = pim.open(free)
comp.paste(im,(w+2*edge,h+2*edge))
comp.save(output)
Our next function renders the view from a specific camera and saves the result to a file. The camera to render is passed as the name of the Blender Object (that is, not the name of the underlying Camera object). The first line retrieves the Camera object
and the current scene and makes the camera current in the scene—the one that will be rendered (highlighted below). setCurrentCamera() takes a Blender Object, not a Camera object, and that's the reason we passed the name of the object.
def render(camera):
cam = Object.Get(camera)
scn = Scene.GetCurrent()
scn.setCurrentCamera(cam)
context = scn.getRenderingContext()
As we might use this function in a background process we will be using the renderAnim() method of the rendering context rather than the render() method. This is because the render() method cannot be used in a background process. Therefore, we set the current frame and both the start and end frames to the same value to ensure that renderAnim() will render just a single frame. We also set displayMode to 0 to prevent an extra render window popping up (highlighted in the next code snippet):
frame = context.currentFrame()
context.endFrame(frame)
context.startFrame(frame)
context.displayMode=0
context.renderAnim()
The renderAnim() method renders frames to files so our next task is to retrieve the filename of the frame that we just rendered. The exact format of the filename may be specified by the user in the User Preferences window, but by calling getFrameFilename() explicitly we ensure that we get the right one:
filename= context.getFrameFilename()
As the frame number will be the same for each camera view that we render, we will have to rename this file otherwise it would be overwritten. Therefore, we create a suitable new name consisting of the path of the frame we just rendered and the name of the camera. We use portable path manipulation functions from Python's os.path module so everything will work just as well under Windows as on Linux, for example.
As our script may have been used already, we try to remove any existing file with the same name because renaming a file to an existing filename will fail under Windows. Of course, there might not be a file yet—a situation we guard against in the try block. Finally, our function returns the name of the newly created file:
camera = os.path.join(os.path.dirname(filename),camera)
try:
os.remove(camera)
except:
pass
os.rename(filename,camera)
return camera
The next important task is to frame the cameras, that is, to choose a suitable camera angle for all of the cameras in such a way that the subject fits the available area in the picture in an optimal way. We want the camera angle to be the same for all cameras to provide the viewer with a consistent perspective from all viewing angles. Of course, this could be done manually, but this is tedious so we define a function to do the work for us.
The way we do this is to take the bounding box of our subject and determine the viewing angle of the camera by assuming that this bounding box must just fill our view. Because we can calculate the distance of the camera to the center of the bounding box, the viewing angle must be the same as the acute angle of the triangle formed by the bounding box and the camera distance.
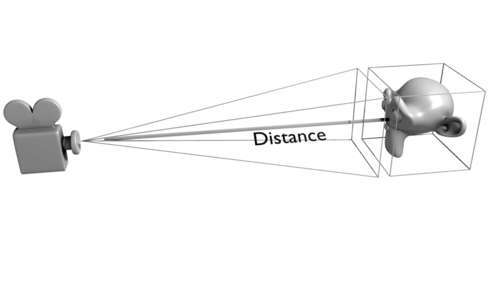
We calculate this angle for all of the cameras and then set the camera angle for each camera to the widest angle calculated to prevent unwanted clipping of our subject. Note that this algorithm may fail if the cameras are too close to the subject (or equivalently, if the subject is too large), in which case some clipping may occur.
The code is pretty heavy on the math, so we start off by importing the necessary functions:
from math import asin,tan,pi,radians
The function itself will take a list of names of Blender objects (the cameras) and a bounding box (a list of vectors, one for each corner of the bounding box). It starts off by determining the minimum and maximum extents of the bounding box for all three axes and the widths. We assume that our subject is centered on the origin. maxw will hold the largest width along any axis.
def frame(cameras,bb):
maxx = max(v.x for v in bb)
maxy = max(v.y for v in bb)
maxz = max(v.z for v in bb)
minx = min(v.x for v in bb)
miny = min(v.y for v in bb)
minz = min(v.z for v in bb)
wx=maxx-minx
wy=maxy-miny
wz=maxz-minz
m=Mathutils.Vector((wx/2.0,wy/2.0,wz/2.0))
maxw=max((wx,wy,wz))/2.0
Next, we get the world space coordinates for each Camera object to calculate the distance d to the midpoint of the bounding box (highlighted in the next code). We store the quotient of maximum width and distance:
sins=[]
for cam in cameras:
p=Mathutils.Vector(Object.Get(cam).getLocation('worldspace'))
d=(p-m).length

sins.append(maxw/d)
We take the largest quotient calculated (as this will amount to the widest angle) and determine the angle by calculating the arc sinus and finish by setting the lens attribute of the Camera object. The relation between camera's viewing angle and the value of the lens attribute in Blender is complex and scarcely documented (lens holds an approximation of the focal length of an ideal lens). The formula shown is the one taken from Blender's source code (highlighted).
maxsin=max(sins)
angle=asin(maxsin)
for cam in cameras:
Object.Get(cam).getData().lens = 16.0/tan(angle)
Another convenience function is the one that defines four cameras and puts them into the scene suitably arranged around the origin. The function is straightforward in principle but is a little bit complicated because it tries to reuse existing cameras with the same name to prevent unwanted proliferation of cameras if the script is run more than once. The cameras dictionary is indexed by name and holds a list of positions, rotations, and lens values:
def createcams():
cameras = {
'Top' : (( 0.0, 0.0,10.0),( 0.0,0.0, 0.0),35.0), 'Right': ((10.0, 0.0, 0.0),(90.0,0.0,90.0),35.0),
'Front': (( 0.0,-10.0, 0.0),(90.0,0.0, 0.0),35.0), 'Free' : (( 5.8, -5.8, 5.8),(54.7,0.0,45.0),35.0)
}
For each camera in the cameras dictionary we check if it already exists as a Blender object. If it does, we check whether the Blender object has a Camera object associated with it. If the latter is not true we create a perspective camera with the same name as the top-level object (highlighted) and associate it with the top-level object by way of the link() method:
for cam in cameras:
try:
ob = Object.Get(cam)
camob = ob.getData()
if camob == None:
camob = Camera.New('persp',cam)

ob.link(camob)
If there wasn't a top-level object present already we create one and associate a new perspective Camera object with it:
except ValueError:
ob = Object.New('Camera',cam)
Scene.GetCurrent().link(ob)
camob = Camera.New('persp',cam)
ob.link(camob)
We end by setting the location, rotation, and lens attributes. Note that the rotation angles are in radians so we convert them from the more intuitive degrees that we used in our table (highlighted). We end by calling Redraw() to make the changes show up in the user interface:
ob.setLocation(cameras[cam][0])
ob.setEuler([radians(a) for a in cameras[cam][1]])
camob.lens=cameras[cam][2]
Blender.Redraw()
Finally, we define a run() method that strings all components together. It determines the active object and then cycles through a list of camera names to render each view and add the resulting filename to a list (highlighted):
def run():
ob = Scene.GetCurrent().objects.active
cameras = ('Top','Right','Front','Free')
frame(cameras,ob.getBoundBox())
files = []
for cam in cameras:
files.append(render(cam))
We will put the combined pictures in the same directory as the individual views and call it result.png:
outfile = os.path.join(os.path.dirname(files[0]),'result.png')
We then call our paste() function, passing the list of component filenames expanded as individual arguments by the asterisk (*) operator and end with a finishing touch of loading the result file as a Blender image and showing it in the image editor window (highlighted below). The reload is necessary to ensure that a previous image of the same name is refreshed:
paste(*files,output=outfile)
im=Image.Load(outfile)
bpy.data.images.active = im

im.reload()
Window.RedrawAll()
The run() function deliberately did not create any cameras because the user might want to do that himself. The final script itself does take care of creating the cameras, but this might be changed quite easily and is as usual quite simple. After the check to see if it runs standalone it just creates the cameras and calls the run method:
if __name__ == "__main__":
createcams()
run()
The full code is available as combine.py in combine.blend.
The script can be used in the following way:
- Put your subject at the origin (position (0, 0, 0)).
- Create suitable lighting conditions.
- Run
combine.py.
The script may be loaded into the text editor to run with Alt + P but you may also put the script in Blender's scripts directory to make it available from the Scripts | Render menu.