
In chapter 11, we covered binding. In chapter 12, I mentioned that I believe binding to be one of the single most important topics for Silverlight developers. Another reason for that is because all the validation approaches covered in this chapter build directly on the binding system.
Validation is something almost every nontrivial application with a TextBox will need to do at some point. Often, we punt and do simple checking in the code-behind. But, if you want to truly leverage binding, take advantage of patterns such as the ViewModel pattern, and just have better structure to your code, you'll want to use one of the established validation mechanisms provided by Silverlight.
Silverlight provides several ways to validate data. The simplest and oldest approach is to use exception-based validation. In that approach, property setters simply throw exceptions when the validation doesn't pass. This is the code equivalent of my toddler's spitting out the food she doesn't like and, like that, anything more complex than a couple of peas is going to get pretty messy.
It wasn't well-known, but Silverlight 2 included basic exception-based validation capabilities. With the releases of Silverlight 3 and 4, these capabilities became more advanced and the exception-based approach was looked at as more of a stopgap, useful in only the simplest of validation scenarios. For those reasons, we'll concentrate the majority of this chapter on the more modern approaches to validation, such as IDataErrorInfo and INotifyDataErrorInfo.
The IDataErrorInfo and INotifyDataErrorInfo interfaces are the newer approach for validating data in Silverlight 4. They're a bit more complex to implement. (when working with them, start out by creating some helper classes to handle all the goo. You'll thank me for it; and, if you do want to thank me, donations and chocolate are always welcome.)
One main difference with these interfaces, as opposed to an exception-based approach, is how far you allow invalid data to get. With exception-based validation, the accepted approach was to not complete the set operation if the validation fails. Using the new interfaces, invalid data will often make it into the class, and will need to be removed or otherwise handled during the final validation or save processes.
Due to the more flexible nature as well as decoupling from the property setters, these interfaces also allow for cross-field validation, where changing the value of one field can invalidate the value of another field.
The final approach to validation is geared to work with the DataGrid and DataForm covered in chapter 12—data annotations. In chapter 12, we saw that data annotations may be used to control various aspects of display and even editability. In this chapter, we'll investigate the use of data annotations specifically for validation.
To keep the examples consistent, we need to do a little setup work and establish a baseline class to use as our binding source: the Employee class. Once we have that set, we'll briefly look at exception-based validation and the shared validation presentation, then tackle synchronous and asynchronous validation with IDataErrorInfo and INotifyDataErrorInfo, and finally end on attribute-based validation as used by the DataForm and DataGrid covered in chapter 12.
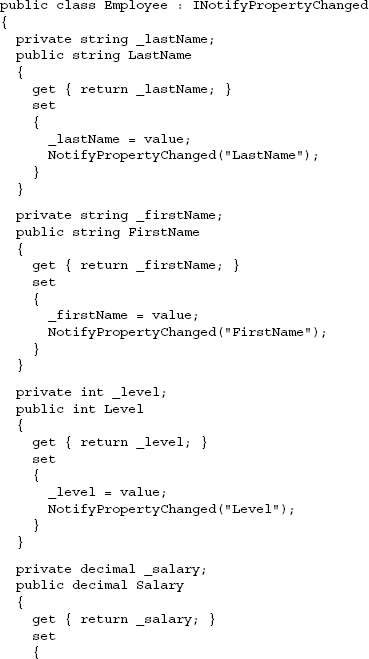
Throughout this chapter, we'll refer back to the Employee class defined here, which will be used as our binding data source. This class represents a fictional employee in a human resources management system.
The Employee class contains the public properties shown in table 13.1.
The class source code is shown in listing 13.1. Note that the Employee class implements the INotifyPropertyChanged interface to support binding change notification, discussed in chapter 11.
Table 13.1. Employee class properties
Property | Description |
|---|---|
Last Name | The employee's last (or family) name |
First Name | The employee's first (or given) name |
Level | The employee's salary level This puts the employee into specific salary "buckets." |
Salary | The salary, in USD, for this employee |
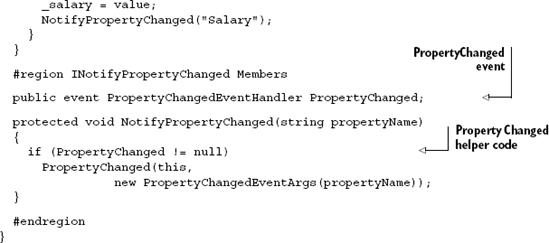
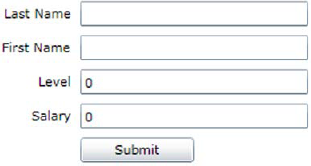
You won't see validation in action unless you wire up some UI, so we'll build a basic user interface that works against a single instance of the Employee class. We'll keep it simple and use code-behind, but I refer you to chapter 16 for best practices on structuring your application using the ViewModel pattern. The XAML and C# for the UI are shown in listing 13.2.
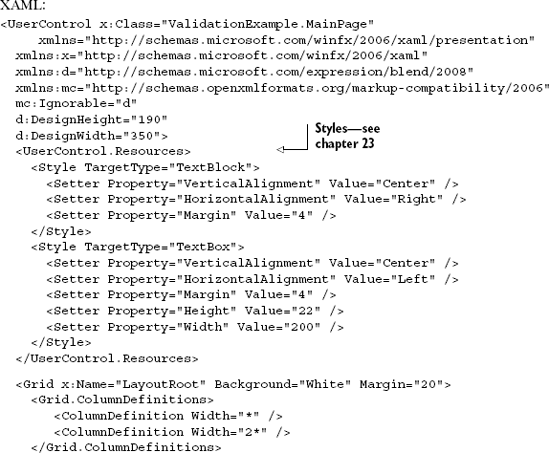
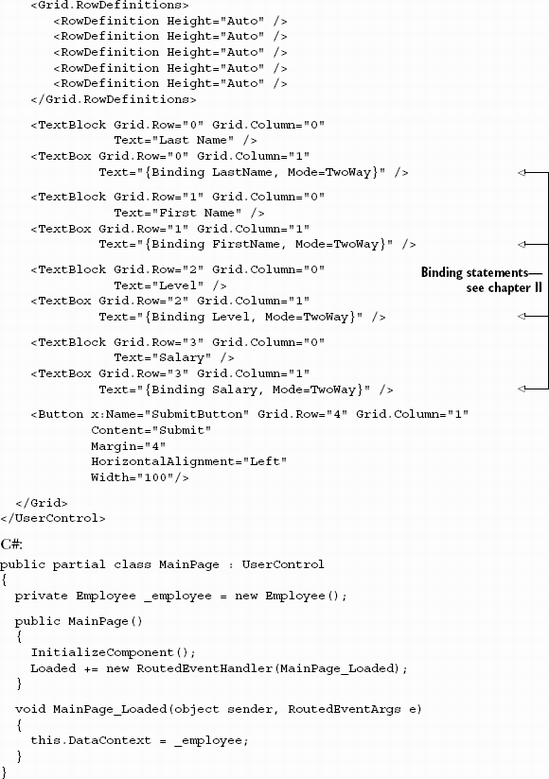
The user interface includes four text boxes, each with a label. There's also a Submit button, but it's there just for aesthetic purposes; all of our validation will happen on lost focus (blur for you web folks). The resulting form should look like figure 13.1. Note that the Level and Salary both show 0; this shows that binding is working for those fields.
That sets up a basic single-entity data entry form we can use for the validation examples included in this chapter minus the ones specific to the DataForm and DataGrid. Throughout this chapter we'll modify various aspects of the Employee class, as well as the binding statements in the form XAML. As we move through the examples, it may be helpful to refer back to these listings.
The first type of validation we'll look at is also the simplest and the one with the most history: exception-based validation.
It wasn't well-known, but Silverlight 2 included basic validation capabilities. With the release of Silverlight 3, these capabilities became more advanced, so we now have the ability to validate bound data and display appropriate error messages using the built-in controls in a standardized and easy to template way. The binding syntax continues to use the ValidatesOnExceptions parameter to enable the display of validation messages when a property setter raises an exception, but the built-in control templates have been updated to provide appropriate display of error state.
Though no longer widely used, it's worth covering exception-based validation for those times when it really is the most appropriate approach. It's also necessary to understand so you can respond to the built-in type validation exceptions.
In this section, we'll look at the basics of using exception-based validation both for your own errors and built-in system errors and then move on to custom validation code and combining multiple validation messages. We'll wrap up this section with a look at the built-in Validation UI in Silverlight, something that applies to all forms of validation.
Even if you don't plan to have your own exception-based validation errors, it's worth handling them in order to get the benefits of automatic type checking. Binding with exception-based validation enabled, in its simplest form, looks like this:
The example binds the TextBox to the LastName property of the object that's the current data context. The ValidatesOnExceptions parameter informs the binding system to report any binding exceptions to the TextBox.
One nice side effect of this is that you get data type validation for free. For example, if you try to enter letters into a decimal property such as the Salary field, you'll get a type mismatch validation error.
In addition to simple data type validation, you can perform virtually any type of validation you want by writing a little code inside the property setter.
Referring back to the Employee class from listing 13.1, let's modify the LastName property to perform some basic validation. We'll make the last name a required field and then make sure it has a length of at least two characters:
public string LastName
{
  get { return _lastName; }
  set
  {
    if (string.IsNullOrEmpty(value))
      throw new Exception("Last Name is a required field.");

    if (value.Trim().Length < 2)
      throw new Exception("Name must be at least 2 letters long.");

    _lastName = value;
    NotifyPropertyChanged("LastName");
  }
}
For brevity, I used the base Exception class for our validation errors. In practice, you'll want to be less generic with your exception types, just as you would when throwing exceptions for hard errors in code. In order for this code to work, you'll need to run without debugging (or ensure the appropriate IDE debugging break options are set, now a default in Visual Studio 2010); otherwise, you'll hit a break in the property setter.
In our setter, we have two guard conditions that throw exceptions when unmet. Since these are real exceptions, the first one hit will pop out of the setter. If you want to have more than one validation rule checked simultaneously, you'll need to combine your checks and throw only a single exception, perhaps like this:
private string _lastName;
public string LastName
{

    get { return _lastName; }
    set
    {
        string message = string.Empty;
        bool isOk = true;

        if (string.IsNullOrEmpty(value))
        {
            message += "Last Name is a required field. ";
            isOk = false;
        }

        if (value.Trim().Length < 5)
        {
            message += "Last Name must be at least 2 letters long. ";
isOk = false;
}
if (isOk)
{
_lastName = value;
NotifyPropertyChanged("LastName");
}
Else
{
throw new Exception (message.Trim());
}
}
}Admittedly, that's a hack, especially once you have more than a couple of rules associated with a single field. If you want to stick with exception-based validation, you're forced to live with the limitations imposed by an exception-based system, including both single checks and the debugging hassles.
When you bind the TextBox to the instance of the Employee class with the simple (one message) exception-based validation code in-place, change the binding statement to validate on exceptions as shown earlier, and try to enter data that violates the rules, you'll get an experience like that shown in figure 13.2 when you tab off the field.
Like almost everything else in Silverlight, the display of the validation error tooltip and the error state of the TextBox are both completely customizable by editing the control template. We'll discuss styling and control templates in chapter 23.
Validation using exception code inside properties can be convenient, but it certainly doesn't look clean. It makes debugging sometimes difficult because there are exceptions on the stack. Another issue is that validation errors can only be raised when a setter is called, not in response to another action such as the changing of a value in a related field. And, truthfully, many of us just have an aversion to using exceptions for business or validation rules.
Silverlight 4 introduced the IDataErrorInfo and INotifyDataErrorInfo interfaces. IDataErrorInfo, covered in the next section, was previously available in WPF, but INotifyDataErrorInfo, covered in section 13.4, is a completely new interface. These interfaces help eliminate some of the issues present with exception-based validation because they have a completely different exception-free implementation. But the same styling guidelines and error display features still apply. In addition, they offer some features, such as asynchronous validation, that would be cumbersome or impossible to implement in an exception-based model.
IDataErrorInfo was introduced in order to address some of the concerns raised by exception-based validation. Unlike exception-based validation, there are no exceptions on the call stack when validation fails. This approach is also more flexible when it comes to setting validation errors for individual fields, regardless of whether their setters are called.
We'll start the discussion of IDataErrorInfo by taking a look at the interface members and the binding statement. We'll then work on handling simple validation errors. Once we have the right approach for handling simple validation errors, we can look at something that IDataErrorInfo can do that was difficult with exception-based validation: cross-field validation errors. Finally, since you'll want to combine the built-in type checking with your custom validation errors, we'll look at what it takes to combine IDataErrorInfo validation with exception-based validation.
Located in the System.ComponentModel namespace, the IDataErrorInfo interface is meant to be implemented by any class you want to use as a binding source and also want to have surface validation errors.
The IDataErrorInfo interface contains two properties: Error and Item. These properties are described in table 13.2.
Table 13.2. IDataErrorInfo members
Property | Description |
|---|---|
| Set this to have a single error message that applies to the entire object. |
| A collection of errors, indexed by property name. Set these to have errors specific to individual fields. |
You can already see how this is going to provide more options than the exception-based approach. With a simple collection of messages, we can add and remove them using code in any place in our class. In addition, the class-scoped error message lets us provide errors that are difficult to attach to any single property.
In return for this flexibility, you'll need to write a bit more code. Before we do that, though, we need to modify the form XAML so that it responds to the IDataErrorInfo errors rather than the exception-based errors. The binding statement for each Text-Box should look like this:
Text="{Binding LastName, Mode=TwoWay, ValidatesOnDataErrors=True}"Note the ValidatesOnDataErrors property versus the ValidatesOnExceptions property. As the name suggests, setting ValidatesOnDataErrors to true tells the binding system to watch the IDataErrorInfo interface on your class and respond to any errors reported.
Now that the binding is set up for each of the TextBox instances on the form, we can get to the actual validation code. We'll put the validation code inline in the Employee class. Once you have some experience with it, you may want to pull the common validation helper code out into a separate class, called from your entities.
The first thing to do is to implement IDataErrorInfo in the class. The modifications to the Employee class to do this look like listing 13.3.
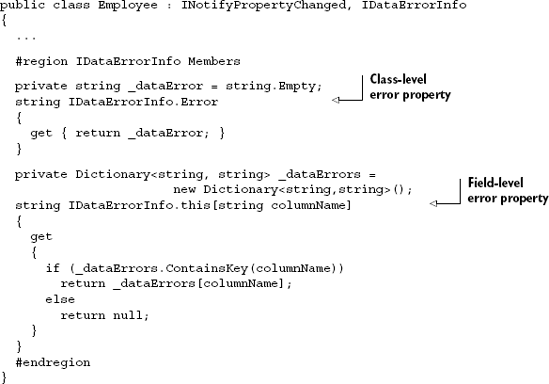
The Dictionary of strings holds the field-level error messages, whereas the single string property holds the class-level error message. To try out the interface, we'll implement the same validation we did in the simple exception-based validation example and check the length of the LastName field:
public string LastName
{
  get { return _lastName; }
  set
  {
    if (string.IsNullOrEmpty(value))
      _dataErrors["LastName"] = "Last Name is required";
    else if (value.Trim().Length < 2)
      _dataErrors["LastName"] =
             "Last Name must be at least 2 letters long.";
else
if (_dataErrors.ContainsKey("LastName"))
_dataErrors.Remove("LastName");
_lastName = value;
NotifyPropertyChanged("LastName");
}
}There are two primary differences in the structure of this rule-checking code as opposed to the exception-based code. First, we needed to include a branch that clears the error when valid, and second, the rules as written let potentially bad data into the class. The second difference is a matter of preference and business rules; you may easily change it so the data is only set when valid. The former check is required because the only thing the binding system uses to check for the presence of an error is whether employee["FieldName"] returns a string or null.
Running the application produces the same results as the exception-based version, as it should. We changed only our implementation of validation at the business object level, not the user interface elements that display the results.
What about cases when you want to validate more than one field? For example, let's say that we need to ensure that an employee's salary is in range when related to his or her level. The valid salary ranges for each level are listed in table 13.3.
Table 13.3. Validation rules for salary and level
Level | Allowable salary range |
|---|---|
100 | 50,000–64,999 |
101 | 65,000–79,999 |
102 | 80,000–104,999 |
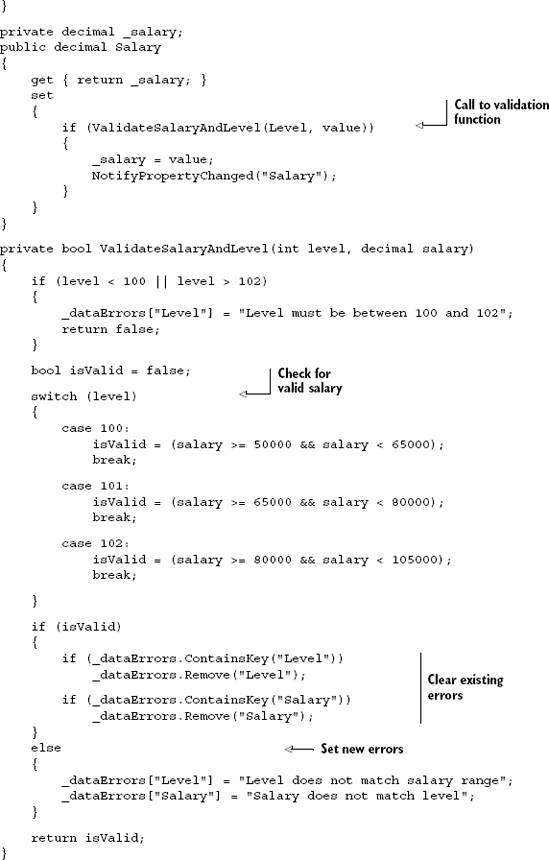
You could put this in the setter for one of the fields, but unless you include the check in both, you're making the mistake of assuming the field data will be input in a specific order. In cases like this, it's better to pull the validation code out into a common function and call it from both setters, as shown in listing 13.4.
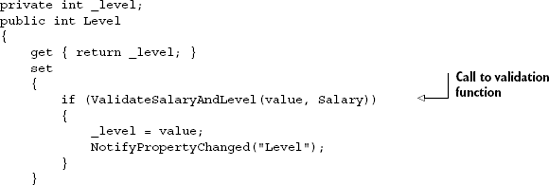

In this example, I decided not to allow invalid values into the class. Validation using this interface makes that a simple choice to make. The code that makes that decision is inside the properties themselves.
The ValidateSalaryAndLevel function is the meat of the validation for these two properties. It takes in both the salary and the level (one of which will always be the current value and the other an entered but not set value) and first validates the level, then validates that the salary falls within the correct range for the level. If so, it clears any previous errors. If not, it sets new errors.
One thing you may have noticed is the proliferation of magic strings (the property names). When implementing this in your own code, you'll want to either use constants for the string names, or use reflection to dynamically pull property names from the classes. The former is quicker both to develop and at runtime; the latter is more robust but slower.
When run, the cross-field validation looks like this figure 13.3. If not, you may have forgotten to add the ValidatesOnDataErrors property to your binding statement. IDataErrorInfo is great, but one thing we lost in the process was the automatic errors when validating the data types. To continue to support that, we'll need to return to exception-based validation.
When we turned on ValidatesOnDataErrors, we removed the ValidatesOnExceptions parameter. That's used not just by our own code but also by the built-in type checking. For example, when you try to assign a string like "dfdf" to an int, you'll get an exception. That exception bubbles up and, if not handled by the binding system, it just disappears.
Luckily, this is easy to fix. Simply modify the binding statement to include both parameters:
When run, the result will look like figure 13.4. Note that, since the exception will be thrown before your property setter code executes, this exception takes precedence over your own validation code.
Using both modes gives you the best of both worlds: you don't need to handle basic type checking, and you get more robust validation support for your own custom code.
IDataErrorInfo is a powerful interface for surfacing your own validation errors. It provides a way to surface errors for the entire class or for individual fields. It also makes it possible to perform cross-field validation or multifield validation without invoking all involved property setters through the binding system.
It's not without its faults, though. String-based property access can get you into trouble when you refactor (or have a typo), and the validation code is all synchronous, run on the client. There are tricks for working around the string-based problem (constants, reflection), but what do you do when you want to validate through a service or do some other long-running validation call? For those instances, we have INotifyDataErrorInfo.
IDataErrorInfo is a synchronous operation validation approach. Though you can bend it to surface errors in an asynchronous way, it's not really optimized for that. In addition, IDataErrorInfo doesn't support having multiple errors for a single property.
INotifyDataErrorInfo solves both of these issues. Though similar in concept to IDataErrorInfo, its design specifically supports asynchronous validation and the method for returning validation errors supports multiple errors for a single field.
We'll start our coverage of INotifyDataErrorInfo with the interface members and how to implement them in your own class. Then we'll move on to the modifications required in the binding statement. Next, because we'll need to show asynchronous validation, we'll implement a simple WCF-based web service. Finally, we'll implement an asynchronous validation function to call the service and call that from our class.
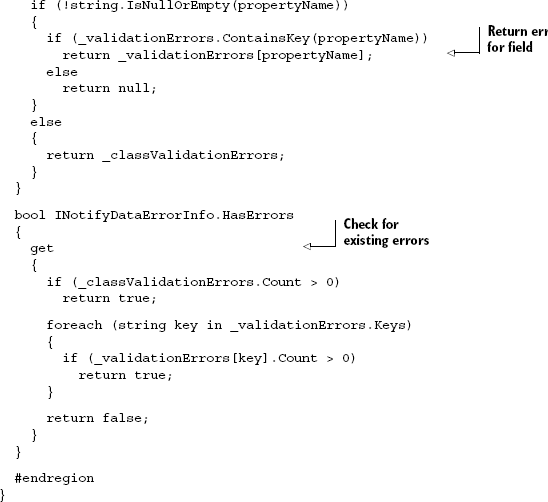
Like the IDataErrorInfo interface, the INotifyDataErrorInfo interface is located in the System.ComponentModel namespace. The interface has only three members, as shown in table 13.4, and is conceptually similar to IDataErrorInfo but optimized for asynchronous operation.
Table 13.4. INotifyDataErrorInfo members
Member | Description |
|---|---|
| This is a method that returns all of the validation errors for a specific field. If the |
| This is a property that returns true if the object has errors; false otherwise. |
| This is an event similar to the |
One difference from IDataErrorInfo you'll immediately notice is the addition of the event ErrorsChanged. Since INotifyDataErrorInfo is meant to be used in asynchronous validation scenarios, it uses an event-based mechanism for notifying listeners of new validation errors.
GetErrors will require the most setup because you need a backing store with a collection of validation error messages for each field you'll validate.
Note
Silverlight will call GetErrors on each public member of your class, even if you don't explicitly support listening to INotifyDataErrorInfo in every given binding statement. Be sure to handle this situation in your own code.
As was the case with IDataErrorInfo, the increase in flexibility means an increase in code. The interface itself is simple enough but, behind that, you must maintain several collections in order to surface the errors. The code to implement INotifyDataErrorInfo is shown in listing 13.5.
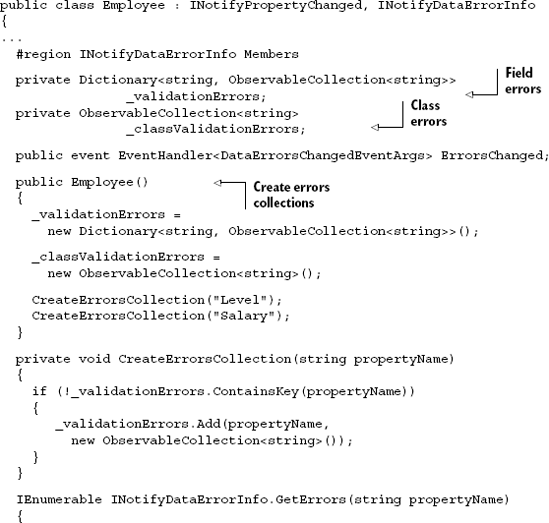
That's what's needed for the interface. I included the code for it but rarely—if ever—bother with class-level errors, preferring instead to light up specific fields. Your mileage may vary.
In addition to implementing the interface, the binding on the fields will need to be modified to support listening to the INotifyDataErrorInfo interface, just as we did with the other validation approaches:
The next step is to create some code to do the actual validation. Let's assume for a moment that the salary and level validation requires a web service call rather than a simple in-code lookup table. The web service may call out to a rules engine or may simply look up values in the database.
In the web project associated with this Silverlight project, add a folder called Services and into it add a new Silverlight-Enabled WCF Service called ValidationService. The template is essentially a SOAP web service served up using WCF. You'll find it easier to use than full-blown WCF and more functional than an .asmx service.
Inside the service code, create a ValidateSalaryAndLevel method that looks like listing 13.6; we'll cover web services in more detail in chapter 14.
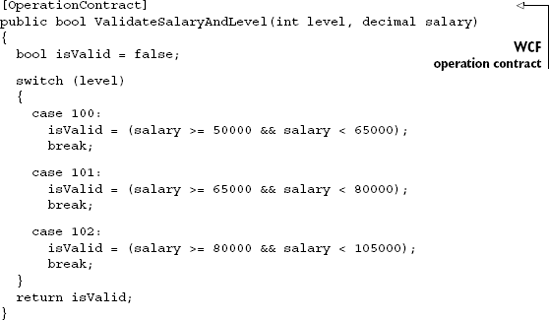
For simplicity, I chose the simple route of returning a Boolean and left it up to the client to assign the appropriate messages to the controls. You may decide instead to return a class that has a Boolean indicating whether validation passed and then a collection of error messages with field names or a couple of strongly-typed properties with the error messages for each field.
The next step is to add a service reference in your Silverlight project to the WCF web service in the web project. Right-click the Silverlight project, select Add Service Reference, click Discover, and name the reference ValidationServices.
Once the reference is added, add the client code from listing 13.7 into the Employee class.
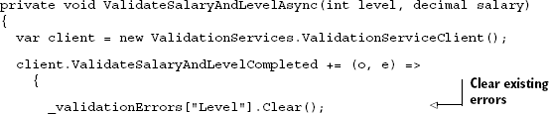
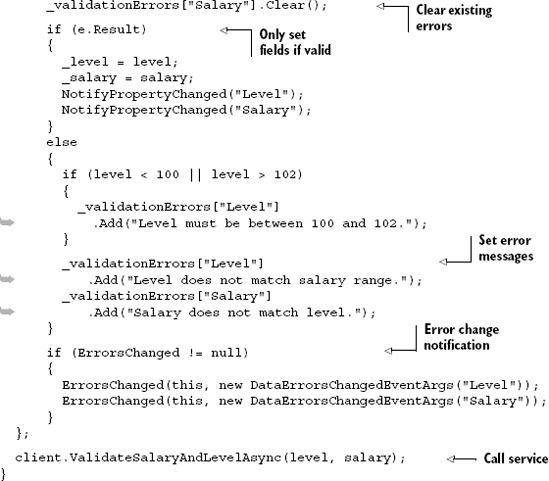
The ValidateSalaryAndLevelAsync class calls out to the web service and validates the salary and the level. If the web service says the values are valid, the underlying fields are updated. If it says the values are invalid, it sets up error messages for the fields. For grins, on an invalid return, it also validates the level number itself.
There are other ways to handle this type of validation, of course. You could have a separate local client method that evaluates the level and call that either asynchronously or synchronously from the client. You could also have the web service return error messages.
Also, for simplicity, the web service client code is in the Employee entity class. In a real application, I strongly encourage you to separate this code out into a separate service client layer that is, at most, loosely coupled to the Employee entity. See chapter 16 on the ViewModel pattern for guidance on this and other topics.
The last step is to add the calls to ValidateSalaryAndLevelAsync. In my code, I handle the property setting and the change notification inside the async method so the setters are significantly simplified:
private int _tempLevel;
private int _level;
public int Level
{
  get { return _level; }
  set
  {
    _tempLevel = value;
    ValidateSalaryAndLevelAsync(value, Salary);
  }
}

private decimal _tempSalary;
private decimal _salary;
public decimal Salary
{
  get { return _salary; }
  set
  {

    _tempSalary = value;
    ValidateSalaryAndLevelAsync(Level, value);
  }
}
Note the _tempSalary and _tempLevel variables. Due to the asynchronous nature of the validation, I needed some place to store the possibly invalid values; otherwise, you could never jump out of the validation error condition (one of the properties would always be the default value during validation) and correct the data. These properties are where I choose to store the temporary values. Consider them "draft" or "unverified" values.
Some caveats to the code I presented here. I don't propose that these are best practices or even stable for production code. The code has been simplified to show the core concepts and stay within the reasonable bounds of a chapter. For example, in the preceding code, you may run into race conditions for multiple property changes that happen during a slow-running web service call. If they happen to get queued out of order, you can end up with skewed validation and entry.
The INotifyDataErrorInfo class implementation is more complex than the other methods presented here. For that reason, you may prefer to implement it only on some fields and use either exception-based or IDataErrorInfo on the remaining fields. The choice is up to you; all of the methods coexist nicely in the same class. The binding system will know which ones to use based on the properties of the binding statement.
INotifyDataErrorInfo fills in the missing gap left by the other methods by enabling you to provide asynchronous validation error reporting and supply multiple validation messages for a single field.
IDataErrorInfo and INotifyDataErrorInfo are the premier ways of handling validation in Silverlight but they require a fair bit of code to implement. What if you want to do something more lightweight? Do you need to turn to exceptions? No, if you're using the DataForm or DataGrid, you can annotate your data using validation attributes.
There are innumerable ways to validate data and an equally diverse number of ways in which to store that validation information including the rules logic and the messages. In section 13.2, we saw how you can use exceptions in property setters to expose validation information to the user interface. In sections 13.3 and 13.4, we saw how to use specialized interfaces to support additional forms of validation.
Though you can continue to code validation directly into properties setters or use interfaces, the System.ComponentModel.DataAnnotations assembly and namespace found in the Silverlight SDK provide a number of attributes designed to make data validation and display hinting easier for controls such as the DataForm, DataGrid, and some third-party controls. The approach taken by these attributes is to mark up the properties in your entities using attributes in code rather than require code within the properties or external to your entities.
If your scenario supports their use, validation attributes are simple to implement and easy to use. In our discussion of these attributes, we'll first go over the available set of attributes and how to implement a select set of them in your own classes. Then, we'll extend the reach of the attributes to call out to external validation functions in your code. Finally, we'll create our own custom validators to handle situations not easily handled by the built-in set. All of these techniques help us create validation code that's cleaner and easier to read than many of the other methods.
Previously we saw how to provide property-level validation using exceptions and synchronous and asynchronous interfaces. Though those work in almost any situation, they're not a very clean approach and lead to a significant amount of branch/check code inside the property setters in your entities. They also require significant code modification to your entities—a luxury we don't always have. One better way to tackle basic validation is to use attributes tied to the properties in the class.
To support attribute or annotation-based validation, the DataAnnotations namespace includes the validation attributes shown in table 13.5.
Table 13.5. Validation attributes in System.ComponentModel.DataAnnotations
Validation attribute class | Validation capabilities |
|---|---|
| It specifies that the value must be parsable as one of the members of a specified |
| It specifies that the value must be between two other values. The type can be any type that implements |
| It enables you to associate a regular expression to validate a value. This is useful for things such as phone numbers and email addresses, as well as any other data that must adhere to one or more specific formats. |
It specifies that the value for this property must be nonnull and not empty. | |
| It enables you to check the length of the value—must be between the specified minimum and maximum length. |
| A catch-all validator that allows you to call custom code to perform the validation. |
| The abstract base class for all other validators. You can create your own validation attributes by deriving from this class. |
Note that this namespace also defines the ValidationException type. You'll recall that in our earlier example we simply used System.Exception. With the introduction of this DLL, you can now use the ValidationException rather than the base System.Exception. But since this DLL provides so many other ways to handle validation, I'd encourage you to try packaging your validation code in either a function used from a CustomValidationAttribute, or as a class derived from ValidationAttribute.
We'll only cover a handful of these attributes because the pattern is the same across the set. In addition, only the DataGrid and DataForm (and a handful of third-party controls) support these annotations, so these attributes aren't necessarily a solution for all applications.
If we take the same Person class we used for the DataForm examples in chapter 12, we can now mark that up to include some basic validation capabilities. To show off validation, we'll also add two new properties: EmailAddress and NumberOfChildren. The final class, with appropriate validation attributes in place, looks like listing 13.8.
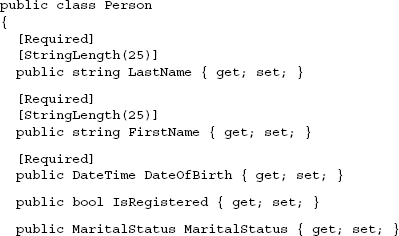
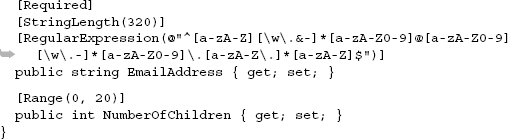
Note that email address validation is complicated, and I don't present the regular expression used here as a fully correct version of an email validation expression, just as an example.
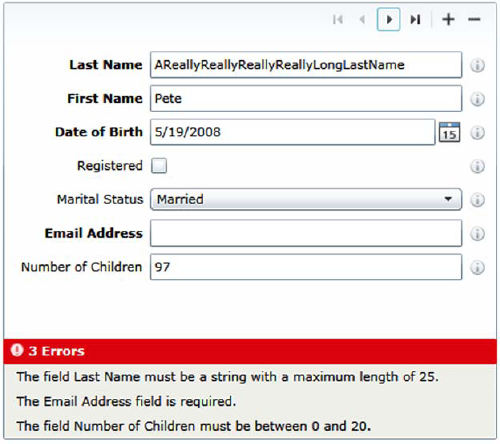
If we then load up the DataForm we used in the earlier examples and let it autogenerate the fields based on the updates to the Person class, we get the result shown in figure 13.5.
The validation attributes may be used both with the DataGrid and with the DataForm and with some third-party controls. Without altering the controls themselves, there are workarounds to use some of the attributes in your own code, but they're neither robust nor fully implemented, so I won't include them here.
One of the validation attributes that could be used in your entities is the CustomValidationAttribute. This attribute takes as parameters a .NET type and the string name of a method to call on that type.
If we wanted to extend our Person class to only allow names that begin with B, we could create a simple validation method and class like listing 13.9.
Example 13.9. A simple custom validation function
public class CustomValidationMethods
{
  public static ValidationResult NameBeginsWithB(string name)
  {
    if (name.StartsWith("B"))
      return ValidationResult.Success;
    else
      return new ValidationResult("Name does not begin with 'B'");
  }
}
The static method simply needs to take in the appropriate type and return a ValidationResult indicating whether the value passed validation. We then wire it up to our Person class using the CustomValidationAttribute like this:
[CustomValidation(typeof(CustomValidationMethods),
    "NameBeginsWithB"]
public string LastName { get; set; }
When validation is performed on the field, your custom function will be called and you'll get a validation error message that contains the text supplied in the ValidationResult or, if provided, the custom error message tied to that instance of the CustomValidationAttribute. An example may be seen in figure 13.6.
The custom validation function has an alternate signature that's worth consideration. In addition to taking in the value to be validated, it can also take as a parameter a value of type ValidationContext. ValidationContext provides some additional information that the validation function may wish to use either in building the error message or in performing the actual validation. Taking the previous example and adding the context property results in the validation function shown in listing 13.10.
Example 13.10. A custom validation function with ValidationContext
public static ValidationResult NameBeginsWithB(
    string name, ValidationContext context)
{
    if (name.StartsWith("B"))
        return ValidationResult.Success;
    else
        return new ValidationResult(
            string.Format("{0} does not begin with 'B'",
            context.DisplayName));
}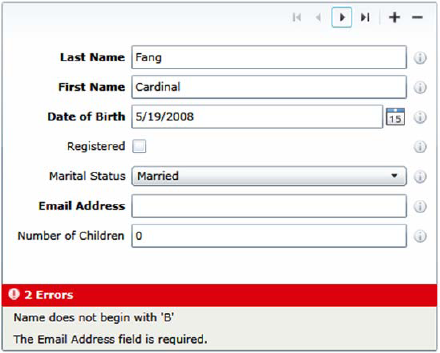
Figure 13.6. The Last Name field failed our custom validation check, as indicated in the error message at the bottom. Note that the field name isn't included in the error message.
Note how we used the DisplayName from the context to make the error message a little more meaningful. The resulting error on the DataForm looks like figure 13.7.
Because ValidationContext also supplies you with the parent object to which the member being validated belongs, you can use custom validation functions to effectively extend the validation system to support cross-field validation checks. Of course, you'll need to be careful so that you don't find yourself in the circular dependency hole that many cross-field checks ultimately end in.
Custom validation functions are one nice way to extend the validation system. They're simple to use and simple to create. Their main downside is they have external dependencies and, therefore, are not entirely self-contained. In addition, the method name is a string, and can be prone to typos or errors resulting from refactoring. To create more robust validation code, you'll want to create a custom validator.
Similar in concept to custom validation functions, custom validators are classes you write that inherit from ValidationAttribute in the System.ComponentModel.DataAnnotations namespace. The code itself is almost identical to what you'd write in a custom validation method. Listing 13.11 shows our custom validation code packaged into a custom validation attribute.

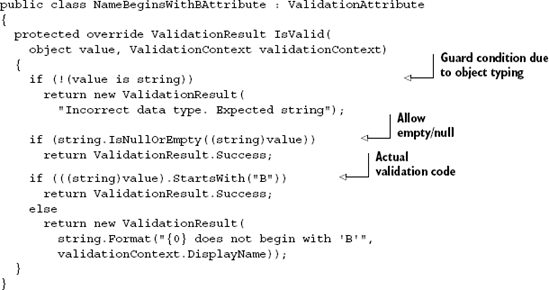
The only thing we're required to do is override the IsValid function and return an appropriate ValidationResult. Once we do that, we can use the validator just like we would any other:
[NameBeginsWithB()]
public string LastName { get; set; }
The end result is the same error message display we saw with the custom validation function approach. But our validator is both simpler to use and less prone to breaking because it's self-contained inside a custom validator attribute class.
That's attribute-based validation in a nutshell. If you can use the DataGrid and DataForm as your primary controls, attribute-based validation is, by far, the easiest approach to getting validation into your classes. Not only does the markup avoid code in your class, but you can also add buddy classes (partial classes) to mark up existing entities from your ORM.
We'll cover the enhanced cross-tier validation features brought by WCF RIA Services in chapter 17. Until then, keep in mind that binding and validation are core Silverlight features and work without the addition of a framework such as WCF RIA Services or a pattern such as ViewModel (see chapter 16).
Let's wrap up our discussion of validation by summarizing what I consider to be the pros and cons of each validation method, shown in table 13.6.
Table 13.6. Validation approach summary
Method | Pros | Cons |
|---|---|---|
Exceptions
| Free type validation Simple inline code; no interfaces | Only invoked when property set; cross-field validation difficult or impossible Only one error per field |
| Cross-field validation No exceptions on the stack | Doesn't handle type validation Only one error per field Slightly more complex implementation than exceptions |
| Cross-field validation No exceptions on the stack Asynchronous validation Multiple errors per field (note: current Silverlight UI templates only support showing the first error) | Doesn't handle type validation More complex implementation than exceptions |
Validation attributes | No exceptions on the stack Multiple validators per field Simple No code other than attribute | Only works with |
These three main approaches to validation are universally supported in Silverlight, requiring no special client-side control code or styles. Most third-party controls will also respect these forms of validation.
My recommendation is:
Always support exceptions, so you get type checking.
Use attributes if you're doing everything in a
DataFormorDataGrid.Use
IDataErrorInfoif you're doing all your validation on the client.Use
INotifyDataErrorInfoif you need to call out to services to perform the validation.
Of course, your specific situation may dictate a different solution, but the guidelines here will apply to most applications.
Input validation is a core requirement of almost every application with a TextBox. Though Silverlight contains a number of different approaches, evolved over the versions, these are at least structured ways to handle validation.
For general Silverlight applications, exception-based validation is one of the easiest approaches to use. It's also very limited but, if your validation requirements aren't heavy, it can often handle the job.
For more robust implementations, turn to IDataErrorInfo and INotifyDataErrorInfo. The two can be complex to implement, especially the latter, but you're provided with pretty much everything you'd need to implement your own validation framework on top of the base interfaces.
When combined with the DataGrid and DataForm, attribute-based validation, along with the UI hinting covered in chapter 12, provides an incredibly simple and powerful way to create capable user interfaces with little plumbing code required.
Now that we've covered binding in chapter 11 and validation in this chapter and introduced the concept of a web service, it's time we dove right into the communications and networking stack that drives most Silverlight applications. Chapter 14 will cover how to use web and REST services as well as how to implement other forms of communication in your applications.