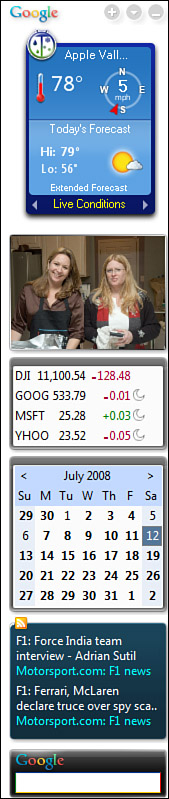
At first glance, the Google Desktop is a sidebar that sits to the right of your computer desktop, as shown in Figure 4.1. The content of the sidebar is totally customizable. As you’ll learn later in this chapter, you can add a variety of gadgets to the sidebar, each with a different and unique function.
The sidebar, however, is just the icing on the cake. The key ingredient in the Google Desktop is a PC-centric version of the Google search engine. After it’s installed, you use Google Desktop to search your hard disk (or your entire network) for files and email messages that match a specific query. You do your searching from your web browser, which displays a special Google Desktop page. It works pretty much like a standard Google web search, except that it doesn’t search the Web—it searches the contents of your computer’s hard disk.
Note
Google Desktop is available for computers running Windows 2000/XP/Vista; slightly different versions of Google Desktop are available for Linux and the Mac OS.
With all this functionality, you might expect Google Desktop to cost an arm and a leg. Well, you can hold onto your limbs, because Google Desktop is freeware. You can download it free of charge from desktop.google.com.
When you first download Google Desktop, a few things happen. First, the default sidebar is built and displayed on your desktop; you’ll be able to configure this to your liking later. Second, the Google Desktop search engine starts up and begins to index the contents of your PC. Depending on the size of your hard disk and how much of it is used, this could take anywhere from a few minutes to a few hours. Although you can use Google Desktop while this index is being created, you probably don’t want to conduct any searches until all your disk’s contents have been indexed.
What types of items does Google Desktop index? Not every type of file, obviously; for example, it doesn’t index executable program files. Here’s the complete list of what’s indexed:
-
Email (including messages from Microsoft Outlook, Outlook Express, Windows Mail, Gmail, Mozilla Thunderbird, and Netscape Mail)
-
Chats (from Google Talk, AOL Instant Messenger, and MSN Messenger)
-
Web history (.htm and .html files from Internet Explorer, Mozilla Firefox, and Netscape browsers)
-
Microsoft Word documents (.doc files)
-
Microsoft Excel spreadsheets (.xls and .xlw files)
-
Microsoft PowerPoint presentations (.ppt files)
-
Adobe Acrobat documents (.pdf files)
-
Media files (image files, audio files, and video files)
-
Text files (.txt format)
-
Other files from Microsoft Outlook and similar programs (contacts, calendar appointments, tasks, notes, and journal entries)
-
Compressed files (.zip files—including the full content of each compressed file)
Google Desktop is really two applications under a single guise. The sidebar, which we’ll discuss later in this chapter, is actually separate from the desktop search engine.
There are several ways to search your computer with Google Desktop:
-
Click the Google Desktop icon in the Windows taskbar tray, and select Search Desktop.
-
Use the Google search gadget in the Desktop sidebar.
-
Select Start, All Programs, Google Desktop, Google Desktop.
-
Press the Ctrl key twice to display a Quick Search Box on the desktop.
Depending on which method you use to start your search, you may see a Quick Search Box in the middle of the screen, as shown in Figure 4.2, or Google Desktop may launch its own search page in your web browser, as shown in Figure 4.3. This browser page looks almost identical to the main Google web page. The main differences are that you’re not connected to the Internet, the search function is set to Desktop, and a few new options appear at the bottom of the page.

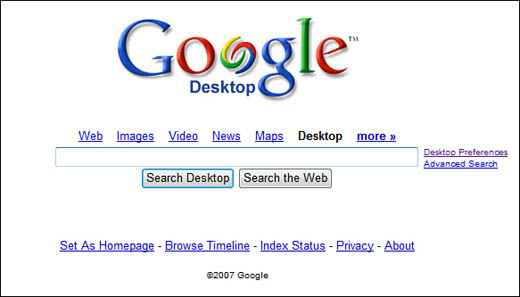
Searching your hard disk is as easy as entering a query into the search box and then pressing Enter or clicking the Search Desktop button. (If you click the Search the Web button instead, Google Desktop connects to the main Google website and initiates a traditional web search.)
The results of your search are displayed, as shown in Figure 4.4. This search results page looks a bit different from a standard web search results page, for two reasons.
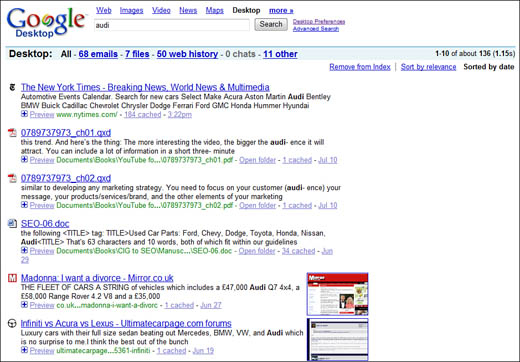
First, the results are, by default, sorted by date instead of relevance, with the most recent results listed first. (You can switch to a relevance list by clicking the Sort by Relevance link at the top of the page.)
Second, the results page contains several different types of results. The type of item found is easily discerned by the icon next to each search result. For example, email messages have an envelope icon, Word files have the Word document icon, and web pages have an icon representing the web page’s logo or a generic web page icon.
Tip
Several types of items (such as .jpg files, MP3 files, and some recently visited web pages) also have a thumbnail of that item displayed to the right of the item listing. Click the thumbnail to view the item (or, if it’s a web page, a cached version of the page).
For each item listing, Google Desktop displays the item or filename, a brief description of or excerpt from the item, and the location of the file on your hard disk. You can open the file by clicking the filename, or open the folder that holds the file by clicking the Open Folder link. Click the Cached link to view a cached version of the folder contents; click the date link to view all items created on the same date. (This last option is good for finding related email messages.)
By default, Google Desktop displays all items in the same list. You can filter the list, however, to display only a single type of item by clicking the Emails, Files, Web History, Chats, or Other links at the top of the page.
Depending on the type of item displayed, you may have additional filtering options from the view list. For example, if you display just emails, you can filter the results to include only those messages to or from specific users. If you display just files, you can filter the results to include only specific file types. If you display “other” items, you can filter the results to include only contacts, calendar appointments, tasks, and the like.
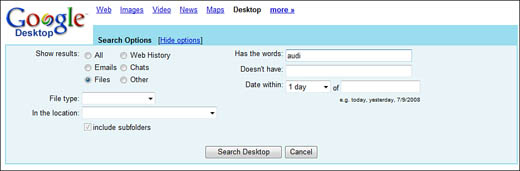
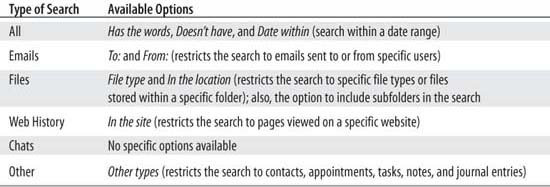
Of course, it’s often easier to refine your query than it is to filter your results. To that end, Google Desktop offers a Search Options page, accessible by clicking the Advanced Search link on the main page. As you can see in Figure 4.5, this page offers various filters you can apply to your query—although the filters available vary by the type of item you’re searching for. Table 4.1 details the available options.
Searching by keyword is how most people find things on their hard drives, but sometimes it’s not the best way to approach the problem. There are times when you remember when you sent or received a message or created a file, not necessarily what the message or file was about.
For these times, Google Desktop offers the Timeline view. This view lets you see everything created or modified on a particular day.
You access Timeline view by clicking the Browse Timeline link on the main Google Desktop page. As you can see in Figure 4.6, Timeline view lists all your desktop items by date, in reverse chronological order (newest first), starting with today. You can view items from another date by clicking that date on the calendar on the right side of the page. You can also filter items to display only emails, files, web history, or chats.

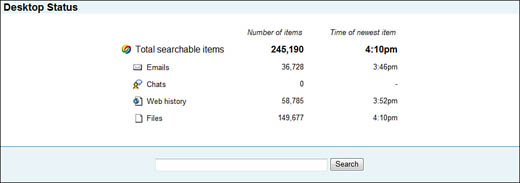
Want to see exactly what (and how much) Google Desktop has indexed? Click the Index Status link on the main Google Desktop page. This displays the Desktop Status page, shown in Figure 4.7. It lists how many emails, chats, web pages, files, and total items Google Desktop has indexed, as well as the time of the most recent item in each category.
When you install Google Desktop, it also installs a special search bar in Microsoft Outlook (assuming you’re using Outlook, of course). This lets you search Outlook’s emails directly from the Outlook program—no need to start up Google Desktop separately.
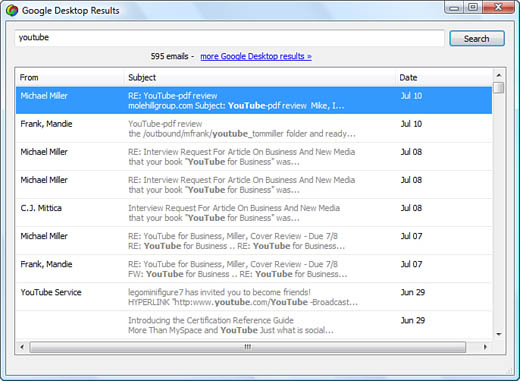
As you can see in Figure 4.8, the Google Desktop toolbar installs at the far right of the normal Outlook toolbar. Enter your query and click the Search button to search all your Outlook mailboxes; matching emails are listed in a separate search results window, as shown in Figure 4.9. Double-click any item to open and view the email message.

Google Desktop isn’t limited to searching your PC’s hard disk. You can also use it to search other computers on your wireless or Ethernet network.
To use Google Desktop across multiple computers on a network, you must have a Google account (just one), and you must have copies of Google Desktop installed on all computers you want to include in the search. The reason you need a Google account is that each computer’s index is transmitted via the Internet to Google’s servers; when you search “across computers” you’re actually searching the index for your network, as stored on Google’s servers.
To set up Google Desktop to search across multiple computers, follow these steps:
-
Open Google Desktop, and click the Desktop Preferences link. (Alternatively, you can right-click the Google Desktop icon in the Windows system tray, and select Preferences from the pop-up menu.)
Tip
Because the index information for all your PCs is stored on Google’s servers, you can use this feature to view your desktop PC’s files and messages from your laptop PC when you’re on the road—or vice versa. Just make sure that Google Desktop is running on both PCs, and that they’re both connected to the Internet.
-
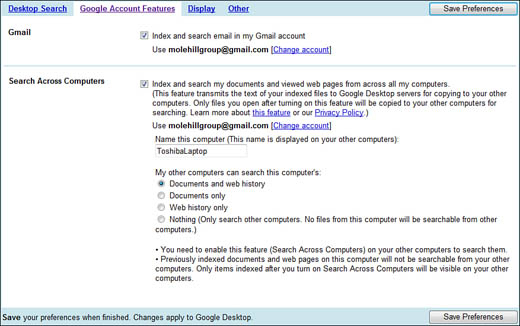
When the Preferences page appears, select the Google Account Features tab, as shown in Figure 4.10.
-
From this tab, go to the Search Across Computers section, and check the main option.
-
Enter a name for this computer.
-
Check which items from this PC you want to be able to search from other PCs: documents and web history, documents only, web history only, or nothing. (The “nothing” option lets this computer search other computers but doesn’t let them search this PC.)
-
Click the Save Preferences button.
You need to repeat these steps for each computer you want to include in the Google Desktop search. You also need to log onto the same Google account on each PC; this is how Google keeps track of the computers to include in the search index.
The Google Desktop program not only lets you search your desktop, it also lets you conduct normal Google web searches—assuming your computer is connected to the Internet, that is. (You don’t have to be connected to the Internet to search your own computer, of course.) There are several ways you can do this; we’ll look at each in turn.
If you have the Google Desktop window open, searching the Web is a snap. Just enter your query as normal, and then click the Search the Web button (instead of the Search Desktop button). Google Desktop connects to the Google website and displays the expected page of search results.
The Google Desktop sidebar includes a standard search box, as shown in Figure 4.11. To search the Web from the sidebar, enter your query and wait for the menu of options to appear. From this menu, select Search Web and then press Enter. Your web search results appear in a new browser window.
Another Google Desktop option is to display a deskbar on your desktop; this is a search box that appears in the Windows taskbar, as shown in Figure 4.12. You can use this search box to search the Web, just like a sidebar search. Just enter your query, select the Search Web option, and press the Enter key. (If you pause while typing, you see the same menu of search options as you do with the normal sidebar search.)
As I noted in the introduction to this chapter, Google Desktop is more than just a desktop search. It’s also about putting more information on your desktop via the Google Desktop sidebar.
Tip
Google Desktop lets you display a search deskbar in the Windows taskbar, a floating search deskbar anywhere on the desktop, or a permanent Quick Search Box on the desktop background. Just select Desktop Preferences, click display, and then check the display option you want.
The Google Desktop sidebar resides on the far right of your computer desktop (by default, anyway—you can change this) and includes a variety of content modules, which Google calls gadgets. You can choose from hundreds of different gadgets to display all sorts of information.
The sidebar is activated by default when you first install the Google Desktop program. You can turn it off by clicking the down arrow at the top of the sidebar to display the pull-down menu and then selecting Close. To redisplay the sidebar, right-click the Google Desktop icon in the Windows system tray and select Sidebar from the pop-up menu.
By default, the sidebar appears on the right side of your desktop. You can move it to the left side of the desktop by displaying the menu and selecting Dock Sidebar, Left. To change the width of the sidebar, just drag the left (or right) side of the sidebar until the sidebar is the desired size.
If you don’t want the sidebar taking up all that screen real estate, consider using the auto-hide feature. When this option is selected, the sidebar is hidden until you move the cursor to the far-right side of the screen. When you do this, the sidebar pulls out for your use. To activate auto-hide, pull down the menu and select Auto-Hide.
The fun thing about using the Google Desktop sidebar is selecting which gadgets you want displayed. Tons of gadgets are available; you can insert as many as you have room for.
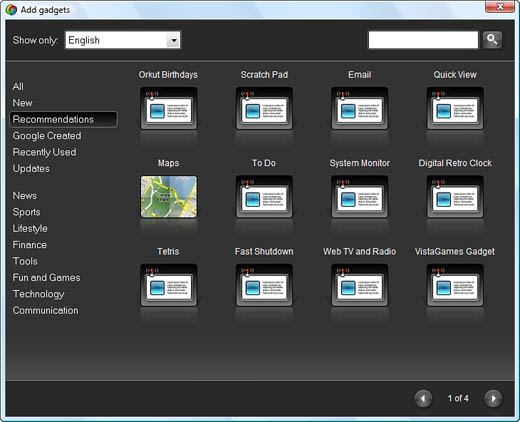
To add a new gadget to the sidebar, click the Add (+) button that appears when you mouse over a category. This displays the Add Gadgets window, as shown in Figure 4.13. From here you can view gadgets in a number of different categories (New, Recommendations, Google Created, News, Sports, Lifestyle, and so on); click the Add button under a gadget to add it to your sidebar.
To remove any gadget from the sidebar, click the down arrow in that gadget’s title bar, and then select Remove. (You can always restore the gadget by clicking the Add button at the top of the sidebar if you like.)
In the sidebar, any gadget can be displayed at any height, or collapsed to just its title bar. Making a gadget taller or shorter is a simple matter of dragging the top or bottom border up or down using the mouse. You collapse the gadget by clicking the gadget’s down arrow and then selecting Collapse.
You can rearrange the gadgets in your sidebar in any order. It’s a dynamic process; just grab the gadget’s title bar with the mouse and drag it into a new position. The other gadgets rearrange themselves to make room for the moved gadget.
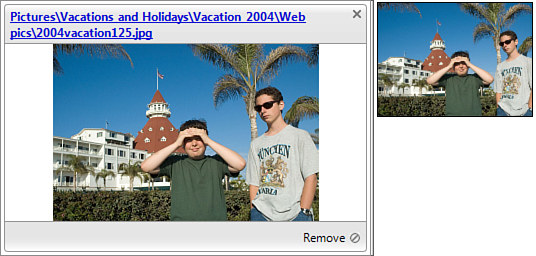
Most gadgets have an expanded view, which you display by clicking the left arrow in the gadget’s title bar. This expands the gadget to the left, where (in most cases) more options are available than in the standard gadget. (Using the expanded view is also a necessity when you have the gadget collapsed.) For example, Figure 4.14 shows the expanded view of the Photos gadget.
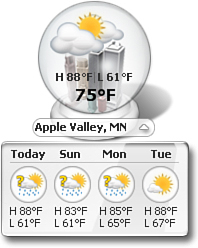
Individual gadgets can also be undocked from the sidebar. When you click the down arrow in the gadget title bar and then select Undock from Sidebar, the gadget is moved from the sidebar to its own window on the desktop. (Figure 4.15 shows the undocked version of the Weather Globe gadget.) To redock a gadget, click the gadget’s down arrow and select Dock to Sidebar.???