
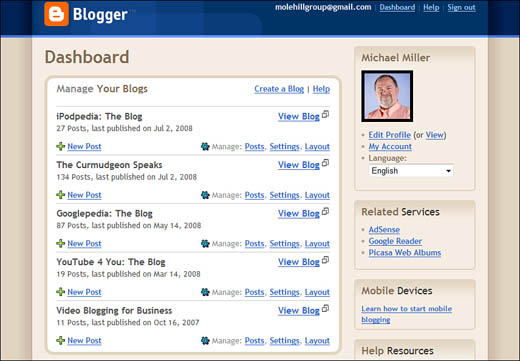
After you’ve registered with Blogger, the home page (www.blogger.com) becomes the Blogger Dashboard, as shown in Figure 18.1. From here, you can manage all your blogs, create new blog posts, manage your Blogger account and profile, and access Blogger’s help system.
Creating a new blog is surprisingly easy. Start by going to the Blogger dashboard and then click the Create a Blog link.
Note
Blogger was a freestanding site with more than a million users long before Google acquired it in 2003. Since then, it’s only gotten bigger—and better. In fact, Blogger is one of the crown jewels of the Google empire; Blogger is host to more than 8 million individual blogs, more than any other blog-hosting service.
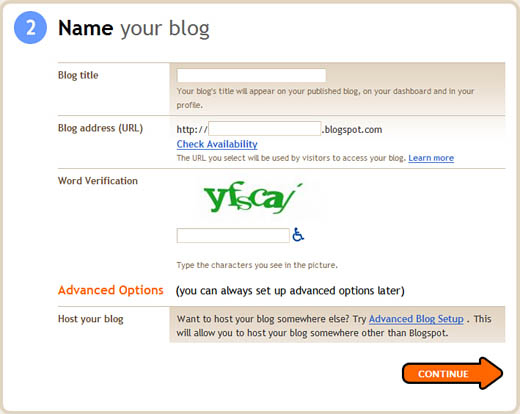
You see the Name Your Blog page, shown in Figure 18.2. Enter a title for your blog and a corresponding blog address (the part of the URL that goes before Blogger’s blogspot.com domain), and click Continue. You are then asked to do a word verification for security purposes. Type in the word shown on the screen, and click Continue.
Next, you get to choose a template for your blog. As you can see in Figure 18.3, a template is a predesigned combination of page layout, colors, and fonts. Try to choose a template that’s easily readable, especially for the types of postings you think you’ll be doing. (You can preview any template at full size by clicking the Preview Template link under the template’s thumbnail picture.) After you make your choice, click the Continue button.

Note
By default, Blogger serves as host for your blog, and it assigns you a URL in the blogspot.com domain. If you’d rather host your blog on another website, read the section “Changing Where Your Blog Is Hosted,” near the end of this chapter.
Blogger creates your blog and displays a confirmation page. If now is a good time to write your first blog post, click the Start Blogging link. Otherwise, you can create posts later.
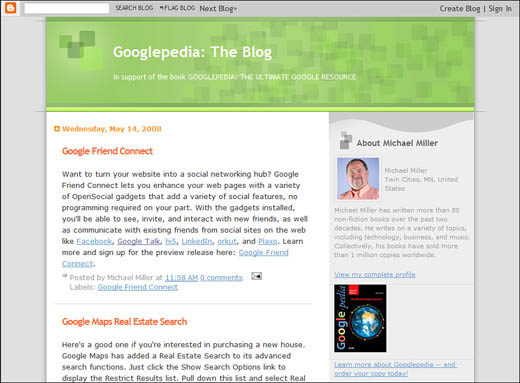
You can view your blog by entering the URL that was previously assigned, or by going to the Dashboard (www.blogger.com), clicking the blog name, and then clicking the View Blog tab. As you can see in Figure 18.4, a typical blog includes a Blogger search bar at the top of the page, with the title of the blog just below that. Blog posts take up the balance of the page, with assorted personal information in a narrow column to the right or left of the postings.
Note
The templates presented on this page are just a subset of the larger number of available templates—but chances are you’ll be happy with one of them. If not, you can change—and customize—templates after you’ve created your blog. Learn more in a moment in the section “Customizing Your Blog.”.
Each blog post is accompanied by a date and time stamp (sometimes above the post, sometimes below), as well as links to any reader comments or other blogs that have linked to this post. Click the Comments link to read any comments; click the Links to This Post link to see the links.
Although the format of the blog posts themselves is fairly standard, the elements in the narrow column are highly customizable. Most blogs include an About Me section (which may or may not include a photo), a listing of recent posts, a listing of archived posts (typically organized by month), and any other information you choose to include. If you don’t like what you see, you can easily customize the contents and layout of your blog page—which we’ll discuss next.
The blog templates you get to choose from when first creating your blog are nice, but there aren’t a lot of them. Fortunately, Blogger offers additional templates for your blog—and lets you fully customize the look and feel of your blog page. Read on to learn more.
First things first: If you no longer like the template you originally chose for your blog, you can change it. Blogger offers more than 35 different blog templates, and there’s no harm in switching from one to another to suit your mood. Here’s how to do so:
-
From the Blogger Dashboard, click the Layout link next to your blog name.
Note
Blogger uses CSS (cascading style sheets) to control all the fonts and colors in a template. The style sheet code is at the beginning of the page’s underlying HTML code, and it defines the look of each page element. Obviously, this all goes on behind the scenes; when you make a selection on the Fonts and Colors page, you’re actually making changes to the CSS code.
-
When the next page appears, select the Layout tab, and click Pick New Template.
-
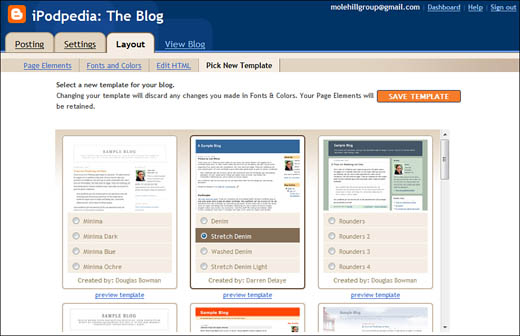
Doing so puts all of Blogger’s templates on display, as you can see in Figure 18.5. This is a larger selection of templates than was visible when you first created your blog; several template styles are available in different color variations. To preview how your blog will look with a given template, click the Preview Template link beneath that template.
-
To choose a new template, select that template’s radio button.
-
After you select a template, click the Save Template button.
You don’t have to settle for the stock templates that Blogger provides. Blogger lets you customize the fonts and colors used in any template, with a few clicks of the mouse.
To customize the look of individual elements in your blog template, go to the Blogger Dashboard, and click the Layout link next to your blog title. When the next page appears, select the Layout tab, and click Fonts and Colors. Doing so displays the Fonts and Colors page, the top of which is shown in Figure 18.6.
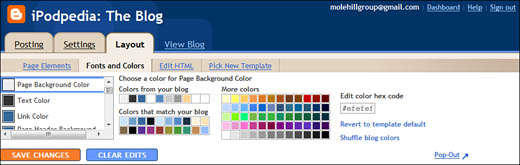
From the Fonts and Colors page, you can change the color of all the elements on your page, from the background and main text to the sidebar and links. You can also change the font of the text and the page header.
For colors, making a change is as simple as selecting the element in the list and then clicking the new color in the color picker. To change the text font, select Text Font from the list and choose a font family, font style (normal, bold, or italic), and font size (smaller or larger). The preview of your blog, at the bottom of the page, reflects your changes. When you’re satisfied with your changes, click the Save Changes button.
One of the more useful features of Blogger is the ability to add subsidiary page elements in either the sidebar or the main column of the blog page. You can use these page elements to add descriptive text, pictures, links, lists, and the like to your blog.
Tip
A fun option for any color element is to shuffle randomly through a compatible color scheme while you display your blog. Just click the Shuffle Blog Colors link to see how this works.
To add a new element to your page, follow these steps:
-
From the Blogger Dashboard, click the Layout link next to your blog name.
-
When the next page appears, select the Layout tab, and click Page Elements.
-
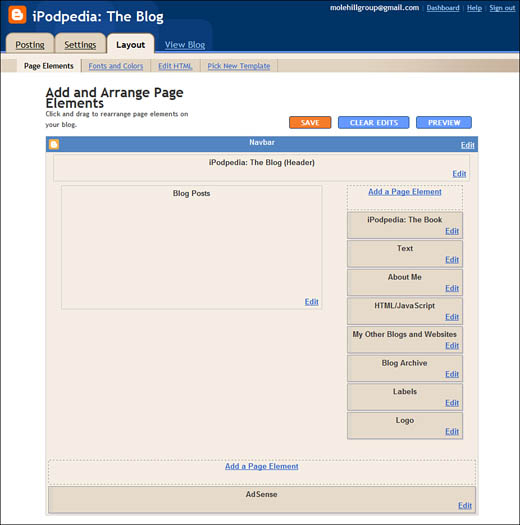
The next page, shown in Figure 18.7, displays all the current elements used in your blog. To rearrange existing elements, simply drag the selected element to a new position on the page.
-
To add a new element to your page, click the Add a Page Element link.
-
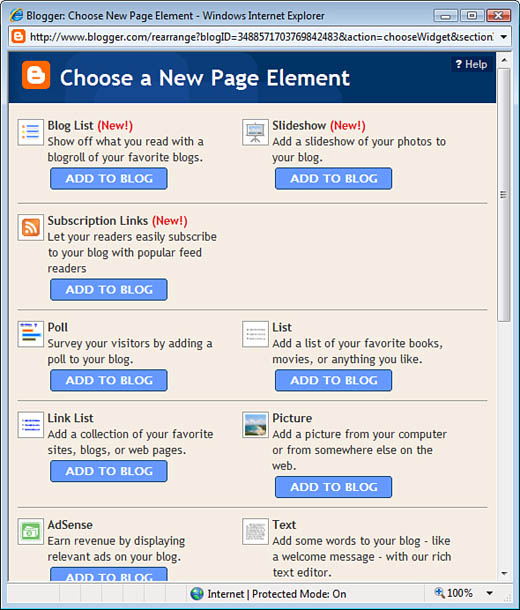
This displays the Choose a New Page Element window, shown in Figure 18.8. Click the Add to Blog button beneath the element you want to add.
-
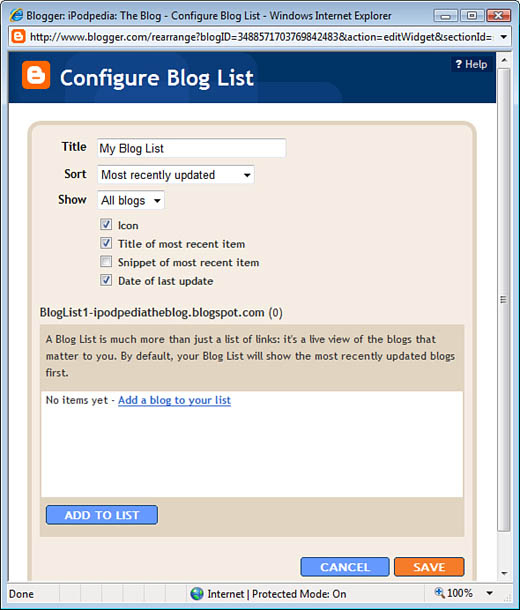
You see a window specific to the type of element you selected. For example, Figure 18.9 shows the Configure Blog List window, which opens when you choose to add a blog list (also called a blogroll) to your blog. Fill in the information required in this window, and then click Save.
Your blog now contains the element you selected. You can then decide where on the page that element will appear, by dragging it into place on the Add and Arrange Page Elements page.
Tip
To edit an existing page element, go to the Add and Arrange Page Elements page, and click the Edit link next to the element you want to edit.
What elements can you add to your blog? Table 18.1 details the page elements that Blogger lets you add.
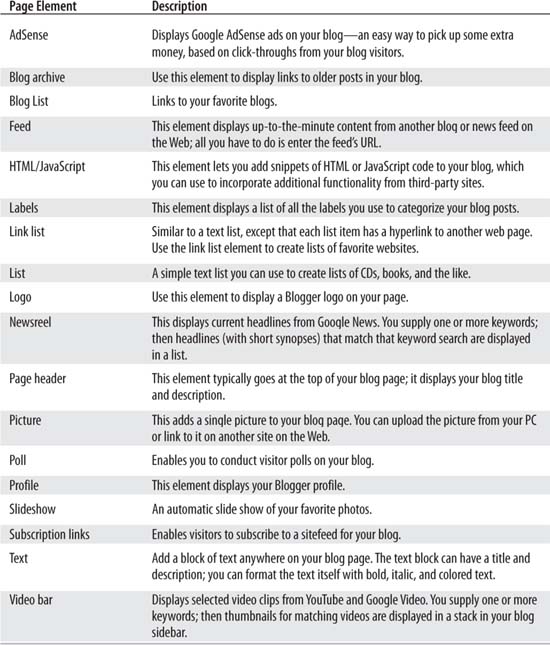
As you can see, these page elements add much useful content to your blog. It’s a simple matter of clicking a few links and filling in a few blanks, and Blogger adds the element automatically.
After you’ve created and customized your blog, it’s time to write your first blog post. Read on to learn how to post.
When you’re ready to post, the place to start is the Blogger Dashboard. All you have to do is follow these steps:
-
From the Blogger Dashboard, click the New Post icon for this particular blog.
-
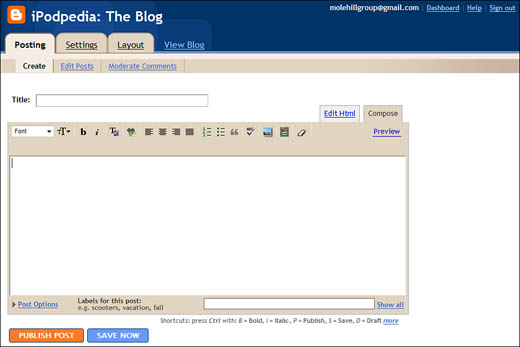
When the Posting page appears, as shown in Figure 18.10, enter a title for this post.
-
Enter the text for your post into the large text box. If you like, you can format the text (bold, italic, colors, and so on) using the formatting toolbar above this text box.
-
If you want to apply more sophisticated formatting (and you know how to code in HTML), click the Edit Html tab and enter your own HTML codes.
-
To check the spelling in your post, click the Check Spelling button. Misspelled words are highlighted in yellow; click a word to see a list of suggested corrections.
-
To view a preview of your post, click the Preview link.
-
When you’re done writing and formatting, click the Publish Post button.
Blogger publishes your post and displays a confirmation screen. Click the View Blog button to view your blog, with the new post at the top of the page.
One of the neat things about a blog is the ability to link to other pages on the Web, via the use of inline hyperlinks. Fortunately, Blogger makes it easy to add links to your post.
You add links while you’re creating the blog post. Just highlight the text from which you want to link, and then click the Link button. This displays the Hyperlink dialog box; enter the URL for the link, and then click OK.
Another way to make a visually interesting blog is to incorporate pictures into your blog entries. Again, Blogger makes this relatively easy to do.
You add pictures while you’re creating your blog post. Just position the cursor where you want the picture to appear, and click the Add Image button. This displays the Upload Images window, shown in Figure 18.11.
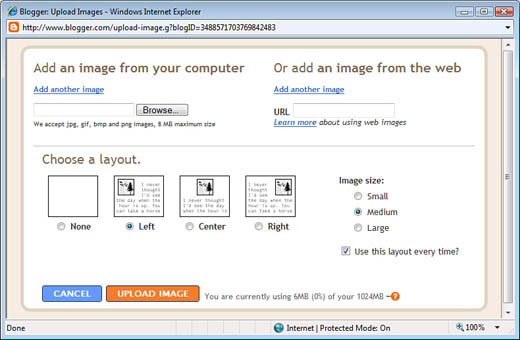
To upload an image file from your computer, click the Browse button in the Add an Image from Your Computer section, and then navigate to and select the image file. You can upload additional pictures by clicking the Add Another Image link.
To point to an image hosted elsewhere on the Web, enter the full web address for that image into the URL box in the Or Add an Image from the Web section. Click the Add Another Image link to link to additional images.
After you select the images to include, you can choose how to display that image in the blog post. In the Choose a Layout section, select how you want the image aligned, relative to the blog text: left, center, or right. In the Image Size section, select how big you want the image to appear: small, medium, or large.
Clicking the Upload Image button adds the photo to the selected blog post. Blog visitors can click the image to view it full size.
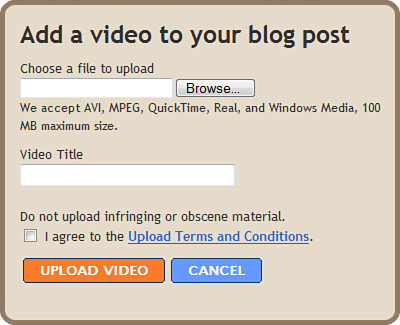
Similarly, Blogger lets you add videos to your blog posts. A video appears in its own video player in the post; visitors click the player’s Play button to watch the video.
To add a video to the current post, click the Add Video button. This displays the Add a Video to Your Blog Post window, shown in Figure 18.12. Click the Browse button to select the video to upload, and then enter the title of the video into the Video Title box. Check the box to agree to Blogger’s terms and conditions, and then click the Upload Video button. The video is uploaded to the Blogger site and inserted into the current blog post.
When you get a lot of posts in your blog, it becomes increasingly difficult to find a particular post. You can make this easier for your blog visitors by using labels to categorize your posts. Visitors can then click a label in the label list to view all posts related to that particular topic.
To add a label to your post, all you have to do is enter the label into the Labels for This Post box at the bottom of the Create page. You can enter multiple labels for any post; just separate the labels with commas.
Blogger also lets you submit your posts via email, which is helpful if you’re posting from the road. That’s right—you can create a post in an email message and then send that message to Blogger to post to your blog.
For this to work, you first have to create a mail-to-Blogger address. You do this by clicking the Settings link next to your blog name in the Blogger Dashboard and then clicking the Email link. When the next page appears, enter or confirm the email address in the Mail-to-Blogger Address section, check the Publish option, and then click the Save Settings button.
Tip
To view a list of all the labels you’ve previously created, click the Show All link beside the label box.
Now you can open a new message in your email program and compose your post within that message. Email the message to your mail-to-Blogger address, and Blogger automatically uses the text of your email to create a new blog post.
Even after your blog is up and running, you still have to perform a bit of ongoing maintenance. Fortunately, you can do everything you need to do from the Blogger Dashboard—and you don’t have to do much.
No one’s perfect. Every now and then, you’ll post something to your blog and then discover an egregious spelling error, or a bad link, or maybe just something you wish you’d never written. Have no fear, gentle blogger; Blogger lets you edit any post you like.
To edit a Blogger post, follow these steps:
By default, anyone can post comments to your blog postings. These comments appear below each posting when a visitor clicks the Comments link. If you’d rather not have everyone and their brother comment on your blog, you can limit comments to either registered Blogger users or members of your blog. You do this by following these steps:
-
From the Blogger Dashboard, click the Manage: Settings link next to your blog name.
-
When the Settings page appears, click the Comments link.
-
When the next page appears, go to the Who Can Comment? section and select either Anyone, Registered Users, Users with Google Accounts, or Only Members of This Blog.
-
Click the Save Settings button.
The Comments tab of the Settings screen also lets you configure several other ways that comments are displayed on your blog. One of the key settings concerns comment moderation. When you choose to moderate comments, you must approve any comments to your blog before they can be posted.
You turn on moderation by checking the Enable Comment Moderation? option on the Comments screen of the Settings tab. This displays a new Moderate Comments link on the Posting tab, which is where all user comments appear. (You also receive an email to alert you to all new comments.) On this page, you can choose to publish or reject any listed comment; click the Publish button, and the comment is posted to your blog.
Another problem with blog comments is that, without any moderation, they can be used for spam purposes. Unscrupulous spammers use spam robots to seed blog postings with unwanted spam messages. It’s all done automatically. Don’t be surprised if you wake up one morning and find a ton of comments to your blog that have nothing to do with your original postings.
There’s an easy way to defeat these spam robots. All you have to do is require some sort of human input to post. Blogger does this by adding a word verification section to the comments posting page. Readers have to enter the word verification code before the comment is posted. Because robots can’t read graphic images like this, they can’t enter the word verification code, and no spam is posted.
You turn on word verification by going to the Comments screen on the Settings tab and checking the Show Word Verification for Comments? option.
By default, your blog is public, so anyone on the Internet can read it. However, there’s a way to make your blog private so that only invited guests can view it. To control access to your blog, follow these steps:
-
From the Blogger Dashboard, click the Manage: Settings link next to your blog name.
-
When the Settings page appears, click the Permissions link.
-
When the next page appears, go to the Blog Readers section and select who can view your blog: Anybody (keeps the blog public), Only People I Choose, or Only Blog Authors.
-
If you select the Only People I Choose option, you have to invite people to view your blog. The page expands to include a new text box; enter the invitees’ email addresses, and then click the Invite button. (If the invitee already has a Google account, he’s automatically granted access; if he doesn’t yet have a Google account, he’s sent an invitation via email.)
-
If you choose the Only Blog Authors option, you have to enable some authors other than yourself. Click the Add Authors button to invite other authors to post on your blog.
A site feed is an automatically updated stream of a blog’s contents, enabled by a special XML file format called RSS (Really Simple Syndication). When a blog has an RSS feed enabled, any updated content is published automatically as a special XML file that contains the RSS feed. The syndicated feed is then picked up by RSS feed reader programs and RSS aggregators for websites, so that subscribers are automatically informed of new posts.
Blogger uses Atom for its blog syndication. When you activate Atom syndication for your blog, Blogger automatically generates a machine-readable version of your blog that can be read by most feed readers and aggregators.
To activate Atom syndication for your blog, follow these steps:
-
From the Blogger Dashboard, click the Manage: Settings icon next to your blog name.
-
When the Settings page appears, click the Site Feed link.
-
To syndicate the full content of each post, pull down the Allow Blog Feeds list and select Full. To syndicate just the first paragraph (or 255 characters) of each post, select Short. If you don’t want to activate a feed, select None.
-
If you want to add a footer that appears at the bottom of each post in your feed, enter that text into the Post Feed Footer section. This is also where you enter the HTML code for any AdSense ads you want to appear in your feed.
Note
Google offers its own Google Reader feed aggregator. Learn more in Chapter 23, “Using Google Reader.”
-
Click the Save Settings button.
Tip
If you’d rather use RSS syndication instead of Atom, use the Feedburner service (www.feedburner.com).
Blogger not only lets you syndicate new posts that you make to your blog, it also lets you syndicate all the comments that visitors make to your posts.
Start by going to the Site Feed page on the Settings tab and clicking the Advanced Mode link. This expands the page to display the following new options:
-
Blog Comment Feed contains all the comments made to posts on your blog; select either None, Full, or Short.
-
Per-Post Comment Feeds creates a separate site feed for each post on your blog, containing the comments for only that post. Again, you can choose either None, Full, or Short posts.
Make your selections and click Save Settings.
Here’s something cool—and potentially profitable—about Blogger. Google lets you insert context-sensitive text advertisements into your blog, which (in theory) could generate a bit of income for you. Every time a visitor clicks one of the ad links, you earn a small commission. However, Google doesn’t disclose just how much of a commission you earn—which is a bit of an odd way to attract participants to the program, if you ask me.
These Blogger ads are served by Google’s AdSense division. This is one of the key revenue-generating parts of the Google empire. It’s to Google’s benefit for you to add ads to your blog; the fact that you participate in the revenues is the carrot to get you to sign up.
To add AdSense ads to your blog, follow these steps:
-
From the Blogger Dashboard, click the Manage: Layout link next to your blog name, and then click the Layout link.
-
When the Layout tab appears, click the Page Elements link.
-
When the Add and Arrange Page Elements page appears, click the Add a Page Element link.
-
When the Choose a New Page Element window appears, click the Add to Blog button for the AdSense element.
-
If you don’t yet have an AdSense account, you’re prompted to create one. Follow the onscreen directions to proceed.
-
After your AdSense account is created, you see the Configure AdSense window, as shown in Figure 18.13. Pull down the Format list and select an ad format. You can choose from various sizes and shapes of ads; the ad you select is previewed on the page below the pull-down list.
-
Pull down the Colors list and select a color scheme for your ad. Alternatively, you can select custom colors from the Customize Colors palette.
-
Click the Save button.
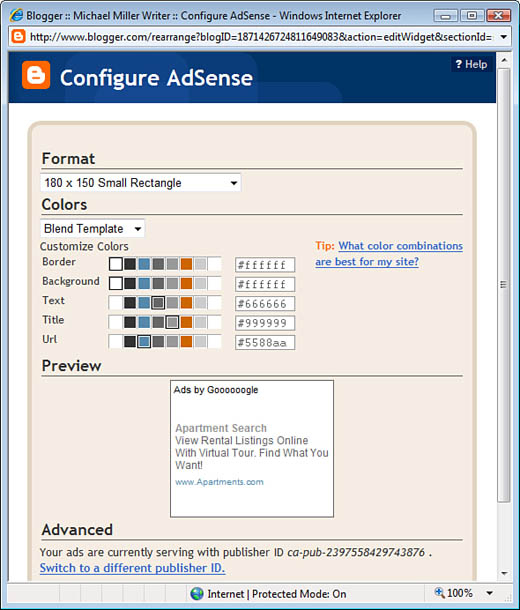
AdSense automatically uses the ID previously assigned to your Google Account. If you want to assign your ads to a different ID, click the Switch to a Different Publisher ID link.
Note
To enable ads in your site feed, you must select the Full option for the Allow Site Feed setting.
After you’ve activated AdSense for your blog, you can view your ad activity in the AdSense console (www.google.com/adsense/). This console tracks your click-through activity; you can also select the AdSense Setup and My Account tabs to manage the details of your account and ads.
When you add an AdSense module to your blog, the ads appear only on your blog—not in the syndicated blog feed. Obviously, the more exposure for the ads, the more revenue you can generate, so it’s probably a good idea to include AdSense ads within your site feed. That isn’t hard to do.
First, you have to copy your AdSense code from the AdSense website. Then go to the Blogger Dashboard, click the Manage: Settings link next to your blog name, and click the Site Feed link. When the next page appears, paste the AdSense code into the Feed Item Footer box. This puts in the ads at the bottom of each feed page. Click the Save Settings button when you’re done.
By default, your Blogger blog is hosted on the Blogger website and has an address with the blogspot.com domain. You’re not limited to using Blogger as a host, however; if you want to, you can host your blog on a different website and give it a unique domain name.
To host your blog on another site, first you have to have another site, provided by a web-hosting service. You also need to have FTP access to that site, because Blogger uses FTP to upload all blog postings.
After your website is set up, you can configure Blogger to use that site to host your blog. Here’s what you need to do:
-
From the Blogger Dashboard, click the Manage: Settings icon next to your blog name.
-
When the Settings tab appears, click the Publishing link.
-
Click the Switch To: Custom Domain link.
-
When the next page appears, click the Switch to Advanced Settings link.
-
Enter the URL for the blog into the Your Domain box.
-
Click the Save Settings button.
Your blog appears on the website you selected. The blog is physically hosted on the other server, and it appears with the website address you specified.