Google Sites (sites.google.com) is a way to create both personal and group web pages and sites. You can use Google Sites to create a single personal web page or a website for your business, community group, or family. In fact, Google Sites shines in its collaborative features; it’s a great way to work on group projects online.
Note
Google Sites replaces Google Page Creator, Google’s previous web page creation/hosting service.
It all starts with web page creation, which Google Sites lets you do with a simple “fill in the form” interface. Enter some basic information, make a few choices, and you’ve created your first Google Sites page.
After you’ve created one page, it’s equally easy to create more—and thus generate an entire website. It’s also easy to open that website to authorized collaborators, who can then edit the site’s pages, add their own content, and share web-based assets.
Your Google Site pages are hosted free by Google. You get 100MB of file storage; your site can hold an unlimited number of pages.
To create your first Google Sites web page, go to sites.google.com and click the Create a Site button. You now see the Create New Site page, shown in Figure 34.1. As you can see, this page is nothing more than a short form, in which you enter the following information:
-
Site name—the title that will show in your visitors’ web browsers.
-
Desired URL—enter the last part of the URL you want in the Your Site Will Be Located At box, or accept the URL that Google enters for you based on your site name.
-
Site description—an optional description of your site’s content.
-
Mature content—check only if your site contains adult content not suitable for minors.
-
Share with—decide whether you want your site to be public (Everyone in the world can view this site) or private (Only people I specify can view this site).
Note
Google Sites pages have URLs that follow the general form http://sites.google.com/sites/ yourURL. You get to choose the yourURL part of the address.
-
Site theme—choose from one of the proffered color and graphics schemes, or click the More Themes link to view additional themes.
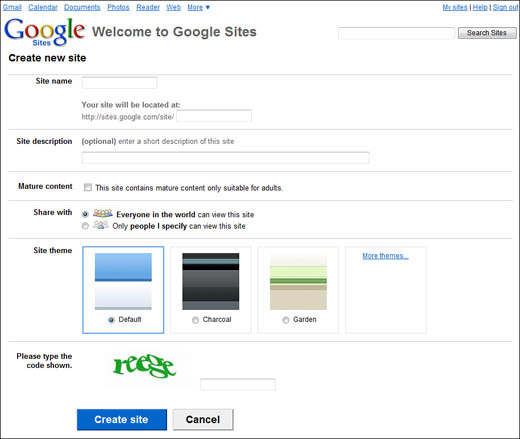
After you’ve filled in the blanks and made your selections, click the Create Site button. Google now displays your page, as shown in Figure 34.2.
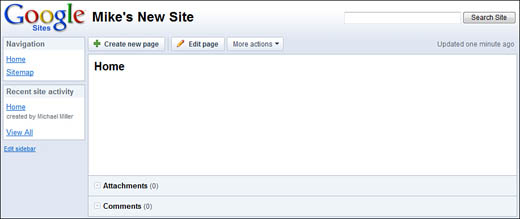
To add content to your web page, click the Edit Page button above your page. (Only you, the site creator, sees this and other management buttons; regular users see only the page itself.) This opens the page for editing, as shown in Figure 34.3.
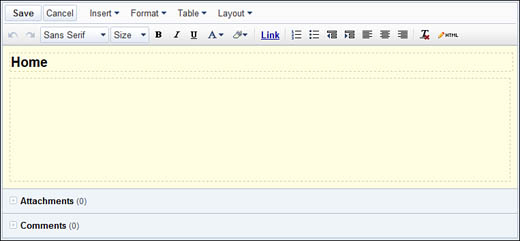
As you can see, what you have here is an “empty” page with two main sections, the title and the body. You add content to the page by clicking within each section and typing in your own text. For example, to add a title, replace the “Home” placeholder text with your own title.
To add a link to another web page, highlight the anchor text for the link, then click the Link link. When the Create Link dialog box appears, click Web Address and then enter the URL for that page. (Alternatively, you can link to other pages on your Google site by clicking Existing Page and selecting the page from those listed.)
To add an image to your web page, select Insert, Image. When the Add an Image dialog box appears, click the Browse button and select the image on your computer’s hard drive. When you click the Add Image button, the image is inserted into your web page at the current cursor position.
Google also lets you insert various gadgets and Google elements to your page. The gadgets are similar to those you can add to your iGoogle page or to the Google Desktop; the Google elements include calendars (from Google Calendar), spreadsheets (from Google Docs), videos (from YouTube), and photo slideshows (from Picasa Web Albums). Just position your cursor where you want the gadget or element to appear, select Insert, then select the item you want. You’ll then be prompted with instructions specific to the type of element you added.
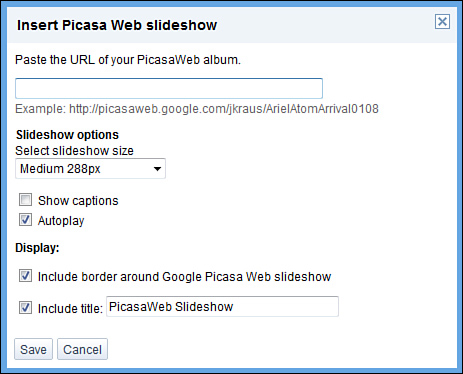
For example, to insert a photo slideshow, select Insert, Picasa Web Slideshow. When the Picasa Web Slideshow dialog box appears, as shown in Figure 34.4, enter the URL of your Picasa Web Album, choose a slideshow size, select other necessary options, then click the Save button. The slideshow is then automatically inserted into your web page.
When you’re done editing your page, click the Save button. The changes you made will now display when you select that page in the Google Sites dashboard.
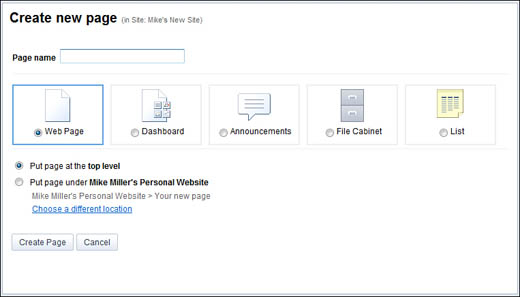
You probably don’t want to create a site with just a single web page. To add more pages to your site, click the Create New Page button above your web page. This opens the Create New Page page, shown in Figure 34.5. Enter a name for this page, select what type of page it should be (a normal web page, a dashboard for group projects, an announcement page for group projects, a file cabinet to hold group files, or a list page for group to-do lists), and choose where you want the page in your site’s hierarchy (to be the top-level home page or somewhere below that). Click the Create Page button, and the new page is added.
You can then add content to that page the same way you added content to your original page. Just select that page in the dashboard and start typing!
When you create the pages of your site, Google applies the theme you originally selected for that first page. If you decide you don’t like this theme, you can change it—as well as other elements of your web pages.
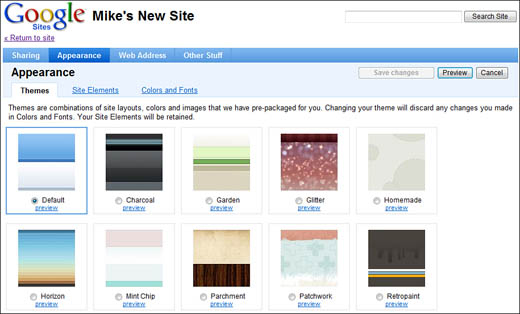
To change your site’s theme, click the Site Settings link at the top of the page. When the next page appears, select the Appearance tab. This displays the Appearance page, shown in Figure 34.6. From here you can choose a new theme (click the Themes tab), customize your site layout (click the Site Elements tab), or change the color and font scheme (click the Colors and Fonts tab). Make your selection then click the Save Changes button.
Tip
Google doesn’t limit you to a single site. You can add more sites to your portfolio by clicking the My Sites link at the top of any Google Sites page. Your current sites are listed on the page that follows; to create a new site, click the Create New Site button and work your way through the familiar site creation process.
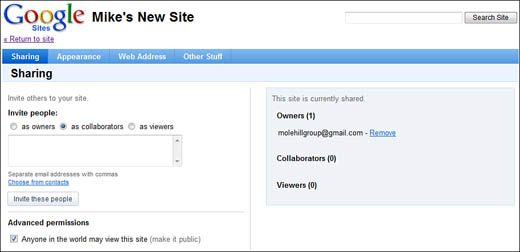
If you want others to collaborate on your website, you have to invite them. You can invite other users with three different levels of access:
-
Viewers can only view the site, not make any changes.
-
Collaborators can create, edit, and delete pages; add attachments and comments to pages; and subscribe to be notified of site changes.
-
Owners can do everything collaborators can, plus they can change the site theme and layout; change the site name; invite other owners, collaborators, and viewers; and delete the site.
To share your site with others, click the Site Settings link at the top of the page and then select the Sharing tab, shown in Figure 34.7. Check what level of access you want, then enter the users’ email addresses into the Invite People box. Click the Invite These People button and the users you specified will receive an invitation via email. After a user has accepted your invitation, he’ll be listed in the right side of the Sharing page.