
If you use Google a lot (and use a recent version of Internet Explorer), you’ll like the Google Toolbar. Everything you normally do on the Google site is right there on the Toolbar, just a click away. It’s easy to use and—even better—it doesn’t take up much screen real estate.
To install the Google Toolbar, go to toolbar.google.com and click the Download Google Toolbar button. Follow the onscreen instructions to download the software and complete the installation.
Tip
If you use Mozilla Firefox instead of Internet Explorer as your web browser, Google offers a version of its Google Toolbar just for Firefox users. It’s quite similar to the IE Toolbar, but with a few Firefox-specific features.
After it is installed, the Google Toolbar appears just below the other toolbars in your web browser. You can customize the Toolbar to display a variety of buttons; Figure 5.1 shows the default configuration.

We’ll look at these and other available features next.
The Google Toolbar, in its default configuration, displays a variety of buttons you can click for direct access to various Google features. And, as you’ll learn later in this chapter, you can add even more buttons to the Toolbar than what you see by default.
Let’s take a quick look at each of the available buttons for the Google Toolbar.
Probably the most important part of the Google Toolbar is the search box. This is the thing that I constantly use. Just enter your query into the search box and click the Search button, and you’ll conduct a Google web search without having to first go to the Google website.
Note
This chapter describes version 5 of the Internet Explorer version of the Google Toolbar. If you’re using a previous version, upgrade today to get the latest features.
If that’s all the Google Toolbar offered, it would be plenty. But what at first glance appears to be a standard search box is in fact an enhanced search box, offering more features than what you get on the Google site itself.
Tip
You can make the Toolbar’s search box wider or narrower by dragging the separator to the right of the Search button.
You can see how the enhanced search box works just by entering a new query. As you type your query, the Toolbar displays a list of useful suggestions. This list is based on popular searches from other users, spelling corrections, and your own search history and bookmarks. If your query is displayed in this list, just select it and press Enter.
You can also use the Toolbar to perform more than just standard web searches. Click the G button (with the down arrow) in the search box, and you see a drop-down menu full of other Google searches you can perform, such as searching Google Images, Google News, or Google Maps. Select a search from this list and finish entering your query. When you click Search, your search is directed as noted.
This one’s easy. Click the Google News button, and you go directly to the Google News site.
This is another easy one. Click this button to go to your Gmail page and see what messages are waiting for you in your inbox. (Learn more about Gmail in Chapter 14, “Sending and Receiving Email with Gmail.”)
Click the down arrow to choose from a select list of additional buttons for the Toolbar. Click a tab to view buttons in a particular category—Popular, News, Tools, and More. Or click Visit the Complete Button Gallery to view all available buttons in a new browser page. (See the “Adding and Removing Buttons on the Google Toolbar” section, later in this chapter, for more information.)
The Google Toolbar includes its own pop-up blocker, the better to block those pesky pop-up windows. The “x blocked” number on the button tells you how many pop-ups it has blocked.
To allow pop-ups on any given page, just click this button. Click the button again to turn the pop-up blocker back on.
The Google Toolbar lets you create a set of bookmarks separate from those normally stored in your web browser. The advantage of these Google bookmarks is that they can follow you from computer to computer; when you log onto your Google account, your stored bookmarks are displayed in whichever browser you’re using at the time.
To bookmark the current page, all you have to do is click the Bookmark button. (That’s the one with the blue star.) To view all your bookmarks, click the Bookmarks button (that’s plural—the one with the down arrow).
Google Notebook is a way to clip and collect information from the pages you visit on the Web. Just select the text or image you want to clip, and click the Google Notebook button on the Toolbar. When the Google Notebook pop-up appears, select the notebook you want to save to, and click the Clip button. The text or graphics you selected are pasted into the notebook you selected.
Looking for a particular word or phrase on the current web page? Click the Find button; this opens a new search bar at the bottom of the browser window, as shown in Figure 5.2. Enter the word you’re looking for, and click the Next or Previous button to find that word later or earlier on the page.
Note
Learn more about Google Notebook in Chapter 7, “Saving Your Searches—and Signing Up for Google Alerts.”
This isn’t one of the most useful buttons, in my opinion—but then, I’m a pretty good speller. What the SpellCheck button does is find any spelling mistakes you’ve made when typing data into a web form. This in itself isn’t that useful, but it also works as a spell checker for any web-based email service, such as Gmail. Click the SpellCheck button to go through the words you’ve typed one at a time. Click the down arrow and select AutoFix to have the spell checker automatically correct any misspelled words, without your input.
AutoFill is one of my favorite features of the Google Toolbar. When you activate this feature, clicking the AutoFill button automatically completes web forms with the personal information you’ve previously entered. Given the increasing number of forms on all manner of websites, it’s a great time-saver.
Caution
AutoFix works only if the spell checker correctly identifies misspelled words—and correctly guesses what word you intended to type. Life being what it is, you might introduce more errors with AutoFix than it actually fixes.
Before you can use AutoFill, of course, you have to enter the data you want to use to fill in all those forms. Here’s what you do:
-
Click the Adjust Toolbar Features button, and select Options.
-
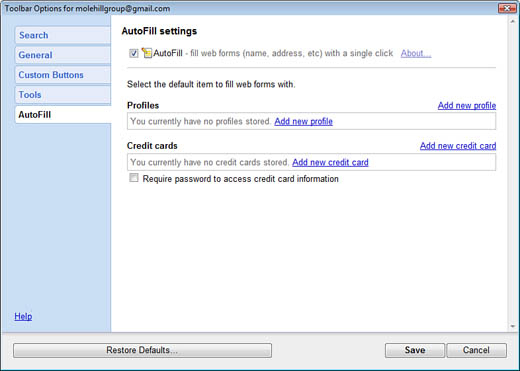
When the Toolbar Options dialog box appears, select the AutoFill tab, shown in Figure 5.3.
-
Activate AutoFill by checking the AutoFill option.
-
To add your personal information, click the Add New Profile link, and then fill in the appropriate information—name, email address, postal address, and so on.
-
To enter your credit card data (necessary if you want to use AutoFill for online shopping), click the Add New Credit Card link, and then fill in the appropriate information—card number, expiration date, and so on. If you want to require a password before the credit card info is automatically filled in, check the Require Password to Access Credit Card Information, and enter the desired password.
-
Click the Save button when done.
You enter data with AutoFill simply by clicking the AutoFill button whenever a web form is displayed. If you use AutoFill to automatically enter credit card information, you’ll be prompted to supply a password before entering credit card numbers.
When AutoLink is activated, Google automatically evaluates each page you load for addresses, locations, and the like. When it finds these items on a web page, the AutoLink button changes its text label appropriately. For example, if it finds a street address, it changes to a Look for Map button, and clicking the address links to a Google Map of that location. If AutoLink finds an ISBN for a book on a page, it changes to a Show Book Info button, and clicking the ISBN links to that book’s page on Amazon.com.
AutoLink can also link package-tracking numbers to delivery status, VINs to vehicle history, and other information. It’s kind of cool; give it a try and see what it finds!
This button lets you configure the Toolbar, as we’ll discuss in a moment. Click the down arrow next to this button if you need help using the Toolbar or if you want to uninstall it.
If you want to apply your Google Toolbar settings to another computer where you have the Toolbar installed, click the far-right button on the Toolbar. This saves your settings online with your Google Account; when you open the Toolbar in another browser on another computer, it automatically goes online and downloads your saved settings.
So far, we’ve discussed just those buttons that are displayed by default when you install the Google Toolbar in your web browser. But many more buttons are available—once you know how to add them.
Tip
If you have more buttons activated than can fit horizontally on the Toolbar, a “more buttons” button appears on the far right of the Toolbar, just to the left of the static Settings button. Click this button to display a list of the remaining buttons you have installed.
You add and remove buttons to and from the Google Toolbar by clicking the Add Buttons button on the Toolbar. A short list of available buttons is displayed when you click the down arrow next to the Add Buttons button; they are organized by category. Click the tab to view the buttons in each category.
These are just a subset of all the available buttons, however. Click the main Add Buttons button, and then click the View the Complete Button Gallery Link. You’re sent to the Web for a page full of Toolbar buttons. As you can see in Figure 5.4, tons of buttons are available from this page; you can search for specific buttons or browse buttons by category.
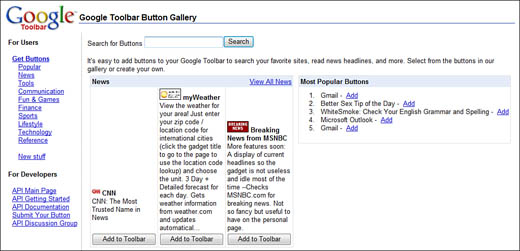
To add a button to the Toolbar, simply click the Add to Toolbar button.
The Google Toolbar is just one way to search Google from within your web browser. You also can employ a few other tools—all of which let you search directly, without having to go to the Google website.
Note
You can even create your own custom Google Toolbar buttons—provided that you know how to program with the Google API. Learn more in Chapter 43, “Using Google’s APIs and Developer’s Tools.”
As you can see in Figure 5.5, Internet Explorer 7 features an integrated search box at the top-right corner of the screen, next to the address box. You can configure Internet Explorer to send your queries to any specific search engine; just enter a query and click the search button (the magnifying glass icon) to view a page of search results.
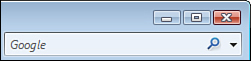
Because this is a book about Google, I’ll tell you how to configure Internet Explorer to use Google as its default search engine. All you have to do is click the down arrow next to the search box and select Find More Providers. This displays a page full of search sites; click the link for Google (in the Web Search section) and, when prompted, confirm your selection.
When you next enter a query into the Internet Explorer search box, that query is sent to Google, and IE displays a page of Google search results. It’s that easy.
You can also add special Google browser buttons to your web browser’s Links or personal toolbar. You can add these buttons to either the Internet Explorer or Netscape browsers (versions 4.0 and later).
You can add two buttons:
-
Google Search. Initiates a Google search when you highlight any word on a web page and then click this button.
-
Google.com. Takes you to the Google home page.
To install these Google browser buttons in your web browser, go to www.google.com/options/buttons.html and click the Get Your Google Buttons Here link. Follow the onscreen instructions to complete the installation.