Google Notebook (www.google.com/notebook/) is a web-based tool that lets you create an online “notebook” to organize all your web-based research on a given topic. You clip text, images, and links from interesting pages you visit, storing them in a topic-specific notebook page. It’s a great way to organize typically chaotic web-based research activities.
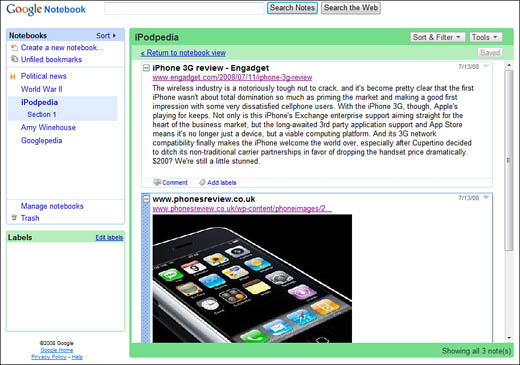
As you can see in Figure 7.1, you create different notebooks for different topics. Each notebook holds the notes you make, as well as links to and clips from web pages you select.
All your notebooks are listed in the Notebooks panel on the left side of the page. Click any notebook to display its contents in the main pane.
The contents of a notebook can be organized by section or displayed independently. Notes are displayed either condensed or in full. To condense a note, click the – button in the top-left corner; to expand the note to display the full contents, click the + button. Notes can include text that you enter, text clipped from a web page, pictures clipped from a web page, or links to a web page. To view a web page linked to from a note, just click the page’s URL.
To create a new notebook, click the Create a New Notebook link in the Notebooks panel. This opens a blank notebook with the name “Notebook 1.” Place the cursor in this text box, type a new name for your notebook, and click OK. Your new empty notebook now appears in the main section of the page, waiting for you to enter new notes.
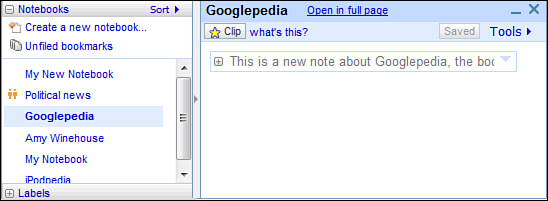
To add a new note to a notebook, click the New Note button to display the Type, Paste, or Add section, shown in Figure 7.2. Click in this section and start typing; the section changes to a note box. You can enter as much text as you like; the note is complete when you stop. You can add more text to a note at any time by positioning the cursor within the note box and typing some more.
To format the text in a note, use the formatting controls at the top of the notebook pane. You can create bold, italic, or colored text; you can also change the font and the text size for selected text.
You can also insert web links into a note by clicking the Link button. This displays the Edit Link box; enter the text you want displayed for the link, and then the link URL. Click OK when you are done.
Tip
To insert additional comments below the main note text, click the Comment link and start typing.
One or two notes in a notebook are easy enough to navigate, but when you start adding a lot of notes, it gets a bit cumbersome to later find the information you want. For this reason, Google Notebook lets you organize each notebook into multiple sections; think of a section as a file folder in a filing cabinet.
To create a new section in a notebook, click the New Note button, and then click the Type, Paste, or Add Section link. This creates a section header, with the name Section 1. Enter a name for the new section, and then click OK. Your new section is added to the notebook; add as many sections as you like.
Google Notebook really proves its worth when you clip web page content into individual notes. This is accomplished via the Google Toolbar, which displays a Google Notebook button by default.
Clipping content from a web page is simple. Start by navigating to the web page, and then use the cursor to highlight the area of the page (text or pictures) you want to clip. Then click the Google Notebook button on the Google Toolbar. This displays the Google Notebook pop-up, as shown in Figure 7.3. Select the notebook you want to save to (or create a new notebook), and then click the Clip button. The text or graphics you selected are pasted into the notebook you selected.
You can manage the content of your notebooks in various ways. Here are some of the most useful:
-
To rename a notebook, select the notebook, click the Tools button, and select Rename Notebook.
-
To print an individual note, select the note, click the Tools button, and select Print.
-
To print all the notes in a given notebook, select the notebook, click the Tools button, and select Print.
-
To delete an individual note, click the down arrow on the note and select Delete Selected Note.
-
To delete a section of a notebook, click the section header, click the Tools button, and select Delete Section and Its Contents.
-
To delete an entire notebook, select the notebook, click the Tools button, and select Delete Notebook.
-
To move a section up or down within a notebook, use the cursor to drag the section header from one position to another. (It helps if you first collapse all the sections in this notebook.)
-
To move a note into a different section within the same notebook, use the cursor to drag it from one position to another. (You can also click the down arrow on the note, select Move, and then select a different notebook or section.)
-
To export a notebook to a Google Docs document, click the Tools button and select Export to Google Docs.
Another nice feature of Google Notebook is that you can use it as a collaboration tool. That is, you can share a notebook with other users, and let them add their own notes and comments.
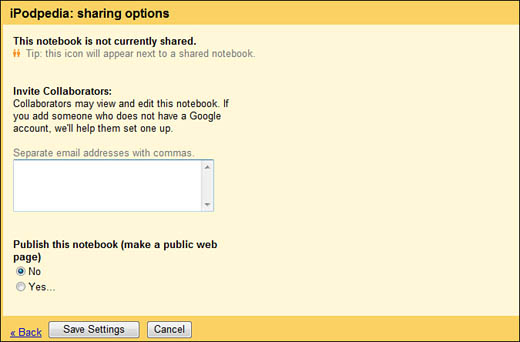
To share a notebook, select the notebook and then click the Sharing Options link. When the Sharing Options page appears, as shown in Figure 7.4, enter the email addresses of those with whom you want to share. When you click the Save Settings button, those users receive email invitations to share the notebook, along with links to the notebook. (You have the opportunity to add a personal message to the invitation.)
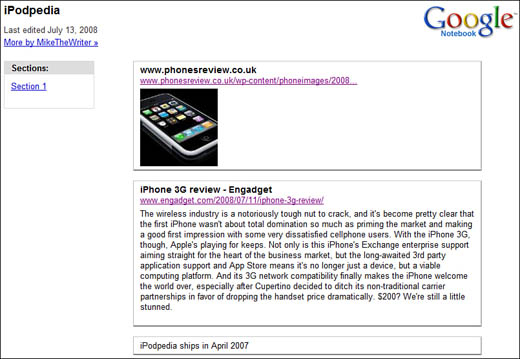
By default, a shared notebook is a private document, accessible only by those you invite. If you want instead to make your notebook a public web page, go to the Publish This Notebook section of the Sharing Options page and check the Yes option. This expands the Sharing Options page to include a second invitation text box, along with the URL of the shared notebook page. When you make your notebook public, users you invite can view the notebook content, but not edit it (unless they’ve been separately invited to collaborate, of course). Such a publicly shared notebook is shown in Figure 7.5; it looks a little like a blog.
A Google Alert is an email that Google sends you when it finds new items of interest. It’s a great way to keep updated when new web pages or news articles of interest appear. All you have to do is sign up for an alert and then wait for your email inbox to fill up.
Google offers five different types of alerts you can choose to receive. Each type of alert is based on a specific type of Google search:
-
News alerts search Google News for new headlines that match your query.
-
Web alerts search Google’s web index for new web pages that match your query.
-
Blog alerts deliver the top ten latest blog posts that match your query.
-
Groups alerts search Google Groups for new messages that match your query.
-
Comprehensive alerts aggregates results from multiple sources into a single email alert; this type of alert provides maximum coverage of your topic of choice.
You can opt to receive news alerts once a day, once a week, or “as-it-happens”—as new headlines and pages appear on Google’s radar. For most users, the once-a-day option is best; this way, you can see what new information has appeared in the last 24 hours.
Note
In most instances, Google Alerts don’t notify you of all items that match your query—otherwise, you’d receive hundreds of email messages a day. Instead, Google Alerts search only the most relevant results, based on Google’s PageRank Algorithm. So if you sign up for News alerts, you’re notified only of new stories that make it into the top 10 results for your query. If you sign up for Web alerts, you’re notified only of new pages that make it into the top 20 results for your query. If you sign up for Groups alerts, you’re notified only of new messages that make it into the top 50 results for your query.
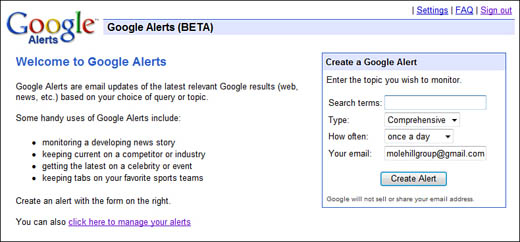
Signing up for a Google Alert is as easy as entering a search query and then activating the alert service. You do all of this from the Google Alerts home page (www.google.com/alerts/), shown in Figure 7.6. Just follow these steps:
-
From the Google Alerts page, enter your query into the Search Terms box.
-
Pull down the Type list and select which type of alert you want to receive—News, Blogs, Web, Comprehensive, Video, or Groups.
-
Pull down the How Often list and select how often you want to receive alerts—Once a Day, Once a Week, or As-It-Happens.
-
Enter your email address.
-
Click the Create Alert button.
To manage your existing alerts, you must be signed in with your Google Account. Then, when you access the Google Alerts page, click the Click Here to Manage Your Alerts link. This displays the Manage Your Alerts page, shown in Figure 7.7.
Note
If you have a Google Account and a Gmail account, your Google Alerts are automatically sent to your Gmail inbox. If you don’t have a Gmail account, you need to specify which email address you want your alerts sent to.
To edit the parameters of an alert, click the Edit link next to that alert. This opens all the fields for editing; you can edit your search query, change the type of alert, or change the frequency of the alert. Click the Save button next to that alert when you’re done making changes.
Tip
If you want to view your alert results now instead of waiting for Google to email them to you, go to the Manage Your Alerts page and click the name of the alert. This runs the specified search and displays a normal search results page.
By default, your Google Alerts come to you with fancy HTML formatting. If you’d rather receive plain-text email messages, click the Switch to Text Emails link at the top of the Your Google Alerts page. (You can always switch back by clicking the resulting Switch to HTML Emails link.)

