
Put simply, an online payment service such as Google Checkout or PayPal functions as a “middle man” between buyers and sellers, handling the details of the payment process. The need for such a service exists because, for most sellers below a certain size, it’s both impractical and unprofitable to handle their own electronic payments.
If you’re a big merchant, like Best Buy or L.L. Bean, you can afford to design and invest in your own electronic payment systems. Even medium-sized retailers can contract with banks and other financial institutions for merchant checking accounts and online checkout services. But small retailers and individuals selling online don’t have the time or money to invest in custom-built payment systems, and aren’t big enough to qualify for merchant credit card accounts and similar services.
For these small merchants and individuals, the only way they can accept electronic payments online is to let someone else do it for them—hence the creation of PayPal, Google Checkout, and similar online payment services. These services are big enough to build their own electronic payment and checkout services; they provide these services to smaller merchants and individuals, so that they can accept credit card payments from their customers.
How exactly does Google Checkout do what it does? To answer that question, let’s take a look at a typical online transaction:
-
The transaction starts when a customer (let’s call him “Bob”) goes to the website of a small online retailer that sells collectible sports cards. Bob finds a card he wants to purchase and clicks the “buy” button.
-
At this point, Google Checkout kicks in. The website has previously contracted with Google Checkout to handle all its checkout and payment processes. As such, the retailer has followed Google’s instructions to insert the proper HTML code onto the site’s web pages. The “buy” button is part of Google’s HTML code.
-
When Bob clicks the “buy” button, an electronic command is sent over the Web to Google Checkout. The service now takes over the rest of the purchasing process, directing Bob’s web browser to the payment service’s website.
-
Google Checkout now displays for Bob a shopping cart page. This page shows the item that Bob wants to purchase, as well as other information regarding the purchase. Bob can, if he wants, return to the retailer’s website to resume shopping, or he can click the “checkout” button to finalize his purchase.
-
Bob, his shopping finished, clicks the “checkout” button. This displays another page on the Google Checkout website, this one showing all the items in Bob’s shopping cart, along with shipping/handling charges and sales tax (if any). This information is inserted by Google Checkout based on the retailer’s pre-arranged instructions. (That is, the retailer specifies ahead of time how much shipping and handling to charge per order, as well as whether or not to charge sales tax.)
-
If Bob concurs with the total amount listed on the checkout page, he clicks a “pay now” button. This directs him to a payment page, again hosted by Google Checkout. Bob will now be asked if he’s already signed up for Google Checkout. If he has, Bob can simply enter his user name and password, and the rest of his personal information—address, phone number, and so on—are retrieved from Google’s database and automatically entered onto the payment form.
-
Next, Bob has to specify how he’s going to pay for his purchase. Google Checkout accepts payment via MasterCard, Visa, American Express, and Discover card. So Bob enters his credit card number and expiration date (unless it’s already stored with Google Checkout), and then clicks the “pay” button to authorize payment.
-
Bob’s credit card information is now transmitted to Google Checkout. The service contacts the issuing bank for Bob’s credit card, ensures that Bob has enough left on his credit line to cover the purchase, and charges the purchase.
-
At this point, several things start to happen. First, Bob is notified by Google Checkout that his purchase has been completed, in the form of a confirmation web page. Second, the retailer is notified by Google Checkout of the purchase, via an email message that includes information about what was purchased, as well as Bob’s shipping information. Third, an electronic transfer of funds is initiated from Bob’s credit card company to Google Checkout; the funds don’t arrive immediately, but the transfer process is started.
Note what doesn’t happen at this point: The retailer does not receive specifics about how Bob paid. Bob’s credit card information is retained by Google Checkout, but not transmitted to the retailer. This keeps Bob’s financial information secure, and helps to protect Bob’s credit card from theft.
-
Once notified of the purchase, the retailer puts the purchase into process, so that the item can be pulled from inventory, packed, and sent to the designated shipping carrier. Depending on the retailer, this might happen immediately, or it may take several days to pack and ship the item. Note that the inventorying, packing, and shipping of the item are all handled by the retailer, not Google Checkout.
-
For its part, Google Checkout now waits for the funds to be transferred from Bob’s credit card account to its bank account. This might take a few minutes or it might take a few days; two days is the norm. Once the funds are transferred from the credit card company, Google Checkout initiates an electronic transfer of those funds to the retailer’s bank account—minus any fees charged, of course.
Note that the retailer ships out the purchase before it physically receives the funds for that purchase. That’s because the retailer trusts Google Checkout to transfer the funds owed; since the actual payment has been made (by Bob to the online payment service), the retailer knows the funds are in the system.
And that ends the transaction. Here’s what happened, from each entity’s point of view:
-
Bob shops at the retailer, places his order with Google Checkout, pays Google Checkout, and receives his item from the retailer.
-
The retailer offers the item for sale to Bob, receives notice of the sale from Google Checkout, ships the item to Bob, and then receives payment for the item from Google Checkout.
-
Google Checkout receives the order from Bob, transmits the order to the retailer, receives payment from Bob (actually, from Bob’s credit card company), and then pays the retailer.
Note
Although the buyer has to create an account with Google Checkout, this account is free; the account exists only to facilitate future transactions, since the buyer’s address and payment information doesn’t have to be re-entered for each new transaction. The seller also needs to create an account with Google Checkout, and this account is also free—although the seller probably has to supply banking information, so the service can electronically deposit funds due.
So, Google Checkout serves as the “middle man” for the transaction, both processing the order (using its own checkout system) and accepting Bob’s credit card payment. The retailer receives both notice of the sale and processed payment for the sale from the online payment service.
On June 29, 2006, Google announced its entry into the online payment services market, via the new Google Checkout service. Google Checkout functions in much the same manner as PayPal, offering checkout and payment services for Internet retailers of all shapes and sizes.
For buyers, Google Checkout lets you store your shipping and credit card information in a single Google Account, and then have that information entered automatically when you make a purchase from any retailer using the Google Checkout system. In this regard, Google Checkout is almost identical to PayPal.
Like PayPal, Google Checkout lets buyers pay via Visa, MasterCard, American Express, and Discover cards. Unlike PayPal, Google Checkout doesn’t offer payment via e-check or electronic bank withdrawal. And, at present, Google Checkout is only available to United States and United Kingdom merchants; it doesn’t offer PayPal’s international payment options.
For sellers, Google Checkout offers the same type of checkout and payment services offered by PayPal. That said, Google Checkout offers two big advantages to sellers—lower transaction fees (2.0% vs. PayPal’s 2.9% for most merchants) and big discounts if you also advertise via Google’s AdWords service. For every $1 a merchant spends on AdWords, that merchant can process $10 in sales through Google Checkout, at no charge.
This last bit reveals Google’s real goal with Google Checkout—to increase its advertising revenues. In fact, Google looks to use Google Checkout to enhance the value of its AdWords advertisements; interested users can now click on a link in an AdWords ad and be offered an instant purchase option via Google Checkout. This should appeal to advertisers who can now realize a true click-to-purchase experience, and perhaps even to those buyers who want to purchase the items advertised.
The one thing Google Checkout doesn’t offer, at this point in time, is the ability to be used in eBay auctions. Shortly after the launch of Google Checkout, eBay announced that Google Checkout was banned from use in eBay auctions. Although that might change sometime in the future, eBay’s ban for now ensures that Google Checkouts is not the PayPal killer some thought it might be.
Google Checkout is used by many online merchants, large and small. For example, most individuals selling via Google Base use Google Checkout for payments, as do many large retailers, including Blue Nile, Buy.com, CompUSA, Dick’s Sporting Goods, Linens ‘N Things, RitzCamera, Toys “R” Us, and Zales.
To pay via Google Checkout, you’ll first want to create a Google account. This is free and relatively easy to do; once you create your account, paying via Google Checkout is as easy as entering your email address and password.
To create a Google account, follow these steps:
When you encounter a merchant that accepts Google Checkout payments, you’ll proceed through the item-ordering process as expected. Find an item you want to buy, click the Add to Cart button, and then keep on shopping.
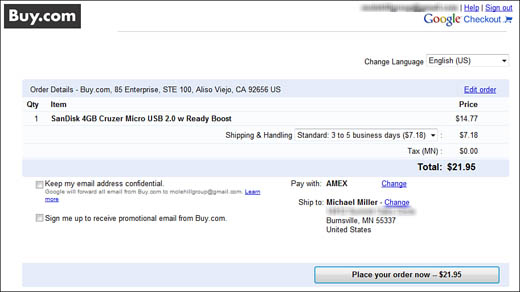
When you’re ready to check out, go to the shopping cart or checkout page; then click the Google Checkout button, like the one shown in Figure 33.1. You’ll now see a checkout page, like the one in Figure 33.2, with all the shipping and billing information already filled out for you. If everything is copasetic, click the Place Your Order Now button, and your order will be processed.

Caution
If you have concerns about your online privacy, know that when you create a Google account, your personal information (including credit card number) is stored on Google’s servers. Although Google says it will not share this information with others, it’s still out there—and could be stolen or used for nefarious purposes.
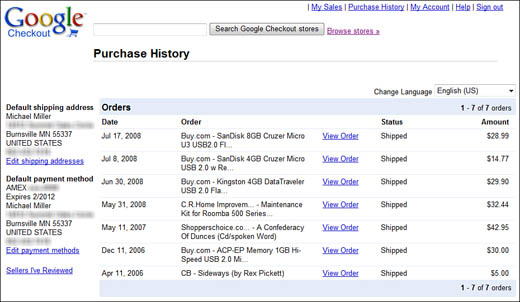
One other nice thing about Google Checkout is that it lets you review all your recent purchases on a single page, even if you purchased from multiple retailers. Just go to the Google Checkout page and click the My Account link at the top of the page. When the next page appears, click the Purchase History link, and you’ll be taken to the Purchase History page. As you can see in Figure 33.3, all your purchases are listed here.
Note
If you don’t yet have a Google account, the Checkout page prompts you to create one. It’s nice that you can create your account from the merchant’s website, without having to exit out to Google.
Google Checkout is an attractive alternative to PayPal for anyone selling items on their website. Your customers get a similar checkout and payment experience, while you end up paying less in transaction fees than you would if using PayPal.
There are drawbacks to using Google Checkout, of course. First, you can only use Google Checkout for U.S. and U.K. orders; at this point in time, you can’t sell to Europe or Asia. Second, you can only use Google Checkout for sales on your own website; it’s not available for eBay auctions. And third, you can only accept credit card payments; Google Checkout has no provision for customers who want to pay via e-check or bank account withdrawal.
Tip
To protect your privacy, Google Checkout offers the option of keeping your email address private from the merchants you buy from, unless you explicitly consent otherwise. When you reach a merchant checkout page, check the option for Keep My Email Address Confidential. When you do this, the merchant won’t get your email address, thus keeping you out of their system and off their mailing lists.
That said, Google Checkout for sellers is very similar to the PayPal service, and quite easy to get up and running on your site.
To use Google Checkout for website payments, you first need to sign up for the service. You start this process by going to the Google Checkout for Merchants page (checkout.google.com/sell/) and signing in with your Google account ID and password. (If you don’t yet have a Google account, now’s the time to sign up for one.)
Note
If you’ve already provided some or all of this information for your Google account or AdWords account, you won’t be prompted for all this information.
When you first sign up, you’ll see a page that lets you know what you’ll need to create your Google Checkout account. You’ll also be asked to describe your business; check the option that best categorizes the type of business you run; then click the Sign In and Continue button.
You’re now taken to the Contact Information page. You’ll need to enter your primary contact name (that’s you), your business name, address, and phone number.
When you click Next, you see the Financial Information page. Now you get to enter even more information about your business, including current sales volume, estimated average order, and Federal tax ID (EIN) or your social security number and credit card information.
Click the Next button, and you see the Public Business Information page. Here you enter as much information about your business as you like, including your website URL, the types of products you sell, the business name you want to appear on customers’ credit card statements, your email address and other information for customer support, and your return/cancellation and shipping policies.
Click the Finish button, and you’re signed up—and ready to integrate Google Checkout with your website.
How much does it cost you, as a merchant, to use Google Checkout? The fee structure is simple. You pay 2% of the total sale price (that’s the price of the item, plus shipping, handling, and sales tax), plus 20 cents per transaction. For small and medium-sized merchants, that’s significantly lower priced than PayPal’s 2.9% (for volumes under $3,000/month) + 30 cents per transaction fee. These charges, of course, are deducted from your funds due in your Google Checkout account.
Here’s something that makes Google Checkout even more attractive—and, perhaps, free. If you advertise with Google AdWords, you get a discount on your Google Checkout fees. For every $1 you spend on the AdWords program, you can process $10 in Google Checkout sales for free.
For example, if you spent $100 on AdWords in the previous month, you can process $1,000 in sales through Google Checkout at no cost. Obviously, this is an incentive for you to use AdWords to advertise your website, but it’s a useful incentive—one that can save you big money over time.
And once you sign up for Google Checkout, a shopping cart icon will appear next to all your AdWords text ads. This provides a fast track for customers to click your ad and purchase your item, using the Google Checkout system.
Google offers three different ways to integrate Google Checkout with your website. Which service you use depends on the number of items you’re selling, and how sophisticated your site is:
-
Buy Now buttons, designed for smaller merchants and individuals selling a limited number of items. This service lets you use the checkout function on Google’s website, and requires only a basic knowledge of HTML to implement.
-
Shopping cart integration, which is useful if you’re using a shopping cart application supplied by one of Google Checkout’s partners.
-
Google Checkout API, which lets you program your own shopping cart and checkout and then tie your site into the Google Checkout Application Programming Interface (API). This option is for larger merchants only.
Table 33.1 details the Interface (API). This features of these different services.
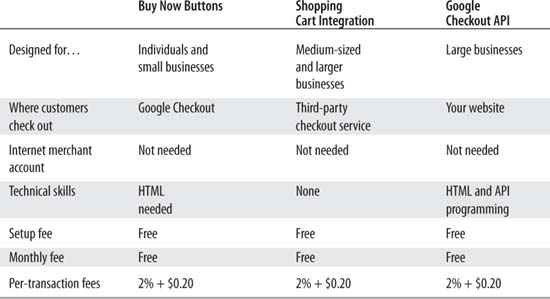
Which option should you choose? If you’re a small merchant or individual selling a limited number of items, the choice is simple—go with the Buy Now buttons. If you’re a larger merchant with a pre-existing checkout system, the choice is also simple—use the Google Checkout API. And if you happen to already use a checkout system provided by one of Google’s merchant services partners, go with the e-commerce partner integration option.
Note
Google Checkout also offers the option of invoicing customers via email, which is useful if you do the majority of your business via phone or fax. Just go to the Tools tab, select Send an Invoice through Email, and fill out the resulting form to email your invoice.
Note
Google Checkout has more than 40 shopping cart partners, including ChannelAdvisor, eCRATER, Mercantec, Miva, and MonsterCommerce. See the full list at checkout.google.com/ seller/integrate_cart.html.
For larger merchants, the Google Checkout API is the way to go. This assumes that you already have a shopping cart application installed on your website; you then use the Google Checkout API to tie your system into the Google Checkout payment system. This requires programming expertise, of course, but provides a seamless integration between your site and the Google Checkout system. Learn more at code.google.com/apis/checkout/.
For most smaller sellers, the easiest route is to add Google Checkout Buy Now buttons to your website. When a customer clicks on the Buy Now button, he’s taken to the checkout system hosted by Google Checkout, where he can pay via credit card.
To add a Buy Now button to your website, sign into Google Checkout, select the Tools tab, and then click the Buy Now Buttons link. This takes you to the Create a Buy Now Button page, shown in Figure 33.4.
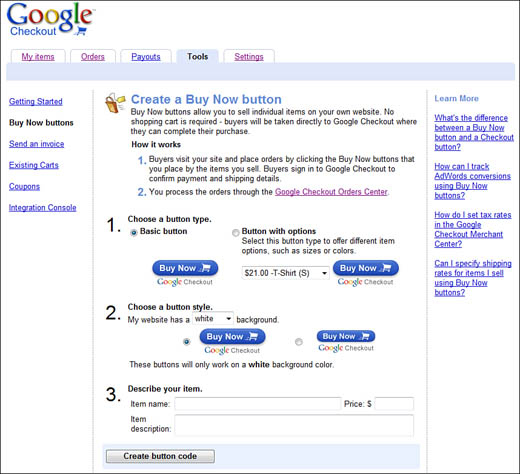
From here, you select a button type (basic button or button with pull-down options list) and button style, and enter your item’s name, price, and description. Click the Create Button Code button, and Google generates the HTML code for the button. Copy the code from this page into your web page’s basic HTML code, where you want the button to appear, and you’re ready to go.
What happens when someone clicks the Google Checkout Buy Now button on your website? If you’ve configured Google Checkout appropriately, Google will email you whenever a new order is received. Otherwise, you can manually check the Orders tab of the Google Checkout Merchant Center. All recent orders will be displayed here.
Tip
If you want to be notified via email of all new purchases, go to the Google Checkout Settings tab and click the Preferences link. On the Order Processing page, check the option for Email Me Each Time I Receive an Order, Cancellation, or Other Transaction, and then click the Save Preferences button.
To view information about a specific order, simply click the order number. You’ll now see the order details, and have the option of choosing a shipping carrier and entering a tracking number. You’ll also need to okay the order and charge the customer’s credit card; you do this by clicking the Charge button beside the order.
When you’re ready to ship the order, return to the Orders tab and click the Ship button beside the order. This will mark the item as shipped, and send an automatic email message to the customer, informing him that the package is on the way.
Google Checkout automatically deposits all funds due into your bank account, electronically. For this to happen, you have to supply your bank account information to Google Checkout. You do this by going to the Settings tab and clicking the Financials link. This displays the Bank Information page; click the Set Up Account button.
When the Bank Account Setup page appears, enter the type of account (checking or savings), bank name, routing number, and account number; then click the Save Account button. Google will now deposit a small amount (a few pennies) into this account; when you see this deposit in your account, return to the Account Verification page and enter the amount deposited. This will verify that the system is working, and activate your account for direct deposit.
On an ongoing basis, Google Checkout will initiate payment to your account within two business days of a transaction. Know, however, that it might take up to three additional days for your bank to process the funds transfer. So, expect payment from a purchase to show up in your bank account within five days of the original purchase.
To protect sellers from online fraud, Google Checkout offers both Chargeback Resolution and Payment Guarantee policies.
Under these policies, Google evaluates all chargebacks filed against your account for potential fraud, and reimburses you from claims of unauthorized purchases and non-receipt of goods. Provided your claim is accepted, Google will reimburse you within a week.
Of course, the transaction in question has to meet certain qualifications for you to be protected. In particular:
-
You have to ship to the buyer’s stated shipping address, using the shipping method specified when the order was placed.
-
You have to provide a tracking number or other proof of shipping (for transactions less than $250).
or
You have to provide the customer’s signature for proof of delivery (for transactions greater than $250).
-
You have to display a clear return policy on your website.
-
You provide all requested documentation to Google within ten business days of the request.
Google promises to reimburse you from fraudulent chargebacks up to $10,000 per year. If your gross Google Checkout sales exceed $1 million per year (lucky you!), Google will protect you for 1% of those sales.