
You access Google Presentations from the Google Docs home page (docs.google.com). All your existing presentation files are listed there, along with your word-processing documents and spreadsheets.
You create a new presentation the same way you create any new Google Docs file. All you have to do is click the New button and select Presentation.
In this activity, you learn how to create a new blank presentation.
Alternately, you can select New, From Template to create a new presentation based on a pre-designed template. This opens Google’s Template Gallery, from which you can make your choice.
After you’ve saved a presentation, reopening it is equally easy. Just click the file’s name on the Google Docs home page, and the presentation opens in a new browser window.
After you create a new presentation, you need to save the file. When you first save a file, you must do this manually—and give the file a name. After this first save, Google automatically resaves the file every time you make a change to the presentation. In essence, this means that you only have to save the presentation once; Google saves all further changes automatically.
To save a newly created presentation file, select File, Save. Google saves the presentation and names it according to the first bit of text in the editing window. For example, if you had entered the text “Sales Conference,” your file would be automatically named Sales Conference.
Many organizations use Microsoft PowerPoint to create their presentations. If you or your colleagues still use PowerPoint, you can import your PowerPoint presentations into Google Presentations for online editing and collaboration.
Tip
If you don’t like the name that Google assigns, you can easily change it. Just click the File button and select Rename; when prompted in the pop-up window, enter the new name and click OK.
To import a PowerPoint presentation, go to the Google Docs main page and click the Upload button. When the Upload a File page appears, click the Browse button; then locate and select the file you want to upload. Enter a name for the uploaded file into the What Do You Want to Call It? box; then click the Upload File button. The file now opens in Google Presentations for editing or presenting.
Tip
Even if you continue to use PowerPoint to create and edit your presentations, you can use Google Presentations to give those presentations when you’re on the road. Just import your PowerPoint presentation into Google Presentations; then you can access that presentation from any computer connected to the Internet. There’s no longer any need to take large PowerPoint files (or even your own notebook PC) with you when you travel!
By default, all the presentations you work with in Google Presentations are stored on Google’s servers. You can, however, download files from Google to your computer’s hard drive to work with in Microsoft PowerPoint.
Here’s how to do it. From within the current presentation window, select File, Download Presentation As, PPT. When the File Download dialog box appears, click the Save button; when the Save As dialog box appears, select a location for the downloaded file, rename it if you like, and then click the Save button. The Google Presentations file is now saved in .ppt format on your hard disk. You can open this saved file with Microsoft PowerPoint and work on it as you would with any PowerPoint presentation.
A presentation is composed of a number of different slides. Each slide can hold text, images, or videos, or any combination of the preceding.
In the Google Presentations workspace, shown in Figure 21.1, the slides in a presentation are displayed in the slide sorter pane, to the left of the main part of the workspace. The larger part of the workspace, called the editing window, displays the current slide for editing. To edit a different slide, just select that slide in the slide sorter.
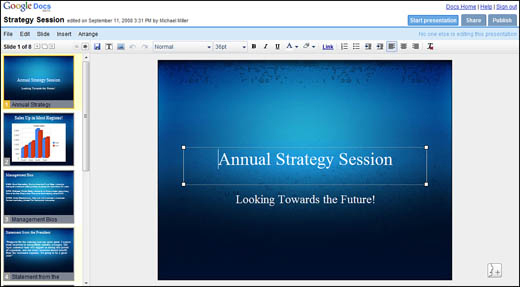
All the application’s editing and formatting tools are at the top of the workspace. Formatting commands are found on the application toolbar.
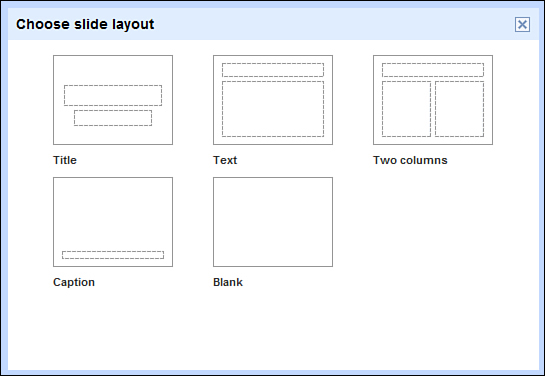
In Google Presentations, a slide can be based on one of five predesigned layouts:
-
Title. This consists of the presentation title and subtitle only (ideal for the lead slide in presentation, or to signal new sections in the presentation).
-
Text. This consists of the slide title and a block of text below.
-
Two columns. This consists of the slide title and two columns of text.
-
Caption. This has a blank main area (ideal for inserting graphics or videos) and a text caption at the bottom.
-
Blank. This is completely blank—you can insert anything on this type of slide.
Every new presentation starts with a single title slide. To add a new slide, click the Insert New Slide button (the + sign above the slide sorter pane). When the Choose Slide Layout dialog box appears, as shown in Figure 21.2, select the layout for the new slide. The new slide is now added to the slide sorter pane and displayed in the main window.
Of course, you don’t always want to keep every slide you create. To delete a slide, simply select it in the slide sorter and then click the Delete Current Slide button.
Tip
If you’ve created a slide with content or formatting that you’d like to repeat elsewhere in your presentation, you can duplicate that slide and then edit the duplicate. Select the slide you want to duplicate in the slide sorter; then click the Create a Duplicate Copy of the Current Slide button. A duplicate of the selected slide is created after the selected slide in the slide sorter.
As your presentation develops, you may need to rethink the order of the slides in the presentation. You rearrange your slides in the slide sorter, using your mouse. Just select the side you want to move, and then drag it up or down to a new position.
Few people want to give a presentation of black text on a plain white background. You gain more attention by using attractive background colors and graphics, as illustrated in Figure 21.3.

Google Presentations lets you choose from several predesigned themes for your presentations. You can also design your own themes by using custom background images on all of your slides.
The easiest way to change the look and feel of your presentation is to choose a new theme. You do this by selecting Edit, Change Theme. When the Choose Theme dialog box appears, as shown in Figure 21.4, click the theme you want to use. This theme is now applied to all the slides in your presentation.

If you don’t like the looks of any of Google Presentations predesigned themes, you can create your own theme by applying a custom background color or graphic to all the slides in your presentation.
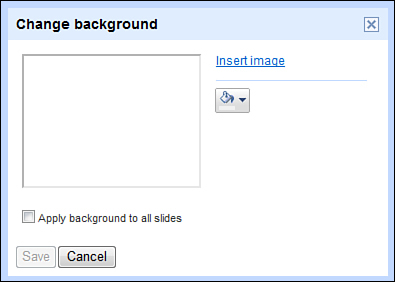
Start by right-clicking anywhere on the current slide, and then select Change Background from the pop-up menu. When the Change background dialog box appears, as shown in Figure 21.5, click the Change Background button to select a new background color.
Note
A theme is a predesigned collection of background images, color schemes, and fonts that are applied to every slide in your presentation.
Click the Apply Background to All Slides option, and then click the Save button. The new background color or image is now applied to all the slides in your presentation.
Once you’ve chosen a slide layout, it’s time to start adding content to that slide. Slide content can be in the form of text or images of various types.
We’ll start by adding some text to a slide. Each block of text is added via a separate text object; select an object to add, edit, or format the text within.
For example, most slides in a presentation have a title that appears at the top of the slide; this title area is an object labeled “Click to add title,” as shown in Figure 21.6. Click this object, and then type your title.
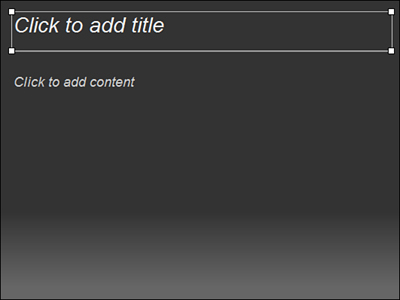
Adding body text is similarly easy. Just click the text object labeled “Click to add content;” then type your text. You can enter a block of text, like a paragraph, or (using the appropriate buttons on the formatting toolbar) bulleted or numbered lists.
Tip
A bulleted list is the best way to emphasize individual points or items. A numbered list is best for presenting step-by-step instructions or a sequential to-do list.
Tip
To add a web page link or email address to the text on a slide, select the anchor text and click the Link button. When the Edit Link dialog box appears, enter the web address (URL) or email address for the linked-to page, and then click OK.
Google Presentations also lets you format text on a slide, pretty much the way you’d format text in a word-processing document. Just select the text object on the slide that contains the text you want to edit and then, within the text object, use your cursor to select the text you want to format. Now click the appropriate button on the formatting toolbar to apply the formatting you want. For example, to change the font of the selected text, select a new font from the Font list; to boldface the selected text, click the Bold button.
Text isn’t the only type of object you can add to a slide. Often, you’ll want to show a picture of some item on a slide, or just add a graphic for visual interest.
Tip
You can also add graphic shapes to a slide, in the form of boxes, arrows, callouts, and the like. Position the cursor where you want the object to appear; then select Insert, Shape and select the desired shape.
To add a picture to a slide, position your cursor where you want the image to appear and click the Insert an Image button. When the Insert Image dialog box appears, click the Browse button and select the image file you want to include. Click OK, and the image is inserted into your slide as a new object.
After the image is inserted, you can now use your mouse to drag the image object to a new location on the slide. You can also resize the image, by clicking and dragging the image’s corner handles.
Although Google Presentations does not currently include its own chart editor, you can add a chart created in another program to a Google Presentations slide. The easiest approach is to create a chart in Google Spreadsheets and then copy that chart to Google Presentations as an image object.
Start by creating a chart in Google Spreadsheets; then double-click the chart and select Save Image. When the File Download dialog box appears, click the Save button; when the Save As dialog box appears, make sure PNG Image is selected in the Save as type box and then select a filename and location for this file.
Now switch to Google Presentations and open the slide for the chart. Position the cursor where you want the chart to appear and click the Insert an Image button. When the Insert image dialog box appears, click the Browse button and then navigate to and select the image file you just created. Click OK and the image of the chart is inserted into your slide as a new object.
You can now use your mouse to drag the chart to a new location on the slide, or click and drag the image’s corner handles to resize the chart.
While Google Presentations does not currently offer slide-to-slide transitions, you can animate the individual elements on a slide. That is, you can configure one element to appear after another element, via what Google calls incremental reveal.
Tip
Google Presentations also lets you run videos from within a presentation, by facilitating the insertion of any video uploaded to Google’s YouTube video-sharing site. To add a video object to a slide, you must first upload that video to YouTube. Then position the cursor where you want the video window to appear on the slide, select Insert Video, and choose the video you want.
When you choose to incrementally reveal an object, it doesn’t appear when you first display the slide during a presentation. To reveal an object, you press the next button as if you were going to a new slide; this displays the first object chosen to reveal. If more than one object on a slide is formatted for incremental reveal, each successive object is displayed each time you press the next key.
It’s even better when you select a bulleted or numbered list for incremental reveal. In this instance, only the first list item is displayed when you press the next button during the presentation. Continue pressing the next button to display successive items in the list.
To use incremental reveal, right-click the object you want to appear first and then select Incremental Reveal from the pop-up menu. A timer icon now appears next to that object on your slide.
Now select the object you want to appear next and select Incremental Reveal from that object’s pop-up menu. A timer button with the number 2 now appears next to that object on your slide. Repeat this second step for any other object you want to be revealed on the slide.
When you give the presentation, all you have to do is click the next button to display each selected item in order.
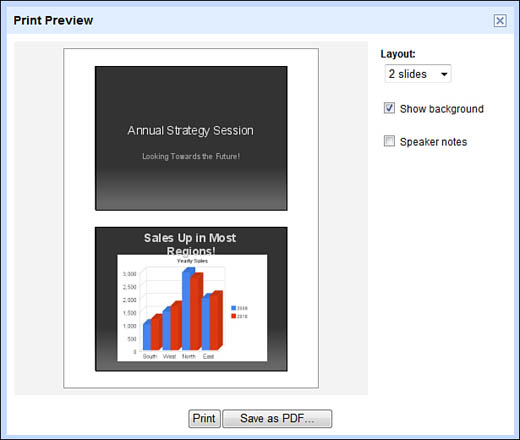
Google Presentations lets you print your entire presentation, one slide per page, or create speaker notes for you to use when giving the presentation.
To create printed handouts, select File, Print. When the Print Preview dialog box appears, as shown in Figure 21.7, pull down the Layout list and select how many slides you want to print per page—1, 2, 4, 8, 9, or 12. Click the Print button, and your handouts will be printed as specified.
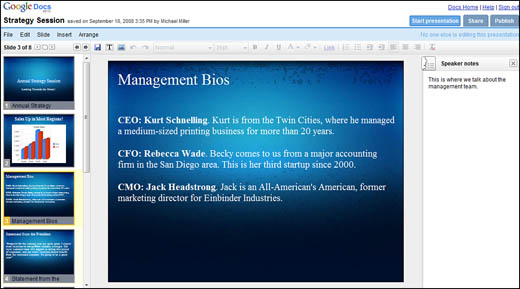
Beyond simple handouts, presenters like to prepare speaker notes that they can then reference while they’re giving a presentation. To do this, go to the first slide of your presentation and click the View Speaker Notes button at the lower-right corner of the workspace. This changes the workspace to reveal a speaker notes pane, as shown in Figure 21.8. Enter your notes for this slide into the speaker notes pane; then move to subsequent slides in your presentation and enter notes for those slides.
To print your speaker notes, select File, Print. When the Print Preview dialog box appears, check the Speaker Notes option and click the Print button. This prints your presentation one slide per page, with speaker notes displayed beneath each slide.
One of the key reasons to use Google Presentations is the collaboration function. Because it’s a web-based application, it’s relatively easy to collaborate with others on group presentations.
Tip
You can also use Google Presentations offline, thanks to Google Gears. This lets you access your presentations even when you’re not connected to the Internet. Learn more about this functionality in Chapter 19, as well.
We covered Google Docs’ collaboration function in depth in Chapter 19, “Using Google Docs.” That function works pretty much the same in Google Presentations as it does in the word-processing application; you find the sharing/collaboration functions on the Share tab, and the publishing functions on the Publish tab.
Of course, the main reason to create a presentation is to present it to others. Google Presentations lets you give in-person presentations or Internet-based presentations that let other users at any location see your presentation in their web browsers.
Google Presentations makes it easy to give presentations. After you’ve created and edited your presentation, you can connect your computer to a projector or large monitor and show it to any sized group of people. In fact, you can take your presentation anywhere you travel just by connecting your computer to the Internet—where your presentation is stored.
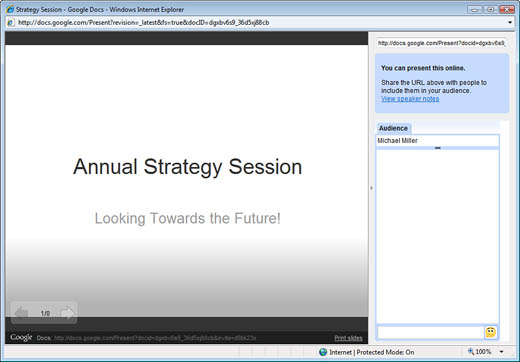
To give a live presentation in person, start by opening the presentation and selecting the first slide; then click the Start Presentation button. This opens your live presentation in a new browser window, as shown in Figure 21.9. Press the F11 key on your keyboard to display the presentation full-screen.
To advance to the next slide in the presentation, click the next slide (right) arrow or press the right-arrow key on your keyboard. If a slide includes objects formatted with incremental reveal, only the slide background and immediate reveal objects will appear when the slide first displays. To reveal the next object on the slide, click the next slide arrow or press the right-arrow key on your keyboard.
When the presentation is finished, you see an End of presentation dialog box. Click the Restart button to start the presentation over, or click the Exit button to close the presentation window.
Another unique feature of Google Presentations is the capability of giving a presentation in multiple locations over the Internet. Invited attendees view the presentation in their own web browsers as you give it.
To invite viewers to your presentation, open the presentation and click the Share tab at the top-right corner of the window. When the Share This Document page appears, check the As Viewers option.
Enter the email addresses of the people with whom you want to share this presentation into the Invite people box; separate multiple addresses with commas. Click the Invite Viewers button, and your recipients receive an invitation via email that contains a link to the presentation.
At the appointed time for the presentation, make sure that you and all viewers are logged on and have the presentation open on your desktops. From your open presentation, click the Start Presentation link, and have your viewers do the same.
This opens your live presentation in a new browser window. At the right side of the window is a Google Chat pane, which lists each viewer who is currently logged on. You can exchange instant messages with other viewers by entering text into the message box and pressing the Enter button on your keyboard.
To synchronize the presentation for all viewers, click the Take Control of the Presentation button. Viewers will now see your current slide displayed above the Google Chat pane. To advance to the next slide in the presentation, click the next slide (right) arrow or press the right-arrow key on your keyboard. To return to the previous slide, click the previous slide arrow or press the left-arrow key on your keyboard.