
Of all the cool Google features, I find Google Maps to be the absolute coolest. Not only does Google Maps compete head-to-head with other online mapping sites, such as MapQuest, Microsoft’s Live Search Maps, and Yahoo! Maps, but it offers a raft of unique and, dare I say, fun features. It’ll help you get to where you want to go, and show you a lot of neat and useful information on the way there.
Tip
Google also offers many Google Maps services for use on your cell phone. Learn more in Chapter 35, “Using Google on Any Mobile Phone.”
Google Maps (maps.google.com) offers a ton of useful mapping services, all packed into an easy-to-use interface. Yes, you can generate maps for any given address or location, but you can also click and drag the maps to view adjacent sections, overlay the map info on satellite images of the given area, view local traffic conditions, display nearby businesses as a series of pushpins on the map, and have Google Maps plot driving directions to and from this location to any other location.
And all this map and direction stuff is done from the familiar Google search box. Unlike other map sites, there are no forms to fill out; just enter what you want to see into the search box, and let Google Maps do the rest.
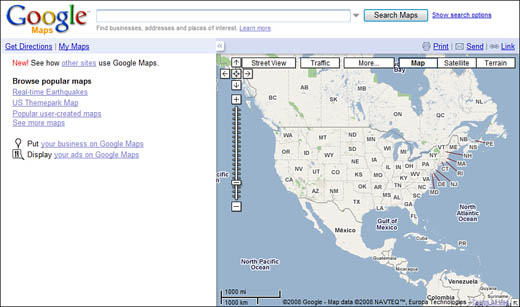
As the name implies, Google Maps is all about the maps. To display a map of a given location, all you have to do is enter information about that location into the top-of-page search box, shown in Figure 27.1. When you click the Search button, a map of that location is displayed on the page.
The most obvious way to display a map of a given location is to enter the location’s street address or general location. There are a number of ways you can enter an address or a location, as detailed in Table 27.1.
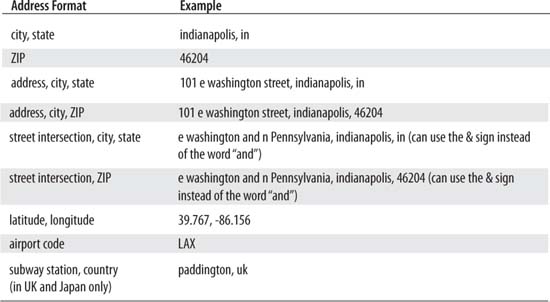
Remember to put a comma after each part of the address. In most instances, you don’t need to spell out words like “east,” “street,” or “drive”; common abbreviations are okay, and you don’t need to put a period after the abbreviation.
For many major cities, Google Maps also accepts just the city name. For example, entering miami gives you a map of Miami, Florida; entering san francisco displays a map of the California city. If, on the other hand, you enter a city name that’s fairly common (such as greentown—which appears in Indiana, Ohio, and several other states), Google will either display a map of the largest city with that name, or provide a list of cities or matching businesses for you to choose from.
Caution
You can’t enter just a state name or abbreviation. Although Google recognizes most cities, it doesn’t recognize states or countries.
If you want to enter latitude and longitude, you have two options. First, you can enter latitude and longitude as decimal degrees, using the - sign to express west longitude or south latitude. Second, you can use N, S, E, and W designations. What you can’t do is express latitude and longitude using degrees-minutes-seconds (such as 28 24’ 23.4”); Google doesn’t recognize the ‘ and “ syntax.
Tip
You can use any of Google’s advanced search operators (discussed in Chapter 6, “Getting the Most Out of Google Search”) to fine-tune your Google Maps searches.
If Google doesn’t recognize an address you entered (such as when an address could either be on an “east” or a “west” street, or the same address for a “drive” and a “lane”), Google will display a list of possible addresses. Assuming you can identify the correct address from this list, click the link to display the map of that location.
Sometimes you don’t need to know the exact address to generate a Google map. Google has hard-coded many landmarks and institutions into its map database, so that you only have to enter the name of the landmark or location into the search box. For example, entering hoover dam generates the map shown in Figure 27.2.
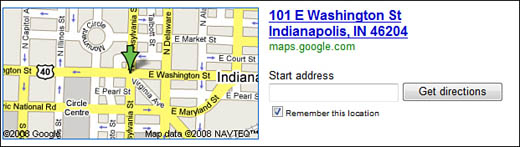
Here’s another tip. You don’t have to go to the Google Maps page to display a Google map. When you enter a street address, city, and state (or ZIP code) into the standard Google web search box, the OneBox at the top of the search results page displays a small map of the address, shown in Figure 27.3. Click the link to see the full Google Maps page, or use the Start Address box to generate a page of driving directions to the address.
When you map an address, Google displays a map of that address in the right side of the browser window, as shown in Figure 27.4. The address itself is listed in the Search Results tab on the left side of the window (along with pictures of that address, if available), and information about the address is displayed as a balloon overlaid on the main map. You can use the balloon info to set this address as your default location in Google Maps, to generate driving directions to or from this address, to initiate a search for nearby businesses, or to save this map in Google’s My Maps. (More on all these features later in this chapter.)

Tip
To display the map the full width of your browser window, click the little arrow on the top-left corner above the map. This hides the entire left-hand panel, and expands the map to fill the space.
Once you have a Google map displayed onscreen, there are many, many different ways to navigate around, into, and out of the map—both with your mouse and with your computer keyboard. Table 27.2 describes the ways.
You can drag the map in any direction by positioning the cursor anywhere on the map, clicking and holding the mouse button, and then dragging the map around. You can also reposition the map by dragging the little blue rectangle in the inset map (located in the lower-right corner of the main map) to a new location. And you can simply center the map on a new location by positioning the cursor over that location and then double-clicking the mouse.
Tip
To re-display the last map you viewed, click the Return to Last Result button in the middle of the arrow buttons on the map.
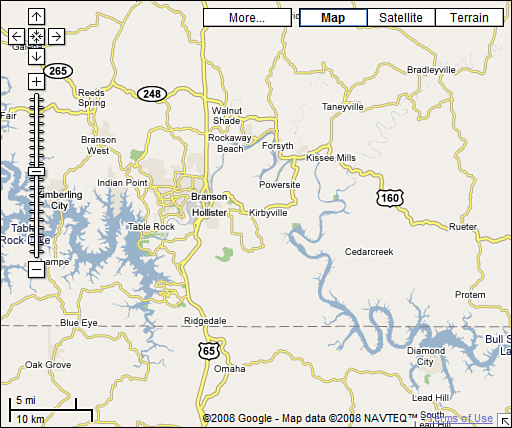
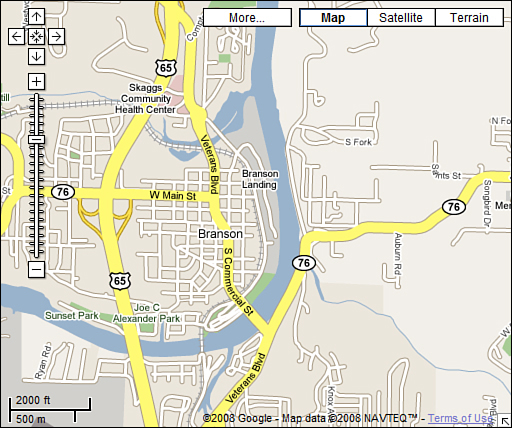
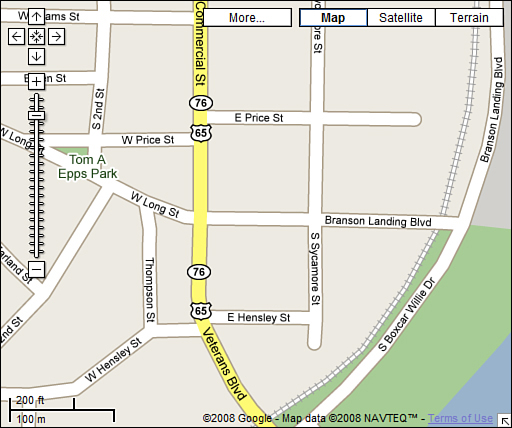
The closer you zoom in, the more detail displayed on the map. You won’t see specific road information until you’re fairly zoomed in; even then, major roads are displayed first, and then minor roads displayed on more extreme zoom levels. For example, Figures 27.5, 27.6, and 27.7 show different levels of zoom over Branson, Missouri; note the emergence of detailed road info at the closer zoom levels.
By default, Google Maps displays a standard map of any location you enter. But that’s not the only way you can view a location. Google Maps also incorporates satellite images, which lets you get a bird’s eye view on the actual location. It’s like having access to your very own spy satellite! Be warned, however, that Google’s satellite images aren’t always current, meaning that you could be looking at an image that was taken today or months ago! Google doesn’t say how current any of its satellite images are.
To display the satellite image of a location, click the Satellite button at the top of the map. You can use the standard navigation and zoom controls to pan around and zoom into or out of the satellite image. Depending on the level of magnification, you may be able to see rooftops and trees. (Figure 27.8 shows a satellite map of Chicago’s Wrigley Field—if it were game day, you could almost see the pitcher on the mound!)

Note
Google Maps sources its map from NAVTEQ and TeleAtlas. It sources its satellite images from DigitalGlobe and EarthSat. Note that the satellite images are apt to be less current than the map data.
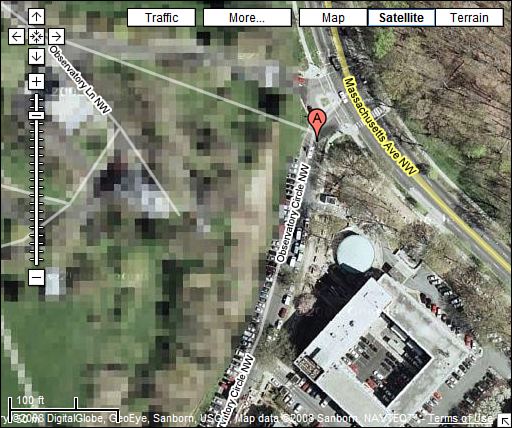
And here’s something kind of creepy. Some satellite images have been digitally altered, supposedly for “national security” reasons. For example, Figure 27.9 shows 1 Observatory Circle in Washington, D.C., the official residence of the Vice President. As you can see, the entire area on the left has been pixilated on the map to keep anyone (terrorists included, I suppose) from seeing what’s going on there. (Interestingly, a similar view of the White House is completely unpixelated, which makes one wonder what it is about the VP’s place that makes it more top secret than the President’s house....)
Caution
If you zoom in too far on a satellite map, you may reach the limits of the satellite imagery. That is, not all locations have super-high-resolution satellite photos. When you zoom in too far, you’ll see a screen with the repeated message “We are sorry, but we don’t have imagery at this zoom level for this region.” If you see this message, zoom out a little to see what you can see.
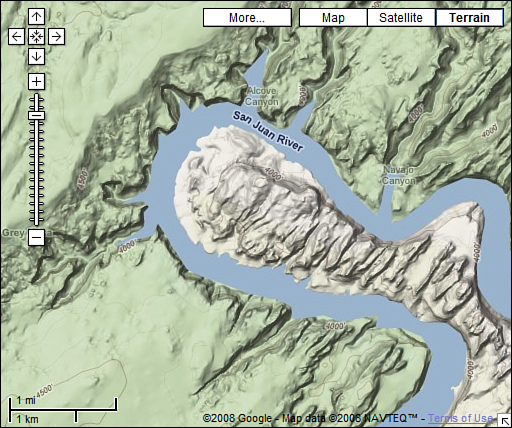
Want to view the different types of terrain (woods, fields, lakes, and so on) in a given location? Your wish is Google’s command; just click the Terrain button to view a color-coded terrain map, like the one shown in Figure 27.10.
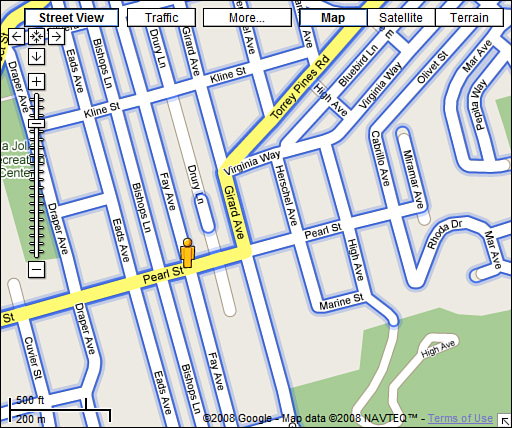
Here’s something else new and cool on Google Maps—for selected locations, anyway. If you’re viewing a map of many cities and towns, you see a Street View button. Click this button, and certain streets on the map turn blue, as shown in Figure 27.11, and you see a little person icon standing on the street. Click the icon, and Google displays a panoramic photo of that location, as shown in Figure 27.12.
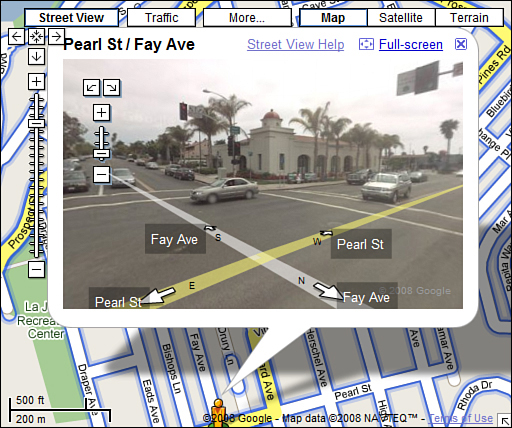
Use your mouse to pan left or right around the photo, or drag within the photo to move up or down the street. You can also use the navigation controls in the upper left of the photo to pan around and zoom in and out of the photo. To display the panoramic photo full-screen, click the Full-screen link in the photo window.
Note
If Street View is not available for a given location, the Street View button will not be present.
Commentary
How can Google make Google Maps even more useful? How about adding live traffic data?
Tip
This live traffic data is especially useful when you’re driving, which is why it’s great that I can access it via Google Mobile on my cell phone. See Chapter 35 for more details.
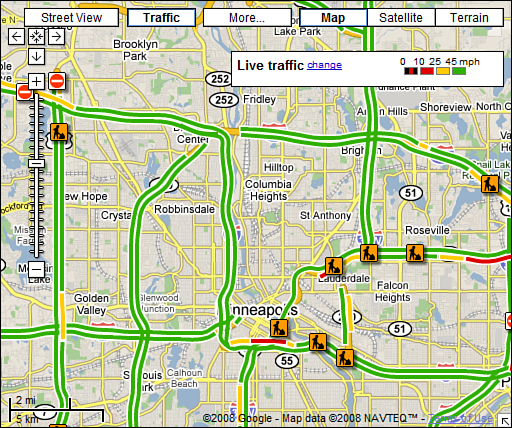
That’s right, Google Maps (in both its desktop and mobile versions) now displays live traffic conditions for over 30 major cities. To display this traffic data, just call up a map and then click the Traffic button.
As you can see in Figure 27.13, major roads appear as green (smoothly flowing traffic), yellow (busy), or red (congested). Road construction is indicated by a separate icon, as are road closures. And on interstate highways, you get the green/yellow/red separately for lanes in both directions!
Once you’ve created a map of a given location, it would be great if you could save the map for use in the future—rather than re-entering the location and manipulating the navigation and zoom controls. Fortunately, there are several ways to save and share the maps you create. Read on to learn more.
The key to saving or sharing any map you’ve created is that Google assigns every possible map its own unique URL. When you know the URL, you can share it with others—or save it to your computer desktop.
Tip
If you’re running Google Desktop, Google offers a Maps gadget for the sidebar. Learn more in Chapter 4, “Creating a Custom Workspace with Google Desktop.”
Here’s how it works:
-
Create a map for the desired location.
-
Click the Link link.
-
Google now displays the URL for this map in a separate dialog box. Highlight this URL, right-click your mouse, and select Copy from the pop-up menu.
-
To paste this link into an email message or text document, position your cursor in the message, right-click your mouse, and select Paste from the pop-up menu.
Alternatively, you can save the map as a shortcut on your desktop. To do this, create the map, click the Link link, highlight the URL, and then drag it onto your desktop.
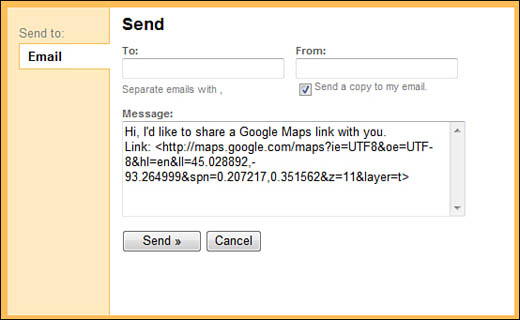
There’s an even easier way to email a map to friends and family—or to yourself, so you’ll have a link to the map as a message in your inbox. Just follow these steps:
-
Create a map for the desired location.
-
Click the Send link.
-
This opens a new email message in your default email program. As you can see in Figure 27.14, the link to the map is displayed in the text of the message; enter the recipient’s email address, and then click the Send button.
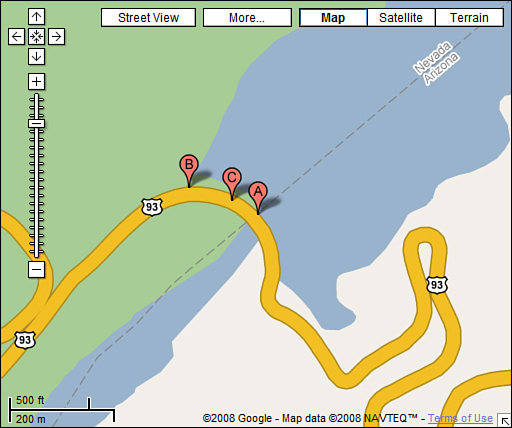
Google Maps does more than just display maps; it can also generate driving directions from one location to another. It’s a simple matter of entering two locations, and letting Google get you from point A to point B (and even to points C and D).
To generate driving directions, follow these steps:
-
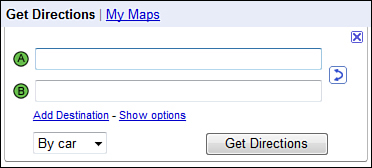
From the Google Maps main page, click the Get Directions link.
-
The left-hand pane now expands to include two search boxes, as shown in Figure 27.15. Enter your starting location into the first (A) box, and your ending location into the second (B) box.
Tip
If Google mapping locations on this planet is too limiting for you, check out Google Moon (www.google.com/moon) and Google Mars (www.google.com/mars). As the names imply, these are Google Maps for extraterrestrial bodies, in the form of landing site images (for Google Moon) and shaded relief maps (for Google Mars). These are fun applications of Google Maps technology—and they’re educational, too!
-
Assuming that you’re driving to your destination, select By Car from the pull-down list. (If you’re walking to a destination within a major city, select Walking from the list instead.)
-
Click the Get Directions button.
You can also generate driving directions to or from any location you’ve previously mapped. When the location is pinpointed on the map, click either the To Here or From Here links in the info balloon. The balloon now changes to include a Start Address or End Address box; enter the second address, and then click the Go button.
Initially, Google Maps only let you generate simple driving directions, from one point to another with no stops in-between. But that’s seldom how we drive, especially on long trips and vacations.
That’s why Google has finally added multiple-stop directions to Google Maps. This means you can plan a multi-stop trip (point A to point B to point C), instead of merely going from point A to point C with no stops in-between.
To create multiple-stop directions, start by generating directions from the starting point to your first stop. Then click the Add Destination link; this extends the Directions panel to include a third (C) address box. Enter your second stop into this box, then click the Add Destination button; directions from the first stop to the second stop will now be generated. Keep clicking the Add a Destination link to create more complex trips and directions.
Tip
Google also lets you generate driving directions directly from the Google Maps search box. Just enter your first location, followed by the word to, followed by the second location. For example, to drive from San Francisco International Airport to the Transamerica Building in downtown San Francisco, enter SFO to 505 sansome st, san Francisco, ca.
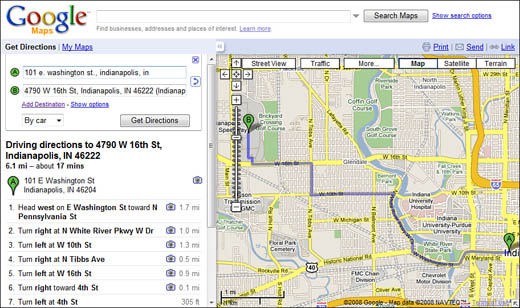
However you enter your locations, Google now generates a page of driving instructions, as shown in Figure 27.16. The step-by-step directions are listed on the left side of the page; an overview map is displayed on the right.
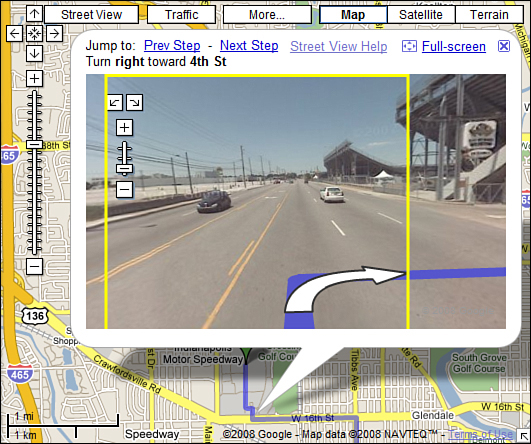
It seems pretty straight ahead so far, but there’s a neat little feature hidden on this page. When you click any of the numbered steps on the left, a Street View photo pops up on top of the overview map, as shown in Figure 27.17. This is a great way to see those detailed directions that are easy to misunderstand—as long as photos are available for that location, of course.
Don’t like the directions that Google suggested? Rather take a slightly different route to your destination? Well, fortunately for you, Google lets you change your driving directions—just by dragging the route on the map.
Tip
You can also fine-tune your directions to avoid highways and tolls. Just click the Show Options link in the Get Directions pane and make the appropriate selections.
Here’s how it works. Generate your driving direction as normal, then locate that part of your route that you want to change. Click that part of the route, press and hold down your left mouse button, and then drag the route to a different location. The route readjusts to include the changes you’ve made.
For example, generate driving directions from Indianapolis to Minneapolis. (That’s a long drive—which I can confirm from experience!) The default directions route you through Chicago, but that’s not the only (or best) way to go. If you’d rather travel via central Illinois, click on the Chicago area of the route and drag it down to Bloomington, Illinois. The directions now change to reflect your preferred route.
One last thing. Google Maps’ driving directions are great, but they won’t do you any good if they’re displayed on your home PC screen while you’re on the road. To take a copy of your directions with you, just click the Print link. This makes a hard copy printout of the directions page, map and all.
Commentary
One of the most useful features of any online mapping service is being able to find and map nearby businesses. That’s also one of the key features of Google Maps, as you’ll soon learn.
As part of its Google Maps service, Google hosts a large database of local retailers. This lets you use Google Maps to search for retailers within any area or neighborhood, or near any address.
The easiest way to find a local business is to start with a map of your location. Now enter the name or type of business into the top-of-page search box, then click the Search Maps button.
Google now displays a map of the specified location with matching businesses pinpointed on the map and listed on the left side of the page, as shown in Figure 27.18.
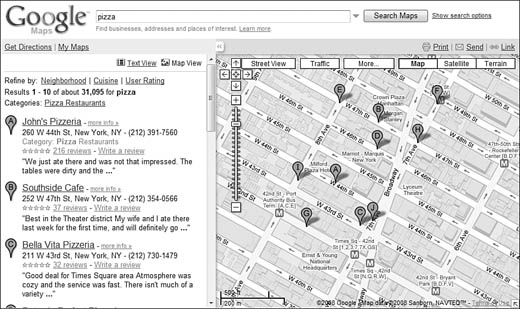
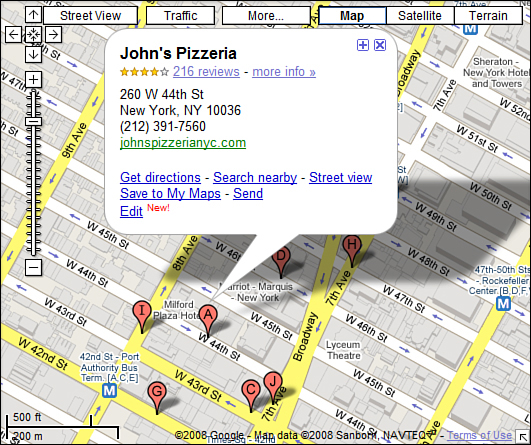
When you click a business name or pinpoint, an information balloon appears, as shown in Figure 27.19. To display more information about a business, click the More Info link in the Search results page; this displays a new box of information and links.
Note that Google Maps only lists 10 businesses per page. To display the next page of results, you have to scroll down the left side of the page and then click the Next link. The map will change (zoom in or out) to display this next batch of businesses; Google Maps typically lists the closest businesses first, and then expands its results, geographically.
Tip
Google Maps gathers the bulk of its local retailer information from various Yellow Pages directories. If your business isn’t automatically included, you can add your business to the Google Maps database from Google’s Local Business Center (www.google.com/local/add/). Follow the onscreen instructions to submit your business info; you can also use this page to correct or delete existing business information.