Any website, no matter how small, can generate revenue. On the Web, one of the primary ways of generating revenue is from advertising; you sell ad space on your site, and whenever a visitor clicks through the ad to the advertiser’s website, you collect a small fee.
The problem with this scenario, of course, is that you’re not in the advertising business; you have no sales force to sell advertising on your site, nor do you have the technology required to place the ads, track click-throughs, and then collect funds due from advertisers. You might be able to generate a bit of revenue, if only you could get the ads placed and managed.
This is where Google AdSense comes in. The AdSense program places content-targeted ads on your site, sells those ads to appropriate advertisers, monitors visitor click-throughs, tracks how much money is owed you, and then pays you what you’ve earned. Granted, a typical personal website or blog isn’t going to generate a lot of click-throughs on its ads, but even a few click-throughs a week will generate a bit of spare cash that you didn’t have otherwise. All you have to do is sign up for the program, insert a few lines of code into your web page’s underlying HTML code, and then sit back and let Google do the rest of the work.
Google AdSense is actually three primary programs in one. Google AdSense for Content is that part of the program that places targeted ads on your web pages; Google AdSense for Search lets you add Google search to your website, and thus generate even more traffic and advertising revenue; and Google AdSense for Feeds lets you add AdSense ads to your blog’s RSS feed.
The main part of the AdSense program is dubbed Google AdSense for Content. This is the part of the program that puts ads on your web pages, and then generates revenue whenever visitors click on the ad links.
AdSense ads aren’t just random advertisements; Google utilizes the same technology it uses to analyze web pages for its search index to determine the content of a page and place a content-appropriate ad on that page. For example, if your web page is about teeth, Google might place an ad for dentists; if your web page is about books, it might place an ad for book clubs. And so on and so forth.
Note
In addition to AdSense for Content, Search, and Feeds, Google also lets you make money by adding YouTube content to your website, as well as by placing ads on websites designed for mobile phone users.
The nice thing about ads that actually relate to your page’s content is that they’re more appealing to your site’s visitors. One can assume that if you have a page about teeth, your visitors are interested in all things teeth-related, and thus are likely to respond positively to ads selling teeth-related merchandise and services. At the very least, the ads Google places should be more relevant to your toothsome visitors than, say, ads for motor oil or Viagra. And the more relevant the ad, the higher the click-through rate will be—which means more profits, for both Google and you.
Note
Google calls this “contextual targeting,” and it works—more often than not. Google’s content parser can only determine which words are used on your page, not how those words are used. So if you have a page that’s critical of the dentistry profession, it will still generate ads for dentists and dental hygienists.
Even better, AdSense ad selection is automatic; you don’t have to do a thing. Google automatically crawls your page to determine its content, and places ads appropriately. Your involvement is to activate the AdSense service, insert the appropriate HTML code (just once), and then sit back and let Google do everything else. You don’t even have to notify Google if you change your site’s content; AdSense automatically monitors your site for changes, and places new ads accordingly.
Then there’s AdSense for Search, to which you get access when you sign up for AdSense for Content. The Search component lets you add a Google search box to your website. This is a good thing, as it keeps users on your site longer; they don’t have to leave your site to conduct a web search.
Keeping visitors on your site longer increases the chances of them clicking through any ad placed on your site. In addition, you now collect a small percentage of the ad revenue when a visitor clicks through an ad on the search results page. It’s only pennies (or fractions of a penny) per click, but it can add up fast.
You can actually put two different Google search boxes on your web pages. You can utilize the standard Google web search box, of course, or you can create a box that lets visitors search within your own website. Either option is free; you can choose either or both.
As to how you get the ads onto your site, it’s a simple matter of feeding some key information to Google, having Google generate the appropriate HTML code, and then you pasting that code into the code for your web page. After the code is inserted, the AdSense ads automatically appear. And every time a visitor clicks one of the ads on your site, you receive a percentage of the fee that the advertiser paid to Google. It’s that simple.
If you run your own blog, you know all about RSS feeds; regular blog readers subscribe to a feed to be alerted when new postings are made. Google AdSense for Feeds lets you place targeted advertisements in your blog’s feeds. As with the other AdSense programs, you control the appearance, positioning, and frequency of these text-based ads.
If you’re like me, one of the first questions you have about AdSense concerns the money—just how much money can you make from the AdSense program? There’s no easy answer to that question, unfortunately.
First, you have to know that Google simply doesn’t disclose how much money you can make; it doesn’t tell you how much it charges its advertisers, nor what percentage of the take you receive. That’s right—when you sign up for the AdSense program, you’re doing so with absolutely no idea what your earnings will be. It doesn’t really sound like a fully informed contractual agreement to me, but that’s the way it is.
That said, we do know in general how the AdSense program works. The ads you display on your pages can be placed on either a cost-per-click (CPC) or cost-per-thousand-impressions (CPM) basis. That is, the advertiser pays either when someone clicks an ad, or when someone simply views the ad. You have no choice on whether you get CPC or CPM ads on your site.
Whenever an advertiser pays Google (for either a click or an impression), you receive a cut of that payment, in the form of a commission. How much of a commission you make depends on how much the advertiser is paying Google for that particular ad. The payment varies by advertiser and by quality of content; competition for the most popular content and keywords causes advertisers to bid up the price accordingly.
What does that mean in terms of dollars? It all depends; I’ve heard of payments running anywhere from 2 cents to $15 per click, depending on the type of content you have on your site. You get a percentage of that. (And what percentage that is, Google doesn’t disclose.)
So, the amount you earn is dependent on the price that advertisers are paying, the amount of targeted traffic your site receives, and the number of visitors who view or click the ads on your site. To that last point, there are things you can do to improve your ads’ visibility and click-through rate; I’ll impart some tips in the “Ten Tips for Improving Your AdSense Earnings” section, later in this chapter.
To add AdSense ads to your website, you first have to sign up for the AdSense program. After you’ve signed up, you then add the AdSense code to your site’s HTML—and wait for the money to roll in.
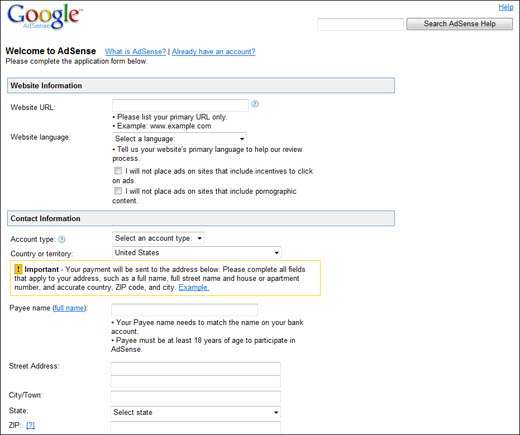
Signing up for the Google AdSense program is easy enough to do. You start at the main AdSense page (www.google.com/adsense/), and then click the Sign Up Now button. On the next page, shown in Figure 40.1, you get to fill out an application form. On this form, you need to supply the following information and make the following choices:
Google will now verify your email address by sending you a confirmation email. Follow the instructions in the email message, and then Google will review your application. The review period typically runs two to three days, and then Google will notify you of your acceptance and you’ll be ready to log into your AdSense account and get started with the rest of the process.
Once your AdSense application has been accepted, you can log into your account from the main AdSense page (www.google.com/adsense/). To add an ad to your website, follow these steps:
-
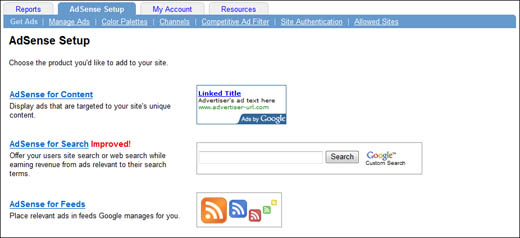
Select the AdSense Setup tab, shown in Figure 40.2.
-
Click the AdSense for Content link.
-
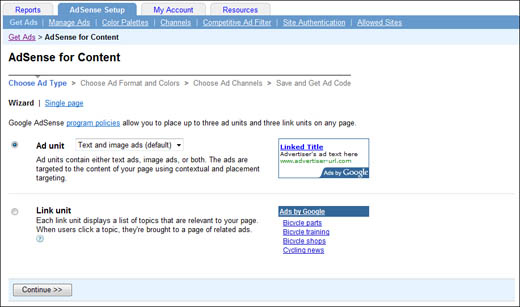
When the AdSense for Content page appears, as shown in Figure 40.3, select whether you want to display an ad unit (a block advertisement) or a link unit (a list of linked topics). If you choose to display an ad unit, you also need to pull down the list and select the type of ads you want—text only, image only, or text and image (default). Click the Continue button to continue.
-
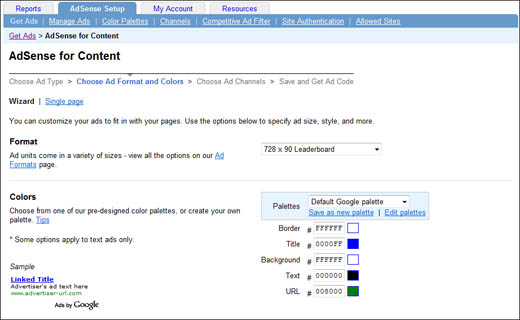
When the next page appears, as shown in Figure 40.4, select the ad format and color scheme you want. Available ad formats include three sizes of horizontal ads, three sizes of vertical ads, and six sizes of square ads. Click the Continue button to continue.
-
The next page lets you specify up to five custom channels for your ads. (You can create different channels for different pages on your site.) Do so if you want (you don’t have to); then click the Continue button.
-
You’re now prompted to name the ad unit you’ve created. Do so, and then click the Submit and Get Code button.
-
The final page, shown in Figure 40.5, displays the code that Google generated for your ad. Copy the code from this page and then paste it into the HTML code for your web page.
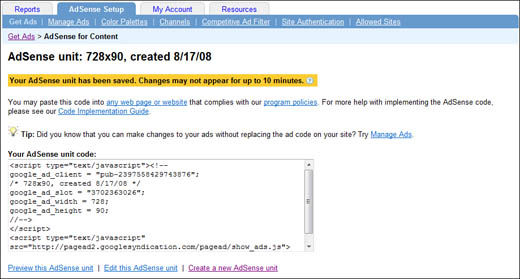
If you want to include the same type of ad (format and color) on every page of your site, you’ll need to copy the final code into each page’s HTML. If you want to generate different types of ads on different pages, you’ll need to repeat this entire process for each different ad type on your site.
Note that Google generates different ads for the unique content on each page of your site. You only need to create new ad code if the format of the ad (size, type, color, and so on) changes from page to page.
Tip
Google makes it even easier to add AdSense ads to your Blogger blog, via pre-designed content modules. See Chapter 18, “Blogging with Blogger,” for details.
If you want to add a Google search box to your pages, follow these steps from the main AdSense page:
-
Select the AdSense Setup tab.
-
Click the AdSense for Search link.
-
When the next page appears, click the Get Started button.
-
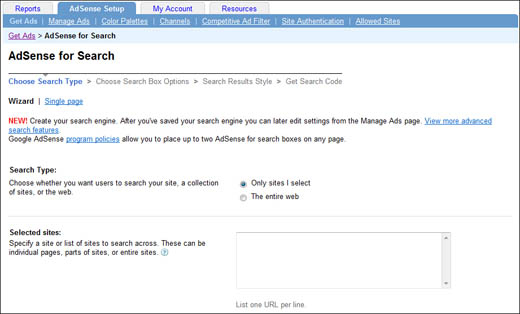
When the AdSense for Search page appears, as shown in Figure 40.6, select whether you want to search only the sites you select or search the entire web. If you select the first option, you’ll need to enter URLS for those sites.
-
In the Optional Keywords section, add one or more keywords that describe the subject and content of your site. (This helps Google fine-tune the ads it places on your site.)
-
Click the Continue button.
-
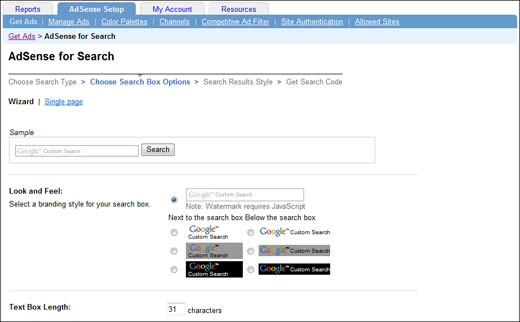
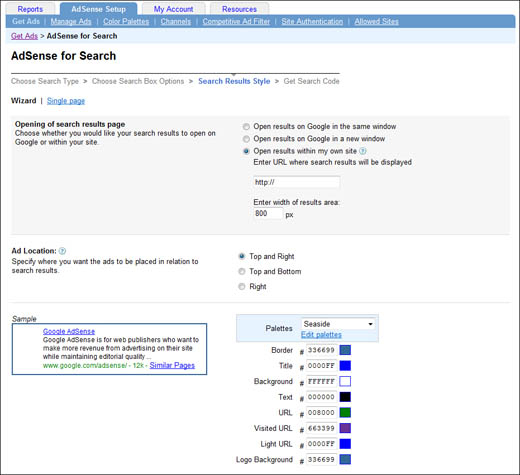
The next page, shown in Figure 40.7, lets you determine how the Google search box will appear on your site. Make the appropriate selections and then click the Continue button.
-
On the next page, shown in Figure 40.8, you determine how you want the search results page to display (in the original browser or in a new window) and how you want the ads on this page to appear. Make your choices; then click the Continue button.
-
On the next page, agree to Google’s terms and conditions and then click the Submit and Get Code button.
-
The final page, shown in Figure 40.9, displays the code that Google generated for the search box. Copy the code from this page and then paste it into the HTML code for your web page.
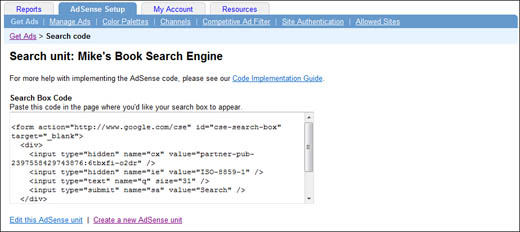
Again, you’ll need to copy this code into each page on your site where you want a search box to appear.
Google’s newest way to make money is by selling ad space on site feeds. This is a great option if you have your own blog and offer RSS feeds of your new posts.
To add advertising to your site feed, follow these steps:
-
Select the AdSense Setup tab.
-
Click the AdSense for Feeds link.
-
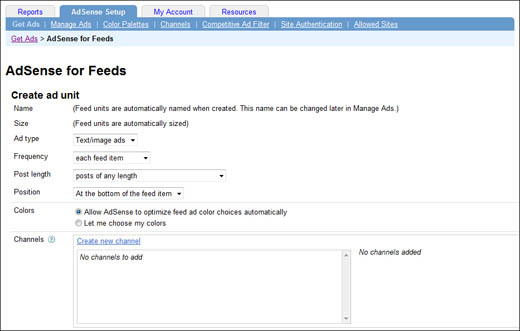
When the next page appears, as shown in Figure 40.10, determine the type of ad you want; how frequently you want the ads to appear; the position of the ads; the ads’ color scheme; and other requested information.
-
Select which of your feeds you want active.
-
Click the Save button, and Google will now display ads on the selected feeds.
Once you have AdSense ads active on your website, you can monitor the performance of those ads—how many clicks you’re generating, and how much that means in terms of earnings. Just go to the AdSense site, select the Reports tab, and click Overview. This report, shown in Figure 40.11, details your page impressions, clicks, click through rate (CTR), the effective cost per 1,000 impressions (eCPM), and total earnings; you can show this information for today, yesterday, the last seven days, this month, last month, and since your last payment.
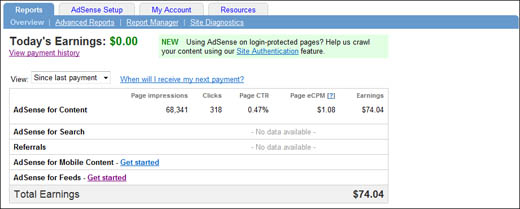
AdSense also lets you generate additional custom reports. Select the Advanced Reports tab to view what’s available.
Just putting an AdSense ad on your website doesn’t guarantee that you’ll make a lot of money from it. The key to generating significant earnings is to get a lot of visitors to view or click-through the ads; that means both increasing your site traffic and the visibility and appeal of the ads themselves.
To that end, here are ten things you can do to improve the earnings potential of your AdSense ads:
-
Tip #1: Give your ads prominent position. If you hide your AdSense ads, no one will see them—and if no one sees them (or clicks them), you won’t generate any earnings. Place the ads in a prominent position on your web pages, and your earnings will increase. The best position is one that a visitor can see without scrolling, which means near the top of your page, either centered above your main content or in the top-left corner. It’s also important to place your ads near important content; you want visitors to see the ads when they view must-read content. (A good position is directly below the end of an article or other editorial content.) Also good is placement near navigational elements, such as menus and back/up buttons.
-
Tip #2: Display text and image ads. When you create your AdSense ad, you have a choice of a text ad, image ad, or both. You should choose the option to display both types of ads. That’s because some advertisers choose the text format only and others choose the image format only; when you opt to display both types of ads, you have a wider pool of potential advertisers who can display their ads on your page.
-
Tip #3: Choose a large ad format. When it comes to advertising effectiveness, bigger is better. It should come as no surprise that wider ad formats tend to outperform narrower formats—even if the narrower ad is also taller. It’s all about readability; visitors can read more text at a glance with a wider ad than they can with a taller one. Google says that the most effective formats are the 336×280 large rectangle, the 300×250 medium rectangle, and (contrary to the previous advice) the 160×600 wide skyscraper; I’ve also had good luck with the 728×90 leaderboard and 468×60 banner.
-
Tip #4: Format your ads to look like they’re part of the regular page. Here’s a test: What type of ad performs best—one that stands out from your regular page template or one that blends in? Contrary to what you might initially think, it’s the ad that blends in that performs best; visitors tend to view such an ad as part of the page content, rather than as an ad. So, when it comes to choosing ad colors, go with a color scheme that is similar to your page’s color scheme. Avoid colors that contrast too much with your page’s colors.
-
Tip #5: Surround your ad with images. You can draw more attention to your AdSense ad if you surround it with images—attractive images that your visitors would want to look at, anyway. This probably means putting an image above or below (or both above and below) the AdSense module. It’s even better if the images have something to do with the ad content. For example, if you have a page about notebook PCs, and you’re fairly sure that AdSense will serve up an ad related to notebook PCs, then surround that ad with pictures of notebook PCs. This approach not only draws attention to the ad, but it actually makes the ad appear to be more integrated into your page’s content.
-
Tip #6: Put multiple ads on your page. If you have a large web page (one with a lot of scrolling content), you have room to put more than one ad on the page. Google lets you put up to three ad units on each page, in addition to one link unit and one referral button. The more ads you include, the more earnings you can generate.
-
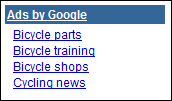
Tip #7: Add link units to your pages. You’re not limited to placing just ads on your page. AdSense also lets you place link units, like the one in Figure 40.12, anywhere on your page. A link unit is a list of topics relevant to your site’s content; when a visitor clicks one of these links, he’s shown a page of ads related to that topic. You’ll earn more money when the visitor clicks one of these topic-related ads.
-
Tip #8: Add AdSense for Search to your pages. You’re missing out on potential earnings if you don’t add AdSense for search to your site. There’s certainly no harm to be done by including a Google web search or site search box to your site; if and when visitors use the search box, you’ll earn money. It’s as simple as that.
-
Tip #9: Configure AdSense to display alternative ads. There’s no guarantee that Google will always have advertisers interested in purchasing space on your site. For those times when ads aren’t ready to serve, let AdSense display alternative ads instead. It’s better to have something filling that ad space, rather than have open space on your page; plus, running a public service ad is a good thing to do.
-
Tip #10: Improve your site’s content—and increase your traffic. Here’s the most valuable tip of all. The better and more timely your site’s content, the more visitors you’ll attract. And the more visitors, the more click-throughs your ads will receive. To increase your ad revenue, improve your site; it’s as simple as that.