
YouTube is a video-sharing site that lets users upload and view all sorts of video clips online. The site is a repository for literally millions of movie clips, TV clips (both current and classic), music videos, and home videos. The most popular YouTube videos quickly become “viral,” getting passed around from email to email and linked to from other sites and blogs on the Web. If a YouTube video is particularly interesting, you’ll see it pop up virtually everywhere, from TV’s The Daily Show to the front page of your favorite website.
Note
YouTube was founded in early 2005 by three former PayPal employees. The site had its official launch in December 2005 and was acquired by Google in October 2006.
All of those videos and all of that sharing make YouTube one of the hottest sites on the Internet today. The YouTube site is one of the largest and fastest-growing on the Web. According to Nielsen/NetRatings, YouTube consistently ranks in the top 10 of all websites, with close to 20 million visitors per month. And those visitors are watching a lot of videos; USA Today reports that more than 100 million clips are viewed on the site each day, with more than 65,000 new videos uploaded every 24 hours.
What makes YouTube so appealing? It’s the videos, of course, all uploaded by other YouTube users. (It’s a video-sharing site, after all.) Whatever you want to watch, chances are you can find it on YouTube.
Many videos on YouTube are the Internet equivalent of America’s Funniest Home Videos, amateur videos of everything from birthday parties to Jackass-style stunts. Anybody with a video camera can easily upload home movies to YouTube and make them available for the whole world to see.
Other videos on YouTube are decidedly more professional. Budding film professionals can post their work on YouTube, which essentially converts the site into a giant repository of filmmakers’ resumes. Student films, independent videos, acting and directing tryouts—they’re all there.
Then there is the category of “video blog,” or vlog. These are video versions of the traditional text-based blog, a personal journal typically captured via webcam and posted to YouTube on a regular basis. Most video bloggers post new entries on a regular basis—or when they have something particularly interesting to say.
YouTube is also a repository for “historical” items. We’re talking old television commercials, music videos, clips from classic television shows, you name it. Want to revisit your childhood and watch an old Maypo commercial? Several are on YouTube. How about a clip of the Ronettes performing on Hullabaloo? Or the Beatles on the Ed Sullivan Show? Or your favorite episode from the old Speed Racer cartoon? They’re all there, believe it or not. YouTube is a great site for nostalgia buffs, collectors, and the like.
Note
This chapter covers only a portion of what you can do with YouTube. For more in-depth coverage, check out my companion book, YouTube 4 You (Que, 2007). Or, if you’re interested in using YouTube to promote your business, check out my other companion book, YouTube for Business (Que, 2008). It’s ideal for all online marketers.
Speaking of music videos, there is no better site on the Web to find your favorite video clips. In fact, YouTube has announced that it hopes to offer every music video ever created and is in talks with Warner Music Group, EMI, Universal Music Group, Sony BMG Music Entertainment, and other record labels to make this happen. That makes YouTube a great place to promote hot new music and bands. If you’re a music lover, you’ll love YouTube.
A lot of current television content is also on the YouTube site. Although not every television network agrees that YouTube is a valid promotional medium (meaning that some networks have asked YouTube to pull their content), many clips from popular TV shows are still on the site—plus movie trailers, promotional videos, and similar items. YouTube is a TV and movie lover’s dream.
So what’s on YouTube tonight? As you can see, a little bit of everything!
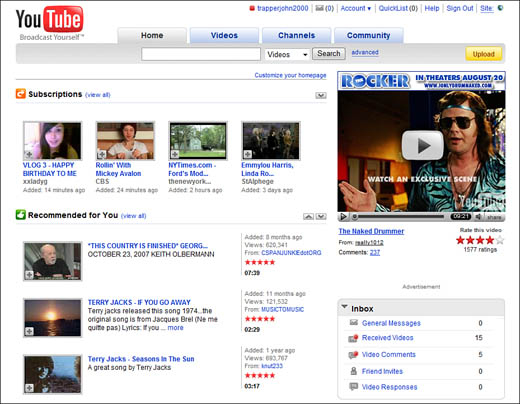
When you first access YouTube (www.youtube.com), you see the home page, shown in Figure 26.1. This is your home base for the entire site; from here, you can browse videos, search for videos, access your favorite videos, and even upload your own videos.
To take full advantage of YouTube’s features, you need to set up your own YouTube account. (You can also sign up with your normal Google account.) Naturally, you must have an account before you can upload any videos to the site. But you also need an account to save your favorite videos, create playlists, join groups and communities, and so on.
Fortunately, it’s both easy and free to create a YouTube account. Just go to the home page and click the Sign Up link at the top of the page. When the Join YouTube page appears, select an Account Type (for most users, a Standard account is the way to go). Then enter the appropriate personal information—email address, desired username, desired password, country where you live, postal code, gender, and date of birth—and click the Sign Up button. YouTube sends a confirmation message to your email address; click the link in that email message to confirm your subscription.
How do you find videos to watch on the YouTube site? Most new users start by browsing for interesting videos. Browsing is perhaps the best way to discover new videos; you can click through the categories until you find something you like.
Caution
YouTube has strict content policies and a self-policing community, but it has no parental controls.
Browsing YouTube is a simple matter of clicking a link—and then another link, and another, and another. The more you click, the more you discover.
Note
Actually, many people are introduced to YouTube when they’re sent a link to a particularly interesting video. If you receive such an email, just click the enclosed link; this will take you to the YouTube page for that video, and playback should start automatically.
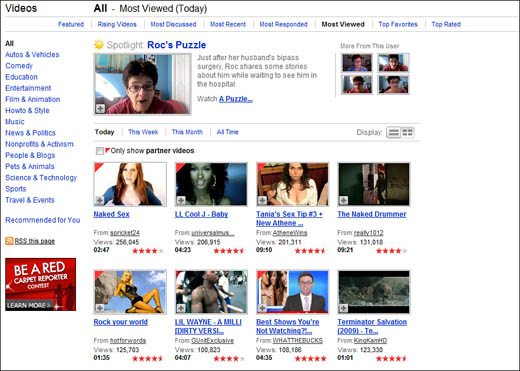
For example, when you choose to browse by category, you start by clicking the Videos tab on the YouTube home page. This takes you to the Videos page, shown in Figure 26.2. On this page, you click a link for a particular category—Music, for example. This displays a page of featured videos in the selected category. To view an individual video on this page, just click the video.
When you’re not sure what you want to watch, browsing YouTube is probably the way to go. If you have a particular type of video in mind, however, searching is a better approach.
Caution
The only problem with browsing is that you don’t get to see everything that’s available. That’s right—you can’t browse YouTube’s complete video catalog. Instead, you browse a list of featured videos in that category, as selected by the YouTube staff. Still, it’s a good way to explore what’s available—and to see the best of the best.
Searching YouTube is easy. A search box is located at the top and bottom of every YouTube page. (It’s the same search box, just in different locations.) To search for a video, simply enter into this search box a keyword or two that describe what you’re searching for, and then click the Search button.
Tip
You can also search YouTube from the main Google search site. Any Google video search you do returns primarily YouTube videos—another benefit of Google’s owning YouTube!
YouTube returns a list of videos that best match your search criteria, as shown in Figure 26.3. If you see a video you want to watch, just click it.
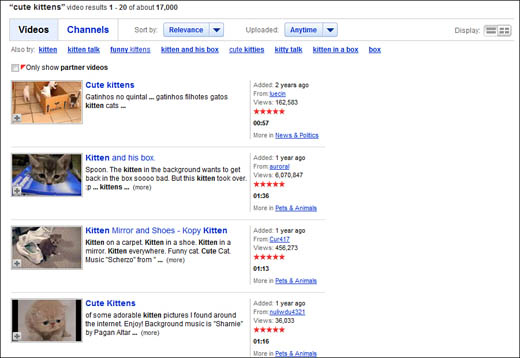
Each search result contains the following information:
-
The opening frame from the video
-
The title of the video
-
The total length of the video, in minutes and seconds
-
A short description of the video
-
When the video was added to YouTube
-
Which category the video resides in
-
The user who uploaded the video (click the user’s name to see all the videos in his or her channel)
-
The number of times the video has been viewed
-
The video’s star rating (from one to five stars—more is better)
The whole point of browsing or searching for videos on YouTube is to find a video to watch. Watching videos is what YouTube is all about, after all.
The nice thing about watching YouTube videos is that they play back in your web browser; no additional software is necessary, save for the flash plug-in for your browser. So get comfortable in front of your computer screen, and get ready to watch!
When you click the title or thumbnail of any video on a search or browse page, a page for that video is displayed, like the one shown in Figure 26.4. This page has several sections, including the following:
-
Video player. Where you watch the videos.
-
Rating and views. How high the video is rated and how many people have viewed it.
-
Share/Favorite/Playlists/Flag. Tabs for sharing the video, saving it as a favorite, adding it to a playlist, or flagging it for inappropriate content.
-
Commentary/Statistics & Data. What other users think about this video, plus detailed statistics on this video’s viewership.
-
Options. Information about the video, and a link to embed it on your own web page.
-
Related Videos. A great way to explore similar videos.
-
Promoted Videos. Videos that YouTube would like you to watch.
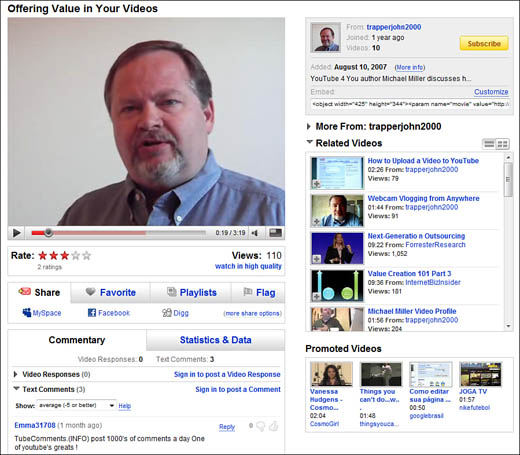
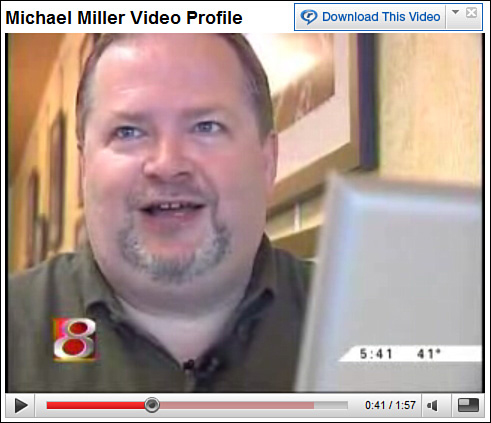
The most important part of the video page is the video player; this is where the video plays back. In fact, playback is automatic—the video starts playing almost immediately after you open the video’s page.
Caution
Some large videos or videos played over a slow Internet connection may pause periodically after playback has started. This is because the playback gets ahead of the streaming video download. If you find a video stopping and starting, just click the Play/Pause button to pause playback until more of the video has downloaded.
The video itself displays in the main video player window. The playback controls are located directly under the main window. From left to right, you use these controls to
-
Pause playback by clicking the Play/Pause button; to resume playback, click the Play/Pause button again.
-
Navigate anywhere within the video by using the slider control. (This control also indicates how much of the video has downloaded; the slider fills with red as the video stream downloads.)
-
View the elapsed and total time for the video via the time display.
-
Control the sound level by either clicking the mute button or hovering the cursor over the button to display a volume slider.
-
Display the video full-screen.
By default, all YouTube videos display in the video player window in your web browser. If you’d rather watch your videos larger, however, you can display any video in its own full-screen window.
To view a video full-screen, click the Full-Screen button at the bottom right of the YouTube video player. When you view full-screen, you get the same transport controls under the video as you do on the standard video viewing page. To return to normal viewing mode, just press the Esc key.
Directly beneath the video window is the Rate box. The stars represent how high the video is rated by other viewers; 1 is lowest, and 5 is highest.
Caution
You may not want to watch all videos full-screen. Because most YouTube videos are optimized for the smaller video player, blowing them up to a larger size might make them too grainy or blocky to watch.
You can also use this box to add your own rating. Think a particular video is really hot? Give it a five-star rating. Think a video is really bad? Give it a one-star rating. Your voice will be heard.
Tip
To browse for the highest-rated videos, go to the Videos tab and click the Top Rated link at the top of the page.
To rate a video, all you have to do is drag the cursor across the stars in the Rate box; stop over the star rating you want to give, and click the mouse. After you’ve rated a video, your vote is added to the ratings given by other users to create an average rating.
Below the Rate box are four tabs that let you share and save the video in various ways:
-
Share. Click this tab to share this video via MySpace, Facebook, or Digg. Click the More Share Options link to post to other social sharing sites, post the video to your blog, or send the video to a friend or colleague via email.
-
Favorite. Click here to add this video to your YouTube favorites list.
-
Playlists. Click here to add this video to a video playlist.
-
Flag. Click here to tell YouTube that something about this video is unacceptable (sexually explicit, mature content, graphic violence, hate speech, or other Terms of Use violation).
On most video pages, the bottom left of the page is taken up by a series of viewer comments, under the Commentary tab. Users can post their comments about any video; comments can be detailed or just exclamatory (“Cool video!”), depending on the person doing the posting. You can even reply to individual comments by clicking the Reply link.
To add your own text-based comment, simply scroll to the bottom of the Commentary section and use the Comment on This Video box. Enter your comments, and then click the Post Comment button.
You can also post another video as a response to a video. To do this, click the Post a Video Response link. You can record a video response (using a webcam and microphone), choose another video you’ve already uploaded to YouTube as your response, or upload a new video as your response. Follow the onscreen instructions to choose/upload the video you want to respond with.
Want to know more about the viewership of the video? Click the Statistics & Data tab. This displays how many times the video has been viewed, rated, and chosen as a favorite; what honors the video has been awarded; which sites link to this video; and, if available, a map of where the video was recorded.
The primary information about the video is located in a box to the right of the video player. This box also includes a Subscribe button; click this button to subscribe to all videos posted by this particular user.
Tip
When you click the Subscribe button, you’re automatically notified of all new videos posted by this member.
Beneath these links is a short description of the video. When you click the More Info link, you see the full description, the category in which the video is listed, the tags used to describe the video, and the video’s URL, which you can use to link to the video from your own web page.
Watching videos on YouTube is great. But with so many videos to watch, how do you keep track of your favorites? And how do your share your favorite videos with others?
Actually, there are several ways to save your favorite videos for easier rewatching. And YouTube also makes it easy to share those videos with friends and family, via email. Read on to learn more.
Here’s a familiar situation. You’re browsing the YouTube site, and you find a video that looks interesting, but you don’t have the time or inclination to watch it right then. Fortunately, YouTube lets you save this video in a temporary QuickList, without having to open the video page and start playback. Then, when you’re ready, you can go back to this video and watch it at your leisure.
To add a video to your QuickList, all you have to do is click the + button at the lower-left corner of any video thumbnail. Videos stay in your QuickList as long as your web browser is open; as soon as you close your browser window, the QuickList is flushed.
To see all the videos stored in your QuickList, click the QuickList link at the top of any YouTube page; this displays the Quicklist page, shown in Figure 26.5. Click any video to view it, or play all the videos in your Quicklist one after another by clicking the Play Quicklist link.

Once you’ve added some videos to your QuickList, YouTube also places a QuickList panel on the right side of all the video pages you open. You can play videos directly from this panel, or click the QuickList title to go to the main QuickList page.
When you view a video you really like, you don’t want to forget about it. That’s why YouTube lets you save your favorite videos in a Favorites list.
A YouTube Favorites list is kind of like the Favorites or Bookmarks list you have in your web browser. All your favorite videos are saved in a list that you can easily access for future viewing.
To save a video to your Favorites list, all you have to do is click the Favorite tab beneath the YouTube video player. The video is automatically added to your Favorites list.
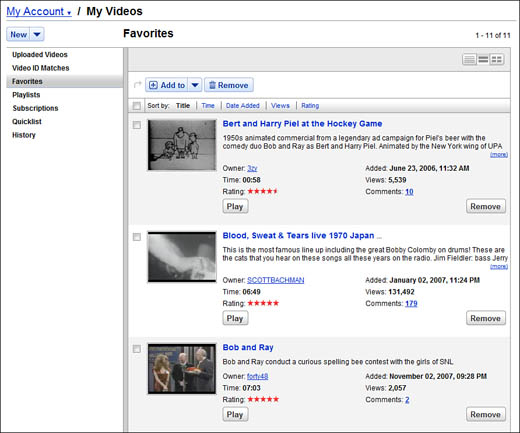
When you want to revisit your favorite videos, hover the cursor over the My Account link at the top of any YouTube page, and then click Favorites on the drop-down menu. As you can see in Figure 26.6, this displays a list of all your favorite videos. Click any video to watch it again.
One of the challenges with YouTube is the sheer volume of videos available. Saving videos to your Favorites list is one way to manage this volume, but even your Favorites list can get too large to be easily manageable.
For that reason, you may want to create playlists separate from (or in addition to) your Favorites list. A YouTube playlist is simply a collection of videos, organized by whatever criteria you deem appropriate. You can play the videos in a playlist individually or as a group, just as you would the songs in a music playlist on your iPod. And, of course, YouTube lets you create multiple playlists, so you can have as many as you want.
There are several ways to create a playlist and add a video to that playlist. The most common method is to open the page for that video and click the Playlists tab. When the Add to Your Playlist panel appears, pull down the Select a Playlist list, select the playlist you want, and click OK.
If you haven’t yet created a playlist, select [New Playlist] from the list and click OK. This displays the Create/Edit Playlist page, shown in Figure 26.7. From here, you have to enter some specific information about the new playlist:
-
Playlist Name. The name you assign to the playlist.
-
Video Log. Check this option if you want this playlist used as the Video Log in your channel profile page.
-
Description. A short description of the contents of this playlist.
-
Tags. Optional keywords you can use to describe this playlist.
-
Privacy. Select whether this playlist should be public (for all YouTube users to view) or private (only you can view it).
-
Embedding. Select whether this playlist can be embedded on other websites.
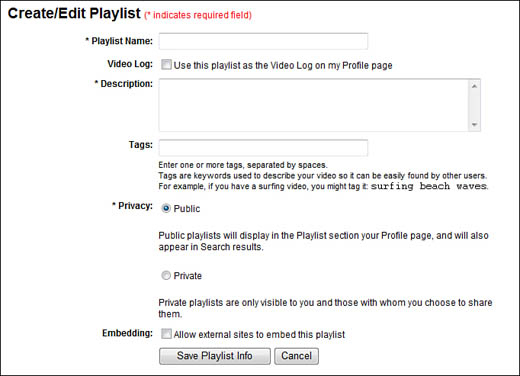
After you’ve filled in all the blanks, click the Save Playlist Info button. Your playlist is now saved.
To view the playlists you’ve created, go to the YouTube home page, scroll to the bottom of the page, and click the Playlist link in the Your Account section. This displays the Playlists page, shown in Figure 26.8. All your playlists are listed on the left of the page; click a playlist name to see the videos in that playlist.
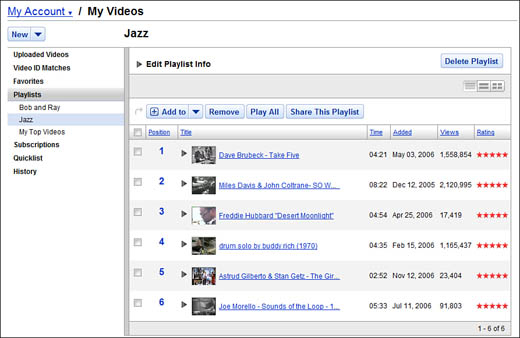
To play an individual video in a playlist, click that video. To play all the videos in a playlist one after another, click the Play All button.
If you like a YouTube video, chances are you have a friend or two who might like that video, too. That’s why YouTube lets you share the videos you like. In fact, this type of video sharing is a defining feature of the whole YouTube experience.
You share YouTube videos via email. That is, YouTube lets you send an email that contains a link to the video you like to your friends. When a friend receives this email, he or she can click the link in the message to go to YouTube and play the video.
When you want to share a video, go to that video’s page, click the Share tab under the YouTube video player, and then click the More Share Options link. When the Share tab expands, scroll to the Send This Video section, shown in Figure 26.9.
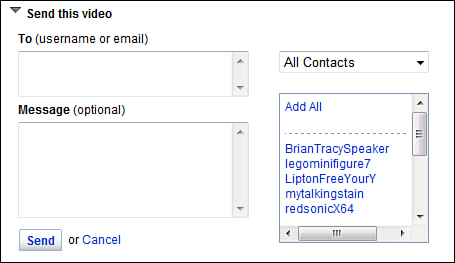
Enter the email addresses of the intended recipients in the To box (separate multiple addresses with commas), or select one or more recipients from your contacts list. Enter a personal message if you want, and then click the Send button. In a few minutes your recipients receive the message, complete with a link to the selected video.
To view the video, all a recipient has to do is click the video thumbnail in the message. This opens a web browser, accesses the YouTube site, and starts playing the video you shared.
YouTube also lets you share complete playlists with your friends. Just go to your Playlists page, select a playlist, and then click the Share This Playlist button. You now see an email window; fill in the necessary information, click the Send button, and the playlist invitation email is sent.
YouTube is a streaming video service. This means that it streams its videos from its site to your computer screen; you don’t actually download and save the videos to your computer.
Even though YouTube doesn’t let you download its videos, other sites and software programs step in to get the job done. There are many options for downloading YouTube videos to your computer’s hard drive—and even to your iPod, for portable viewing.
Several websites and software programs let you do what YouTube doesn’t—save YouTube videos to your computer’s hard drive. After you’ve saved a YouTube video, you can watch it anytime you want, even if you’re not connected to the Internet.
The best of these solutions is to use the latest version of RealPlayer (www.real.com/player/). Not only does RealPlayer enable one-button downloading of any video from the YouTube site, but it also functions as a player for .FLV-format videos (among others).
When you install RealPlayer, you also install a special add-in for Internet Explorer. This add-in automatically displays a Download This Video button above the top-right corner of any video you view on the YouTube site, as shown in Figure 26.10. (It displays the same button on any video-streaming site, so you can download videos from any website that offers streaming videos, such as CNN.com or ESPN.) To display the Download This Video button, simply hover the cursor over the video you want to download; the button should appear automatically.
Note that the RealPlayer program doesn’t have to be running to display the Download This Video button in your web browser. The button is an add-in program that launches automatically whenever you launch your web browser.
To download a video, just click the Download This Video button. RealPlayer displays the Download & Recording Manager window and automatically saves the video to your hard drive. You don’t have to do anything; the file is automatically named and saved.
To play back a saved video, launch the RealPlayer program and select the My Library tab. The videos you’ve downloaded in this fashion should be listed here; double-click a video to start playback. If you’ve downloaded a video using another download website, select File, Open to locate the file on your hard drive, and then load the video for playback.
Playback takes place within the RealPlayer window itself, as you can see in Figure 26.11. You use RealPlayer’s transport controls to pause, stop, rewind, and fast-forward the video. You can even play back in slow motion by clicking Pause and then using the Slow Reverse and Slow Forward buttons.
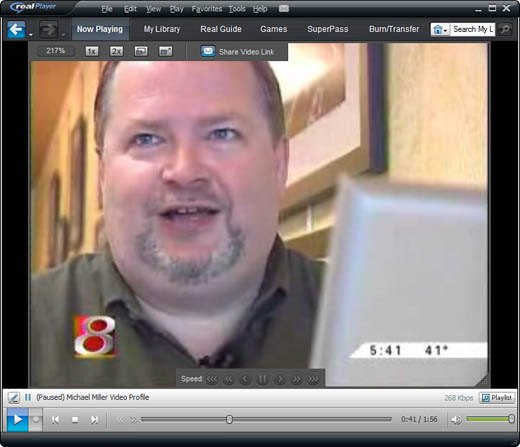
All in all, the new RealPlayer is an elegant solution for downloading and playing YouTube and other streaming videos. And the best thing is, it’s free—which means that it’s worth your consideration.
If you have a video-enabled iPod or iPhone, you’re always looking for new (and low-cost) videos to play on your iPod. YouTube videos are ideal for iPod playback—after they’ve been properly converted, that is.
Several programs available convert downloaded FLV-format YouTube videos to the MPEG-4 file format (with .MP4 or .MPV file extensions) used by the iPod. The most popular Windows-compatible programs include these:
-
YouTube-to-iPod Converter (free, www.dvdvideosoft.com)
-
iTube (free, www.benjaminstrahs.com/itube.php)
-
Ivy Video Converter ($15, www.ipodsoft.com)
Online, the vixy.net Online FLV Converter (www.vixy.net) downloads and converts any YouTube video to iPod video format, with no software necessary. The service is free.
If you have a Web-enabled mobile phone, such as the Apple iPhone, you can watch YouTube videos wherever you are. YouTube has gone mobile, with the new Mobile YouTube service. As you can see in Figure 26.12, the mobile interface lets you search for, download, and view videos on your Web-enabled mobile phone. (Just be sure you have a fast mobile Internet service—and a fully charged battery!) To try it, point your phone to m.youtube.com, and get ready to watch.
One of the great things about YouTube is how easy it is to share YouTube videos. You’ve already learned how to share videos via email links; now it’s time to learn how to share videos via your own web page or blog.
The easiest way to reference a YouTube video from your web page is via a link to that video page on the YouTube site. Every YouTube video has its own unique URL; you can copy and paste this URL into email messages, newsgroup postings, or your own web page.
You find a video’s link URL by clicking the More Info link in the description box to the right of the video. It’s the bit in the URL box.
Tip
To insert a YouTube video link into an email message, simply copy the URL from the video page and paste it into the body of your email message.
To insert the link into a web page, copy it from the video page and insert it into your page’s underlying HTML code, surrounded by the appropriate link tag. The resulting code should look something like this:
Click <a href="http//:www.youtube.com/watch?v=12345">here</a> to view my
YouTube video.
Naturally, you replace the href link with the URL from the video you’re linking to. When visitors click the resulting link on your web page, they’re taken to that video’s YouTube page.
Linking to YouTube videos from your web page is one thing; embedding an actual video into your web page is quite another. That’s right—YouTube lets you insert any of its public videos into your web page, complete with a video player window. And it’s easy to do.
That’s because YouTube automatically creates the embed code for every public video on its site (as well as your own private videos) and lists this code on the video page itself. The code is in the description box to the right of the video, in the Embed box. You need to copy this entire code (it’s longer than the Embed box itself) and then paste it into the HTML code on your website.
Insert this code into your web page’s HTML, where you want the video player window to appear. You get a special click-to-play YouTube video player window, inline on your web page. The video itself remains stored on and served from YouTube’s servers; only the code resides on your website. When a site visitor clicks the video, it’s served from YouTube’s servers to your viewer’s web browser, just as if it were served from your own server. (This means you don’t waste any of your own storage space or bandwidth on the video.)
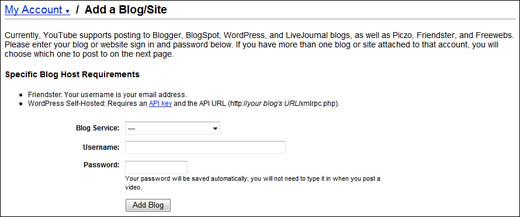
If you have a blog, YouTube makes it easy to send any public YouTube video to your blog as a blog posting. First, however, you have to tell YouTube about your blog so that it knows where to send the post.
Start by clicking the Account link at the top of any YouTube page. When the My Account page appears, scroll down to the Account section, and click the Blog Posting Settings link. When the Blog Posting Settings page appears, click the Add a Blog/Site button.
Note
YouTube supports automatic posting to the following blog hosts: Blogger, BlogSpot, Freewebs, Friendster, LiveJournal, Piczo, and WordPress.
YouTube displays the Add a Blog/Site page, shown in Figure 26.13. Pull down the Blog Service list and select your blog host; assuming you’re using Blogger, it’s in the list. Enter your blog username and password, click the Add Blog button, and you’re finished with this preliminary setup.
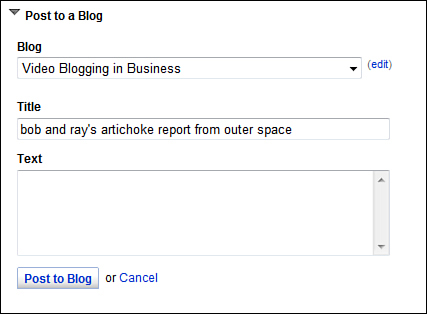
After the configuration, it’s a snap to send any public YouTube video to your blog. Just open the video page, click the Share link, and then click the More Share Options link. When the Share panel expands, scroll down to the Post to a Blog section, shown in Figure 26.14. Pull down the Blog list and select your blog, enter a title for this post, and then enter any text you want to accompany the video. Click the Post to Blog button, and YouTube posts the video (and accompanying text) to your blog as a new post.
As you know, YouTube isn’t just for viewing; you can also upload your own videos to the YouTube site. How you do this depends on what type of video you’re uploading.
Most users upload videos that are stored on their PC’s hard disk. YouTube makes this kind of PC-based upload easy.
First, however, you have to make sure that your video file meets YouTube’s requirements, which are as follows:
-
MPEG-4 format video with either DivX or XviD codecs
-
MP3 format audio
-
640×480 resolution
-
Frame rate of 30 frames per second (FPS)
-
Length of 10 minutes or less
-
File size of 100MB or less
Assuming that your video is in a YouTube-approved format, you’re ready to upload. You start by clicking the Upload button in the top-right corner of any YouTube page. This displays the Video Upload page, shown in Figure 26.15. You now have a little paperwork to do.
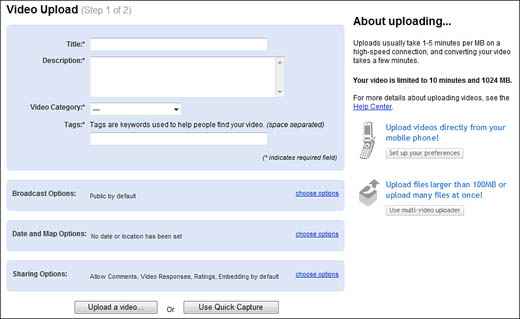
First, enter a title for your video. Make sure it’s descriptive without being overly long. Then enter a description for the video; this can (and should) be longer and more complete.
Next, pull down the Video Category list, and select a category for the video. Then enter one or more tags for the video, separating each tag with a space. Tags are keywords people use when searching; use as many tags as necessary to capture all possible search words.
The next three parameters typically are set in advance, although you can change any of the defaults by clicking the appropriate Choose Options link. These include Broadcast Options (whether the video is public or private), Date and Map Options (when and where the video was recorded), and Sharing Options (whether you want to allow comments, links, and embedding). Click the Upload a Video button when you’re ready to proceed.
Step two of the video upload process is where you specify the file to upload. Click the Browse button to open the Choose File dialog box; navigate to and select the file you want, and then click Open. This loads the filename into the Select a Video to Upload box on the Video Upload page.
When these steps are done, the final step is to click the Upload Video button. YouTube finds the video on your hard disk and starts uploading it; the progress is shown on the Video Upload page.
Note
Videos you upload are not immediately available for viewing on YouTube. They must first be processed and approved by the site, which can take anywhere from a few minutes to a few hours.
After you click the button, you need to be patient; it can take several minutes to upload a large video, especially over a slow Internet connection. Additional processing time is needed after the upload is complete, while YouTube converts the uploaded video to its own format and adds it to the YouTube database.
When the video upload finishes, YouTube displays the Upload Complete page. To view your video, click the My Videos link on any YouTube page, and then click the thumbnail for your new video.
If you have a webcam video camera connected to your PC, you have two ways of uploading webcam videos to YouTube.
Caution
If you see an Adobe Flash Player Settings window on the Quick Capture page, click the Allow button.
First, you can save your webcam videos as you normally do and then upload those videos via YouTube’s normal video upload process. Or, if you like, you can upload videos as you shoot them, “live” from your webcam.
This second method of uploading webcam videos utilizes YouTube’s Quick Capture feature. Here’s how it works.
With your webcam connected and running, click the Upload button on any YouTube page. When the Video Upload page appears, enter the title, description, and other information as normal, but then click the Use Quick Capture button.
This displays the Quick Capture page, shown in Figure 26.16. Pull down the list boxes above the video window to select your webcam video and audio options. You should see the picture from your webcam in the video window; click the Record button to start recording.
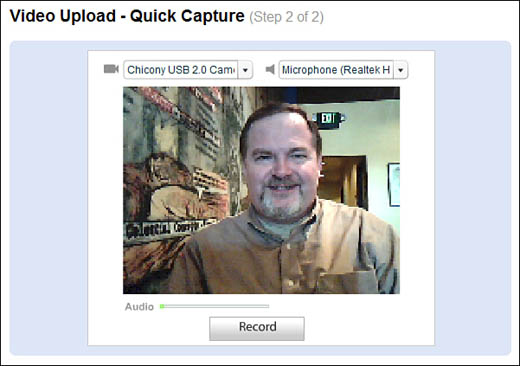
When you’re finished with the recording, click the Stop button. At this point you can click Cancel to delete your recording, click Preview to view a preview of the video you just recorded, or click Save to save your video to the YouTube site. When you click Save, YouTube automatically uploads the video to the site and displays the Upload Complete page. Your video will be available for viewing in a few minutes.
Finally, if your mobile phone has a built-in video camera, you can upload videos directly from your cell phone without first copying them to your PC. All you have to do is set up YouTube’s mobile upload options and then email your videos to the YouTube site.
To configure YouTube for your mobile phone, click the Account link at the top of any YouTube page. When your Account page appears, scroll down to the Account section and click the Mobile Video Upload Settings link. When the next page appears, supply the necessary information. This includes the profile name, video title, whether you want the filename or date appended to the video title, a short description of the profile, whether your mobile videos should be public or private, tags for your mobile videos, a category for your videos, whom you want to share them with, and how you want to be notified when the upload is complete. Click the Save Settings button, and your profile is created.
Your completed profile includes the email address to which you should send your mobile videos, typically a series of numbers @mms.youtube.com. To upload a video from your mobile phone, simply email the video to this address. You’re notified via email or text message when YouTube has received the email and begun processing the video; you can then go to YouTube’s website and edit specific information about the newly uploaded video.