
To view your iGoogle page, go to www.igoogle.com. (You can also access the page by clicking the iGoogle link on the main Google page.) You must have a Google account to create your iGoogle page; you can then log into your account from any computer to see your iGoogle page wherever you are.
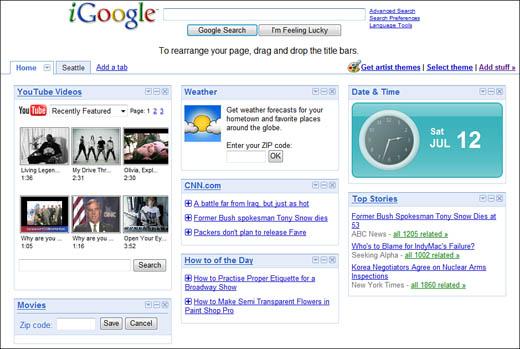
When you first visit iGoogle, it looks like the page shown in Figure 3.1. There’s not a whole lot there yet, just a sampling of content available. (The available choices might be different for you than they are for me; they’re somewhat locally based.) Don’t fret; the whole point of creating a personal iGoogle page is to personalize the content—which you’ll learn how to do next.
Personalizing iGoogle involves choosing which content you want to display, as well as how you want to display it. We’ll start with the content-picking part.
Note
For the first year or so of its existence, iGoogle was known by the rather unwieldy title of Google Personalized Homepage. I like iGoogle a lot better.
To add content to your personalized page, start at the default iGoogle page and click the Add Stuff link. This displays the Add Gadgets to Your Homepage page, shown in Figure 3.2. This is where all the content resides.
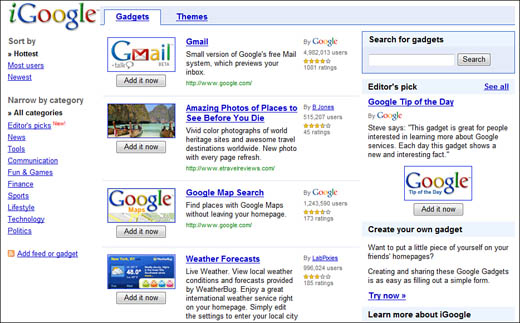
iGoogle’s content is offered in a series of modules called gadgets; select a gadget, and it appears on your iGoogle page. The gadgets on the Add Gadgets to Your Homepage page are organized by type (News, Tools, Communication, and so on). To see modules of a particular type, just click a content link on the left side of the page.
Not surprisingly, Google also lets you search for gadgets to include on the iGoogle page. Just enter your query into the Search for Gadgets box at the top of this page, and then click the Search button; gadgets that match your query are displayed.
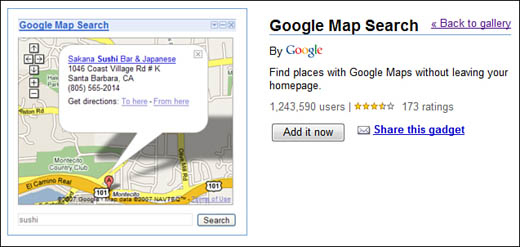
To view what a “live” gadget looks like (and to see more details about the content), click the gadget title; this displays a content information page like the one shown in Figure 3.3. To add a gadget to your iGoogle page, click the Add It Now button, either on the main gadget listing or on the detailed content information page.
Of course, you can add new gadgets to iGoogle at any time—not just when it’s new. All you have to do is open your iGoogle page, click the Add Stuff link, and choose the gadget(s) you want.
You’re not limited to adding prepackaged content to iGoogle. You can also use iGoogle to display RSS feeds from blogs and other feed-enabled websites (including major news sites). All you need to know is the URL of the RSS feed, and then follow these steps:
After you’ve added some gadgets to iGoogle, you may want to customize how they’re displayed. Some gadgets let you specify the number of headlines that are displayed; others let you display information for a particular location.
You customize a gadget by clicking the down arrow button on the gadget’s title bar and then selecting Edit Settings.
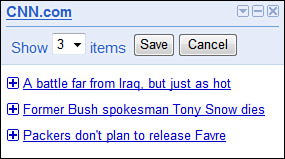
If a gadget lets you change the number of headlines displayed, you see a pull-down number list, like the one shown in Figure 3.4. Select the number of stories from the list, and then click the Save button.
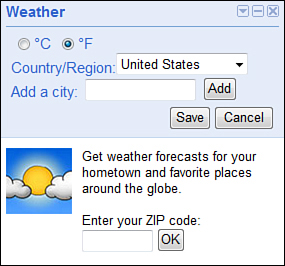
If particular content requires localization, selecting Edit Settings displays the necessary options for your selection. For example, Figure 3.5 shows the editing options for the Weather gadget. You can choose to display the temperature in Fahrenheit or Celsius, choose which country or region to display, and add cities that you want to view. Click the Add button, and the selected cities are added to the Weather gadget’s display.
It’s easy to remove any gadget you no longer want to appear on your iGoogle page. Just click the X in the gadget’s title bar, and the gadget is removed from the page. Simple.
With some personalized start pages, you have to access a separate “design” page to rearrange content on the page. Not so with iGoogle. The iGoogle page has a set three-column design, and any gadget can appear anywhere in any column.
To rearrange content on iGoogle, all you have to do is use the mouse to drag a gadget to a different location. The layout of the page is “live” all the time. Just position the cursor in the gadget’s title bar, click and hold the left mouse button, and then drag the gadget to where you want it to appear. It’s that easy.
Here’s something else unique about iGoogle. Instead of putting all the content you want on a single page, iGoogle lets you create multiple tabs, each of which can be filled with different content.
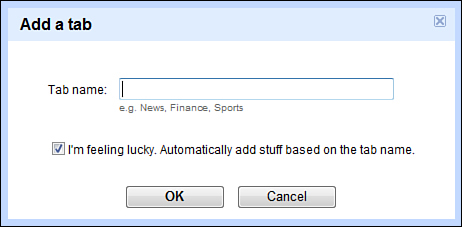
To add a new tab to iGoogle, click the Add a Tab link. This displays the Add a Tab box, shown in Figure 3.6. Enter a name for your new tab, and then decide how lucky you feel.
What do I mean by that? Simple. You can manually add content to any tab, or you can let Google add content based on the tab’s name. Let’s say, for example, that you want to add a tab with movie-related content. Just enter Movies as the title of the tab, check the I’m Feeling Lucky option, and click OK. iGoogle creates a new Movies tab that is automatically populated with movie-related gadgets, as shown in Figure 3.7. Included gadgets include Yahoo! Movies, New York Times Movies, Top 5 Movies at the Box Office, Fandango Movie Lister, Fandango Movie Showtimes, Netflix New Releases This Week, Rolling Stone Movie Reviews, Movies Opening This Week, and other similar items.

If you don’t want iGoogle to prepopulate your new tab, uncheck the I’m Feeling Lucky option. When you click OK, you get a new, empty tab that you can manually fill with gadgets of your choosing.
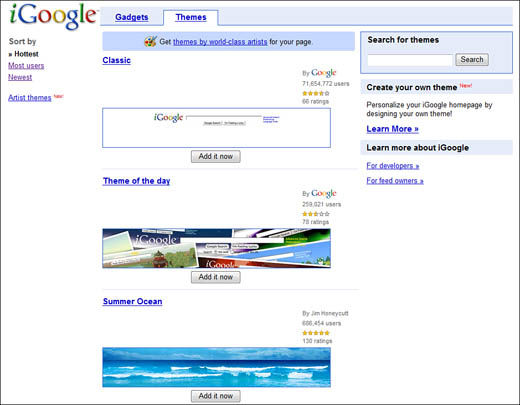
As soon as all your gadgets are organized the way you want them, you can decide how you want iGoogle to look, color- and graphics-wise. This is accomplished via the use of themes. You can apply different themes to different tabs.
To apply a theme to an iGoogle tab, click the Select Theme link. This displays the Add Themes to Your Homepage page, shown in Figure 3.8. Select the theme you want from the list, and then click the Add it Now button. The theme includes not only a specific color theme, but also graphics for the top of the iGoogle page.
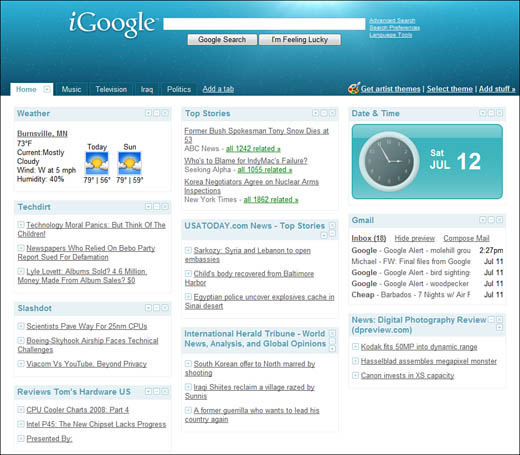
When you’re done adding, editing, and deleting gadgets, you have a start page that’s as personalized as you like. It’s great to have all the content you’re interested in assembled on a single page—and still have the handy Google search box at the top. Figure 3.9 shows what my personalized iGoogle page looks like. What about yours?
There’s one last thing I need to mention about iGoogle. You’re not limited to the gadgets that Google and its third-party developers provide. You can actually create your own gadgets to include on your iGoogle page. It’s quite easy.
From your main iGoogle page, click the Add Stuff link. When the Add Gadgets to Your Homepage page appears, click the Try Now link in the Create Your Own Gadget section.
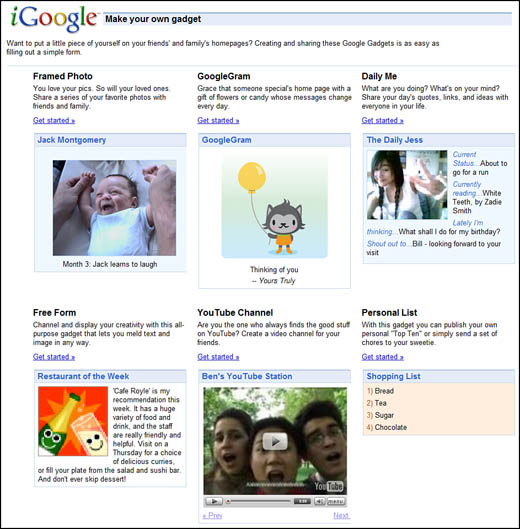
As you can see in Figure 3.10, Google lets you create seven different types of gadgets:
-
Countdown, which displays a countdown to any given event.
-
Daily Me, which displays information about your current activities.
-
Framed Photo, which displays a picture of your choice.
-
Free Form, which lets you display any combination of image and text.
-
GoogleGram, which displays a special message (along with a “gift” graphic)—one for each day of the week.
-
Personal List, which lets you display any type of list—favorite books, tunes, and so on.
-
YouTube Channel, which lets you display any number of YouTube videos.
To create and add any of these gadgets to your iGoogle page, just click the gadget title. You’re taken to a form page for that gadget; fill in the form with the appropriate information, and then click the Create Gadget button.???
Note
After you create your gadget, you have the opportunity to invite others to view your gadget. You’re also asked whether you want to publish your gadget to the Google gadget directory or keep it private (the default).