
What is a gadget? Put simply, a gadget is a small, simple, typically single-purpose application that can be embedded in web pages and other applications. For example, Figure 44.1 shows a time and date gadget—neat and compact.

Gadgets are written in HTML and JavaScript, and don’t necessarily require advanced programming skills to develop. You can, however, use Google’s JavaScript libraries to create gadgets that contain Flash content, dynamic resizing, persistent storage, and more.
Where can you use Google Gadgets? The list of gadget-friendly sites is large and growing, and includes the following:
-
Blogger blogs
-
iGoogle personalized web pages
-
Google Apps start pages
-
Google Calendar
-
Google Desktop
-
Google Maps
-
Google Spreadsheets
-
Google Toolbar
-
Orkut profile pages
In addition, you can add Google gadgets to many third-party websites and products, including MyAOL, IBM’s websphere portal, RedHat’s JBoss portal, the SUN portal, and the BEA weblogic portal. You can also add Google gadgets to your own web pages and blogs; all you have to do is insert the gadget code into your page’s underlying HTML code.
Tip
To view a variety of gadgets available for iGoogle and the Google Desktop, check out Google’s Gadget Directory (www.google.com/ig/directory).
Gadgets are capable of interfacing with the host Google applications, thanks to Google’s Gadgets Application Programming Interfaces (APIs). There’s one core Gadgets API, two Desktop Gadgets APIs, and extensions to the core API for specific Google applications.
The Core Gadgets API (code.google.com/apis/gadgets) is the basic API that enables the creation of all types of gadgets. The other gadget-related APIs are extensions of this core Gadgets API.
If you’re developing gadgets for the Google Desktop or iGoogle home page, you use Google’s two Desktop APIs (code.google.com/apis/desktop). These include the following:
-
Desktop Gadget API, used for creating rich desktop experiences.
-
Desktop Search API, used to add Google Desktop search to gadgets and other applications.
In addition to the core Google Gadget API and desktop gadgets APIs, Google also offers a number of Gadgets API extensions for use with other Google applications. These include the following:
-
Google AdSense API (code.google.com/apis/adsense), used to place dynamic AdSense ads in gadgets and on websites.
-
Google Calendar API (code.google.com/apis/calendar), used to build Calendar gadgets and display time-based information in gadgets and on websites.
-
Google Finance Data API (code.google.com/apis/finance), used to retrieve and display Google Finance data in gadgets.
-
Google Maps API (code.google.com/apis/maps), used to add customized maps to gadgets and websites.
-
Google Spreadsheets Data API (code.google.com/apis/spreadsheets), used to add gadgets to Google Spreadsheets or add spreadsheet data to other gadgets.
-
OpenSocial API (code.google.com/apis/opensocial), used to create gadgets for social networking websites.
Note
Learn more about OpenSocial gadgets in Chapter 45, “Creating Social Applications with OpenSocial.”
If you know a little bit about HTML or JavaScript coding, it’s easy to create a Google gadget. Here are the basic steps you need to follow:
-
Use any text or HTML editor or the Google Gadgets Editor to write the gadget code.
-
Host the gadget code on a public web server, or on Google’s servers via the Google Gadgets Editor.
-
Use the Google Gadgets Editor to publish your gadget. Select File, Publish; then choose Add to My iGoogle Page.
-
Go to iGoogle (www.google.com/ig) to access your newly published gadget.
By now you’re probably curious about this Google Gadget Editor thing. The Google Gadget Editor, or GGE for short, is perhaps the easiest way to get started writing gadgets. It also serves as a public web host to the gadgets you create.
You access the GGE at code.google.com/apis/gadgets/docs/legacy/gs.html#GGE. As you can see in Figure 44.2, the GGE is comprised of two tabs and a single pull-down menu. The Editor tab is where you enter your gadget code; the Preview tab displays the output of your code. The URL for your gadget is displayed in the upper-right corner of GGE.
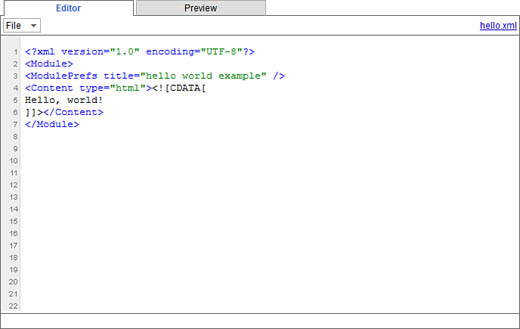
When you first access the GGE, it is preloaded with the code for the Hello, World! gadget. Leave all the code as-is except for line 5 (“Hello, world!”); insert your own gadget code where the line 5 code is.
You use the File menu to start new projects (File, New), open existing projects (File, Open), save current projects (File, Save As or File, Save), and publish your projects to iGoogle (File, Publish).
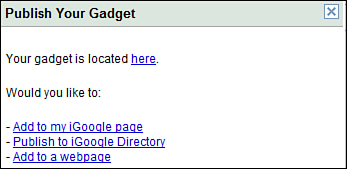
Let’s talk a bit about publishing your gadget. When you select File, Publish, the GGE displays the Publish Your Gadget dialog box, shown in Figure 44.3. You have three publishing options:
-
Add to My iGoogle Page. Adds your gadget to your iGoogle page.
-
Publish to iGoogle Directory. Submits your gadget to the iGoogle Gadget Directory. If you choose this option, your gadget becomes public for anyone to use.
-
Add to a Webpage. Takes you to the Add This Gadget to Your Webpage page, shown in Figure 44.4. This page helps you generate code that lets you add your gadget to any web page.

To write the code for a gadget, you need to know a little HTML, JavaScript, and XML. Your final code is saved in an XML file; it’s this XML file that is referenced in your iGoogle, Google Desktop, or other application.
Here’s what a typical gadget code looks like:
<?xml version="1.0" encoding="UTF-8" ?>
<Module>
<ModulePrefs title="title" />
<Content type="html">
<![CDATA[
// Your code here...
]]>
</Content>
</Module>
Note
Google originally used the term “module” for what it now calls a gadget—so don’t be surprised when you see the word “module” throughout the Gadgets API.
There are five main sections of any gadget code, with an optional sixth section, as detailed in Table 44.1.

The optional section, not shown in the previous example, is the <UserPrefs> section. This is where you define controls that enable users to specify their own personal settings for the gadget. For example, a map gadget might include an input field for the user’s ZIP code or city.
Let’s look at the code for a very simple gadget—the Hello, World! gadget included by default in the GGE. The Hello, World! code looks like this:
<?xml version="1.0" encoding="UTF-8" ?>
<Module>
<ModulePrefs title="hello world example" />
<Content type="html">
<![CDATA[
Hello, world!
]]>
</Content>
</Module>
As described, this code starts with the declaration line, followed by the <Module> line. Then the <Module Prefs> line defines the title of this gadget (“hello world example”).
The <Content> line declares the start of the module content, and defines the content type as HTML. Then we have the content container (the <!CDATA[ line), followed by the actual programming code. In this example, the programming code is a single line: “Hello, world!”
The code ends up with the closing brackets for the CDATA, Content, and Module codes.
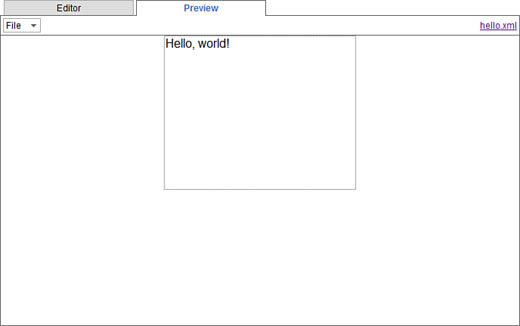
The result of this code is a very simple gadget. As you can see in Figure 44.5, this gadget does nothing more than display the words “Hello, world!” onscreen. If you want to display other words, just edit the “Hello, world!” line in the code.
Obviously, you can create gadgets that are much more complex than this. Instead of displaying a simple line of text, you can insert dynamic content via JavaScript code, for example. The type of gadget you can create is limited only by your programming skills—and your imagination!