
The comparison is simple. Google Docs is Google’s answer to Microsoft Office. Google Docs is a suite of word processor, spreadsheet, and presentation applications that mimics most of the key features of similar freestanding programs, such as Office.
Note
Even though Google Docs is a Web-based application, you can still use it when you’re not online, thanks to something called Google Gears. Learn more in the “Working Offline” section, near the end of this chapter.
What’s different about Google Docs, however, is that it’s all Web-based. The application and all your documents reside on Google’s servers, not on your computer. This results in some unique benefits.
Caution
Given how websites and Web browsers work (or sometimes don’t), it’s always possible that your latest changes might not make it to Google’s servers. Server overload or a slow connection can sometimes cause your changes to take more time than expected to get stored on the server. The bottom line is, even though Google goes to great lengths to avoid data loss, there’s always a slight chance of losing your latest data when the Internet is involved.
The most obvious benefit of using a Web-based application is that you can access your documents wherever you are, from any PC. With Google Docs, you’ll never be disappointed to realize that the document you need is located on your office PC when you’re using another PC, either at home or on the road.
Also nice is that, by being Web-based, you can easily share your documents with others. That makes real-time workgroup collaboration possible from anywhere around the globe, which is something you don’t have with Microsoft Office and similar programs.
Another benefit of being Web-based is that you can’t lose your work—theoretically, anyway. After you’ve named the document you’re working on, Google Docs saves your file on its servers. From that point on, every change you make to the document gets saved to the Google servers automatically. Nothing gets lost if you close your web browser, navigate to another website, or even turn off your computer. Google saves everything you do.
The final thing that’s unique about Google Docs is that it’s free. It costs nothing, unlike the ever increasingly expensive Microsoft Office. Being free makes it easy to take for a test drive, and even easier to add to your bag of applications. Many early users who’ve tried Google Docs have said that they’re likely to switch from Office. It can do almost everything Word and Excel can do, from a basic editing standpoint, which makes it perfect for corporate and small-business environments.
When you use Google Docs, you rely on Google to store your work on its servers. This may raise some concerns about privacy and security; all your data is in Google’s hands.
These sound like reasonable concerns, but Google says you shouldn’t worry. Although Google stores your documents on its servers, it does not collect other personal information about you. In addition, Google uses a secure authentication method to control access to any document you create. Although you can grant access to others to share your documents, those documents are private by default. Unless you share a document URL, no one else can view that spreadsheet.
Before you jump into the Google Docs waters, you need to consider whether Google Docs is right for your particular needs. Here are the users for whom I’d say Google Docs holds promise:
-
Beginning users. If you’re just starting out with word processing, spreadsheets, or presentations, there’s no better place to start than with Google Docs. The slightly limited functionality of Google’s applications actually works to the benefit of beginning users; you aren’t overwhelmed by all the advanced options that clutter the Word, Excel, and PowerPoint workspaces. Plus, Google Docs is extremely easy to use; everything you need is out in the open, not hidden beneath layers of menus and dialog boxes. I wish I’d had Google Docs 20 years ago, when I was learning how to use PC-based word processing and spreadsheet programs.
-
Casual users. Google Docs is also a good choice if you have modest word processing, spreadsheet, and presentation needs. If all you’re doing is writing memos and letters, totaling a few numbers, or giving a short presentation, Google Docs gets the job done with ease.
-
Anyone who wants access to their documents from multiple locations. If you work on the same data at work and at home (or on the road), you know what a hassle it is to carry your data around with you from computer to computer—and keep it synchronized. Google Docs solves this problem. Wherever you are (home, office, on the road), you always access the same version of your document, stored on Google’s servers. There are no synchronization issues; you work on the same file wherever you go.
-
Anyone who needs to share their documents with others. Sometimes you need others to view what you’re working on. Maybe you have a family budget that you and your spouse both need to see. Maybe you have a soccer team schedule that other parents need to view. Whatever the need, Google Docs lets you share your documents with anyone you like, over the Web.
-
Anyone who needs to edit their documents in a collaborative environment. Sharing is one thing; collaborative editing is another. If you need multiple users to both access and edit data in a document, Google Docs lets you do things that are impossible in Microsoft Office. For example, I know of one entrepreneur who adopted Google Docs for his small telemarketing company. He has five employees making calls at the same time, all from their homes. He has all five employees work from the same spreadsheet; not only do they access the same call data, but they also enter their results into the spreadsheet—live, via the Internet.
All that said, Google Docs isn’t for everyone. So who shouldn’t use Google Docs?
-
Power users. If you’ve created your own custom documents or spreadsheet applications in Microsoft Word, Excel, or PowerPoint, especially those with macros and pivot tables and the like, Google Docs is not for you. Google Docs lacks many of Office’s most advanced features and simply won’t get the job done.
-
Anyone who wants to create sophisticated printouts. Google Docs lacks some of the more sophisticated formatting options that some Office users take for granted. With Google Docs, what you see onscreen is exactly what prints—for better or for worse. If you need fancy printouts, Google Docs will probably disappoint.
-
Anyone working on sensitive documents. Web-based applications (and documents stored on the Web) are not good tools if your company has a lot of trade secrets it wants to protect. In fact, some organizations may bar their employees from working on documents that don’t reside on their own secured servers, which rules out Google’s applications.
So, if you’re a beginning or casual user who doesn’t need fancy charts or printouts, or if you need to share your documents or collaborate online with other users, Google Docs is worth checking out.
You access Google Docs at docs.google.com. After you log on with your Google account, you see the page shown in Figure 19.1. This is the home page for all three applications—word processing, spreadsheets, and presentations. All your previously created documents are listed on this page.
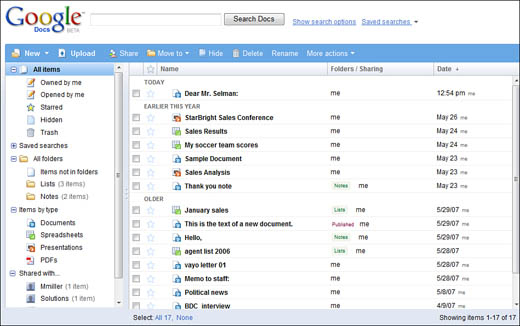
The left pane helps you organize your documents. You can store files in folders, view documents by type (word processing documents, spreadsheets, presentations, or PDFs), see the results of saved searches, and display documents shared with specific people.
Tip
To create a new folder, click the New button, select Folder, and then give the new folder a name. To move a document to a folder, check the document, click the Add to Folder button, and then select the folder you want to add it to.
The documents for the selected folder are displayed in the main part of the window. As you can see, word processing documents are noted with a document icon, spreadsheets have a spreadsheet icon, and presentations have a slide icon. (And, of course, PDF documents have the requisite Adobe PDF icon.) To open any type of document, click the item’s title; the document opens in a new window. To delete an item, select it and then click the Delete button.
To create a new word processing document, click the New button and select Document; the new document opens in a new browser window. Ditto to create a new spreadsheet or presentation: click the New button and select either Spreadsheet or Presentation to open a new, empty spreadsheet or presentation window.
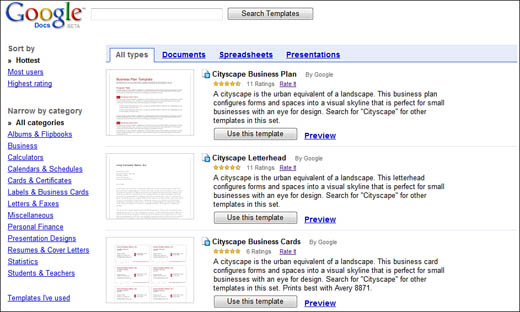
Alternatively, you can create a new document based on a predesigned template. When you click the New button and select From Template, Google opens a new Templates Gallery window, as shown in Figure 19.2. You can search or browse for templates; Google has templates for documents, spreadsheets, and presentations. Click the Preview link to see a quick view of the template, and then click the Use This Template button to create a new document based on the template.
One of the nice things about Google Docs is that you can use the application to work on files you’ve previously created in your regular word processing or spreadsheet programs. After they are imported, you can work on these documents in Google Docs, online.
Note
A template is a combination of text styles, document formatting, and graphics to which you can add your own text, graphics, and numbers. Templates are great for getting a head start on a specific type of document or project; Google includes templates for calendars, photo albums, invoices, letterhead, business cards, business plans, budgets, and the like.
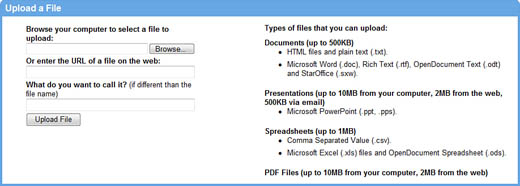
You can import the following file types:
-
Adobe PDF files (.pdf) up to 10MB in size (2MB if imported from a website)
-
Comma-separated value (.csv) spreadsheet up to 1MB
-
Microsoft Excel (.xls) spreadsheet up to 1MB
-
Microsoft PowerPoint presentation (.ppt or .pps) up to 10MB (2MB if imported from a website or 500KB if added via email)
-
Microsoft Word document (.doc) up to 500KB
-
OpenDocument Spreadsheet (.ods) up to 1MB
-
OpenDocument Text (.odt) up to 500KB
-
Plain text (.txt) up to 500KB
-
Rich text (.rtf) up to 500KB
-
StarOffice (.sxw) up to 500KB
-
Web and HTML documents (.htm) up to 500KB
To import a file, follow these steps:
-
From the Google Docs home page, click the Upload button.
-
When the Upload a File page appears, as shown in Figure 19.3, click the Browse button and select the file to upload. Alternatively, if you want to import a file found on a website, enter the file’s full URL into the Or Enter the URL of a File on the Web box.
-
If you want to rename the file during the upload process, enter a new filename into the What Do You Want to Call It? box.
-
Click the Upload File button.
Google displays the uploaded document in your browser window. You can edit the document as you like; Google automatically saves a copy of the file on its servers for your future use.
Now it’s time to examine the individual applications included in the Google Docs suite. We’ll start with the most obvious application—the Google Docs word processor, Google’s Web-based competitor to Microsoft Word.
Tip
You can also email your documents to your Google Docs folders. Just email a file to the email address displayed on the Upload File page.
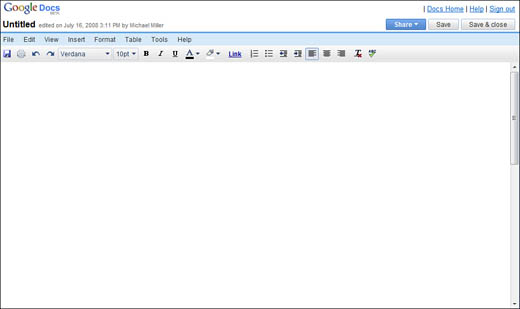
As you’ve learned, you open a new word processing document by clicking the New button on the Google Docs home page and selecting Document. The new document, like the one shown in Figure 19.4, looks like a big blank space in a new browser window, one with a menu bar and toolbar at the top.
Note
Google Docs is based on the Writely Web-based word processor, originally developed by the software company Upstartle. Google acquired Upstartle in March 2006 and subsequently mated it with its homegrown Google Spreadsheets application.
You enter your text into the main window. Each pull-down menu is dedicated to a specific function; for example, you use the Edit menu to perform basic editing functions. And you click the buttons on the toolbar to perform some of the most common file, editing, and formatting functions.
When you create a new document, you need to save the file. When you first save a file, you must do so manually. After this first save, Google automatically resaves the file every time you make a change to the document. In essence, this means that you have to save the document only once; Google saves all further changes automatically.
To save a new document, click the Save button. Google saves the document and names it according to the first bit of text in the editing window. For example, if you entered the text “Dear Mr. Selman:”, your file would automatically be named Dear Mr. Selman:.
Note
When you create a Google Docs document, you’re actually creating an HTML document. All HTML-type formatting is available for your documents through the Google Docs interface.
If you don’t like the name Google assigns, you can easily change it. Just pull down the File menu and select Rename; when prompted in the pop-up window, enter the new name and click OK.
The document is now saved on Google’s servers, and you don’t have to bother resaving it in the future.
Remember that the document file you just saved isn’t on your PC’s hard disk. It’s stored on Google’s servers, which means that you must be connected to the Internet to access it.
By default, all the documents you work with in Google Docs are stored on Google’s servers. You can, however, download files from Google to your computer’s hard drive to work with in Microsoft Word. In essence, you’re exporting your Google document to a .doc format Word file.
To export the current document, select File, Download File As, Word. When the File Download dialog box appears, click the Save button. When the Save As dialog box appears, select a location for the downloaded file, rename it if you like, and then click the Save button.
The Google Docs file is saved in .doc format on your hard disk. You can now open that file with Microsoft Word and work on it as you would with any Word document. Know, however, that whatever changes you make to the file from within Word affect only the downloaded file, not the copy of the document that still resides on the Google Docs site. If you later want to reimport the Word file to Google Docs, you’ll need to return to the main Google Docs page and use the Upload function.
Now to the main event—entering text into your document. It’s as easy as positioning the cursor in the blank area of the document window and typing the text. Use the cursor keys on the keyboard to move back and forth through the text, and the Delete and Backspace keys to delete text you’ve entered.
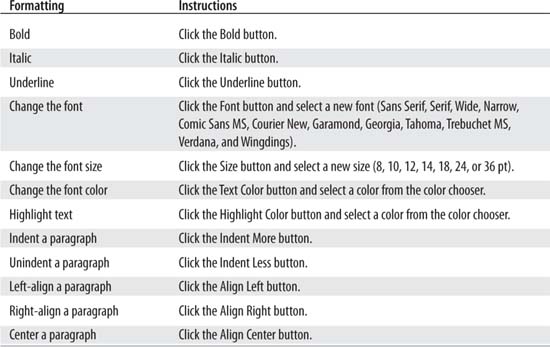
Google Docs lets you format your text in a number of ways. Table 19.1 details the formatting options, all available from the toolbar.
Tip
Google also lets you export your document as a PDF file, an OpenOffice file, a plain text or RTF (Rich Text Format) file, and as an HTML file for use on the Web.
You can also create a numbered list by clicking the Numbered List button, or a bulleted list by clicking the Bulleted List button. Additional formatting options are available from the Format menu, including three levels of headings, strikeout, superscript, subscript, and block quote formats.
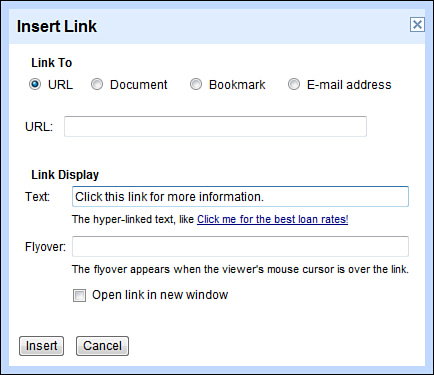
Because Google Docs is a Web-based word processor, it’s not surprising that you can include links to web pages in your documents. All you have to do is highlight the text you want to use for the link, and then click the Link button. Google Docs displays the Insert Link dialog box, shown in Figure 19.5. Enter the URL you want to link to, as well as any “flyover” text you want displayed when the link is hovered over. If you want the link to open in a new window, click the Open Link in New Window option. Click the OK button to create the link.
To insert pictures and other images into a document, position the cursor where you want the image to appear, and then select Insert, Picture. This displays the Insert Image dialog box; you can insert images from your computer (click the Browse button) or from the Web (enter the URL of the image).
To see more configuration options, click the More Image Options link; this lets you resize and position the image, as well as wrap the text around the image. Click the Insert button to insert the image.
Google Docs also lets you insert tables into your documents. Position the cursor where you want the table to appear, and then select Insert, Table or Table, Insert Table.
This displays the Insert Table dialog box, shown in Figure 19.6. From here, you select the following options:
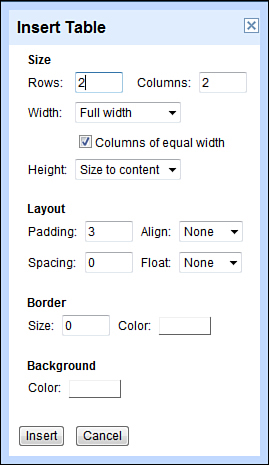
After the table is created, you can position the cursor within the cells to enter text. To further edit the look of the table, as well as insert or delete rows and columns, right-click the table and make a selection from the pop-up menu.
Note
Google Docs offers many more features than we have space to examine here. Most of these features are similar to features in Microsoft Word, so if you know how to use Word already, you should be able to do the same in Google Docs.
A word processor wouldn’t be complete without a way to check your spelling, which is why Google Docs includes its own spell checker. To check the spelling in a document, just click the Check Spelling button on the toolbar. Google Docs checks your document and highlights words that are either misspelled or not in its built-in dictionary. Click a highlighted word to see a list of suggested spellings or to add this word to the dictionary.
The truly unique feature of Google Docs is the ability to share a document with others—either for viewing or for collaborative editing. The only hitch to this process is that anyone you want to share with must have his or her own Google account to access the Google Docs site. That said, you can easily invite another user to create his or her own new Google account.
To share a document for viewing or collaboration, click the Share button at the top right of that document, and then select Share with Others. This displays the Share This Document panel, shown in Figure 19.7.
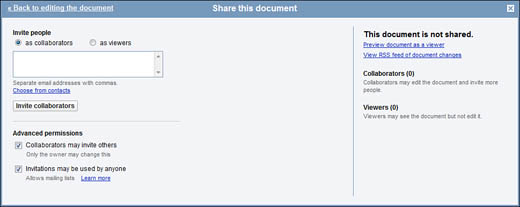
In the Invite People box, enter the email addresses of the people you want to share the document (separate multiple addresses with commas). If you want others to simply view the document without being able to edit it, check the As Viewers option. If you want others to be able to edit the document, check the As Collaborators option. Click the Invite Viewers or Invite Collaborators button to send the invitations.
Your recipients will receive an invitation via email. The invitation contains a link to the document; clicking this link opens the document in a new browser window.
Tip
If you want your collaborators to invite other collaborators, check the Collaborators May Invite Others option.
Anyone invited as a viewer can navigate the entire file and also save that file to his or her personal Google Docs online storage area or as a file to his or her PC. Anyone invited as a collaborator can edit the file in real time. (In fact, multiple users can edit the document at the same time.)
Caution
Google permits more than one user at a time to make changes to an open document; the document isn’t “locked” when the first user starts editing. This can create havoc if both users try to make changes to the same data or are unaware of the other changes being made. For this reason, you should always use caution while collaboratively editing a document.
Another way to share a document is to publish it as a public web page or blog posting. When it is published, anyone can access the document for viewing; all they have to know is the URL for the page or blog post.
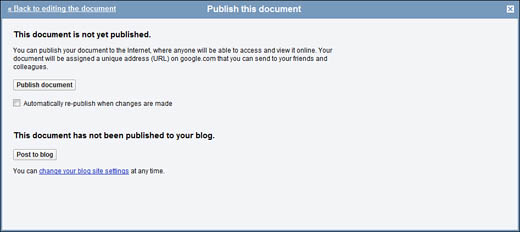
To publish your document, click the Share button for that document and then select Publish as Web Page. This displays the Publish This Document panel, shown in Figure 19.8. To publish the document as a web page, click the Publish Document button. If you want to update the web page as the document is edited, also check the Automatically Re-Publish When Changes Are Made option. You’re prompted to let anyone on the Internet see this document; click OK. The web page is now published, and Google Docs displays a link to the document’s web page.
To post the document to your blog, click the Post to Blog button. The first time you do this, you’re prompted to set your blog site settings; you need to provide your blog host, username, password, and the like. The document is then posted to your blog as a new post.
Originally, Google Docs was a Web-only application, meaning that you had to be online to edit a document; if you weren’t connected to the Internet, you couldn’t access your Google Docs files. That changed with the introduction of Google Gears, a utility that lets you access all your Google Docs documents when you’re offline.
To edit your documents offline, you have to install the Google Docs Offline application. Do this by clicking the Offline link at the top of the Google Docs home page and then clicking the Get Google Gears Now button. It’s a short and simple installation; just follow the onscreen instructions to do the download.
After Google Gears has been installed, you can open the offline version of Google Docs by entering http://docs.google.com into your web browser, or by clicking the Google Docs shortcut on your desktop. If you’re not connected to the Internet, you open the offline version of Google Docs; if you are connected to the Internet, you open the normal online version. Whenever you’re online, Google Docs automatically synchronizes the files stored on your computer with those stored online. It’s a seamless and relatively invisible process.
Note
You can use Google Docs offline via the Google Chrome web browser, which has Google Gears built in. Learn more about Chrome in Appendix C, “Introducing Google Chrome.”