
Google Calendar (calendar.google.com), shown in Figure 22.1, looks like every other Web-based calendar you’ve ever seen. (And like most software-based calendars, too.) You enter your appointments (which Google calls “events”) directly into the calendar, which you can display in either daily, weekly, or monthly view. You can also, if you like, view your weekly agenda on a single page.
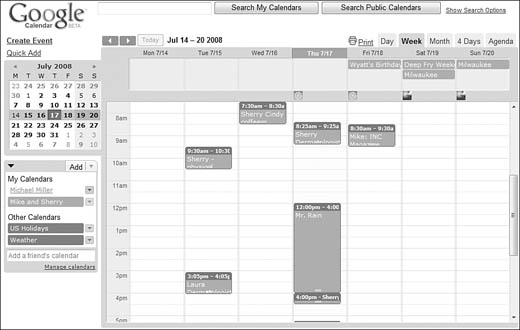
Nothing unusual about any of that. So, compared to all the other calendar applications, what’s unique about Google Calendar?
-
Google Calendar is a Web-based calendar. This means that your calendar information is stored on Google’s servers, not on your own computer. The advantage of this is that you can access your calendar from any computer anywhere in the world. Just log onto the Google Calendar page, and your calendar and all events are there.
-
Because Google Calendar is Web-based, you can use it to create not only a private calendar for yourself, but also public calendars for your company or organization. When you create a public calendar, all employees or attendees can access it via the Web. In addition, special event invitation features make it easy to invite others to an event—public or private.
-
Google allows you to create several different—and different types of—calendars. You can create one calendar for home, another for work, and yet another for your son’s soccer team. Then you can view all your calendars from the same Google Calendar page.
-
Because Google Calendar is part of the Google empire, it integrates smoothly with Gmail. Google Calendar can scan your email messages for dates and times. With a few clicks of the mouse, you can create events based on the content of your Gmail messages.
-
Google Calendar tries to be as universal as possible. That means relatively seamless integration with the information you created previously with any other calendar programs you may be using, such as Yahoo! Calendar or the Microsoft Outlook calendar.
The bottom line is that Google wants to make it both beneficial and easy to move from your current calendar program to Google Calendar. Give it a try and see what you think.
Commentary
Google Calendar is designed to be easy to use. To that end, Google succeeds.
Setting up your first calendar is comically easy. In fact, there’s nothing to set up. When you first sign in to the Google Calendar page, your calendar is already there, waiting for your input. There’s nothing to create and nothing to configure. Could it be any easier than that?
One of the key features of Google Calendar is the ability to create and manage multiple calendars. For example, you might want to create one calendar with work events and another with social events.
To create a second (or third or fourth) calendar, follow these steps:
-
From the main Google Calendar page, click the Create link in the My Calendars pane.
-
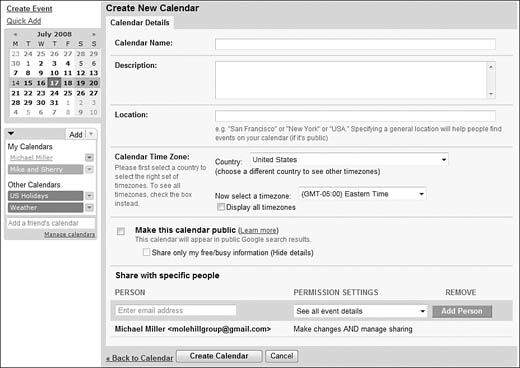
When the Create New Calendar page appears, as shown in Figure 22.2, give the calendar a name and description, and then enter other appropriate information.
-
Click the Create Calendar button.
All the calendars you create are listed in the My Calendars pane on the left side of the Google Calendars page.
The main Google Calendar page (calendar.google.com) is where you view all your calendars—in any of several different views.
Google Calendar lets you view your calendar in several different ways. You select each view by clicking the appropriate tab above the main calendar. You can view your calendar by day, week, month, next four days, or agenda. Figure 22.3 shows the Agenda view, which lists only your upcoming events.
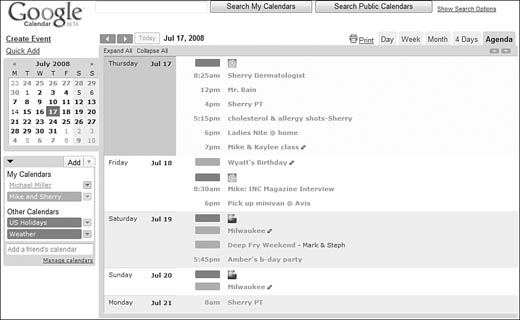
For each view, you can move backward and forward in time by clicking the left and right arrow buttons at the top of the calendar. To center the calendar on the current day, click the Today button.
You can also create customized calendar views that include any number of days. For this, you use the mini-calendar on the left side of the Google Calendar page. Just click and drag the mouse cursor across the mini-calendar from the first to the last day you want to view; the main calendar changes to reflect the number of days you select.
The main calendar on the Google Calendar page can display any single calendar individually, or multiple calendars simultaneously. It all depends on which—and how many—calendars you check in the Calendars box.
By default, every calendar is displayed in the main calendar. To display only a single calendar, click that calendar; the name changes from the normal shaded box to just a link. Click the link again to redisplay the events from that calendar in the main calendar, color-coded appropriately.
Google Calendar can export its event information in XML, HTML, or iCal formats. (iCal is used on the Macintosh, XML is used by most Web-based calendar applications, and HTML calendars can be viewed in any web browser.) This lets you read your Google Calendar data in other calendar applications.
Note
Sharing your calendar’s private address lets others read your calendar information, but not add to or change that information.
The key is to distribute your calendar’s private address to another calendar application. To do this, follow these steps:
-
In the Calendars box, click the down arrow next to the calendar you want to share, and then select Calendar Settings.
-
When the Details page appears, scroll down to the Private Address section.
-
Click either the XML, HTML, or iCal button in the Private Address section.
-
A pop-up window containing your calendar’s address appears; copy this address into the other calendar application.
All the items scheduled on your calendar are called events. An event can include all sorts of information, some of which is augmented by information provided by the Google website.
Google provides several different ways to add events to your calendar. Let’s look at each in turn.
First, you can simply click the hour or the day on your calendar on which you’d like to create a new event. If you add an event to a daily calendar, click and drag the cursor over the entire timeframe of the event. This opens a new event balloon, like the one shown in Figure 22.4. Enter the name of the event into the balloon, and select which calendar you want to add the event to.
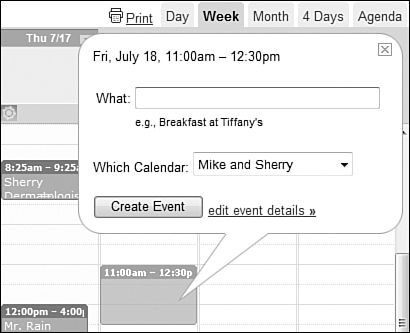
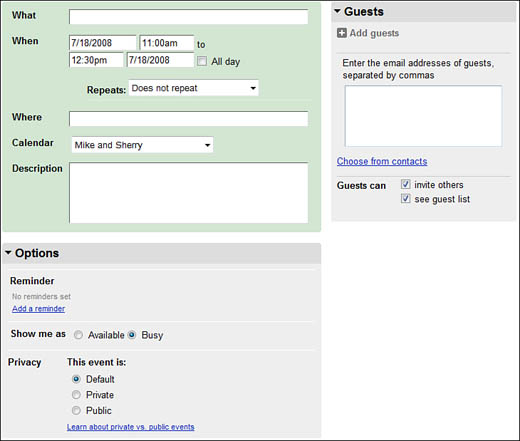
If you use this approach on a monthly calendar, unfortunately you can’t easily determine the length of the event. To fine-tune these and other details of the event, click the Edit Event Details link in the event balloon. This opens the page shown in Figure 22.5, where you can enter the following information:
-
What (name of the event)
-
When (start and end times—or days)
-
Repeats (use for repeating events)
-
Where (the event’s location)
-
Calendar (which of your calendars the event should be added to)
-
Description (a brief overview of the event)
-
Reminder (how much in advance you want to be reminded of the event, and how)
-
Show Me As (either available or busy, for anyone viewing a public calendar)
-
Privacy (determines whether the event is private, public, or your default setting)
-
Add Guests (enter the email addresses of any guests you want included; you’re prompted to email them with notice of the event, if you like)
-
Guests Can (either invite others to your event, see the guest list, or neither)
You can also add an event by clicking the Create Event link in the upper-left corner of the Google Calendar page. This opens the page shown in Figure 22.5; enter the appropriate information, and then click the Save button.
Perhaps the easiest way to add an event is with Google Calendar’s Quick Add feature. When you click the Quick Add link (or type the letter Q), the Quick Add entry box appears, as shown in Figure 22.6. Enter the name and time of the event, and then press Enter. This method is quite intelligent; if you enter Lunch with George at noon Monday at Applebee’s, Quick Add translates the text and enters the appropriate event at the specified date and time.

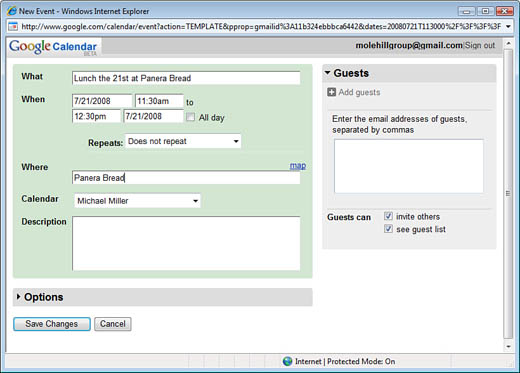
Here’s a neat feature that arises from the integration of Google Calendar and Gmail. When you’re reading a Gmail message that contains information pertaining to a possible event, just pull down the More Actions menu and select Create Event. This opens a New Event window, as shown in Figure 22.7; enter the appropriate information and click Save Changes. The event is added to your Google Calendar.
If you use Microsoft Outlook to manage your home or work schedules, you can import your Outlook events into Google Calendar—and export your Google Calendar events into Outlook. All you need is the Google Calendar Sync utility, which you can download for free at www.google.com/support/calendar/bin/answer.py?answer=89955.
Tip
When you include location information about an event, Google Calendar includes a Map link in that event’s information. Click the Map link to view a Google Map of that event’s location.
When you install Google Calendar Sync, you see the configuration window shown in Figure 22.8. Enter your Google Account info, as well as how you want to sync:
-
2-way automatically syncs events from each application to one another.
-
1 way: Google Calendar to Microsoft Outlook calendar syncs your Google Calendar events to Outlook (Google Calendar is the master app).
-
1-way: Microsoft Outlook calendar to Google Calendar syncs your Outlook events to Google Calendar (Outlook is the master app).
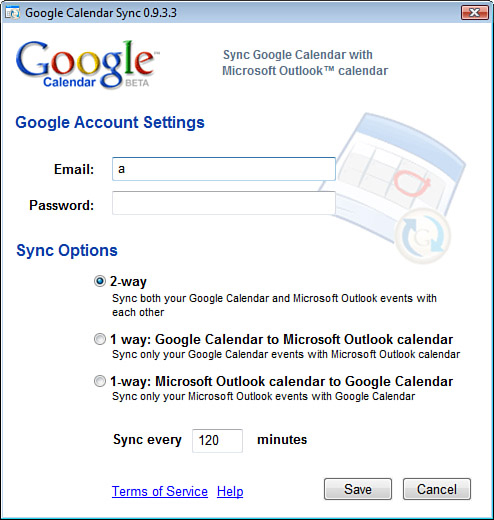
You also have to determine how often you want to synchronize your events, in minutes. Make your choices, and then click the Save button. Now, whenever your computer is online, your events are synchronized between your two calendars; events you add in the one application are automatically added to the other.
If you want to take your Google Calendar with you wherever you go, all you have to do is enable automatic phone notifications. Go to the Google Calendar home page and click the Settings link. When the Settings page appears, select the Mobile Setup tab.
The first time you access this page, you have to verify your mobile phone number, which you do by having Google send a verification number to your phone via text message. After this is done, enter the verification code into the appropriate box on the Settings page, and then click the Finish Setup button.
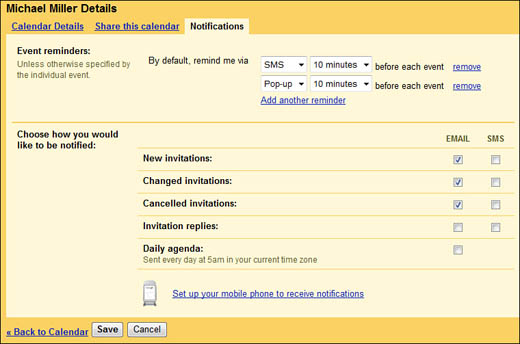
The Notifications tab changes to its final form, as shown in Figure 22.9. You can choose to be notified via SMS (text message), email, or pop-up (if you have a Web-enabled phone, like the Apple iPhone). Select how long before each event you want to be notified, as well as how you want to be notified for each type of item (new invitations, changed invitations, and the like). Click the Save button, and you’re ready to go.
When you first created an event, you had the option of adding guests to this event’s information. If you did so, you were prompted to send email invitations to those guests.
After you’ve created an event on your calendar, you can invite more guests at any time. Just follow these steps:
-
Edit the selected event to display the event page.
-
Click the Add Guests link, and then enter the email addresses of your guests into the text box. Separate multiple addresses with commas.
-
Click the Save button.
-
Google Calendar now displays the message “Would you like to send invitations to new guests?” Click the Send button to do so.
Google now sends invitations to all the guests you added. Each invitation includes links for the guest’s response—Yes, No, or Maybe. When the guest clicks one of these links, he is taken to a Submit Response web page. His response is then automatically entered into the event in your Google Calendar, as shown in the Guests section of the event page.