
In the previous chapter, we referred several times to configurations that can be done at the pfSense console. The same functionality is available via remote SSH login, if you enable it:
- To do so, navigate to System | Advanced. Make sure that the Admin Access tab is selected and scroll down to the Secure Shell section of the page.
- Check the Secure Shell Server checkbox to enable SSH login.
- If all you want to do is enable traditional login via the standard SSH port (22), then you can click on the Save button at the bottom of the page.
- If you want to change the login port, you can do so by entering a port number other than 22 in the SSH port edit box. Changing the SSH port is a good additional security measure, especially if you plan on making SSH login accessible from the WAN side of the firewall.
- If you set a strong password, SSH login should be pretty secure, but you can add another layer of security by checking Disable password login for Secure Shell (RSA/ DSA key only). If you invoke this option, you must create authorized SSH keys for each user that requires SSH access.
- The process for generating SSH keys differs, depending on what program and OS you use. One handy program for generating SSH keys is PuTTYgen, a companion to the PuTTY terminal program. This program can be downloaded from the following link: https://www.chiark.greenend.org.uk/~sgtatham/putty/latest.html.
- PuTTYgen's interface takes the form of a dialog box. In the Parameters section at the bottom, you can select the type of key to generate (select either RSA or DSA to generate a valid SSH-2 key for pfSense) and the number of bits in the key.
- When you are finished setting the parameters, click the Generate button in the Actions section to generate a public/private key pair. The program will request that you move the mouse over the top area of the dialog box to generate some entropy. When the key is generated, the dialog box should look similar to the following screenshot:
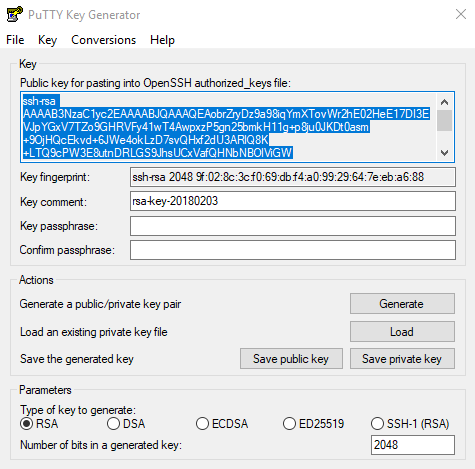
- Click the Save private key button to save the private key; you will need this later to log in to pfSense. Once you have saved the private key, copy the public key in the textbox at the top of the dialog box to the clipboard.
- The next step is to paste the public key into pfSense. From the web GUI, navigate to System | User Manager. Scroll down to the Keys section, and paste the public key into the Authorized SSH Keys edit box. Once you have done this, scroll to the bottom of the page and click on Save.
- Now, you can launch PuTTY and configure your session. Enter the IP address of the pfSense system in the Host Name (or IP address) edit box. Enter the port in the Port edit box. Keep the default Connection Type on SSH.
- In the left pane, navigate to Connection | SSH | Auth (you may have to expand Connection and SSH to reveal the Auth settings page). In the Private key for authentication: edit box, enter the full path and filename of the private key. This is the private key you saved previously.
- You can now save the current configuration by clicking on Session at the top of the left pane, typing a name into Saved Sessions and clicking on Save, or you can just click on Open to connect to the pfSense console.
- At the login as: prompt, type in the administrator username; the next prompt will be for the key's passphrase. Enter the passphrase and press Enter, and you should be logged into the console.
If you were unable to log in to the console, then you need to make sure that you went through the process correctly; namely, the following steps must have been completed:
- Enabling SSH login in pfSense.
- Generation of a valid SSH-2 public/private key pair.
- Adding the public key to the list of authorized SSH keys for the administrator in pfSense.
- Configuring PuTTY to log in to pfSense, remembering to add the private key to the SSH authorization options.
If there was a public/private key mismatch, make sure that the keys are correct and that there aren't any additional characters or white spaces in them.